
Oh my gosh, are you ready for a massive dose of sunshine in a bowl? If you’ve ever dreamed of biting into heavenly, perfectly creamy **mango sticky rice**, stop scrolling right now because this is the recipe you need. We are ditching the thin, watery sauces and mushy rice that plagues so many recipes out there. This version focuses on making truly authentic **mango sticky rice** with that rich, velvety coconut sauce that tastes just like the best street carts in Bangkok.
Here at Taste This Plate, Kate always reminds us that great food shouldn’t give you a headache. That’s why I spent weeks tweaking this until it was foolproof—simple, reliable, and delivering those amazing tropical dessert ideas every single time. Trust me, once you master this technique for soaking and steaming your rice, you’ll feel like a total culinary rockstar! You can read more about why we love making complex flavors easy in our philosophy over on the About Page.
- Why This Authentic Mango Sticky Rice Recipe Works
- Ingredients for Ultimate Mango Sticky Rice
- How to Make Mango Sticky Rice Step-by-Step
- Ingredient Notes and Substitutions for Mango Sticky Rice
- Serving Suggestions for This Thai Dessert Recipe
- Storage and Reheating Instructions for Mango Sticky Rice
- Frequently Asked Questions About Mango Sticky Rice
- Estimated Nutrition for This Mango Sticky Rice Recipe
- Share Your Homemade Mango Sticky Rice Experience
Why This Authentic Mango Sticky Rice Recipe Works
Making fantastic **mango sticky rice** isn’t just about luck; it’s about nailing two critical steps. So many people end up with either soup instead of sauce, or gummy rice that needs a dental appointment afterward. Not here! We fixed those issues by focusing on quality ingredients and a very deliberate, two-step coconut absorption process.
- We insist on the long soak time for the rice—you can’t rush glutinous rice!
- The sauce is deliberately thick so it doesn’t just run off the plate.
- We use only full-fat coconut milk for that non-negotiable richness.
Achieving Perfect Creamy Coconut Rice Texture
The secret to that incredible mouthfeel? It’s all in that coconut milk layering! First, after your rice steams, we pour warm, lightly salted coconut milk right over it. This milk soaks in while the rice rests, turning it fragrant and tender. Then, and this is genius, we fold in half of the *thicker* glaze at the very end. This second layer of sweetness keeps the rice moist beautifully for hours. This technique locks in texture!
Tips for the Best Mango Sticky Rice Flavor
Look, you can have perfect technique, but if your ingredients are sad, your dessert will be sad. You absolutely must use full-fat coconut milk—no light stuff allowed, unless you want a watery mess! Also, pick gorgeous mangoes. I look for Ataulfo or Nam Dok Mai varieties that are deeply fragrant and give just a little when you push them gently. Nail the mango, and you’ve nailed this super **easy Thai dessert recipe**.
Ingredients for Ultimate Mango Sticky Rice
Time to gather our treasures! Don’t panic when you see the list; we’ve organized it so you pull everything out in the order we use it. We need three specific groups of items to make this **mango sticky rice** sing. Everything listed here is what you need for those rich, authentic flavors, especially that amazing **coconut milk glaze recipe**!
For the Creamy Coconut Rice
This section is all about getting that sticky rice perfectly plumped up and fragrant before we even think about the sauce.
- 1 cup sweet glutinous rice (Make sure it says glutinous, please! Regular rice will just not do.)
- 1 cup water (for soaking the rice – yes, we soak first!)
- 1 cup full-fat coconut milk (This is for soaking/steaming, get the good creamy stuff!)
- 1/2 teaspoon salt (A little secret for balancing the sweetness.)
For the Sweet Coconut Milk Glaze Recipe
This is the magic liquid that makes the final presentation so gorgeous and tastes decadent. Remember, we only use half of this sauce on the rice, saving the rest for drizzling!
- 1 cup full-fat coconut milk (The second cup—this is for the glaze base!)
- 1/2 cup granulated sugar (Just regular white sugar works best here.)
- 1/4 teaspoon salt (Yes, a little salt in the glaze, too!)
- 1 teaspoon cornstarch mixed with 2 teaspoons water (This is our slurry for thickening—mix it really well beforehand.)
For Assembly and Garnish
These are the stars of the show—the fruit and the sparkle!
- 2 ripe Ataulfo or Nam Dok Mai mangoes (They must be deeply fragrant and soft enough to yield slightly!)
- 2 tablespoons toasted sesame seeds (Only toasted—it brings out a beautiful nutty crunch!)
How to Make Mango Sticky Rice Step-by-Step
Okay, let’s get cooking! This process might look lengthy, but once you break it down, making incredible **mango sticky rice** is totally straightforward. The key is managing your timings because the rice needs attention right after it finishes steaming. We aren’t using any fancy equipment; just a strainer, a steamer, and a bowl!
Preparing the Sweet Sticky Rice Dessert Base
First things first: rinse that sweet rice until the water looks, well, *not* murky anymore. Then, we soak it—at least four hours, but honestly, overnight is just better. When you’re ready, drain it really well and get it steaming for about 25 to 30 minutes until it’s tender. While that’s happening, gently warm up your first batch of coconut milk with salt—don’t let it boil! As soon as the rice is done, *immediately* transfer that hot rice into a bowl, pour the warm coconut milk over it, stir lightly, cover it up, and leave it alone for 30 minutes. This absorption step creates the foundation for our **sweet sticky rice dessert**.
Creating the Coconut Milk Glaze for Mango Sticky Rice
Next up is the sauce! In a small pot, heat your second cup of coconut milk, sugar, and salt over medium-low heat. Stir constantly until that sugar dissolves. Please, please don’t let this boil, or the texture will go wonky! Once it’s warm, whisk in your cornstarch slurry and cook just until it thickens slightly—we want a light glaze, not paste. Take it off the heat right away. This is the crucial **coconut milk glaze recipe** part!
Assembling Your Final Mango Sticky Rice Dish
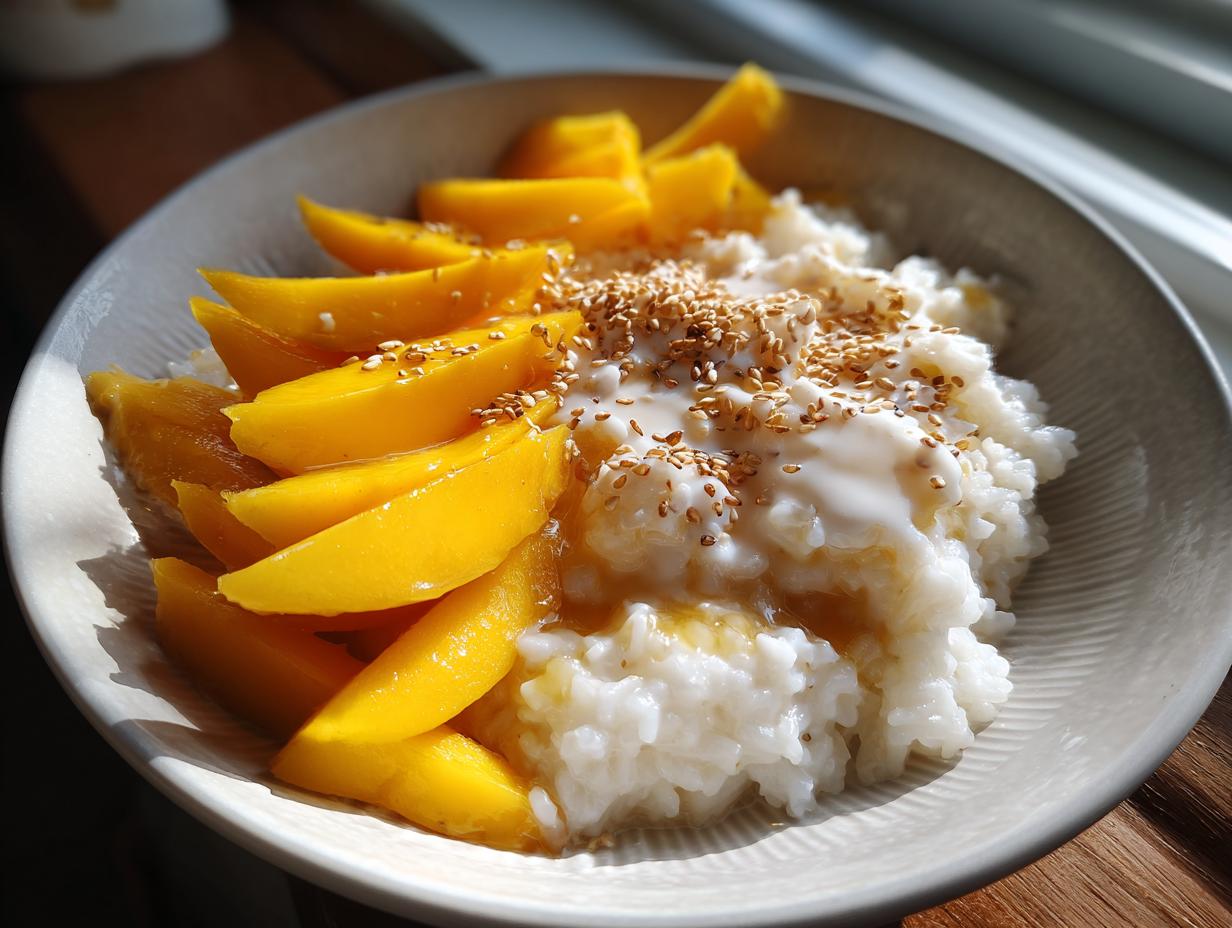
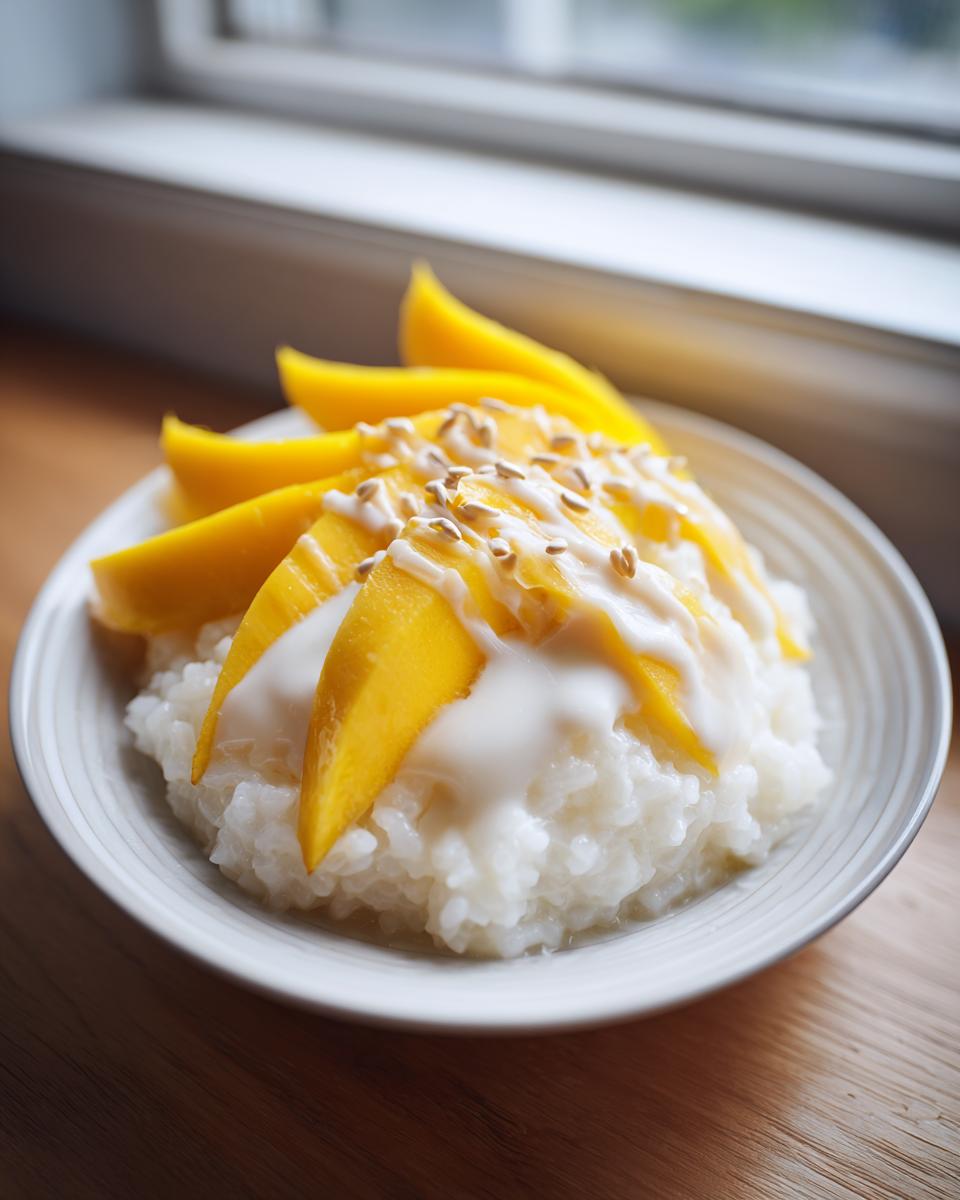
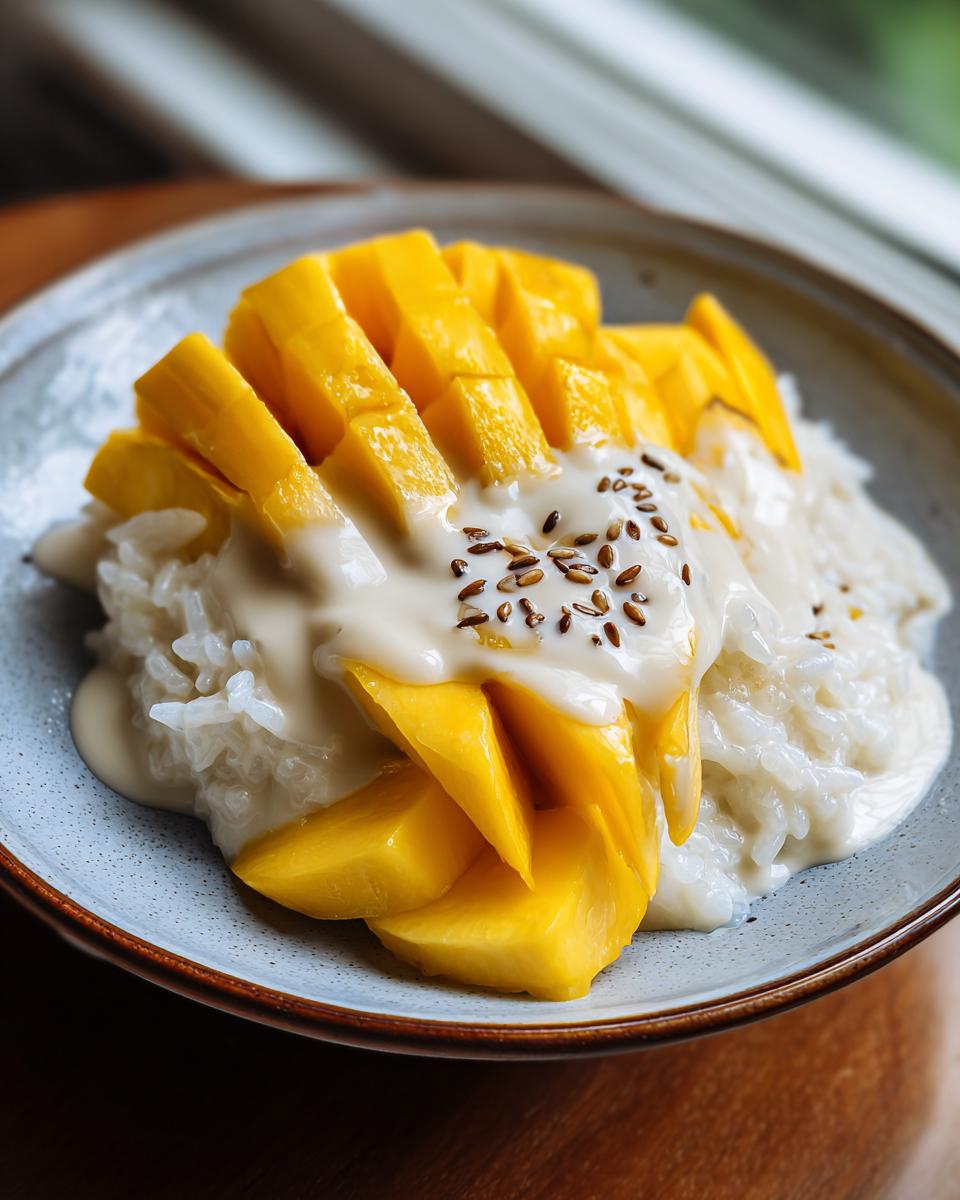
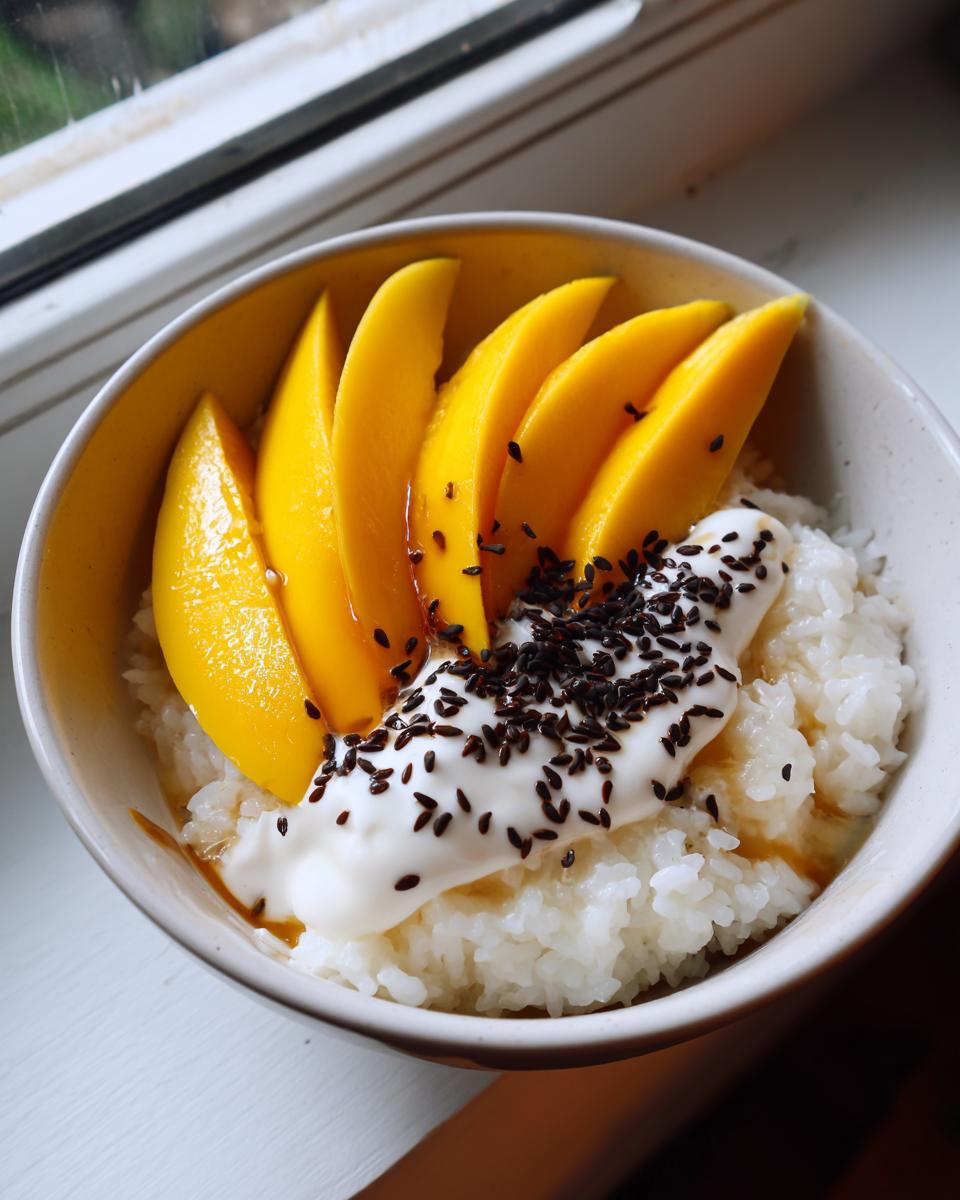
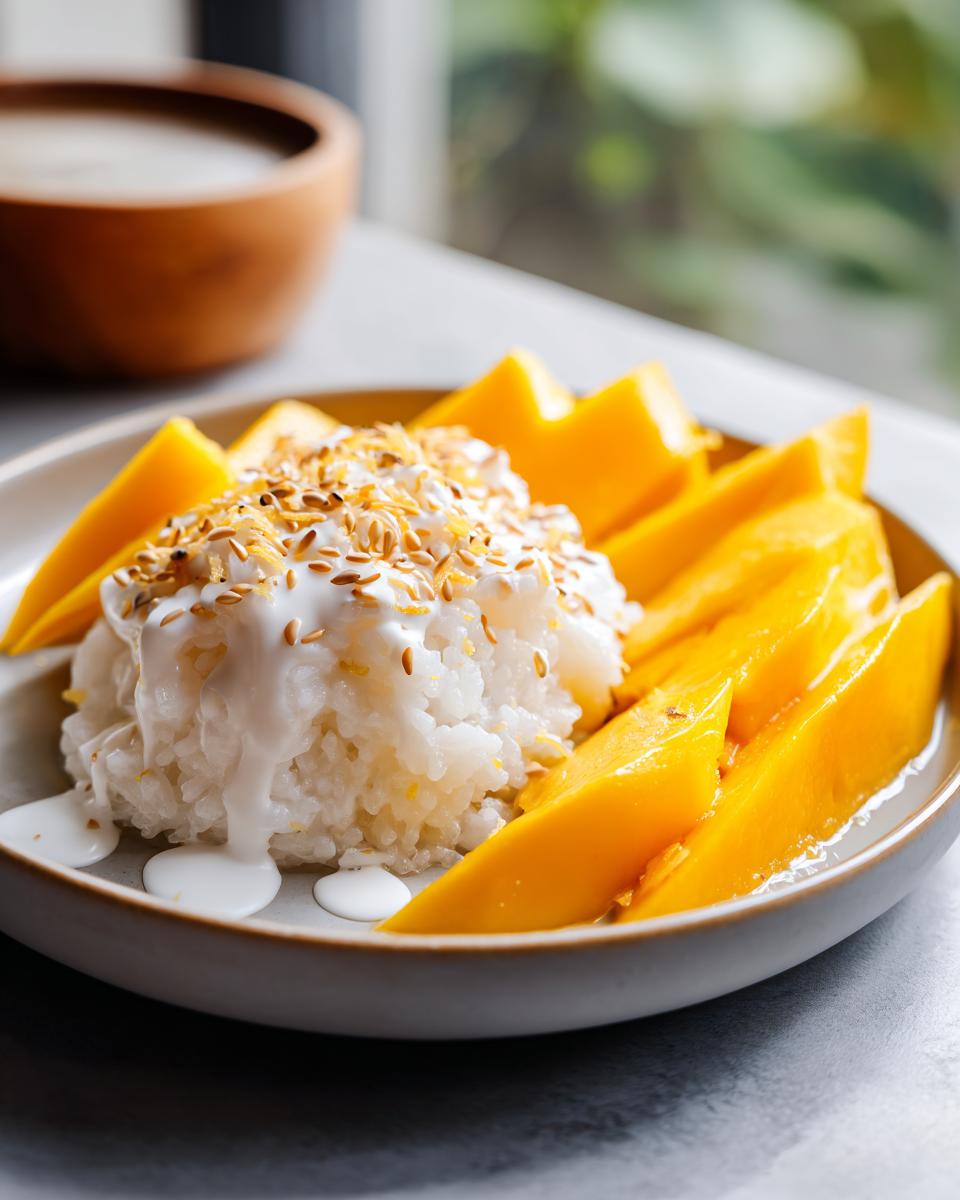
Now, bring that rice back into focus. Gently fold about half of that thick, glossy glaze right into the warm, soaked rice. Let it sit for a final 10 minutes; it’s resting time! While it rests, peel and slice up those perfectly **ripe mango dessert** pieces. To serve, spoon out a perfect mound of rice—maybe check out some fun plating ideas you can find for appetizers and snacks on our site for inspiration! Arrange the mango slices beautifully next to it, drizzle the remaining sauce over everything, and toss on those toasted sesame seeds. That’s it! You nailed it!
Ingredient Notes and Substitutions for Mango Sticky Rice
Listen, friends, the biggest mistake people make making **mango sticky rice** is trying to cut corners on the ingredients. If I’m being honest, you can’t substitute the rice. You must use glutinous rice—sometimes called sweet rice—or the whole magic of that bouncy, sticky texture disappears. Regular long-grain just won’t absorb the coconut milk the right way; it ends up just being soggy rice, not that beautifully creamy coconut rice!
Also, please, use full-fat canned coconut milk for both soaking AND the glaze. The flavor payoff for that extra fat is huge. And for the mangoes? They need to be ripe. If you gently press them and they feel rock hard, they won’t have that sweet, almost buttery flavor that sings against the salty coconut sauce. Pick the fragrant ones!
Serving Suggestions for This Thai Dessert Recipe
You’ve made the most incredible **mango sticky rice**, and now it’s time to serve it up like a pro! Since this is such a rich and satisfying **tropical dessert**, you don’t need much else on the plate, but pairing it with the right drink just elevates the whole experience. Honestly, I think the contrast between the sweet, creamy rice and something bright and cold is just heaven sent.
First off, make sure your mangoes are perfectly ripe, as we talked about. That natural sweetness is key! Then, you can play around with serving temperatures. Some folks love their rice warm, and others prefer it slightly cooler. I usually serve mine lukewarm with very cold mango slices—that temperature contrast is amazing!
When you’re thinking about what to drink alongside this amazing **sweet sticky rice dessert**, go for something refreshing that can cut through the richness of the coconut milk. Think icy cold tea or something citrusy without too much sugar. If you’re looking to mix up something truly special to serve right after, you should definitely check out our favorite cocktail and mocktail recipes over at the Drinks & Cocktails page. A simple fresh limeade or a chilled jasmine iced tea works like a dream alongside the sweetness of the mango.
For a little visual flair when serving all these **summer fruit desserts**, try laying out the rice slightly flattened on a small, round plate, then carefully arrange the mango slices artfully over one side. Drizzle that extra coconut glaze sparingly over the mango, not just the rice! Don’t forget those toasted sesame seeds—they add that unexpected crunch that makes people stop and go, “Wow, what is that?” It’s all about presentation when you’re making something this special.
Storage and Reheating Instructions for Mango Sticky Rice
Okay, let’s talk about leftovers, because let’s be real, sometimes we make too much of this incredible **mango sticky rice**—or maybe we just really love it and want it for breakfast the next day! The key to keeping this **creamy coconut rice** tasting great is separating the fresh elements from the cooked ones *before* storing.
First, if you have any leftover mango slices, pull those right out and store them in a separate little container. Mangoes just don’t hold up well when chilled for too long; they can get mushy and lose that vibrant flavor. The sticky rice and the leftover coconut glaze can hang out together, though!
Store the rice in an airtight container in the fridge. It’s going to firm up a lot—that’s normal for sticky rice. Don’t worry if it looks drier when you pull it out! The best way to reheat the rice is gently. You don’t want to microwave it straight up, or it turns into a hard brick. Instead, put the rice in a microwave-safe bowl and stir in just a splash—maybe a tablespoon—of plain water or a little extra coconut milk. Cover it tightly and microwave it in short bursts, stirring between each one. This steam helps it loosen up and regain some of that lovely moisture without drying it out.
If you happened to have drizzled extra sauce over the rice before storing it, that’s fine, it will just get very thick. If you saved extra sauce separately, warm that gently on the stovetop until it’s pourable again. Then, plate your reheated, fluffy **creamy coconut rice**, add fresh mango slices if you have them (or slice some fresh ones!), and drizzle with that warm glaze. Perfection restored!
Frequently Asked Questions About Mango Sticky Rice
I get so many questions about this dessert, which just proves how much everyone loves a great **mango sticky rice**! It’s totally normal to have a few questions when you’re trying to achieve that perfect texture. Here are some of the most common things I hear, so you feel super confident making this incredible **Thai dessert recipe**!
Can I make mango sticky rice without a steamer?
Oh yes, absolutely you can! Don’t let a lack of a steamer stop you from making this **easy Thai dessert**. If you have an oven and a standard 8×8 inch baking dish, we can pivot. After soaking and draining the rice, mix the rice with the salted coconut milk right in that baking dish. Cover it tightly with foil—like, really tight! Then bake it in a preheated oven at 350°F (175°C) for about 30 to 40 minutes, checking it around the 30-minute mark. You want the liquid absorbed and the rice tender. It works surprisingly well!
What makes this authentic Khao Neeo Mamuang?
When people ask about the authentic version, **Khao Neeo Mamuang**, they are usually asking about the balance. True authenticity comes from three major things: one, sticky rice—always glutinous rice, never jasmine rice! Two, it’s the quality of the coconut milk; it needs to be full-fat and rich. And three, it’s the sauce balance. The glaze shouldn’t just be straight sugar; the hint of salt we add cuts through the sweetness beautifully, making it richer, not just sweeter. That blend is what you’d get from the best vendors in Thailand!
If you want to see how others have had success getting this right, I saw a fantastic guide detailing their process over at Foodie Happy Vibes—it’s always good to see another trusted method in action!
We have tons more amazing **dessert recipes** if you’re looking for something else sweet to try after you master this! Head over to the Desserts section of the site.
Estimated Nutrition for This Mango Sticky Rice Recipe
Now, I have to give everyone a little disclaimer here: because we are cooking with homemade sauces and fresh fruit, these numbers are just estimates! I ran the core recipe through a calculator, but your actual results might vary slightly depending on the exact ripeness of your mangoes or the specific brand of coconut milk you decide to use. But it gives you a good idea of what you’re diving into when you make this indulgent **sweet sticky rice dessert**!
This isn’t exactly a low-calorie treat—hello, full-fat coconut milk!—but wow, is it worth it for that incredible flavor experience. For a single serving based on a four-serving yield, here is what you can expect:
- Calories: Roughly 450 calories
- Fat: About 20g (Don’t skip the fat; that’s where the creamy flavor lives!)
- Carbohydrates: Around 65g
- Sugar: About 30g (Mostly natural sweetness from the mango and sugar in the sauce)
- Protein: Approximately 5g
- Sodium: Around 250mg
We keep the cholesterol surprisingly low since this recipe, as written, is totally vegetarian-friendly (and easily vegan, if you use vegan sugar!). Enjoy every single bite of this famous **Southeast Asian cuisine recipe**!
Share Your Homemade Mango Sticky Rice Experience
Now that you’ve made a batch of what I truly believe is the **best mango sticky rice** out there, I absolutely need to hear about it! Seriously, my favorite part next to eating it is seeing your results. Did your rice come out perfectly sticky? Tell me about your mangoes—were they perfectly ripe and sweet?
Leaving a rating, even if it’s just five stars for the sheer decadence of the **coconut milk glaze recipe**, helps other folks know they can trust this recipe, which is everything to us here. If you tried the little trick of folding half the sauce into the rice, let me know what you thought of that trick for supreme creaminess!
If you snapped a gorgeous picture of your finished plate—especially if you found a beautiful way to arrange those tropical dessert ideas—please tag us or drop a link in the comments below! We love collecting photos from real home kitchens to see how everyone is enjoying Kate’s philosophy of making amazing food accessible. If you have any final questions or need help troubleshooting that sauce thickness, the comments section is the best place to ask, or feel free to reach out directly on our Contact Page. Happy cooking, everyone!
PrintAuthentic Creamy Mango Sticky Rice (Khao Neeo Mamuang)
Make truly creamy and sweet Thai Mango Sticky Rice at home using simple steps. This recipe focuses on perfectly cooked sticky rice and a rich coconut sauce for an authentic tropical dessert.
- Prep Time: 4 hours (soaking)
- Cook Time: 40 min
- Total Time: 4 hours 40 min
- Yield: 4 servings 1x
- Category: Dessert
- Method: Steaming
- Cuisine: Thai
- Diet: Vegetarian
Ingredients
- 1 cup sweet glutinous rice (sticky rice)
- 1 cup water (for soaking)
- 1 cup full-fat coconut milk (for soaking/steaming)
- 1/2 teaspoon salt (for rice)
- 1 cup full-fat coconut milk (for sauce)
- 1/2 cup granulated sugar
- 1/4 teaspoon salt (for sauce)
- 1 teaspoon cornstarch mixed with 2 teaspoons water (slurry)
- 2 ripe Ataulfo or Nam Dok Mai mangoes
- 2 tablespoons toasted sesame seeds (for garnish)
Instructions
- Rinse the sticky rice under cold water until the water runs clear. Soak the rice in 1 cup of water for at least 4 hours, or preferably overnight. Drain the soaked rice completely.
- Steam the drained rice. Place the rice in a steamer basket lined with cheesecloth over simmering water. Steam for 25 to 30 minutes until the rice is tender and cooked through.
- While the rice steams, prepare the sweet coconut soaking milk. In a small saucepan, heat 1 cup of coconut milk with 1/2 teaspoon salt until just simmering. Do not boil.
- Once the rice is cooked, immediately transfer the hot rice to a heatproof bowl. Pour the warm coconut milk mixture over the rice and stir gently to combine. Cover the bowl tightly with plastic wrap and let it sit for 30 minutes to absorb the liquid.
- Prepare the coconut sauce. In a separate small saucepan, combine the remaining 1 cup of coconut milk, granulated sugar, and 1/4 teaspoon salt. Heat over medium-low heat, stirring until the sugar dissolves completely. Do not boil.
- Thicken the sauce slightly by whisking in the cornstarch slurry. Cook for 1 minute until the sauce thickens to a light glaze consistency. Remove from heat.
- Gently fold half of the thickened coconut sauce into the warm, soaked sticky rice. Let the rice sit for another 10 minutes.
- Peel and slice the ripe mangoes.
- To serve, spoon a portion of the sweet sticky rice onto a plate. Arrange the fresh mango slices next to the rice. Drizzle the remaining coconut sauce over the rice and mango. Garnish with toasted sesame seeds.
Notes
- Use only glutinous or sweet rice; long-grain rice will not work for this recipe.
- For the best flavor, use high-quality, full-fat canned coconut milk.
- Ensure your mangoes are ripe; they should yield slightly to gentle pressure and smell fragrant.
Nutrition
- Serving Size: 1 serving
- Calories: 450
- Sugar: 30
- Sodium: 250
- Fat: 20
- Saturated Fat: 18
- Unsaturated Fat: 2
- Trans Fat: 0
- Carbohydrates: 65
- Fiber: 2
- Protein: 5
- Cholesterol: 0