
When the air starts getting that crisp edge—you know, the one that just begs for a cozy blanket and something warm from the oven—I always reach for fruit crisps. They are truly the superstars of simple baking for autumn! Forget fussy pie crusts and complicated layering; we’re talking about pure, unadulterated comfort here. That’s why I’m sharing my ultimate **pear crisp**. It’s so easy, uses ingredients you probably already have, and it delivers that rich, spiced fruit flavor that just screams ‘fall.’ For me, bringing this warm dish out of the oven is how I show love, just like my grandmother used to do in her kitchen. Trust me, this recipe is proof that you don’t need a culinary degree to make something truly memorable!
- Why This Easy Pear Crisp Recipe is Your New Favorite Fall Dessert
- Ingredients for the Brown Sugar Cinnamon Pear Crisp
- How to Prepare the Best Cozy Pear Crisp
- Tips for the Perfect Cinnamon Pear Crisp Success
- Simple Fruit Crisp Variations: Apple Pear Crisp and Cranberry Pear Crisp Recipe
- Serving Suggestions for Your Warm Spiced Fruit Dessert
- Storage & Reheating Instructions for Homemade Pear Dessert
- Frequently Asked Questions About Making a Pear Crisp
- Estimated Nutritional Data for This Simple Baking for Autumn Treat
Why This Easy Pear Crisp Recipe is Your New Favorite Fall Dessert
Listen, I developed this **Easy Pear Crisp Recipe** because life is too short to stress over dessert when you need a little comfort. This is pure magic with minimal effort! It checks every box you could possibly have for a wonderful **Fall Pear Dessert**, and it tastes like you spent hours fussing over it.
Here’s exactly why you need to bake this tonight:
- It earns the title of **Best Cozy Pear Crisp** because the filling melts in your mouth.
- It’s a genuine **Minimal Effort Dessert**—I promise the prep is faster than making a batch of cookies.
- It’s unbelievably crowd-pleasing; everyone asks for seconds!
Ready in Under an Hour for Cozy Evenings
When you’re craving something warm, you don’t want to wait until midnight! This entire thing comes together so fast. We’re looking at about 15 minutes of active prep time, and then 40 minutes in the oven. That means you can have this incredible **Quick Baked Fruit Dessert** ready to serve in under an hour. That speed is exactly what we need on a busy weeknight when we still want that cozy feeling.
The Ultimate Crunchy Topping Recipe
Oh, the topping! This is where the real battle is won. You need that contrast, right? Tender, spiced pears meeting the most wonderfully **Buttery Oat Topping Recipe**. I’m talking about a satisfying golden crunch that just crumbles perfectly over the hot fruit. Getting that texture right is half the fun, and I’ll show you the trick to making sure it doesn’t get soggy!
Ingredients for the Brown Sugar Cinnamon Pear Crisp
The beauty of this **Simple Fruit Crisp** is that you likely have everything sitting right there in your pantry. We aren’t messing around with fancy extracts or hard-to-find fruits here. I’ve listed everything you need for both the soft, juicy filling and that perfect crunchy topping. Remember, when you’re working with fresh fruit, quality matters, so pick pears that are ripe but still a bit firm so they hold their shape!
Here is what you’ll gather for the full recipe. No extra trips to the specialty store, I promise:
- For the Filling: 6 medium ripe pears (I love using Bartlett or Bosc—they hold up so well when baked!), peeled, cored, and sliced about 1/2 inch thick.
- 1/4 cup granulated sugar.
- 1 tablespoon fresh lemon juice (this stops browning and brightens the flavor—don’t skip it!).
- 1 teaspoon ground cinnamon—make sure it’s fresh!
- 1/4 teaspoon ground nutmeg (this adds that lovely depth).
- For the Buttery Oat Topping Recipe: 1/2 cup all-purpose flour.
- 1/2 cup rolled oats (use the old-fashioned kind, not the instant stuff; we need texture!).
- 1/2 cup packed light brown sugar (this is key for that rich caramel color).
- 1/4 teaspoon salt.
- 1/2 cup (that’s one full standard stick) cold unsalted butter, cut into small cubes. Cold is non-negotiable for the crunch!
Grab those ingredients, and we’re practically halfway done. Seriously, this **Homemade Pear Dessert** comes together in a snap!
How to Prepare the Best Cozy Pear Crisp
Okay, this is the fun part! Since we are aiming for that perfect balance between tender fruit and amazing crunch, we need to treat the filling and the topping separately. Don’t worry, this whole process is quick, and the payoff is huge. If you’ve checked out some of my other simple baking recipes, like my easy apple crumble, you know I love efficiency. This pear crisp is no different but we focus on flavor first!
Preparing the Juicy Pear Dessert Filling
First things first: Preheat your oven to 375 degrees F, and grab an 8×8 baking dish—give it a light grease so we don’t have any sticking surprises later. Now, take those sliced pears and toss them gently in a big bowl. You want every piece coated in that granulated sugar, vibrant cinnamon, nutmeg, and the splash of lemon juice. Once they look perfectly happy and spiced, spread that **Juicy Pear Dessert** mixture out into an even layer in your dish. Don’t pile it in one spot; we want even cooking!
Assembling the Buttery Oat Topping Recipe
In a separate bowl, mix your dry topping ingredients—the flour, oats, brown sugar, and salt. Now, for the secret to the ultimate **Crunchy Topping Recipe**: the butter must be cold! Toss those cold cubes into the dry mix. Use your fingers, a fork, or a pastry blender, and work it in until you get coarse crumbs. You are looking for texture here; you want some pea-sized bits of butter still visible. Those little pockets of butter create the golden crisp we are obsessed with in this **Buttery Oat Topping Recipe**.
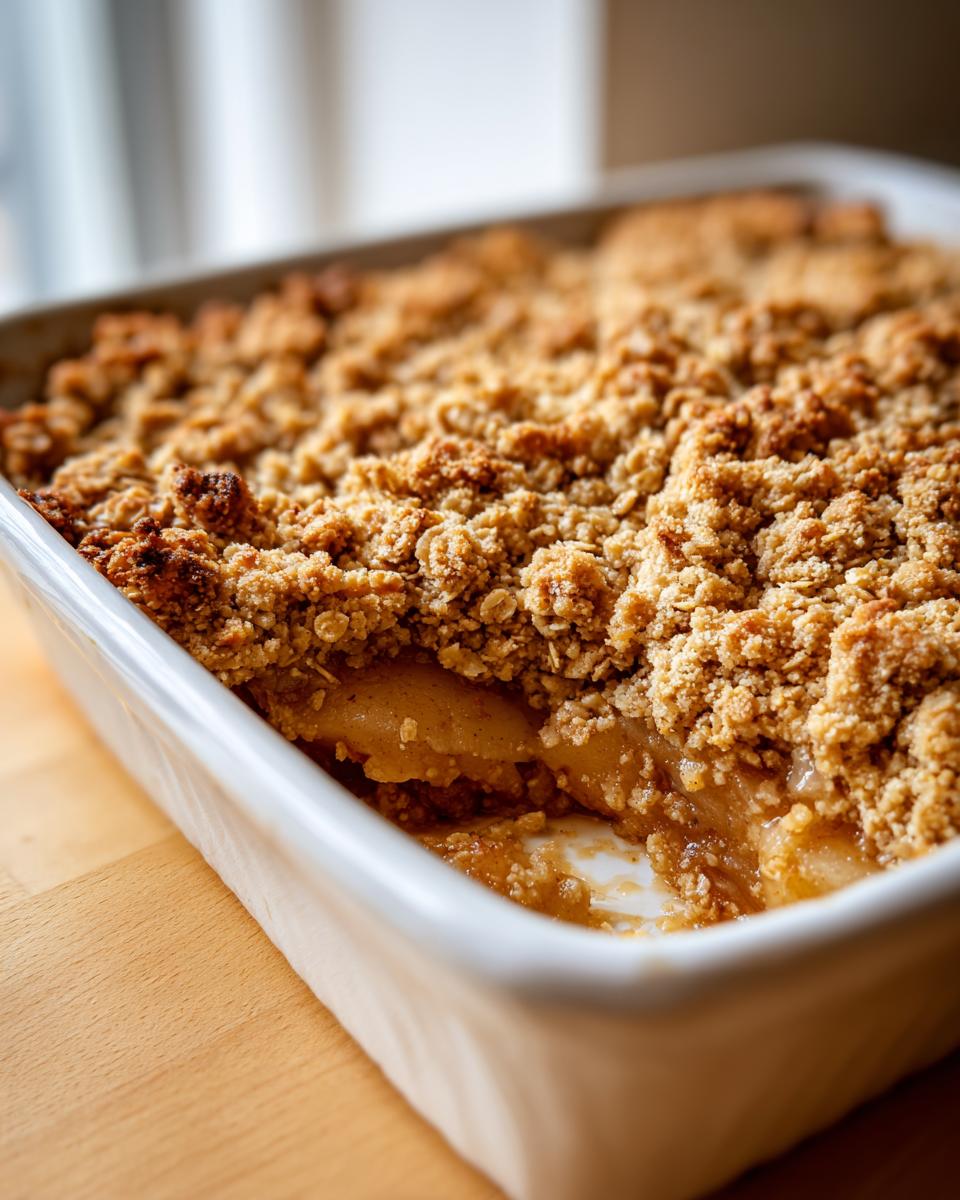
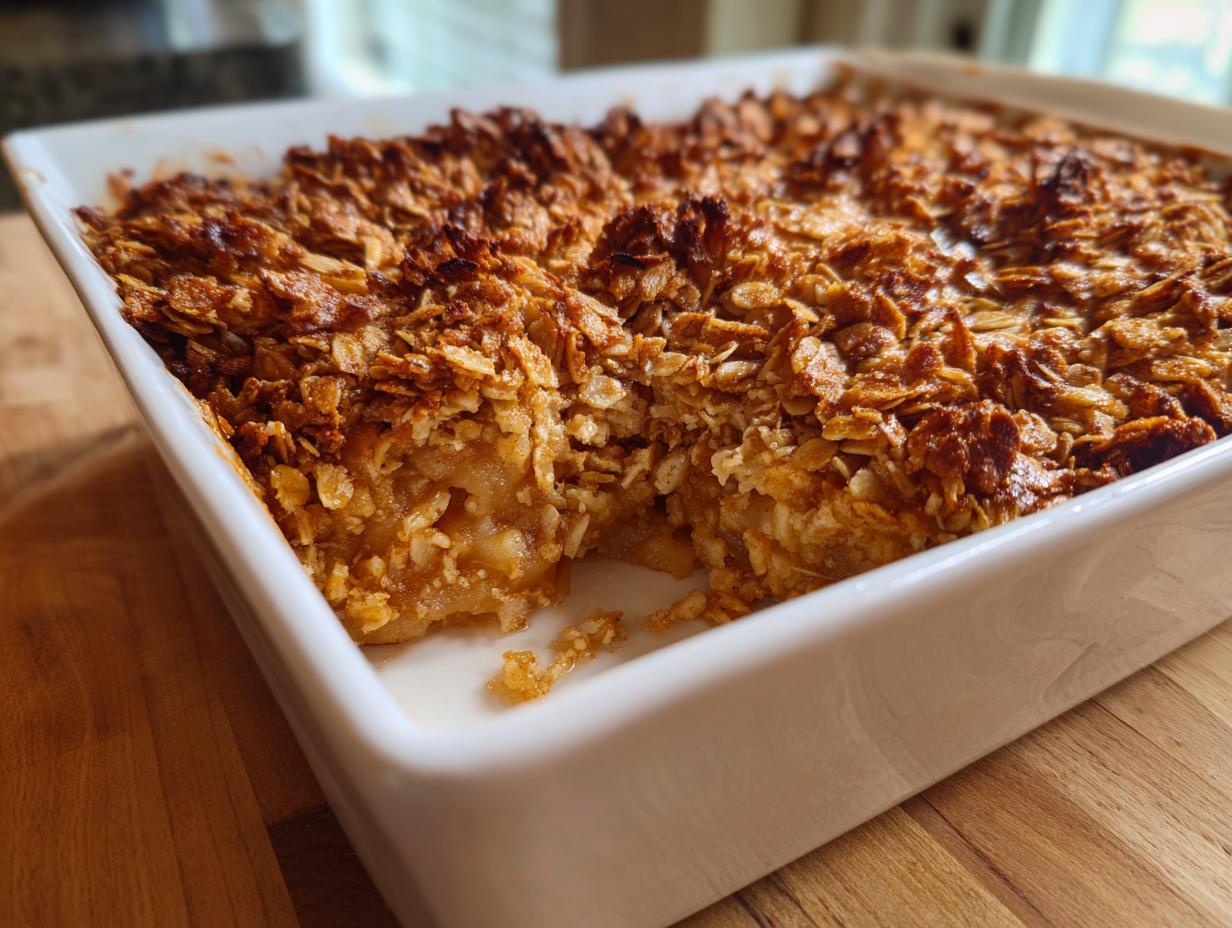
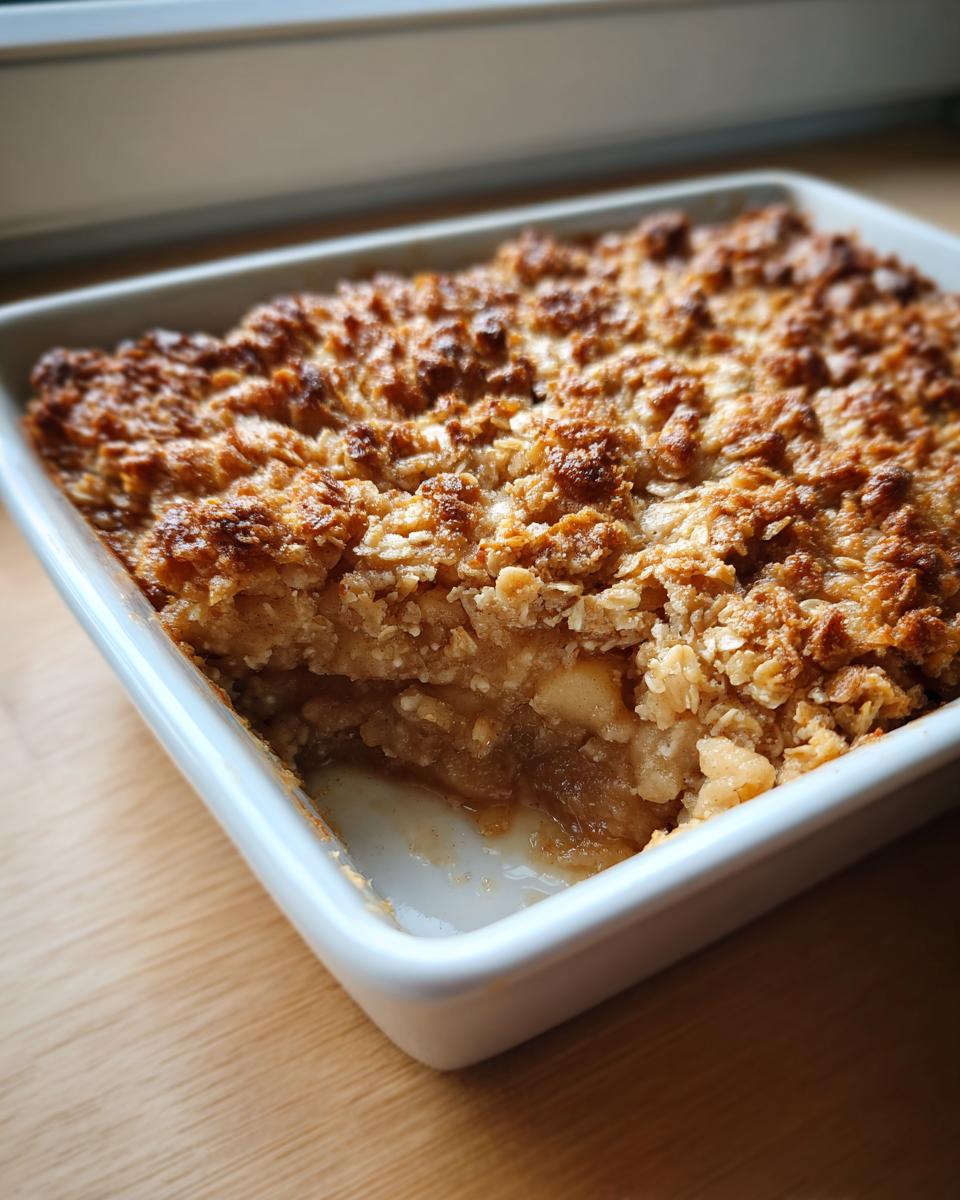
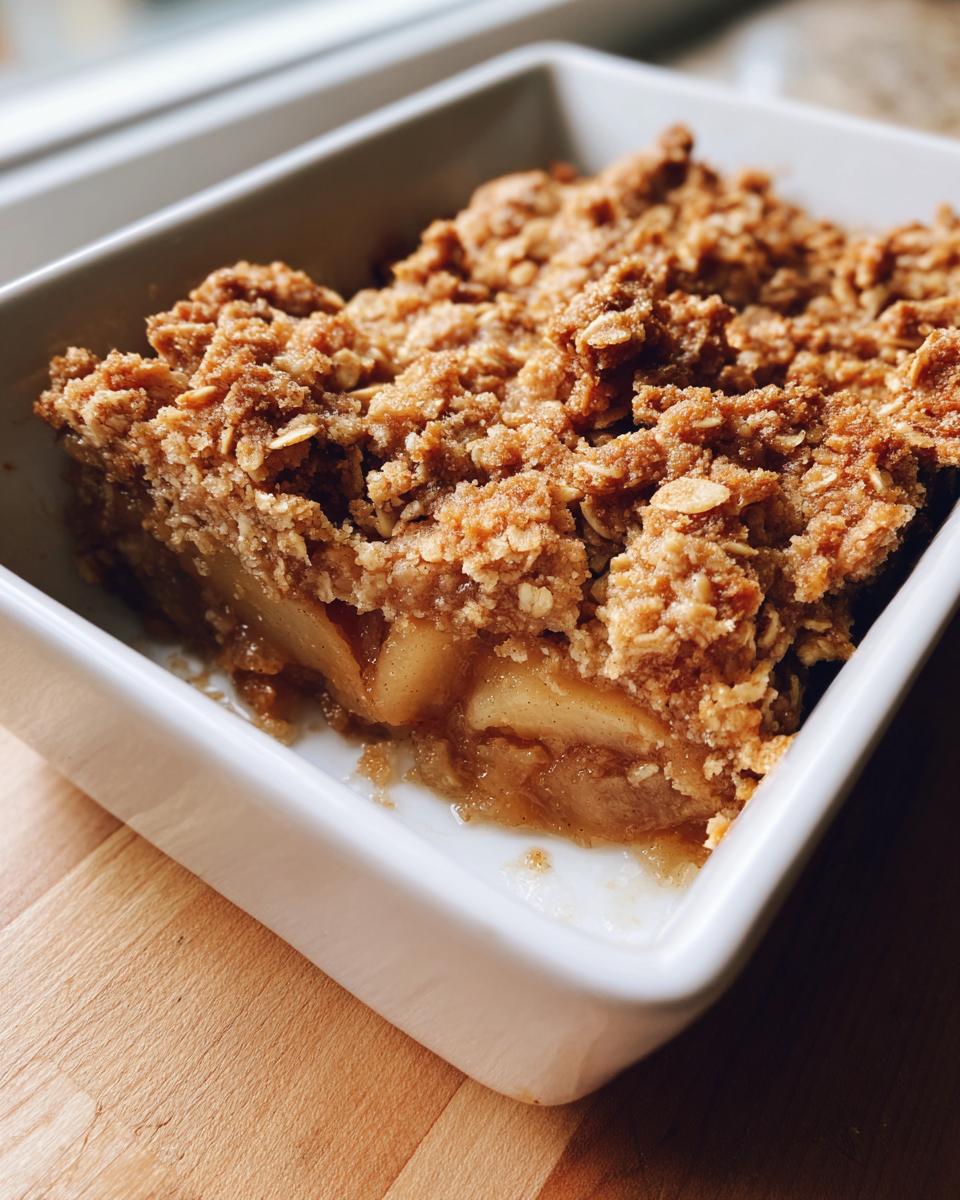
Baking and Resting Your Pear Crisp
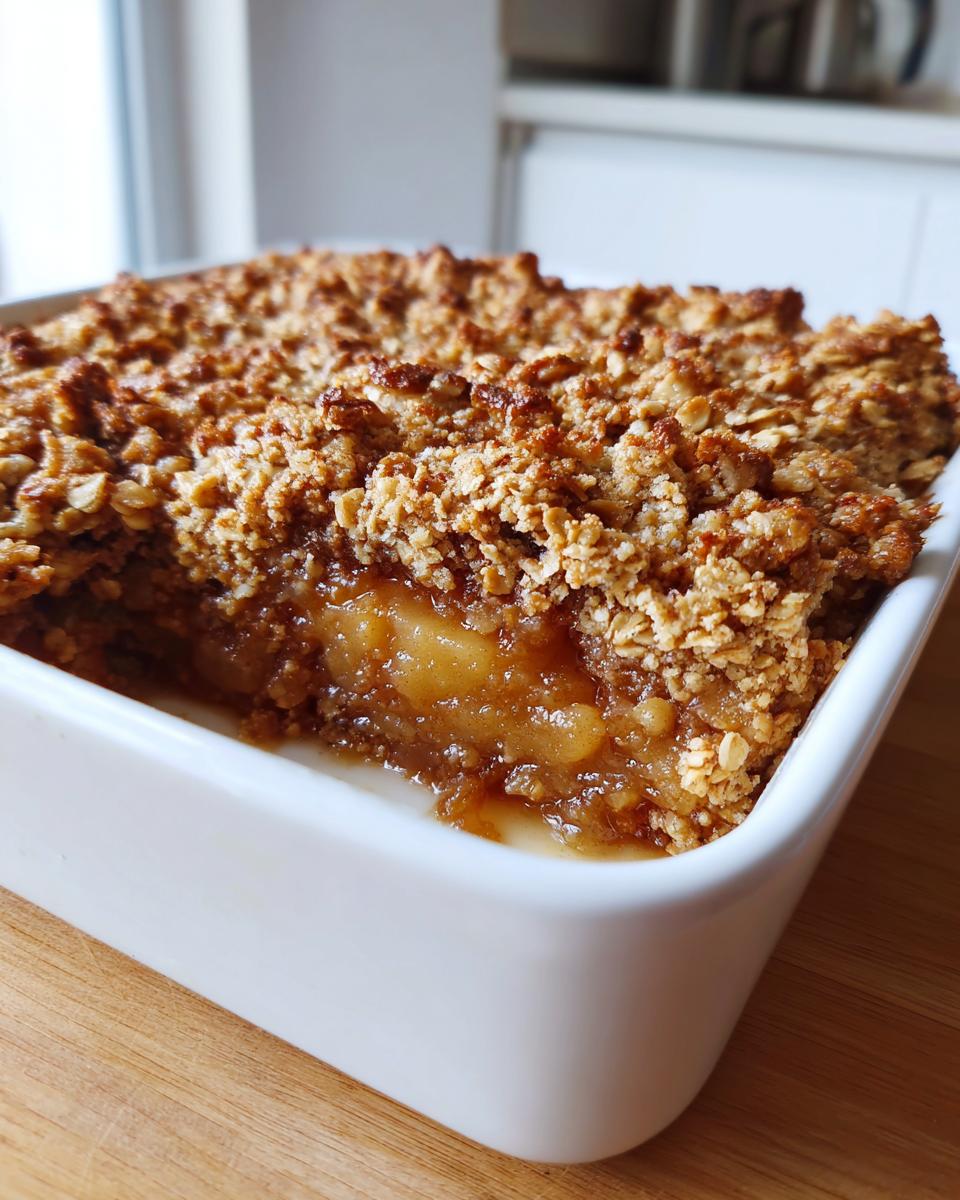
Sprinkle that glorious crumb mixture evenly over your spiced pears—make sure the fruit is totally covered. Pop it into that hot oven for 35 to 45 minutes. You’ll know it’s ready when the topping is golden brown and you see that sweet, thick filling bubbling up around the edges. This is the best sound! But here’s a pro-tip for your **Pear Crisp**: Once it comes out, let it rest on a wire rack for at least 15 minutes. That resting time is crucial because it lets those juices thicken up so you aren’t eating soup!
Tips for the Perfect Cinnamon Pear Crisp Success
We’ve got the basic **Cinnamon Pear Crisp** down, but since we’re aiming for that truly memorable, crowd-pleasing dessert, let me give you a few pointers I picked up from years of testing these things. Baking should build confidence, not create stress, so these little tweaks ensure you get that perfect, soft-yet-structured fruit layer every single time.
First, your fruit choice really impacts the texture of your **Simple Baked Fruit Dessert**. You want pears that are ripe enough to be sweet but firm enough to resist turning into total mush during that 40-minute bake time. That’s why I almost always recommend Bosc or Bartlett pears when making a **Pear Crisp**.
Choosing the Right Pears for Your Pear Crisp
When you’re squeezing a pear at the grocery store, you’re not looking for that deep give you’d want in a pear you plan to eat raw right away. For baked goods, especially something like this, you want a gentle resistance when you press near the stem end. If they feel rock hard, they won’t soften up enough during baking, and you’ll end up with slightly crunchy pieces in your filling. If they feel too soft, they’ll break down completely, and you lose the beautiful structure we talked about!
Also, don’t be afraid to mix it up! If you happen to have some firm apples kicking around, throwing in a couple of chopped apples with your pears makes a lovely, traditional blend. It adds a nice, subtle tartness that balances the rich brown sugar in the topping.
And if you want to level up that topping texture? Absolutely throw in 1/4 cup of chopped walnuts or pecans when you’re mixing the butter into the dry ingredients. Nuts toast up beautifully in the oven and add an extra layer of satisfying crunch to your **Buttery Oat Topping Recipe**. Just make sure they are incorporated well with the oat mixture before sprinkling!
Simple Fruit Crisp Variations: Apple Pear Crisp and Cranberry Pear Crisp Recipe
One of the best things about a **pear crisp** is how adaptable it is! It’s such a foundational, lovely **Comfort Food Desserts** base that you can totally play around with it depending on what’s seasonal or what you have on hand. I always encourage home cooks to experiment once they nail the main recipe. If you’re looking to mix things up for your table, I have two favorite swaps that still keep this dish utterly delicious and true to the spirit of a **Simple Fruit Crisp**.
First, let’s talk about adding some tartness, which balances the sweetness of the pears and brown sugar perfectly. The **Cranberry Pear Crisp Recipe** is my go-to when the holidays roll around. It just feels festive!
To make this variation, you don’t have to change the topping at all—that Brown Sugar Crisp Topping works beautifully with tart fruit. When you’re mixing your fruit filling, simply add about 1 cup of fresh or frozen cranberries in with your sliced pears. That’s it! They cook down beautifully and give you this gorgeous jewel-toned sauce bubbling underneath. If you want to see another great cranberry recipe, I just released a wonderful cranberry orange bread that is perfect for a weekend breakfast.
Now, if you want something that leans even harder into classic fall flavors, the **Apple Pear Crisp** is the way to go. This is fantastic because you get a slightly different structure from both fruits. I usually swap out about half of my pears for firm apples—think Honeycrisp or Gala. You can follow the exact recipe instructions, but keep in mind that apples can sometimes take a few extra minutes to soften. For more ideas on rustic fruit combinations, you might want to check out some inspiration online, like this lovely rustic cranberry pear crisp!
No matter which way you go—cranberry mixed in or apple substituting—you get a winning **Dessert for Fall Evenings**. It’s all about using fresh, flavorful fruit and letting that buttery crumb do the heavy lifting!
Serving Suggestions for Your Warm Spiced Fruit Dessert
Okay, the **pear crisp** is out of the oven, it smells divine, and you’re ready to dig in—but wait! While eating it warm straight from the dish is always an option (especially when nobody is looking!), serving it properly just takes this **Warm Spiced Fruit Dessert** from great to absolutely legendary. Trust me, the right topping really seals the deal for the ultimate **Comfort Food Desserts** experience.
Here are my must-haves when setting this dessert on the table:
- Ice Cream: You absolutely need that temperature contrast! A generous scoop of good quality vanilla bean ice cream is the classic choice. The melting ice cream mixes right into those hot, spiced pear juices to create an instant, glorious sauce. It’s non-negotiable in my book.
- Whipped Cream: If you have a few extra minutes, whipping your own heavy cream with just a tiny splash of vanilla and maybe a dusting of powdered sugar is fantastic. It’s lighter than ice cream, and you can dollop it beautifully right on top.
- Simple Caramel Drizzle: Want to lean into that brown sugar flavor? Melt about 1/4 cup of caramels with a teaspoon of milk or cream for a quick drizzle right before serving. It makes the whole thing look fancy but takes two minutes!
Whatever you choose, make sure you let that crisp rest for those 15 minutes first, as I mentioned earlier. A little patience here ensures you get that perfect scoop, crunchy crumb, and juicy fruit all in one bite!
Storage & Reheating Instructions for Homemade Pear Dessert
Now, the hard part: saving some for later! This is the magic of a good **Homemade Pear Dessert**—it often tastes just as good (dare I say better?) the next day once the spices have really married in the fridge. But we have to be careful about the topping. We want to keep that fantastic crunch we worked so hard to achieve with the **Brown Sugar Crisp Topping**.
Store any leftover **pear crisp** in an airtight container. You can leave it on the counter overnight if you plan to eat it the next morning, but honestly, to keep it truly fresh for more than 24 hours, tuck it into the refrigerator. It should last quite well for about four days when stored properly.
How to Revive That Crunchy Topping
If reheating in the microwave, just be warned: that beautiful oat topping will soften up—you’ll trade crunch for speed, which is sometimes necessary, I get it! If you have time, the oven is always the hero here for texture.
For the best results, spread the leftover crisp onto a baking sheet—try not to leave it piled high in a heap, as that traps steam and makes the top soggy. Pop it into a 350-degree oven for about 10 minutes, or until it’s heated through and you see the top just starting to look dry and golden again. It restores nearly all of that original wonderful crunch! If you just want a single serving warmed up, a toaster oven works wonderfully for this too, usually needing 5-7 minutes.
If you absolutely must use the microwave for a quick fix, heat only what you plan to eat immediately, maybe for 30-45 seconds. Then, and this is important, eat it fast before the residual heat steams the topping!
The pear filling itself freezes really well, too. If you made a double batch (which you absolutely should!), you can freeze the baked crisp or even just the raw fruit/topping combo before baking for a **Quick Baked Fruit Dessert** night later on.
Frequently Asked Questions About Making a Pear Crisp
It’s so common to have questions pop up when you’re making a new recipe, especially when you want to make sure your **pear crisp** comes out perfect the very first time! I get questions all the time about ingredients, texture, and timing. That’s why I pulled together the most common things people ask me about this recipe. I want you to feel totally confident when you step into the kitchen!
If you’re looking for tips on side dishes to serve with dessert—like perhaps a simple, buttery grain—you can check out my recipe for easy butter rice recipe, though it’s certainly not a dessert!
Can I make this Easy Pear Crisp Recipe ahead of time?
Yes, you absolutely can prep ahead of time, which is great for busy days! You have two main options here. You can assemble the entire **Easy Pear Crisp Recipe**—fruit filling in the dish, topping sprinkled over—and cover it tightly with plastic wrap. Keep it in the fridge for up to 24 hours. When you are ready to bake it, you might need to add about 5 to 10 minutes to the baking time since the dish will be cold going into the oven. Don’t try to bake it straight from frozen, though; that will definitely lead to soggy fruit!
What is the best way to get a really Crunchy Topping Recipe?
This is the most important question for any successful crisp! The secret to that ideal, shatteringly good texture in your **Crunchy Topping Recipe** is twofold: temperature and technique. First, your butter *must* be ice cold—straight from the fridge, just cubed up. Second, you cannot overmix it once you introduce the butter to the flour and oats. You are trying to create little pockets of fat that melt in the oven and leave behind air space. If you mix until it’s uniformly smooth or pasty, you’ve overworked the gluten and melted the butter too much, resulting in a hard hockey puck instead of a buttery crumble. Stop mixing as soon as you see those pea-sized chunks!
What if my pears are too firm or too soft?
This is a classic baking challenge! If your pears are too firm, they won’t soften enough during our regular baking time. My suggestion is to give those hard pears a quick head start. After tossing your pears with the spices, toss them into a skillet over medium heat for about 3 to 5 minutes, just until you see the edges start to look slightly translucent. Then, move them to your baking dish and proceed with the topping. If they are too soft, then definitely use less granulated sugar in the filling, or consider adding a cup of slightly firmer apples to give the overall mix more structure!
Can I substitute the oats in the topping?
You certainly can substitute the oats, but the texture will change a bit. The old-fashioned rolled oats provide that classic chewy-yet-crispy texture that makes a crisp great. If you absolutely can’t use them, you can swap them 1:1 with almond flour, though it won’t offer the same chewiness. If you prefer nuttier crunch, try adding finely chopped walnuts or pecans as I mentioned earlier, or if you have certified gluten-free oats, those work like a charm too!
Do I have to use brown sugar in the topping for this pear crisp?
While the recipe calls for brown sugar because that molasses note adds such wonderful warmth and color, you can technically substitute it with an equal amount of granulated sugar if you’re in a real pinch. However, you’ll lose some of that classic, deep flavor reminiscent of caramel. If you use only white sugar, I highly recommend adding an extra 1/4 teaspoon of ground cinnamon to compensate for the lost richness in the topping of your **pear crisp**.
Estimated Nutritional Data for This Simple Baking for Autumn Treat
Now, I’m not a nutritionist, and I mostly focus on making delicious food that brings people together, so please take these numbers with a grain of salt—or maybe a tablespoon of that brown sugar we used! The nutritional information below is an estimate for one serving of this **Easy Pear Crisp Recipe** based on the ingredients listed. If you use extra butter in the topping or add nuts, those values will certainly change, so use this as a guide!
We baked this to be a delightful treat, not a diet food, but it’s nice to know what’s in our **Comfort Food Desserts**, right?
- Serving Size: 1 serving
- Calories: 350
- Sugar: 35g
- Fat: 18g
- Saturated Fat: 11g
- Carbohydrates: 48g
- Fiber: 5g
- Protein: 4g
- Sodium: 120mg
- Cholesterol: 45mg
Just remember, these figures assume you are serving it plain, without the vanilla ice cream or whipped cream! If you’re bringing this **Simple Fruit Crisp** to a gathering, just know that everyone will be too busy enjoying the sweet, spiced pears and that fantastic crunch to worry too much about the details!
PrintEasy Brown Sugar Cinnamon Pear Crisp with Crunchy Oat Topping
Create a comforting, crowd-pleasing dessert with this simple pear crisp recipe. It features tender, spiced pears under a buttery, crunchy oat topping, perfect for cozy fall evenings.
- Prep Time: 15 min
- Cook Time: 40 min
- Total Time: 55 min
- Yield: 6 servings 1x
- Category: Dessert
- Method: Baking
- Cuisine: American
- Diet: Vegetarian
Ingredients
- 6 medium ripe pears (like Bartlett or Bosc), peeled, cored, and sliced about 1/2 inch thick
- 1/4 cup granulated sugar
- 1 tablespoon lemon juice
- 1 teaspoon ground cinnamon
- 1/4 teaspoon ground nutmeg
- 1/2 cup all-purpose flour
- 1/2 cup rolled oats (not instant)
- 1/2 cup packed light brown sugar
- 1/4 teaspoon salt
- 1/2 cup (1 stick) cold unsalted butter, cut into small cubes
Instructions
- Preheat your oven to 375 degrees F. Lightly grease an 8×8 inch baking dish.
- In a large bowl, gently toss the sliced pears with the granulated sugar, lemon juice, cinnamon, and nutmeg until the fruit is evenly coated. Spread the spiced pears in an even layer in your prepared baking dish.
- Prepare the topping: In a separate medium bowl, whisk together the flour, rolled oats, brown sugar, and salt.
- Cut the cold butter cubes into the dry ingredients using a pastry blender, two knives, or your fingertips. Work the mixture until it resembles coarse crumbs with some pea-sized pieces of butter remaining. This creates the best crunchy topping.
- Sprinkle the oat mixture evenly over the pears, covering the fruit completely.
- Bake for 35 to 45 minutes, or until the topping is golden brown and the fruit filling is bubbling thickly around the edges.
- Let the pear crisp cool on a wire rack for at least 15 minutes before serving. This allows the juices to set slightly.
Notes
- For a variation, substitute 1 cup of fresh or frozen cranberries with the pears for a Cranberry Pear Crisp.
- If you want an extra crunch, add 1/4 cup of chopped walnuts or pecans to the oat topping mixture.
- Serve this warm pear crisp with a scoop of vanilla ice cream or a dollop of whipped cream for a classic comfort food dessert.
Nutrition
- Serving Size: 1 serving
- Calories: 350
- Sugar: 35
- Sodium: 120
- Fat: 18
- Saturated Fat: 11
- Unsaturated Fat: 7
- Trans Fat: 0
- Carbohydrates: 48
- Fiber: 5
- Protein: 4
- Cholesterol: 45