

It’s true, right? Entertaining should feel joyful, not like a high-stakes chemistry exam! When friends show up unexpectedly, or when game day rolls around, you just need a go-to appetizer that requires zero fuss but gets all the ‘oohs’ and ‘aahs.’ That’s why I’m sharing what I truly believe is the best, easiest, and most reliable cheese ball recipe you will ever rely on. My grandmother taught me that showing love through food doesn’t require complicated techniques, just good, honest flavor. This classic spread is proof you can create something dazzling with just a handful of simple ingredients. Truly, this is one of my favorite simple homemade appetizers to put together.
- Why This Classic Cheese Ball Recipe Is Your New Crowd Pleaser Recipe
- Gathering Ingredients for Your Easy Cheese Ball
- How to Prepare the Ultimate Cheese Ball
- Chilling Time: The Key to a Great Cheese Ball Recipe
- Serving Suggestions for Your Holiday Cheese Ball
- Storage and Make Ahead Appetizer Tips for This Cheese Ball Recipe
- Best Cheese Ball Variations for Game Day Snacks
- Frequently Asked Questions About Making a Cheese Ball Recipe
- Share Your Simple Homemade Appetizer Experience
Why This Classic Cheese Ball Recipe Is Your New Crowd Pleaser Recipe
I promise you, if you bring this little sphere of cheesy goodness to any gathering—be it a loud tailgate or a slightly fancier holiday party—it will disappear first. That’s the power of a truly reliable cheese ball recipe. It isn’t about twenty different steps; it’s about making those core ingredients sing!
- It’s remarkably reliable. Every time I mix this up, it’s perfect. No guesswork involved here!
- It works equally well for a low-key Tuesday night snack or a big family event. It’s highly flexible!
- The combination of sharp cheddar and creamy cream cheese, hugged by toasted pecans, is just timeless. It’s the definition of a crowd pleaser recipe.
If you need other easy options for your next gathering, I have a whole collection over here that I’ve tested until they were foolproof.
Simple Ingredients, Extraordinary Flavor in This Cheese Ball Recipe
When you only use a few things, each one has to pull its weight, right? That’s the secret to this Classic Cheese Ball Recipe. We aren’t hiding anything behind layers of obscure seasonings. We rely on high-quality sharp cheddar—none of that pre-shredded stuff that has weird coatings! The tanginess of the cheddar cuts through the rich cream cheese beautifully. Then, we hit it with just a whisper of Worcestershire sauce and onion powder to deepen the savory notes. It really proves that the best flavors often come from the simplest base.
Gathering Ingredients for Your Easy Cheese Ball
Okay, let’s get down to business. Since this is such a simple spread, the ingredients list is short and sweet, which is exactly what we want when thinking about a quick party dip. I’ve listed out exactly what you need below. The most important thing here is the texture of your cheese, so please read closely before you head to the store!
- 8 ounces cream cheese, make sure it’s softened—and I mean really softened!
- 8 ounces sharp cheddar cheese, shredded by you, please!
- 1 teaspoon Worcestershire sauce
- 1/2 teaspoon garlic powder
- 1/4 teaspoon onion powder
- 1/4 teaspoon salt and 1/4 teaspoon black pepper
- 1 cup finely chopped pecans
- A good assortment of crackers, pretzels, or fresh veggies for serving
Ingredient Notes and Substitutions for Your Cheese Ball Recipe
Here’s where we make this cream cheese appetizer truly yours. If you don’t love pecans, swap them out one-for-one with coarsely chopped walnuts! They toast up beautifully and give you that satisfying crunch for your pecan crusted cheese ball.
Now, I know some of you are going to email me asking about bacon—and yes! If you want to turn this into an epic Bacon Cheese Ball Recipe, just cook about 4 slices of bacon until crisp, crumble it finely, and mix the bacon right into the cheese base (before rolling). You might need to cut back slightly on the salt if you do this, since bacon brings its own saltiness!
How to Prepare the Ultimate Cheese Ball
Okay, this next part is where the magic happens, and frankly, it’s so easy you’ll feel like you cheated. We’re taking those fantastic flavors we just assembled and turning them into the centerpiece of your party appetizer recipe spread. Just follow my lead through the mixing and the shaping process, and you’ll have an incredible, firm ball ready for its coat of crust!
Mixing Secrets for a Perfect Cream Cheese Appetizer Base
Step one is all about texture, and texture starts with temperature. If your cream cheese is too cold when you start beating it, you end up with little hard white lumps throughout your finished product. Yuck! Make sure that cream cheese has sat out for a good while. You want it soft enough that when you press it, your finger sinks right in without effort.
Grab your hand mixer—though honestly, a really sturdy wooden spoon works fine if you’re making my other simple appetizers, too—and beat that softened cheese until it looks light and fluffy. Then, add everything else except the pecans. Mix until everything disappears smoothly into the base. We want this to be an utterly smooth cream cheese appetizer before we even think about rolling it.
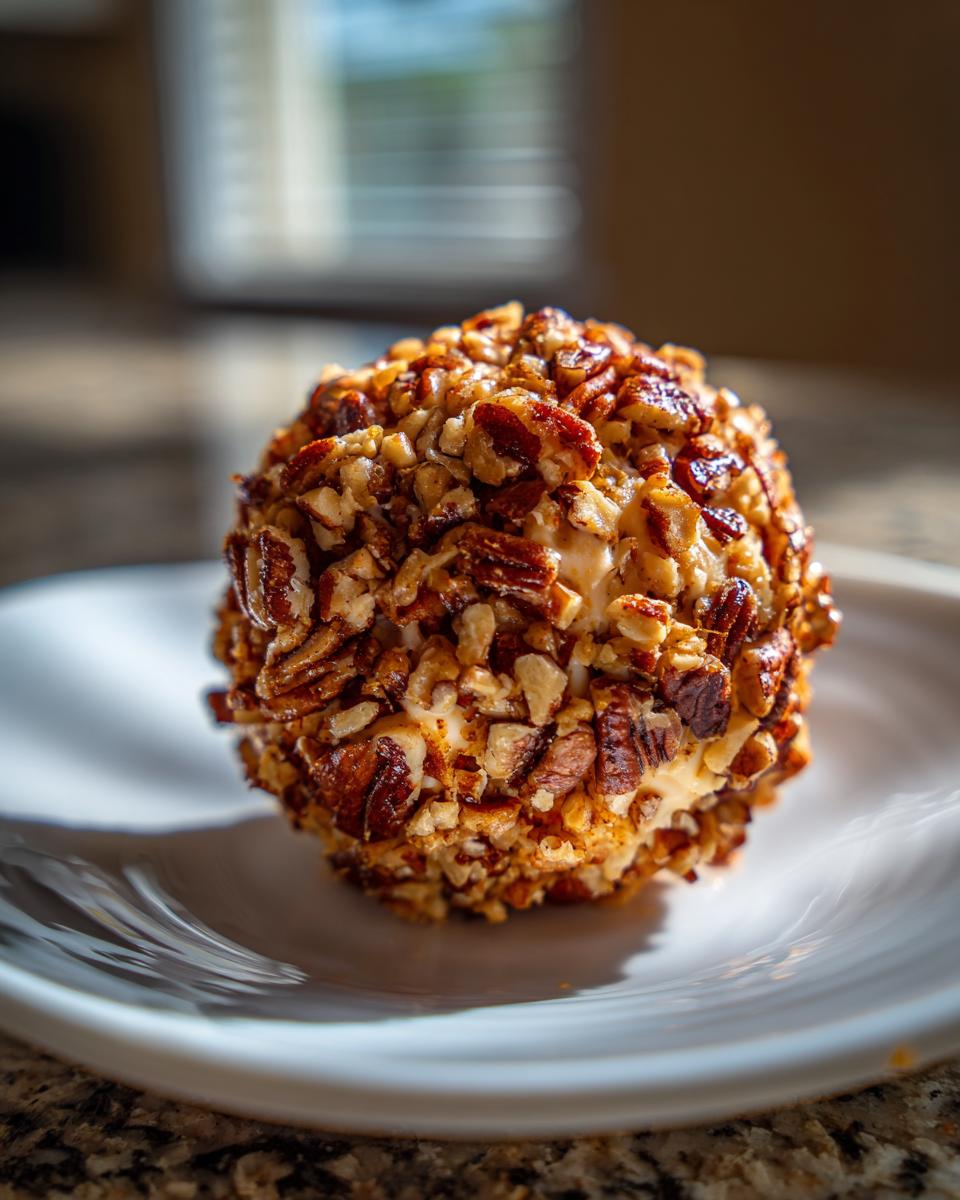
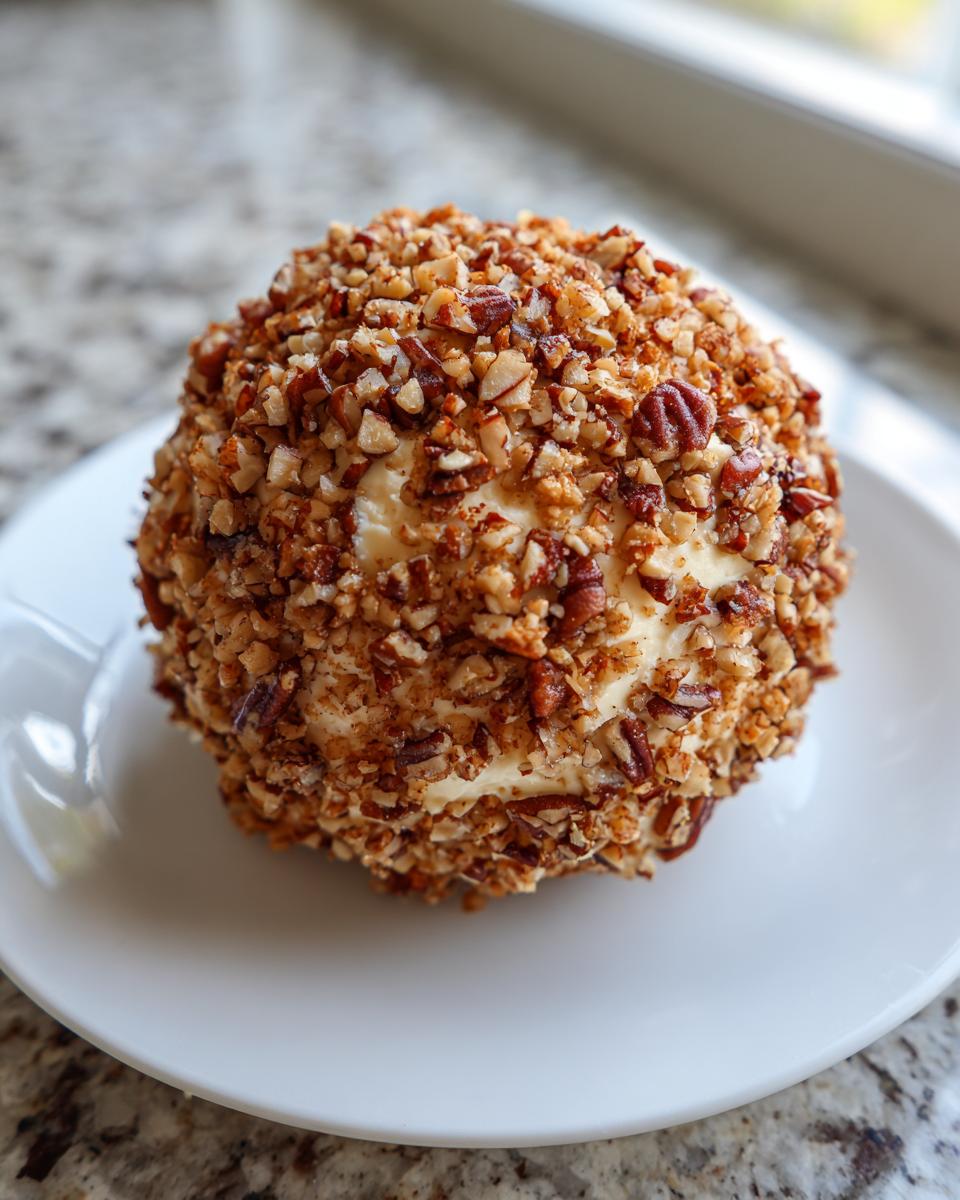
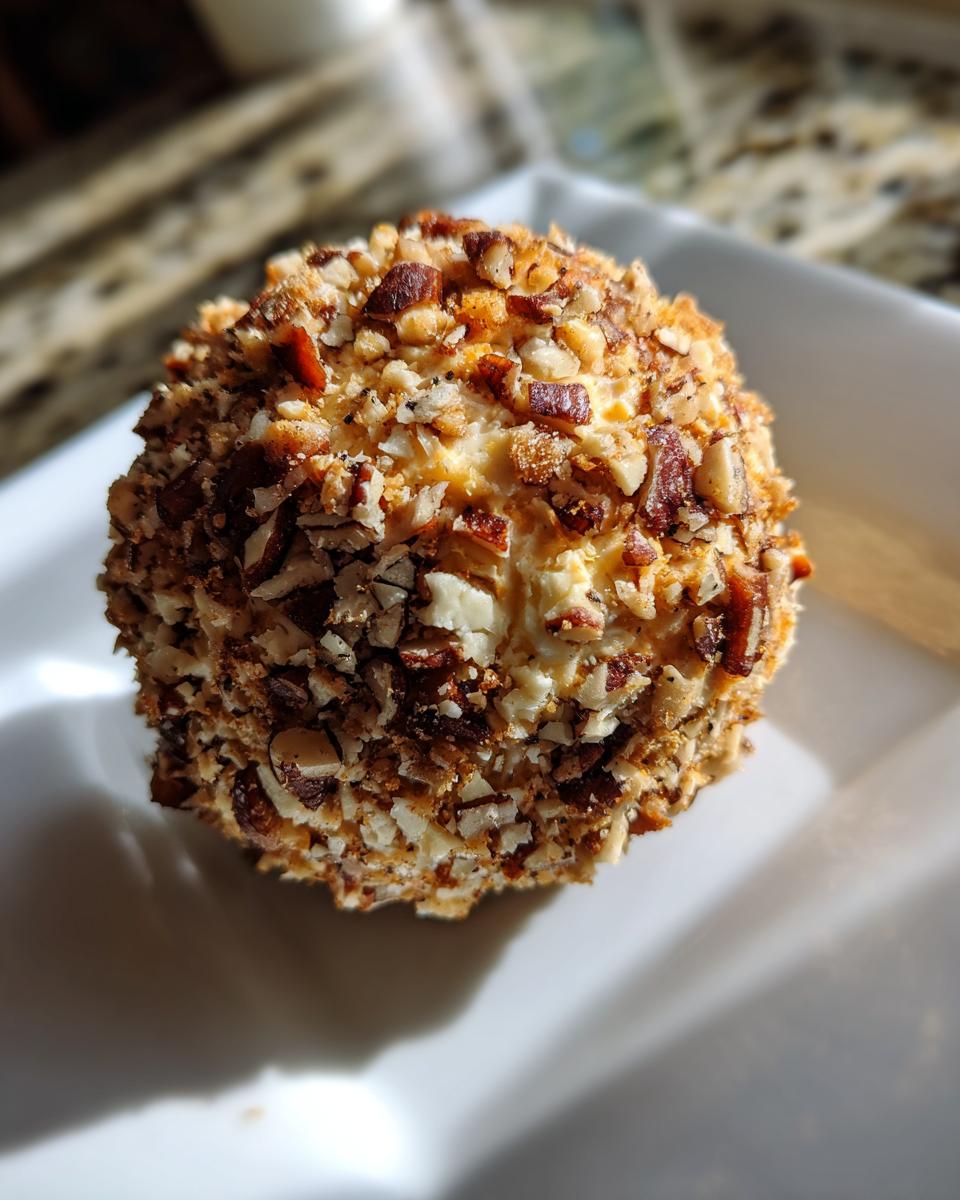
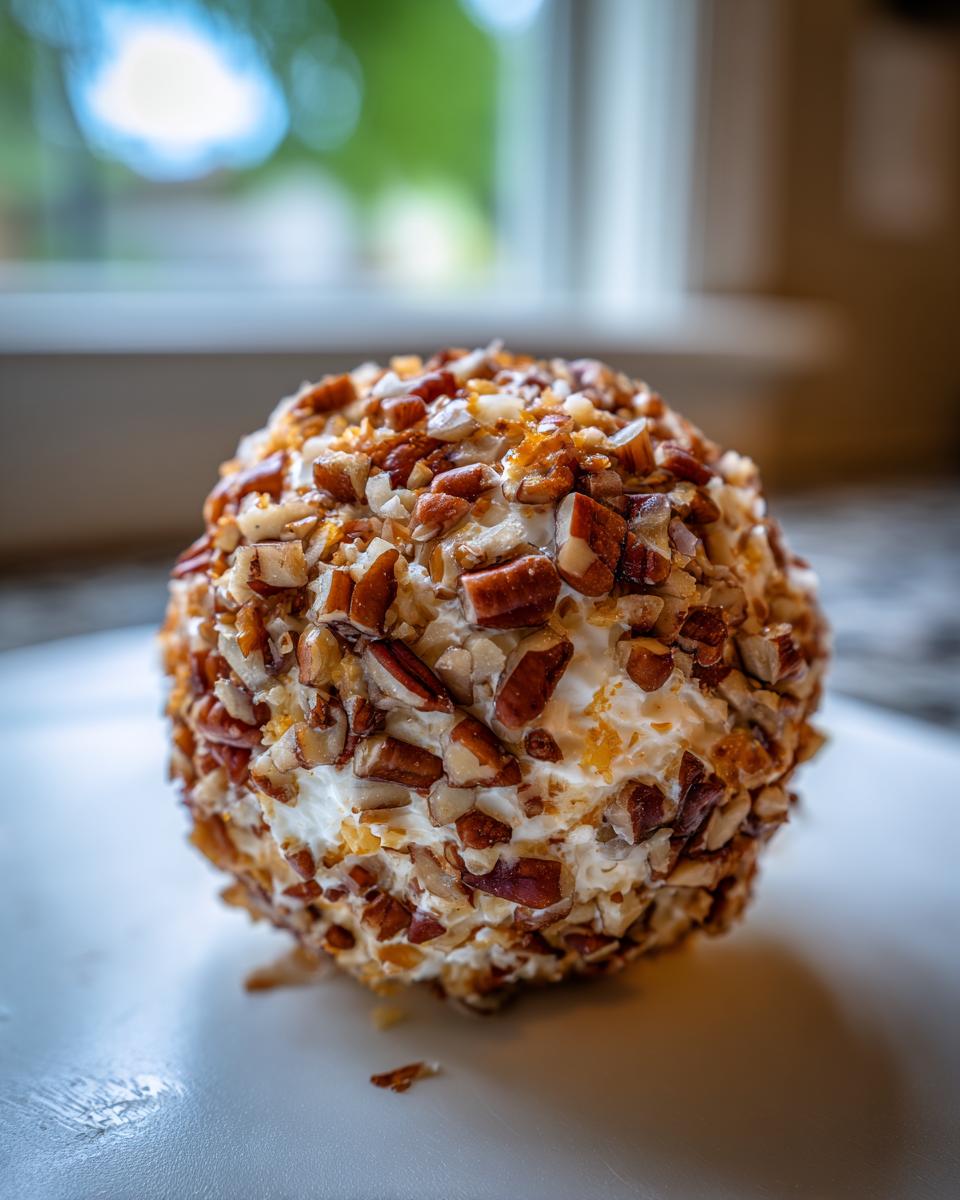
Shaping and Coating Your Pecan Crusted Cheese Ball
Once it’s mixed, take a big scoop out onto a piece of plastic wrap—and I mean a generous piece, you need room to work! Use the plastic wrap itself to gently start pulling the edges up and around the cheese mixture, pushing gently inward to form that perfect sphere shape. Think of it like wrapping a very fancy, soft piece of candy.
Lay your chopped pecans out on a flat plate. Once you have your ball shaped, peel back some of the plastic and drop that cheese mound right into the nuts. Roll it gently but firmly. You want full coverage—this coating isn’t just for looks; it helps the ball stay together and gives you that amazing crunch that makes this a killer game day snack!
Chilling Time: The Key to a Great Cheese Ball Recipe
Okay, don’t skip this step! I know when you’re making finger foods for parties, you’re tempted to just serve everything immediately, but this is where patience pays off huge. Chilling does two crucial things for your cheese ball recipe. First, it firms up the mixture so you can handle it without making a total mess. Second, and more important, it lets those little flavor particles—that onion powder, that Worcestershire—really get to know each other. They meld and deepen into one cohesive, amazing spread.
You absolutely need at least 2 hours in the fridge for this to firm up properly. I’ve pushed it to 3 hours if I was running late! And guess what? This is your secret weapon as a host; you can wrap this thing up tightly and keep it chilling for up to two full days. Talk about a fantastic make ahead appetizer!
Serving Suggestions for Your Holiday Cheese Ball
You’ve done the hard work—it’s chilled, it’s coated, and now it’s time to show off this beautiful centerpiece! Remember, friends, that when it comes to serving this Holiday Cheese Ball, presentation is everything. Take it out of the fridge about 15 minutes before you plan to serve it. If it’s rock-hard coming straight from the cold, it’s tough to scoop! Letting it soften just a touch ensures maximum creaminess.
Set it on your prettiest serving platter—maybe something reclaimed wood or even just a simple white ceramic plate works if the coating is the star. Then, surround that sphere with an assortment of dippers. I always put out both sturdy crackers and something crunchy like pretzels. Also, make sure you grab some fresh veggies! Thinly sliced cucumbers or celery sticks are great for folks watching their carbs, but they still get that cheesy goodness. It’s one of those essential appetizer ideas for entertaining that never fails.
If you want to see another fantastic approach to the classic, check out Sarah’s take on the classic cheese ball recipe—she always has great serving ideas too!
Storage and Make Ahead Appetizer Tips for This Cheese Ball Recipe
This is truly where this cheese ball recipe shines for stressed-out hosts! If you want to keep your party day completely stress-free, you need to know your reliable recipes can be done early. And this, my friends, is the ultimate make ahead appetizer. You can mix the entire cheese base, form the ball, and coat it in pecans up to two full days before you need it!
The key to storing it is airtight security. Once you roll the coated ball, wrap it tightly in plastic wrap—I always go for two layers just to be safe. Then, pop it in the fridge. If you are making something like my cannoli cookies the day before, this cheese ball is your best friend.
What about leftovers? If, by some miracle, you have any leftover cheese ball after the party, just wrap it back up tightly. It stays delicious in the fridge for about 5 days. You can even freeze it! If you freeze it, wrap it extra well and plan on thawing it overnight in the fridge before serving again. For more great tips on advanced entertaining planning, check out this article on make-ahead appetizers!
Best Cheese Ball Variations for Game Day Snacks
While our basic Classic Cheese Ball Recipe is perfect all by itself, sometimes you need to kick things up a notch, especially when you’re hosting fans for a big game! This base is so wonderfully flexible; it’s begging for a little creativity. You don’t have to reinvent the wheel, just tweak the ingredients slightly to hit those secondary flavors everyone loves.
If you want something that screams tailgating energy, try turning this into a full-on Cheddar Ranch Cheeseball. Just swap out the garlic and onion powder for about two tablespoons of high-quality dry ranch seasoning mix when you are blending the cheeses. Trust me, that tangy flavor is instantly addictive!
Another winner, especially if you want heartier finger foods for parties, is mixing in some finely crumbled, crispy bacon right into the cheese base. That makes a fantastic Bacon Cheese Ball Recipe that feels extra celebratory. If you try that variation, you might want to check out my recipe for creamy Boursin mashed potatoes for another rich side dish!
If you want to move away from nuts entirely, change up the coating! Herbs are wonderful. Try rolling the chilled ball in finely chopped fresh chives mixed with a little dried parsley. For a savory twist that really pops, some folks even use crushed, seasoned rice crackers for the coating—it adds a completely different texture profile. You can see how they did a great job adapting toppings over at this blog if you want more inspiration!
Frequently Asked Questions About Making a Cheese Ball Recipe
I know that once you get into the kitchen, little questions pop up, and honestly, that’s great! Being an intuitive cook means asking *why* things might go wrong or *how* to adjust. I’ve gathered the questions I get most often about making this cheese ball recipe so you can feel totally confident walking into your next party.
Can I use pre-shredded cheese in this cheese ball recipe?
Oh, please don’t if you can help it! This goes back to my philosophy of using simple ingredients for extraordinary meals. That pre-shredded stuff, bless its heart, is coated with starches like potato starch or cellulose to keep the shreds from clumping together in the bag. When you mix that into your soft cheese base, those tiny starches can make your final product grainy or just frankly weird.
For the creamiest possible texture—the kind of texture that makes this an amazing cream cheese appetizer—you really need to shred your block of sharp cheddar yourself. I know it feels like an extra tiny step, but trust me, it makes a huge difference in the final feel of your spread.
How long is this *Classic Cheese Ball Recipe* safe to eat after making?
This is such an important question, especially when planning appetizer ideas for entertaining! Because this recipe is full of dairy, we have to play it safe and remember that this is not something you want sitting out all day long.
In the refrigerator, tightly wrapped, this Classic Cheese Ball Recipe will stay perfectly safe and good for up to 5 days. However, for the best flavor and easiest spreading, I generally recommend serving it within 3 days.
When you are actually serving it at your party or game day gathering, try to keep it chilled until the last minute. Because the butter and cream cheese start softening at room temperature, you shouldn’t let it sit out on the snack table for more than two hours total. If it’s a really hot day, maybe bring it out for an hour, then tuck it back into the fridge for a little rest! For more general guidelines on keeping party food safe, I always send folks over to look at tips for other appetizers and snacks.
Share Your Simple Homemade Appetizer Experience
Well, there you have it! This incredible, no-fuss cheese ball recipe is ready to be the star of your next party or gathering. I truly hope that bringing this delicious, reliable snack to your table helps you focus less on cooking stress and more on enjoying the wonderful people around you—that’s always my goal here at Taste This Plate!
Now that you’ve whipped up this creamy delight, I absolutely want to hear about it! Did you stick with the classic pecans, or did you go bold with bacon or maybe even some chopped fresh herbs? Let me know what coating you decided on for your Pecan Crusted Cheese Ball or whatever flavor variation you chose!
If you managed to take a picture while this simple homemade appetizer was still surrounded by crackers, please tag me on social media! And if you have any questions at all about the technique or maybe need another idea for entertaining food ideas, don’t hesitate to reach out to me directly over at the contact page. I honestly love hearing how you’ve made these recipes your own. Happy snacking!
PrintThe Best Classic Cheese Ball Recipe

This easy party appetizer uses cream cheese, sharp cheddar, and pecans for a crowd-pleasing snack perfect for holidays or game days. Make this simple homemade appetizer ahead of time.
- Prep Time: 15 min
- Cook Time: 0 min
- Total Time: 2 hr 15 min
- Yield: 12 servings 1x
- Category: Appetizer
- Method: No Bake
- Cuisine: American
- Diet: Vegetarian
Ingredients
- 8 ounces cream cheese, softened
- 8 ounces sharp cheddar cheese, shredded
- 1 teaspoon Worcestershire sauce
- 1/2 teaspoon garlic powder
- 1/4 teaspoon onion powder
- 1/4 teaspoon salt
- 1/4 teaspoon black pepper
- 1 cup finely chopped pecans
- Assorted crackers, pretzels, or vegetable sticks for serving
Instructions
- Combine the softened cream cheese, shredded cheddar, Worcestershire sauce, garlic powder, onion powder, salt, and pepper in a medium bowl. Mix with a hand mixer or a sturdy spoon until the mixture is smooth and fully combined.
- Place the chopped pecans on a shallow plate or piece of wax paper.
- Scoop the cheese mixture onto a sheet of plastic wrap. Use the plastic wrap to shape the mixture into a ball.
- Roll the cheese ball gently in the chopped pecans until it is completely coated.
- Wrap the cheese ball tightly in plastic wrap. Chill in the refrigerator for at least 2 hours, or up to 2 days, to allow the flavors to meld and the ball to firm up.
- Before serving, place the chilled cheese ball on a serving platter. Let it sit at room temperature for about 15 minutes to soften slightly.
- Serve immediately with crackers, pretzels, or fresh vegetables for dipping.
Notes
- You can make this cheese ball up to two days ahead of time. Keep it wrapped tightly in the refrigerator until you are ready to serve.
- For a different flavor, substitute the pecans with chopped walnuts or dried herbs like dried parsley or chives for the coating.
- If you are serving a large crowd, consider making two smaller cheese balls instead of one large one.
Nutrition
- Serving Size: 1/12 of cheese ball
- Calories: 180
- Sugar: 1
- Sodium: 250
- Fat: 16
- Saturated Fat: 8
- Unsaturated Fat: 8
- Trans Fat: 0
- Carbohydrates: 2
- Fiber: 0
- Protein: 7
- Cholesterol: 40