
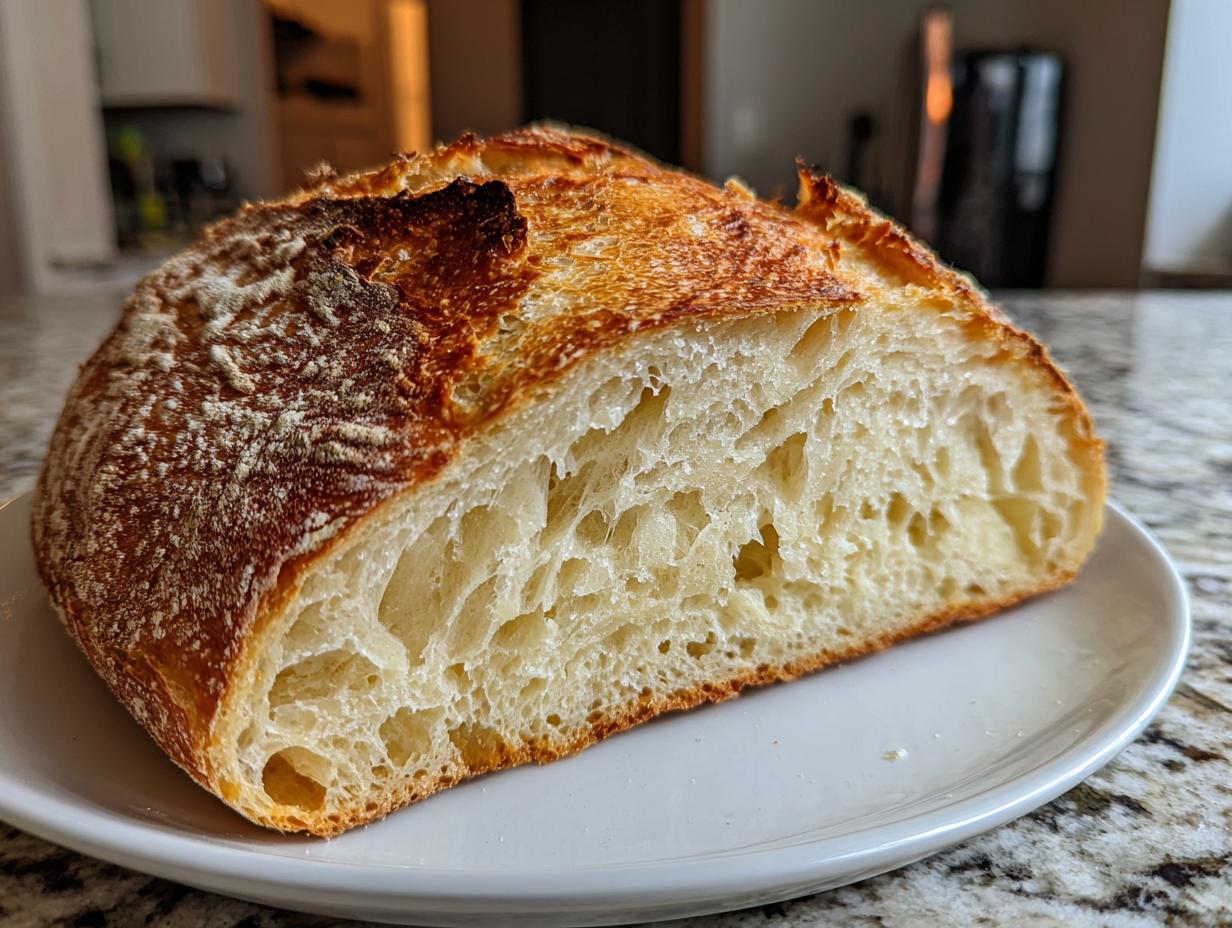
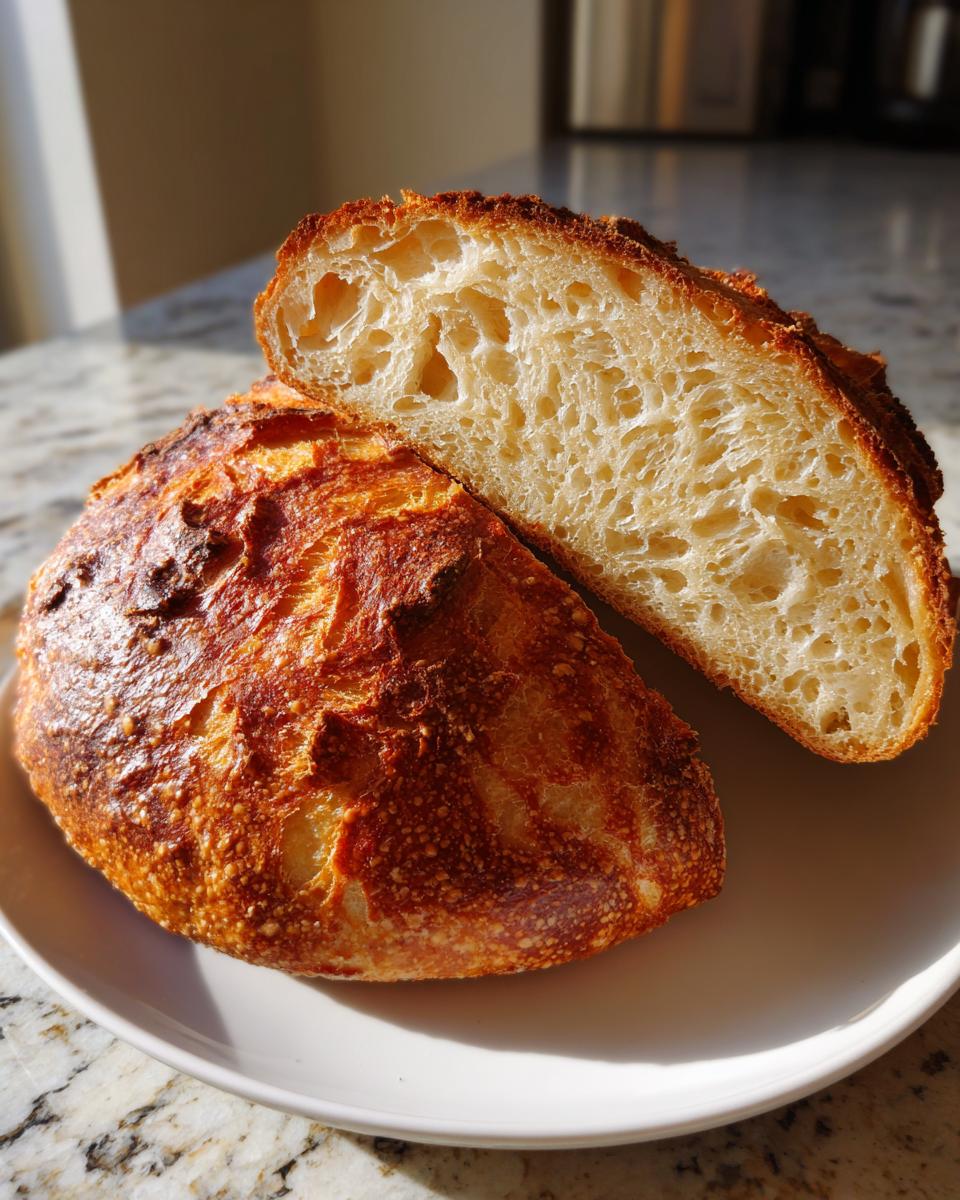
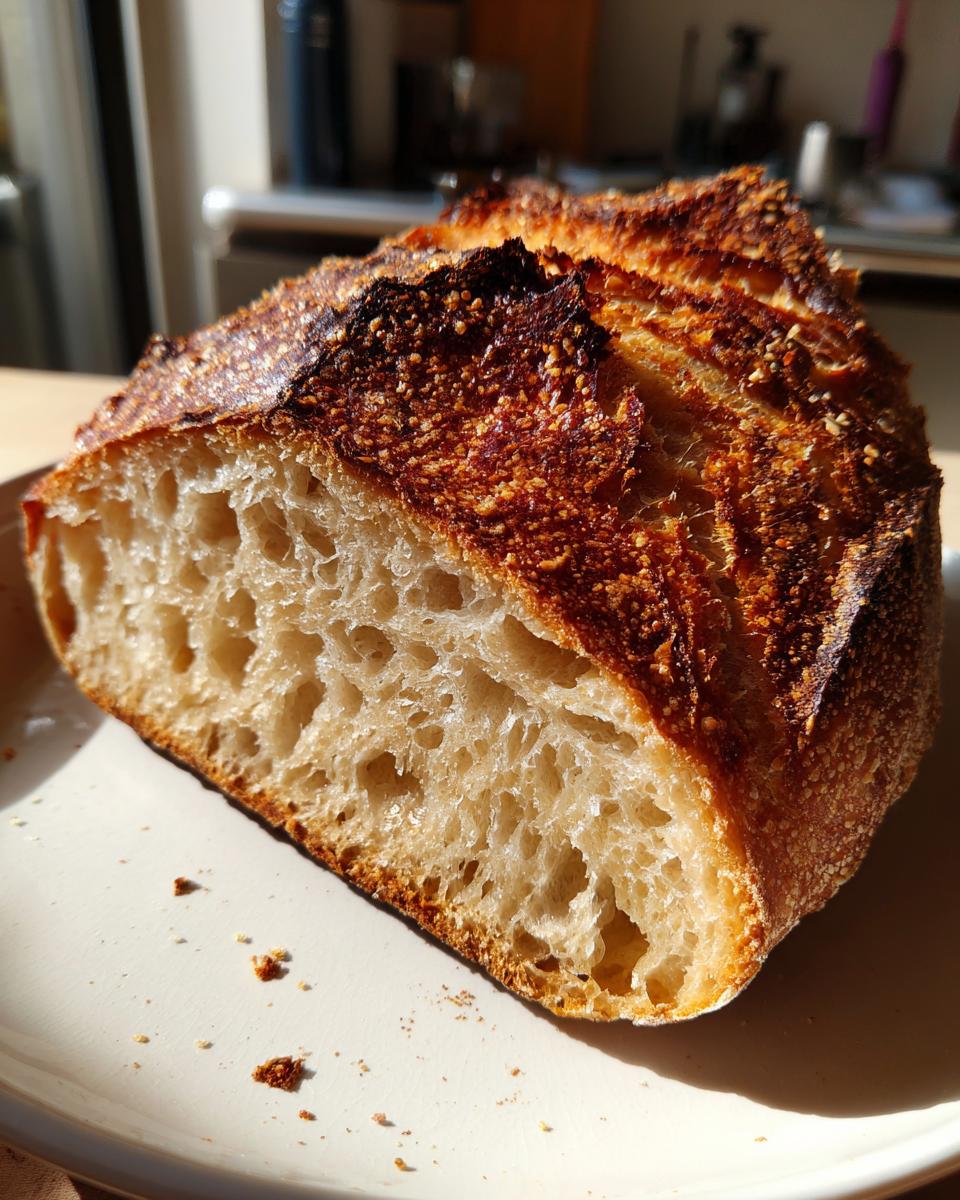
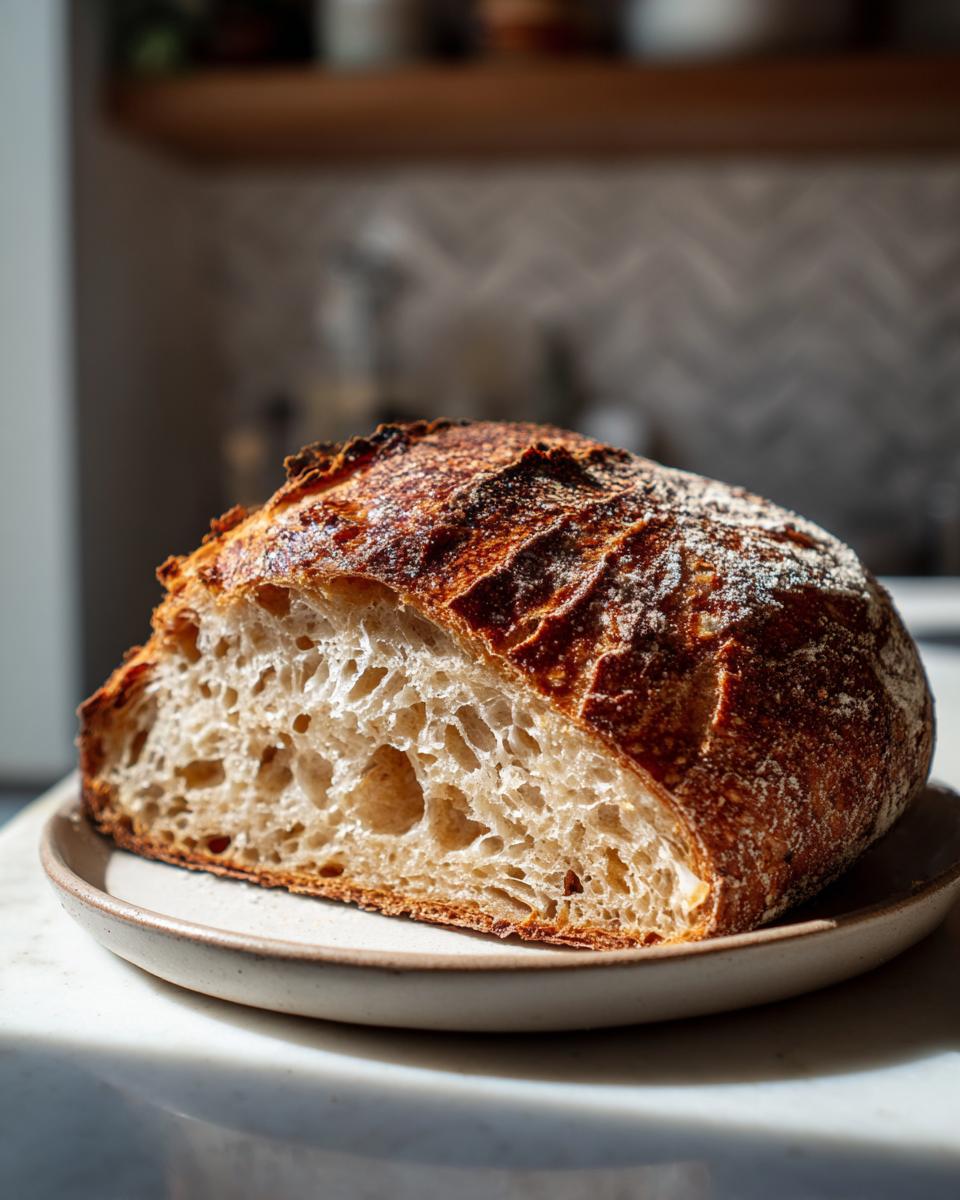
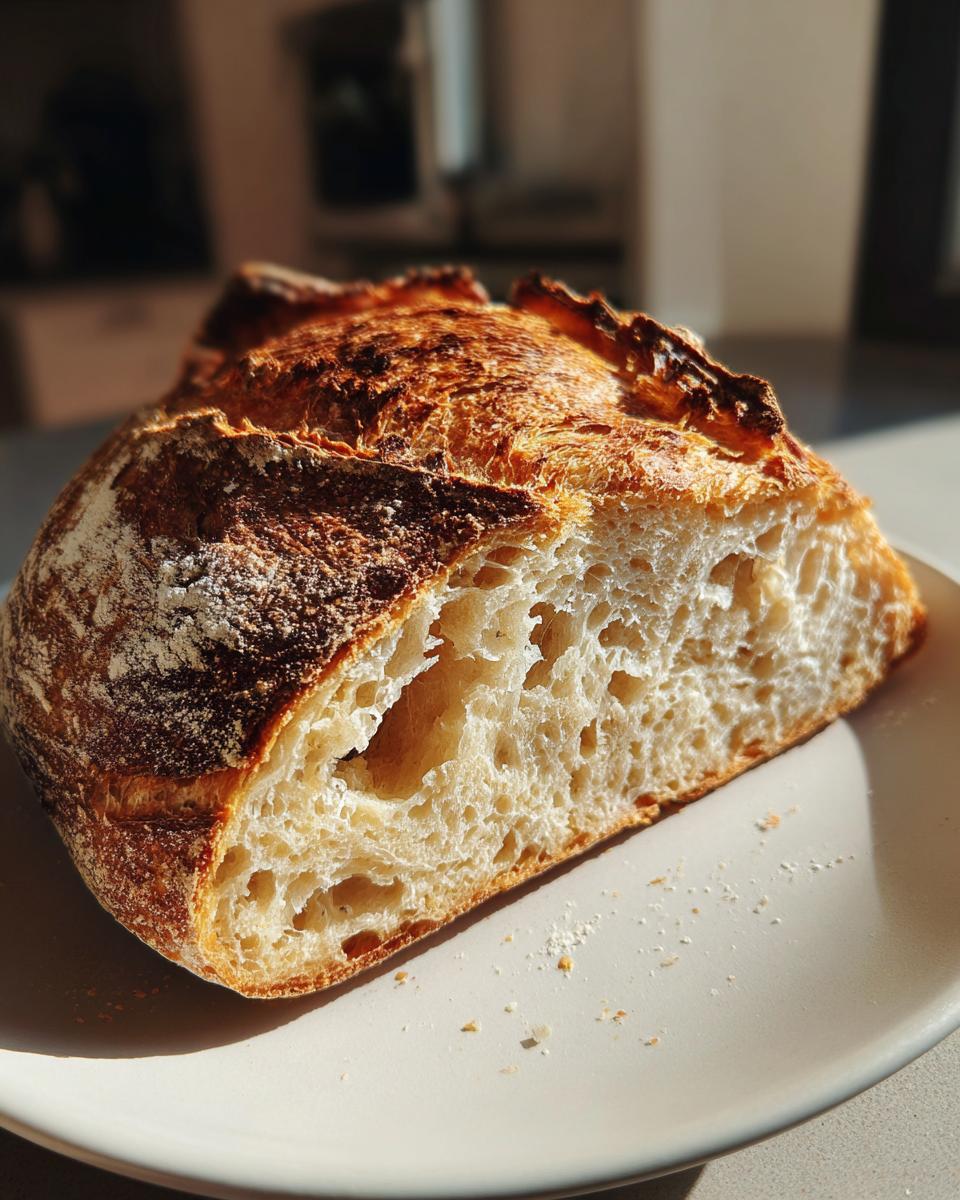
You know that gorgeous, crackly loaf of artisan bread you see in those fancy bakery windows? The kind with the deep brown crust that sings when you slice it, revealing those perfectly airy holes on the inside? Well, stop dreaming, because you absolutely can make that right here in your own kitchen, and trust me, it’s ridiculously easy. I’m sharing my recipe for the Ultimate Easy No-Knead Artisan Bread, which uses just four simple ingredients and relies on the magic of a Dutch oven to get professional results. This method reminds me so much of my grandmother, Kate’s, memories of the smell of yeast filling her Midwestern kitchen; she always believed good food shouldn’t be stressful, and this bread is the proof. We believe in simple ingredients for extraordinary meals, just like I mentioned over on our About page!
- Why This No Knead Artisan Bread Recipe Works for Beginners
- Essential Ingredients for Your Four Ingredient Artisan Bread
- Equipment Needed for Perfect Dutch Oven Bread
- Step-by-Step Instructions for Your Artisan Bread Recipe
- Tips for Success Making Crusty Bread at Home
- Serving Suggestions for Your Bakery Style Bread Recipe
- Storage and Reheating Instructions for Leftover Artisan Bread
- Frequently Asked Questions About This Artisan Bread
- Share Your Homemade Baking Guide Success
Why This No Knead Artisan Bread Recipe Works for Beginners
I know what you’re thinking: Baking your own artisan bread looks complicated and messy. Nope! That’s the best part about this particular recipe. We stripped away all the hard work so you can focus on getting that perfect crust, which is easier than you think. It’s all about letting time, not your muscles, do the heavy lifting for you.
- Only four basic ingredients needed—we keep it simple!
- Absolutely zero kneading required. Seriously, just mix it up and walk away.
- The electric Dutch oven method guarantees you get that bakery-style crusty exterior—it traps the steam perfectly.
We pride ourselves on recipes that yield flawless results, and this one is no exception. We test everything so you don’t have to worry about slaving over the mixing bowl. If you’re looking for a great pairing for this loaf, check out my easy chili recipe next!
The Magic of Long Fermentation in Artisan Bread
So what gives this bread all its amazing flavor if we aren’t kneading it? It’s all about patience! That long rest time—the 12 to 18 hours—is where the magic happens. While that dough is chilling out on your counter, the yeast is slowly working away, developing those complex, deep notes you usually only find in bread made by seasoned professionals. This slow fermentation breaks down the dough naturally, creating those beautiful, airy pockets inside the loaf, leading to a superior texture without ever having to punch or stretch the dough.
Essential Ingredients for Your Four Ingredient Artisan Bread
Wow, look how simple this list is! To nail this artisan bread, you only grab four things that I bet you already have hanging around. We are sticking strictly to the basics here because that’s what makes this recipe work so well. Everything must be measured correctly because there’s no kneading buffer to fix things!
- 3 cups All-Purpose Flour
- 1 1/2 teaspoons Salt
- 1/4 teaspoon Instant Yeast (this is important!)
- 1 1/2 cups Cool Water
As I always say over on our About page, we love simple ingredients that give us extraordinary meals. Seriously, don’t try to substitute specialty items here—we want that classic, rustic rise!
Ingredient Notes and Substitutions for Easy Homemade Bread
A couple of quick notes on these essentials. You absolutely must use All-Purpose Flour for this specific method; if you swap it for bread flour, the long rise changes everything, and you might end up with a dough that’s far too tough. Also, we need that instant yeast, not active dry yeast, because we aren’t blooming it separately—it needs to mix right into the ingredients to start that slow fermentation process properly.
Equipment Needed for Perfect Dutch Oven Bread
You don’t need a ton of fancy gadgets for this, which is why I love sharing this recipe! The secret weapon here, the one thing that guarantees you that crackly crust, is a sturdy Dutch oven. It traps all the steam released from the dough, creating a little micro-climate inside that makes the outside brown beautifully before the inside overcooks.
Here’s what you need sitting next to your mixing bowl when it’s time for the oven. Keep everything clean and ready to go!
- A heavy, oven-safe Dutch oven (preferably cast iron with a lid).
- Very sturdy oven mitts—that pot gets scorching, trust me!
- A plastic or silicone spatula for scraping the sticky dough out of the initial bowl.
- Parchment paper; you’ll use this to lower the dough into the hot pot.
That’s it! See? No complicated mixers or proofing baskets required. We focus on the essentials that make the difference between good bread and amazing, crusty bread.
Step-by-Step Instructions for Your Artisan Bread Recipe
Okay, this is where the real fun starts, turning four simple things into spectacular, bakery-quality artisan bread. You need to follow the timing here, especially that big first rest! Don’t worry about doing anything complicated; most of this time is just waiting while your dough ferments beautifully. You’re going to be shocked how little hands-on work this actually takes!
Mixing and the Long Rest for Maximum Flavor
First things first, grab your big bowl. Whisk the flour, salt, and instant yeast together—make sure they are totally combined! Now, pour in the cool water and mix it up with a sturdy spoon or spatula. You are stirring until you think you are done, and then stir just ten more seconds. Trust me when I say you want to mix until there is absolutely no dry flour hiding on the bottom of that bowl; it’ll look shaggy and sticky, and that’s perfect! Cover that bowl up super tight with plastic wrap—no air sneaking in!—and forget about it for 12 to 18 hours at room temperature. This is your hands-off flavor-building time.
Shaping and Preheating for Crusty Bread
Once that dough is bubbly and looks ready, dust a clean counter lightly with flour. Gently scrape the dough out—it will be jiggly! Fold the dough over itself just a couple of times to form a rough ball. That’s your shaping! Don’t knead it; we aren’t developing gluten here. Place that creation on a piece of parchment paper and let it rest for 30 minutes while your oven gets serious. This is critical: at least 20 minutes before that 30 minutes is up, you need to place your empty Dutch oven, lid on, into the oven and crank the heat up to 450°F (232°C). It needs to be screaming hot before the dough goes in for that perfect crusty bread!
Baking Your Rustic Loaf
Use your oven mitts—carefully!—and pull out that hot Dutch oven. Using the parchment paper like little handles, gently lower your dough ball right into the blazing hot pot. Pop the lid back on and slide it into the oven for 30 minutes. This steam trapped inside creates the soft interior we love. After half an hour, take the lid off! Let it bake another 10 to 15 minutes uncovered until it’s deep golden brown all over. The very last step? Get it out onto a wire rack immediately. You have to let this rustic loaf cool completely before you slice, or you’ll mess up that beautiful soft crumb structure!
When you’re ready for some serving inspiration, you might want to check out this recipe for garlic parmesan mashed potatoes—or maybe dip this bread into my famous chili!
Tips for Success Making Crusty Bread at Home
When you’re making this kind of no-knead artisan bread, the technique matters just as much as the ingredients. We aren’t relying on muscle to build structure; we trust time and heat. I always go back to what Kate talks about on the About page—understanding the *why* helps you bake better! If you want that crackling crust and that soft interior every single time, pay attention to these small but mighty details.
- Don’t Peek During the First Bake: Those initial 30 minutes with the lid on the Dutch oven are crucial for trapping steam. Resist that urge to lift the lid! Peeking lets that steam escape, and that steam is what keeps the dough surface pliable so it can expand fully before the crust sets hard.
- The Cold Water Rule: I always stress using cool or room-temperature water, never hot! If the water is too warm, it wakes up the yeast too fast, shortening that slow fermentation time we rely on for deep flavor. We want a lazy, slow rise here.
- Cooling Time is Non-Negotiable: I know this bread smells amazing hot out of the oven, but you must let it cool completely on a wire rack—at least an hour, maybe two. When you slice it hot, you just release all the trapped moisture too quickly, and you’ll end up with a gummy texture inside where it should be chewy and airy.
- Preheating is Power: If you skip preheating the empty Dutch oven, you are essentially skipping the best part of the recipe. That intense heat hitting the bottom of the dough instantly creates the environment needed for that beautiful crackly bottom crust. It has to be searing hot!
Follow these hints, and you’ll be making your own bakery-quality loaves without breaking a sweat!
Serving Suggestions for Your Bakery Style Bread Recipe
Now that you have this magnificent loaf of artisan bread cooling on the rack, what do you do with it? Oh, the possibilities! Since this bread is so versatile—crusty outside, tender inside—it’s perfect for everything. It’s fantastic just sliced thick and served warm with good butter, but it really shines as a dipping vehicle.
If you’re making a big pot of soup, you absolutely need this bread on the side. Seriously, try it with my huge pot of chili next time! It’s also wonderful served simply alongside any pasta dish you make, perhaps even my garlic butter linguine. Don’t forget the sandwiches—the sturdiness of this loaf holds up beautifully to fillings!
Storage and Reheating Instructions for Leftover Artisan Bread
I swear, this bread is usually gone the day I bake it, but if you manage to have some leftover—maybe you were disciplined and waited the full two hours for it to cool completely—how do you keep that amazing crust from going soft? This is something I learned the hard way when my first no-knead loaf went limp overnight!
The golden rule is to absolutely, under no circumstances, store this bread in plastic. Plastic traps moisture, and moisture is the enemy of that beautiful, shatteringly crisp crust we worked so hard for in the Dutch oven. You want air circulation!
- For Day 1 or 2: Store the cooled loaf cut-side down on a clean wooden cutting board, loosely covered with a linen or cotton kitchen towel. If you must cover the entire loaf, use a paper bag. This lets the bread breathe but keeps the interior soft.
- If It’s Getting Stale: Honestly, stale bread made this well is still great bread. If you notice that crisp exterior has softened too much, don’t sweat it. Just give it a little revitalization!
Waking Up the Crust for Serving
To bring that initial crackle back to life, you only need a minute or two. If you have a few slices left, just pop them directly onto the middle rack of the oven—no need to put them back in the Dutch oven! Set the temperature really low, about 300°F (150°C). Let them bake for four to six minutes, depending on how thick the slice is.
Watch them closely! You are just heating them through and encouraging the surface moisture to evaporate. When you pull them out, they should sound crunchy again when tapped. That makes perfect toast or a great accompaniment for dipping!
Frequently Asked Questions About This Artisan Bread
It’s totally natural to have questions when diving into baking your first artisan bread recipe, especially one that asks for a long rest time. Don’t worry, these are all common concerns, and once you understand the *why*, you’ll feel like a total pro next time!
Can I make this No Knead Bread faster than 12 hours?
Oh, I hear you! Sometimes you need that crusty bread *right now*. While the recipe calls for 12 to 18 hours because that slow rest develops incredible flavor, you *can* speed it up if you’re desperate. If you use water that is lukewarm (around 90°F, definitely not hot!) instead of cool, you might be ready in about 8 hours. But, I have to warn you: you will sacrifice some of that deep, complex flavor that makes this homemade bread taste so amazing. We are sticking to the long rest for the best results!
What if I don’t have a Dutch Oven for my Rustic Loaf?
Don’t panic if you don’t own a Dutch oven! You can still achieve fantastic crusty bread. Instead of the pot, place a baking stone or a heavy baking sheet on the bottom rack while your oven preheats to 450°F. When it’s time to bake your rustic loaf, carefully slide the bread (still on its parchment paper) onto the hot stone or pan. To trap the steam needed for that initial rise, put a broiler pan on the lowest rack, and pour about a cup of boiling water into it right after you put the bread in. Close the door fast! That steam mimics the Dutch oven perfectly for the first half of the bake.
Is this truly the easiest homemade bread recipe available?
For achieving bakery quality with minimal hands-on time, yes! Because we eliminated kneading entirely and rely on just four ingredients, it truly is one of the most simple bread recipes out there. If you mess up the mixing a little, the fermentation process usually forgives you. It’s forgiving for beginners, which is why I love it so much!
If you still have questions or want to share photos once you’ve baked your loaf, please get in touch with us through the contact page. Happy baking!
Share Your Homemade Baking Guide Success
Whew! You just officially changed the game on store-bought bread. I truly hope tackling this amazing, crusty loaf has given you a boost of confidence in the kitchen. This is exactly the kind of moment Kate loves to see—people moving past the stress and just enjoying the process of creating something wonderful from scratch!
Now that you’ve mastered this artisan bread recipe, I’d love to know how it turned out for you! Did you get that perfect crackle? Did your family notice the difference in flavor compared to regular yeast bread?
Please take a second to leave a rating right below this section. Five stars if you loved ditching the kneading! And if you happened to snap a picture of your beautiful rustic loaf cooling on the rack, please share it with us on social media, or drop a note in the comments so I can cheer you on.
If you’re feeling inspired by how easy this homemade baking guide was, jump over and check out some of my other accessible favorites. We have tons of simple ideas for appetizers and snacks that pair perfectly with this fresh bread, like my favorite dips and simple toasts. You can find those when you browse the Appetizers & Snacks section of the site!
Thank you so much for stopping by my table today. Happy baking, and I can’t wait to read about your success!
PrintUltimate Easy No-Knead Artisan Bread: Bakery Quality Crust with 4 Ingredients (Dutch Oven Method)
Bake bakery-style artisan bread at home using only four basic ingredients. This no-knead method requires minimal hands-on time and uses a Dutch oven to achieve a perfectly crusty exterior and a soft, airy interior.
- Prep Time: 10 min
- Cook Time: 45 min
- Total Time: 13 hours 55 min
- Yield: 1 loaf 1x
- Category: Baking
- Method: No-Knead Baking
- Cuisine: American
- Diet: Vegetarian
Ingredients
- 3 cups All-Purpose Flour
- 1 1/2 teaspoons Salt
- 1/4 teaspoon Instant Yeast
- 1 1/2 cups Cool Water
Instructions
- In a large bowl, whisk together the flour, salt, and yeast.
- Pour in the cool water and mix with a wooden spoon or spatula until a shaggy, sticky dough forms. Make sure no dry flour remains.
- Cover the bowl tightly with plastic wrap. Let the dough rest at room temperature for 12 to 18 hours. The dough will become bubbly and increase in volume.
- After the long rise, lightly flour a work surface. Gently scrape the dough out of the bowl onto the flour.
- Fold the dough over itself a few times to form a rough ball. Do not knead; just shape it gently.
- Place the dough ball on a sheet of parchment paper. Cover the bowl loosely with plastic wrap or a clean kitchen towel. Let it rest for a second proof for 30 minutes.
- About 20 minutes before the second proof ends, place your empty Dutch oven (with the lid on) into your oven. Preheat the oven to 450 degrees Fahrenheit (232 degrees Celsius).
- Carefully remove the hot Dutch oven from the oven using oven mitts. Lift the dough by the parchment paper handles and gently lower it into the hot Dutch oven.
- Cover the Dutch oven with the lid and place it back into the oven. Bake for 30 minutes.
- Remove the lid from the Dutch oven. Continue baking for another 10 to 15 minutes, or until the crust is deep golden brown.
- Carefully remove the bread from the Dutch oven and place it on a wire rack to cool completely before slicing. This cooling time develops the final texture.
Notes
- This recipe relies on a long, slow fermentation for flavor development, so plan your mixing time ahead.
- For the best crust, do not skip preheating the Dutch oven with the oven.
- If you do not have a Dutch oven, you can bake the bread on a baking stone or sheet pan, but you must create steam in the oven for the first half of the bake to mimic the Dutch oven environment.
Nutrition
- Serving Size: 1 slice
- Calories: 200
- Sugar: 0.3
- Sodium: 380
- Fat: 0.5
- Saturated Fat: 0.1
- Unsaturated Fat: 0.4
- Trans Fat: 0
- Carbohydrates: 42
- Fiber: 1.5
- Protein: 7
- Cholesterol: 0