
Confession time: Party food can sometimes stress me out more than a complicated French pastry! Walking into a gathering and realizing everyone brought chips and dip that looks exactly the same? No thank you! That’s why I spent years perfecting this recipe, and I still bring it to every single potluck. This Classic Seven Layer Dip is, without a doubt, the easiest and most reliable appetizer you can keep in your back pocket. It requires absolutely no cooking, it looks gorgeous with its distinct, colorful strata when served in a clear dish, and it’s the definition of a guaranteed crowd-pleaser for game days. Seriously, if you need a foolproof, quick **Layered Dip Recipe**, you should browse all our appetizers and snacks, but I promise this dip is your secret weapon for delicious success.
- Why This Classic Seven Layer Dip is the Ultimate Game Day Appetizer
- Gathering the Simple Ingredients for Your Layer Dip
- Step-by-Step Instructions for the Best Seven Layer Dip
- Tips for Success with Your Layered Bean Dip
- Simple Dip Ideas: Seven Layer Dip Variations
- Serving Suggestions for Your Layered Dip Recipe
- Storage and Reheating Instructions for the Cold Layer Dip
- Frequently Asked Questions About This Layer Dip
- Share Your Favorite Party Food Creations
Why This Classic Seven Layer Dip is the Ultimate Game Day Appetizer
I love this **Easy Party Dip** because it checks every single box for entertaining stress-free. When I bring this to a game night, I know it’s going to be the first thing gone—it is a true **Crowd Pleaser Dip**! The beauty of this **No Bake Layered Dip** isn’t just the flavor; it’s the presentation. Because we take a moment to be neat, those individual layers really pop. That visual appeal makes it seem fancy, but trust me, it’s so simple to put together! I often think about how much easier this is than my famous **potluck chili** when I’m in a hurry.
Key Features of Our Seven Layer Dip
- It’s lightning fast. Prep time is only about 15 minutes, which is huge when you’re trying to juggle everything before guests arrive.
- No oven required! Being completely cold means you don’t tie up your oven space for other dishes. Always helpful when hosting.
- It tastes even better made ahead! You can assemble the base layers and let it chill, meaning less rush on party day.
- That vibrant **Tex Mex Dip** presentation in a clear dish makes it look like you spent hours on it. It reinforces the whole **layer dip** experience!
Gathering the Simple Ingredients for Your Layer Dip
You already know I’m all about everyday ingredients, and this classic **layer dip** is no different. Forget specialty stores! Everything here comes from your standard grocery run, which is why I love keeping this recipe ready for last-minute invites. We need to be really clear on prepping these items, though, so the final result isn’t messy. I want defined lines, not soup!
Ingredient Clarity: Preparing for the Best Layered Dip Recipe
First, let’s talk about that sour cream. You absolutely need to mix it with the taco seasoning packet *before* it goes into the dish. That’s what creates our second creamy, flavorful layer. The most crucial part, and please listen closely to Kate on this one, is the salsa. You must drain that salsa well! If you skip draining, you’ll end up with a watery mess weeping down into the beans, and that ruins the whole point of a beautiful **layer dip**.
- 1 (16 ounce) can refried beans (make sure they’re the smooth kind!)
- 1 cup sour cream, plus 1 packet taco seasoning (to mix together for Layer 2)
- 1 cup prepared guacamole (your favorite brand, no shame here!)
- 1 cup shredded cheddar or Mexican blend cheese
- 1 cup salsa, drained really, really well
- 1/2 cup sliced black olives, drained
- And just a sprinkle of fresh cilantro if you want a pop of green right at the end.
Step-by-Step Instructions for the Best Seven Layer Dip
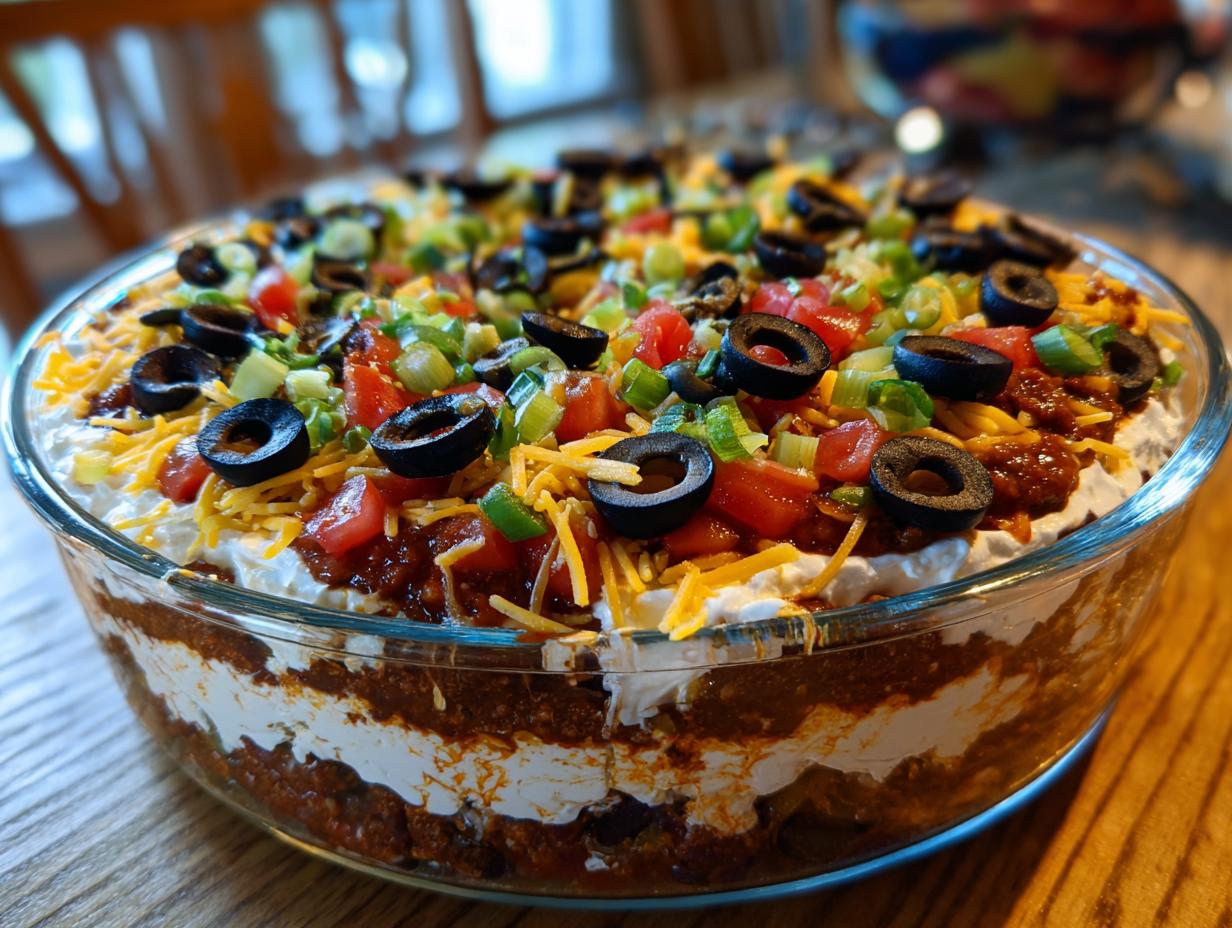
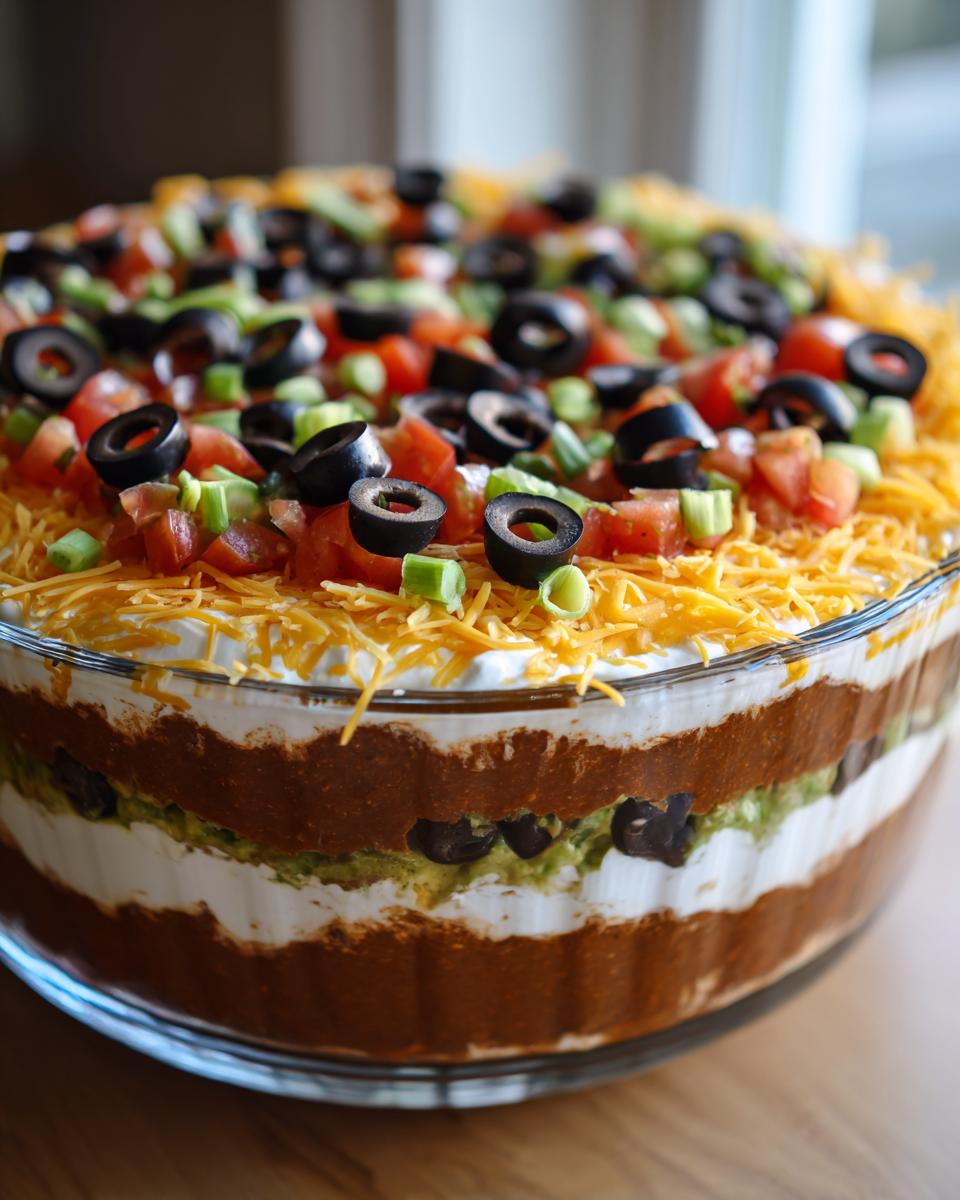
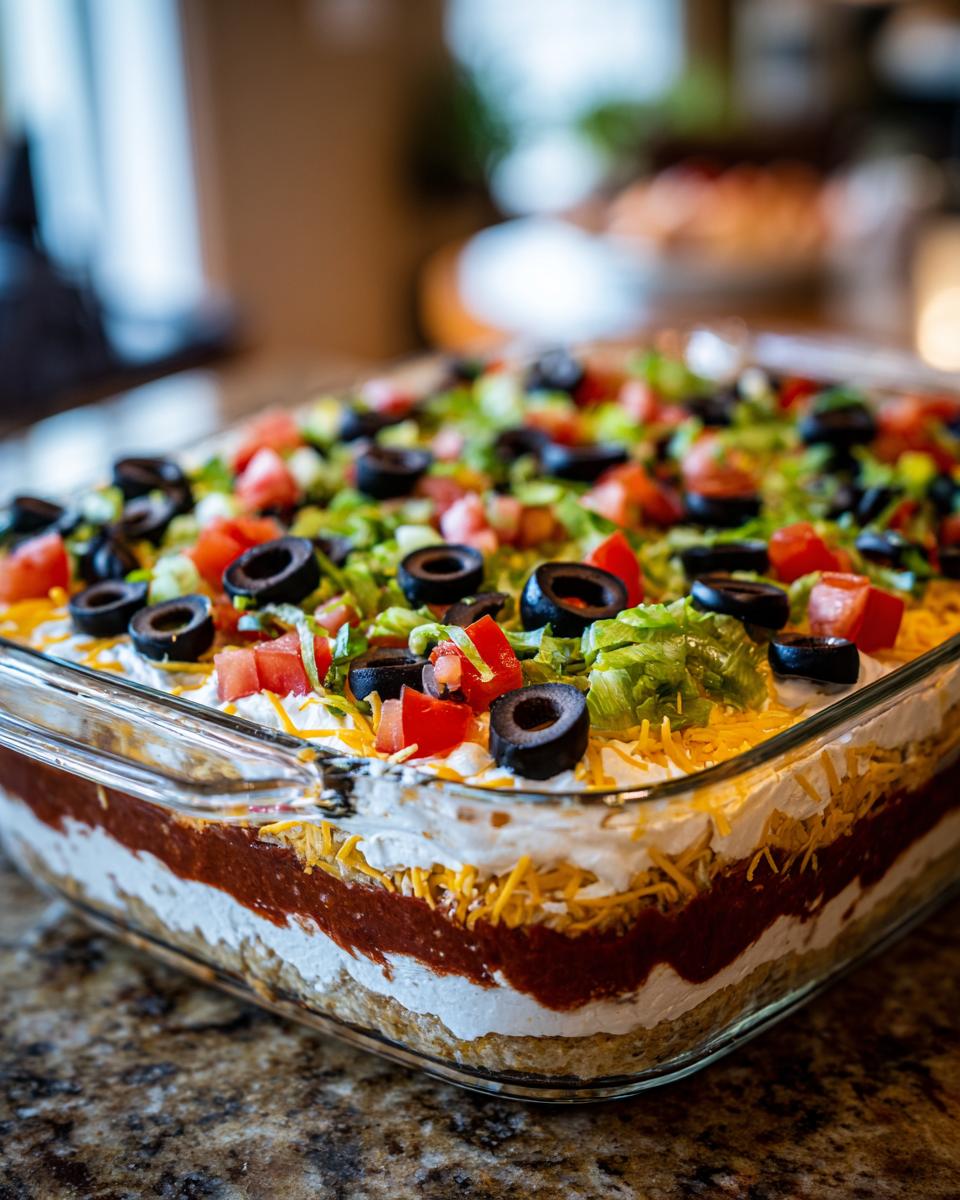
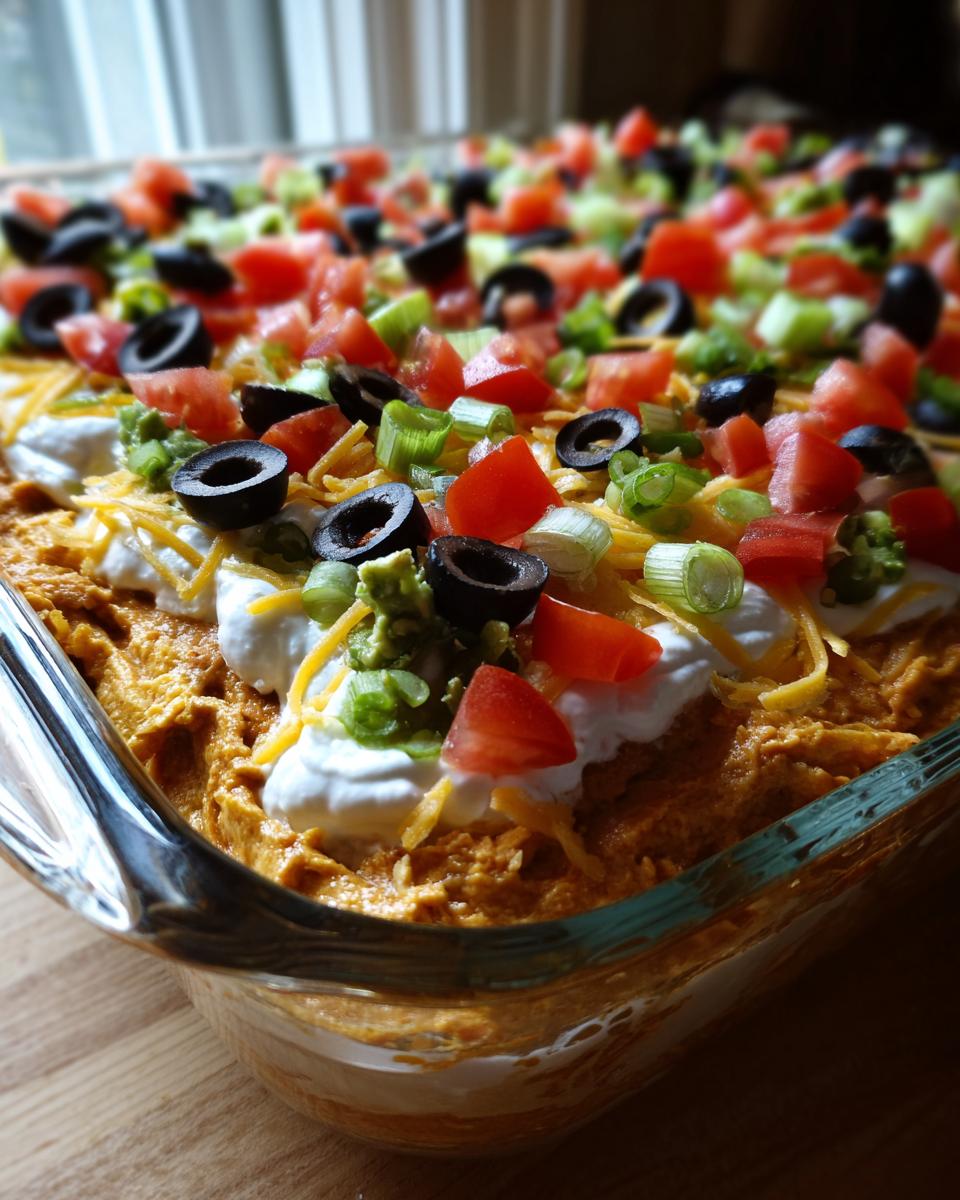
Okay, let’s build this thing! Making the **layer dip** perfect is all about treating each layer like its own tiny masterpiece before they become one big, delicious masterpiece. We’re aiming for clean lines here, and that’s achieved by being patient between steps. Start by grabbing a shallow, clear serving dish—I use mine that’s about 8×8 inches. Having a clear dish is non-negotiable because you have to *see* those layers working their magic; that’s half the fun of this appetizer!
Mixing the Seasoned Sour Cream Layer
First things first, we need to prep our star player for Layer Two: the seasoned sour cream. Take your cup of sour cream and dump that whole packet of taco seasoning right in. Don’t just plop it on top later—mix it right now until it’s perfectly smooth and creamy. This ensures every single scoop of this flavor bomb is evenly spiced. This little bit of upfront work on our **Cold Layer Dip** makes the final taste so much better than just sprinkling seasoning on top.
Building the Layers of Your Tex Mex Dip
Now, we go slow. Spread those refried beans across the bottom of your dish so they are even. They are the foundation! Once the beans are flat, gently dollop the seasoned sour cream mixture on top. Use the back of a spoon to spread it out gently—slow and steady wins the race so you don’t drag the brown beans up into the white layer. I learned that lesson the hard way when I was rushing for a holiday party!
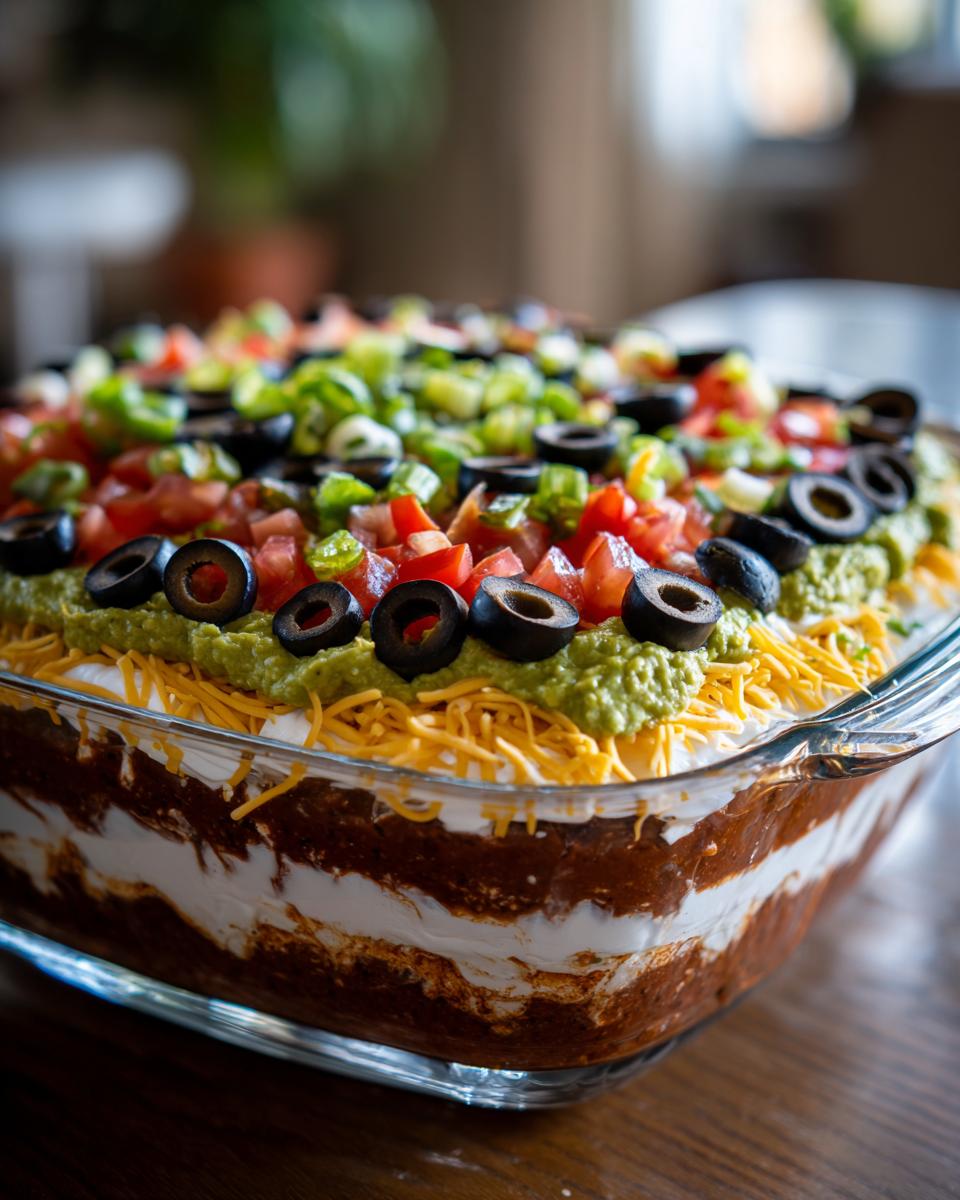
Next comes the homemade guacamole. Again, spread carefully over the sour cream. After that, gently spoon on your well-drained salsa. Remember what I said about draining? Crucial! Then, top it off with the shredded cheese and the olives. Once those top layers are on, you MUST cover it and get it into the fridge for at least an hour. That chilling time lets those flavors really marry together, making this **layer dip** absolutely unbeatable.
Tips for Success with Your Layered Bean Dip
Look, I want you to have the best results, so I need to share a little embarrassing moment with you. Once, I was running late for a big game day celebration, and I thought, ‘Eh, the salsa has been in the jar a while, I don’t need to drain it too much.’ Big mistake! By the time the party was midway through, the bottom layer of the **Layered Bean Dip** was swimming in watery tomato juice. It was a sad, soggy start! Never skip that draining step, seriously.
This is why I always push this recipe as the best **Make Ahead Dip**. You can assemble the bottom three layers—beans, seasoned sour cream, and guacamole—the day before you need it. Cover it tightly and keep it chilled. Then, the morning of your event, you can add your salsa, cheese, and olives. It keeps the top layers crisp and fresh, and it still allows you to whip up this fantastic dip with zero morning rush.
If you want the very best results for your **Layered Bean Dip**, make sure your guacamole isn’t too runny either. If your store-bought guac seems a little liquidy, just let it sit in a fine-mesh sieve over a bowl for ten minutes before layering. A little extra care on drainage means you get perfect, defined layers every single time! You can even check out my notes on canning salsa to see how I handle moisture control for homemade batches, which applies here too!
Simple Dip Ideas: Seven Layer Dip Variations
I know we all adore this classic Tex-Mex combination, but sometimes you want to switch things up a little bit without completely changing the blueprint! That’s the beauty of a good foundation, right? You can take this **layer dip** and customize it slightly based on what your crowd loves best. The best variation I play with, especially when feeding a hungry bunch watching a football game, is adding meat. But you can experiment with cheese, too!
Making a Heartier Layer Dip with Meat
If you’ve got some ground beef lying around—maybe you made a taco salad last night?—this is the perfect way to bulk up your **layer dip** into something super satisfying. The key here is that the meat must be fully cooked and completely drained of any grease. I mean, *completely* drained; we don’t want any grease sneaking down and mixing with the beans!
When you build this version of the **layer dip**, you add that warm, seasoned ground beef right on top of the refried bean layer. Then, you immediately follow it with the seasoned sour cream, just like the original recipe dictates. It’s sneaky because everyone sees the beans, then the white layer, but there’s hearty beef hiding right underneath! It still chills beautifully and still looks amazing when you serve it alongside some of those spicy jalapeño popper dips.
Serving Suggestions for Your Layered Dip Recipe
This **Layered Nacho Dip** is an absolute magnet at any event, but what you serve it with truly matters! While a big bag of tortilla chips is totally fine, if you want to step it up for your next **Appetizer for Gatherings**, try offering some great variety. Everyone loves scooping that goodness up, so make it easy for them!
Of course, sturdy tortilla chips are the classic choice, but I always make sure to include some crisp, fresh veggies. Sliced bell peppers—the red and yellow ones look so bright against the dip—and carrot sticks work wonders. They give people a crunchy, lighter option. If you’ve got extra time, homemade crackers feel so much more special than the store-bought stuff. You can even serve these alongside some of my crispy potato wedges if you need something warm on the table too!
Storage and Reheating Instructions for the Cold Layer Dip
One of the biggest wins with this **layer dip** is knowing you can make it ahead of time! Who needs extra oven timers stressed into their day when hosting? Because this is a **Cold Layer Dip**, storage is really simple, but we need to respect those layers, especially the guacamole layer which loves to oxidize, you know, turn brown.
If you are planning more than a day ahead—say, you’re prepping for a huge weekend party—I strongly suggest you stop assembly after the sour cream layer. Cover that tightly with plastic wrap, making sure the wrap actually touches the surface of the sour cream to block air, and keep it chilled. You want to add the guacamole, salsa, cheese, and olives on the day you serve it. This keeps everything looking vibrant, which, let’s be honest, is half the fun of a **seven layer mexican dip**!
If you’re storing this for 24 hours or less, you can assemble the whole thing, but again, plastic wrap making contact with the guacamole is your best friend. When you pull it out of the fridge, you might notice a tiny bit of moisture has surfaced, especially near the salsa. Just gently blot that with a clean paper towel before you top it with fresh cilantro or any final garnishes right before setting it out. This dip doesn’t reheat, obviously, since it’s served cold, but it handles refrigeration like a champ if you follow those simple covering steps!
Frequently Asked Questions About This Layer Dip
I know when I’m planning a big spread, I always have a few little nagging questions pop up! It’s why I put together this little FAQ to cover the most common things I hear when people try my **Simple Dip Ideas** for the first time. We want zero stress going into your gathering!
Can I substitute the refried beans in this layer dip?
That’s a really good question! The refried beans are absolutely the base layer, and honestly, they are what holds everything else in place as people dig in. They are the glue of this whole **layer dip** structure! If you truly can’t use traditional refried beans, you could try a thick, savory black bean dip base, but make sure it’s very thick—runny beans equal a messy dip, and that’s the last thing we want for game day!
How long before serving should I assemble the Seven Layer Dip?
For the absolute best texture and the cleanest lines, I always recommend assembling this dip at least one hour before you plan to serve it. That minimum hour lets everything chill together nicely. However, if you need that time back on party day, you can totally assemble the *base* layers (beans through guacamole) up to 24 hours ahead of time, as long as it’s tightly covered in the fridge. Just add those top layers, like the cheese and olives, right before setting out your **Classic Taco Dip**!
Got more questions about making appetizers? You can always click over to my About Me page and see what else I’ve been testing in the kitchen!
Share Your Favorite Party Food Creations
And there you have it! This Classic Seven Layer Dip has been my go-to for years because it proves you don’t need hours of complicated work to create something truly memorable for your friends and family. It’s the perfect, no-stress **layer dip** that tastes like a fiesta in every single chip scoop.
When you make this for your next gathering, I absolutely want to hear about it! Did everyone gasp when they saw the layers? Did it disappear before the second quarter even ended? Don’t keep those great moments to yourself! Please leave a rating below on how your **layer dip** turned out, and definitely reach out to me through my Contact page to share your hosting victories or any little twists you tried!
Happy celebrating, and happy dipping!
PrintClassic Seven Layer Dip: Easy Party Appetizer

Make this Classic Seven Layer Dip for your next gathering. It is a simple, no-bake Tex-Mex appetizer packed with distinct, flavorful layers that always disappears fast.
- Prep Time: 15 min
- Cook Time: 0 min
- Total Time: 1 hour 15 min
- Yield: 8 servings 1x
- Category: Appetizer
- Method: No Bake
- Cuisine: Tex-Mex
- Diet: Vegetarian
Ingredients
- 1 (16 ounce) can refried beans
- 1 cup sour cream
- 1 packet (1 ounce) taco seasoning mix
- 1 cup prepared guacamole
- 1 cup shredded cheddar or Mexican blend cheese
- 1 cup salsa, drained well
- 1/2 cup sliced black olives, drained
- 1/4 cup chopped fresh cilantro (optional, for garnish)
Instructions
- In a small bowl, mix the sour cream and taco seasoning mix until fully combined. This creates your seasoned sour cream layer.
- Select a clear, shallow serving dish (about 8×8 inches or similar size) so you can see the layers.
- Spread the refried beans evenly across the bottom of the dish to form the first layer.
- Carefully spread the seasoned sour cream mixture over the beans to create the second layer.
- Gently spread the prepared guacamole over the sour cream layer.
- Spoon the drained salsa evenly over the guacamole layer.
- Sprinkle the shredded cheese over the salsa layer.
- Top with the sliced black olives.
- Cover the dish and chill the layer dip in the refrigerator for at least 1 hour before serving. This allows the flavors to meld.
- Garnish with fresh cilantro, if using, just before serving with tortilla chips.
Notes
- Drain your salsa well before adding it; excess liquid will make the lower layers watery.
- You can make this cold layer dip up to 24 hours ahead of time. Assemble all layers except the cheese and olives, cover, and chill. Add the cheese and olives just before serving.
- For a heartier dip, you can add a layer of seasoned ground beef (cooked and drained) between the beans and the sour cream layer.
Nutrition
- Serving Size: 1/8 of dip
- Calories: 210
- Sugar: 4
- Sodium: 450
- Fat: 15
- Saturated Fat: 7
- Unsaturated Fat: 8
- Trans Fat: 0.5
- Carbohydrates: 14
- Fiber: 3
- Protein: 7
- Cholesterol: 25