
Don’t you just love desserts that feel like pure childhood magic? We all have those nostalgic sweets we crave, and for me, nothing beats the smell of a carnival! That’s why I am so thrilled to share this absolutely stunning **cotton candy cake** with you. Trust me, even though this cake looks like something that took days of fancy pastry school work, it is surprisingly simple to make right here in your own kitchen. If you’re looking for amazing celebration recipes, you should peek at all of our best dessert recipes!
Here at Taste This Plate, we believe the best memories are made when you aren’t stressed out. My whole mission is proving that you don’t need to be a professional chef to create those perfect, memorable bakes from scratch. This pastel swirl design makes it a total showstopper, but the process is straightforward, using accessible ingredients. We are going to create something wonderful together!
- Why This Fluffy Pastel Swirl Cotton Candy Cake is Your Next Showstopper Baking Project
- Ingredients for Your Fluffy Pastel Swirl Cotton Candy Cake
- Step-by-Step Instructions for the Cotton Candy Cake Layers
- Assembling Your Colorful Layer Cake Tutorial
- Mastering the Homemade Cotton Candy Frosting
- Tips for the Perfect Cotton Candy Cake Presentation
- Essential Equipment for Your Cotton Candy Cake
- Common Questions About Making a Cotton Candy Cake
- Storing and Serving Your Cotton Candy Cake
- Estimated Nutritional Data for This Sweet Celebration Dessert
- Share Your Whimsical Cake Creations
Why This Fluffy Pastel Swirl Cotton Candy Cake is Your Next Showstopper Baking Project
If you need a cake that screams “celebration” and genuinely looks like a dream, this is it! I know visual impact is huge, especially for birthdays, which is why I focused so much on making this cake light and airy. We succeeded, which is why this fits perfectly into our collection of whimsical cake recipes.
- It’s surprisingly easy to achieve those beautiful pastel blue and pink swirls—it’s just a little gel coloring and gentle spooning!
- We nail the **fluffy cake construction** by using room-temperature ingredients and focusing hard on creaming the butter and sugar properly. No dense bricks here, I promise!
- It delivers that intensely sweet, colorful vibe everyone associates with carnival treats without being overly complicated.
Achieving the Signature Cotton Candy Flavor in Your Cotton Candy Cake
Now, a logical question: why don’t I just mix actual clumps of cotton candy into the batter? That’s a great idea for decoration, but trust me, it won’t give you consistent flavor in the cake layers or the frosting. The actual candy just dissolves into sticky goo when it hits moisture!
So, the secret here is the extract. Using a good quality cotton candy extract gives you that unmistakable, electric-sweet flavor throughout the entire bake while keeping the batter beautifully smooth. It’s the only way to guarantee that signature taste we’re after without ruining our delicate crumb structure. Smell-wise, it’s intoxicating!
Ingredients for Your Fluffy Pastel Swirl Cotton Candy Cake
Okay, gathering your supplies is where we set ourselves up for success! I’ve broken this down because having things in order makes the whole process flow so much better. Honestly, the ‘why’ behind using room temperature ingredients—like your eggs and milk—is that they emulsify so much better with the butter and sugar, giving us that airy texture we desperately want for this **cotton candy cake**. Don’t skip that step; it’s critical!
Cake Layer Components for the Cotton Candy Cake
For the actual, brightly colored cake layers, you’ll need the following standard dry and wet items. Make sure those eggs and the milk have been sitting out on the counter for about an hour before you start creaming the butter; that really helps.
- The Dry Stuff: You’ll need 1 3/4 cups of all-purpose flour, 1 1/2 teaspoons of baking powder for a little lift, and just a pinch of salt to balance out all that sweetness. Whisk these together until they are nicely combined.
- The Base: We start with 1 cup (that’s two full sticks!) of unsalted butter. It must be softened—not melted, just soft enough for your finger to leave an easy dent. You’ll also need 1 3/4 cups of granulated sugar.
- The Wet Stuff & Flavor: Grab 4 large eggs—again, room temperature, please—1 teaspoon of vanilla extract, and the star flavor: 1/2 teaspoon of cotton candy extract. If you want it stronger, you can add a little more later, but start conservatively! Finally, 1 cup of whole milk, also at room temperature.
- For the Color! Since we are making lovely swirls, you’ll need Pink gel food coloring and Blue gel food coloring. Gel works so much better than liquid because it won’t thin out our beautiful batter consistency.
Homemade Cotton Candy Frosting Ingredients
The frosting needs to be just as light and fluffy as the cake layers themselves. This frosting recipe is designed to hold its shape beautifully while delivering that extra punch of that carnival flavor. For this part, your measuring cup should be very generous with the powdered sugar.
- We start with 1 total cup (two sticks again!) of room-temperature unsalted butter.
- Next come 4 cups of powdered sugar. Listen to me: you absolutely must sift this! Sifting is the secret to avoiding those terrible lumps in your **homemade cotton candy frosting** that look like little sugar pebbles stuck in the clouds.
- Flavorings need to be spot on: 1 teaspoon vanilla extract and 1/2 teaspoon of that essential cotton candy extract.
- And for consistency, we use 2 to 4 tablespoons of heavy cream. We add this slowly until it feels perfect. A tiny pinch of salt goes in here, too!
Step-by-Step Instructions for the Cotton Candy Cake Layers
Now that we have all our beautiful ingredients ready, it’s time to assemble this masterpiece! Remember how I talked about the creaming step being the foundation for a light cake? Whether you’re using a sturdy stand mixer or you’re doing it the old-fashioned way with a hand mixer, you need to beat that butter and sugar until it’s genuinely pale yellow and fluffy. That whole process traps the air that makes your **cotton candy cake** layers so delicious and airy. And speaking of light and airy, if you ever need a refreshing drink to sip while you bake, check out my recipe for creamy frozen blender lemonade!
Once your eggs and flavorings are beautifully incorporated, we get to the most critical moment for that fluffy texture: alternating the dry mixture and the milk. You add some flour, mix just until it disappears, add some milk, mix just until it disappears. I cannot stress this enough—stop mixing as soon as everything comes together! We want tender cake, not tough cake, so don’t let the mixer run wild here.
Coloring and Swirling the Cotton Candy Cake Batter
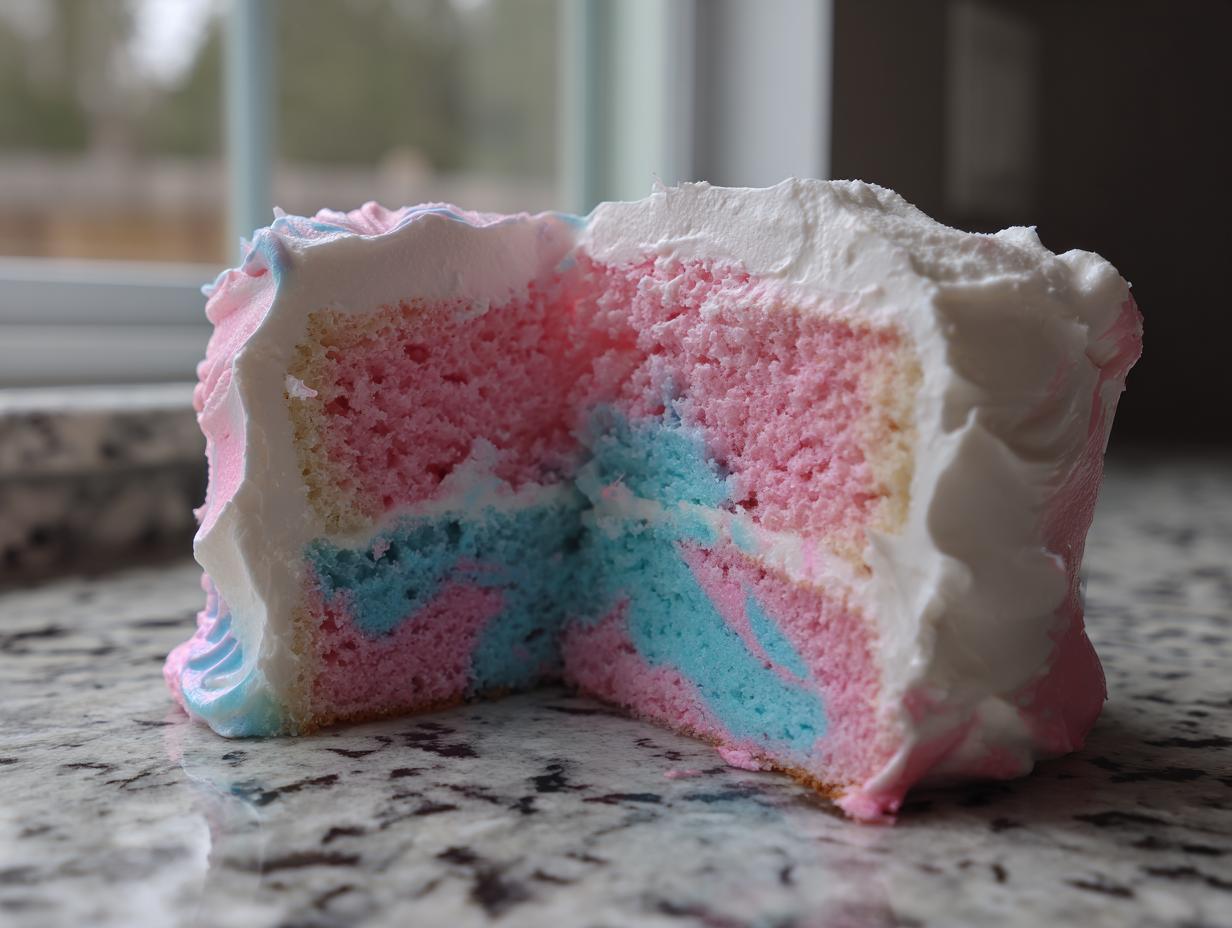
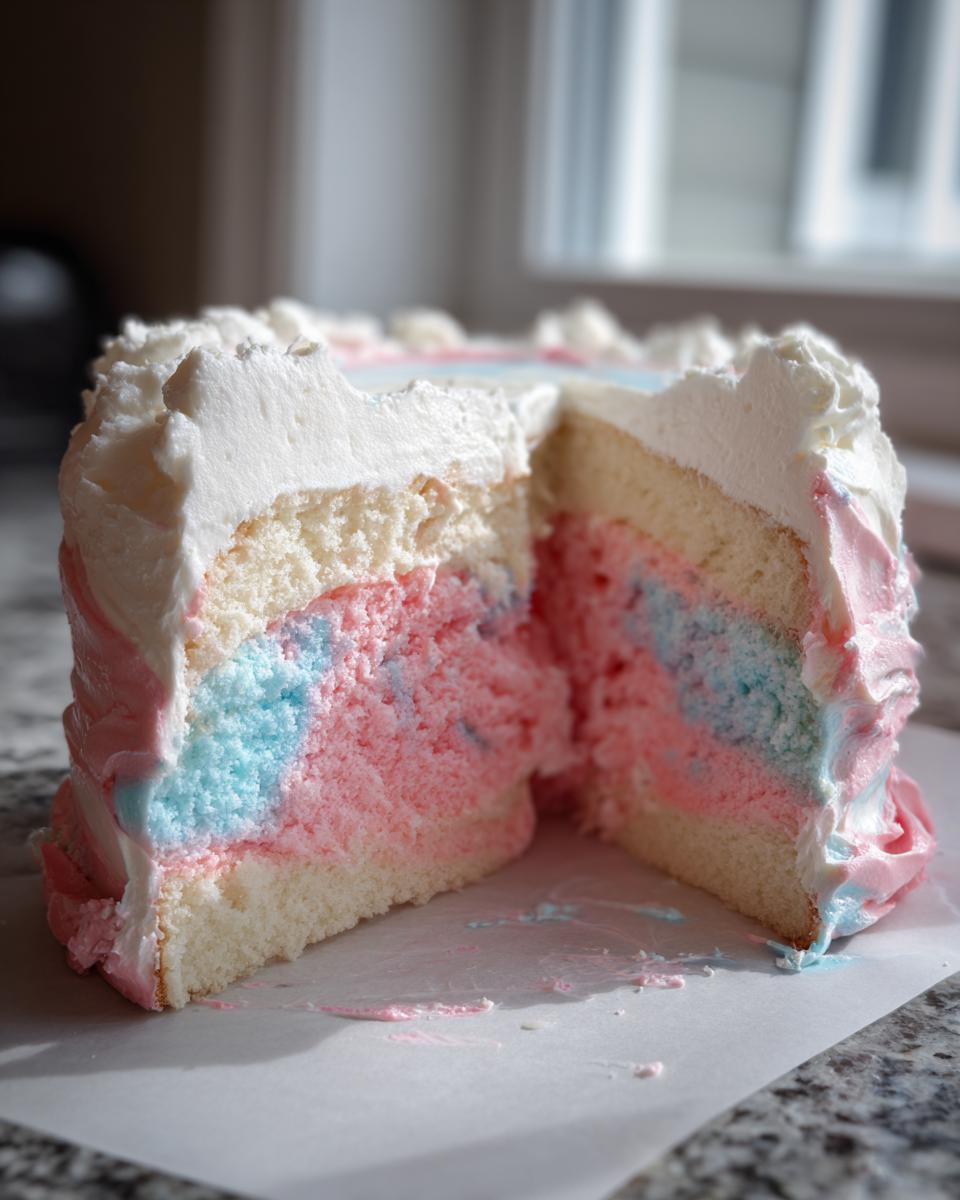
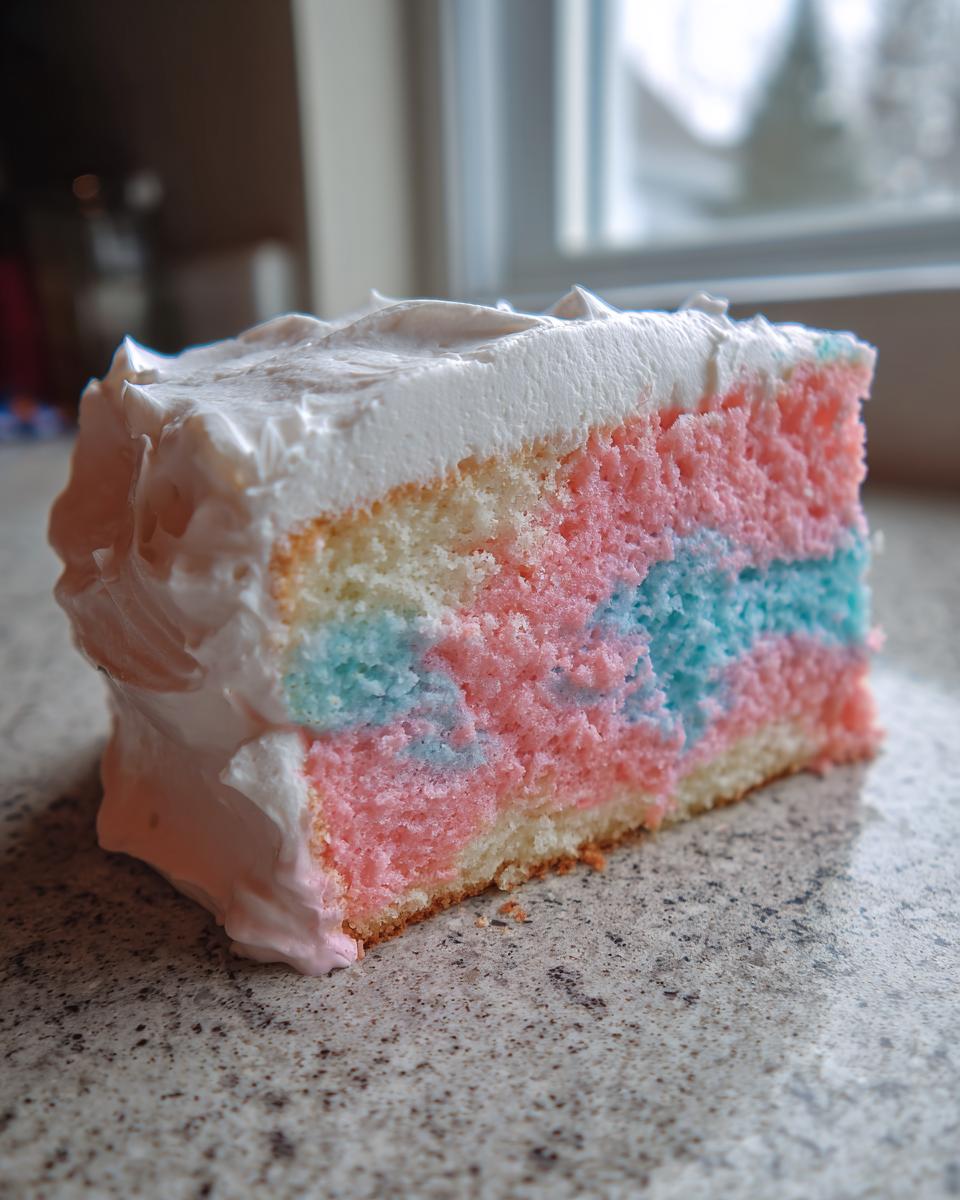
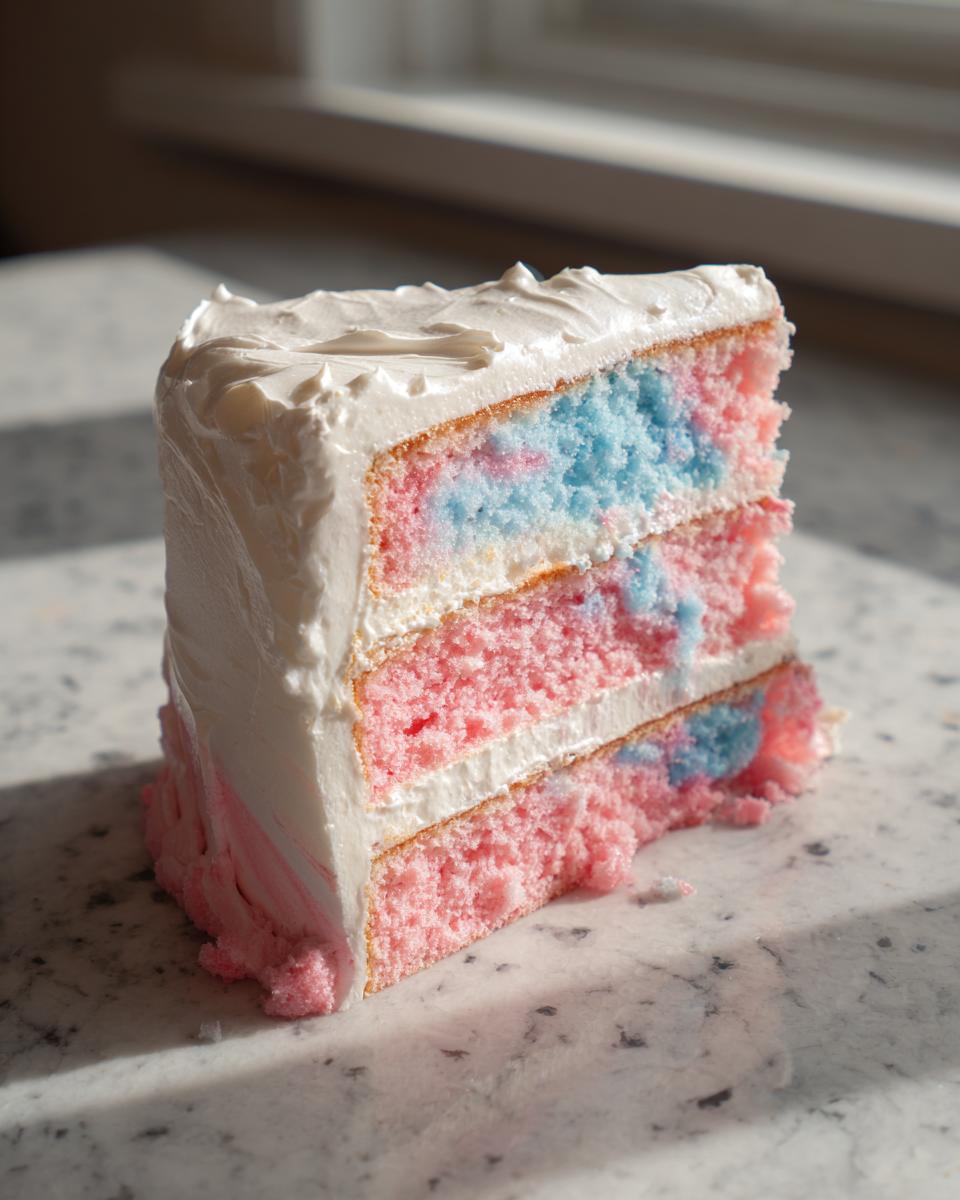
This is the fun, nearly messy part! Once your base batter is complete—and I mean *complete*—divide it evenly into three bowls. One bowl stays pure white, which is gorgeous on its own. In the second bowl, start adding your pink gel coloring. Use a spatula and fold it in maybe six or seven times, just enough so you see streaks, not a uniform color. We are aiming for marbling, not solid pink!
Do the same with the blue gel in the third bowl. Then, grab your three prepared pans. Don’t worry about layering neatly! Just randomly spoon alternating scoops of white, pink, and blue batter into each pan. Seriously, just plop it in there. You want randomness! When you bake it, those random colors will expand beautifully into gorgeous, distinct pastel swirls inside the final cake. Afterward, pop them into that 350°F oven and bake them until they pass the toothpick test—about 28 to 32 minutes.
Assembling Your Colorful Layer Cake Tutorial
The hardest—and most fun—part is over! Now we need patience, which I know is tough when you have a beautiful, colorful cake staring at you. Trust me on this step: if you try to assemble or frost these layers while they are even a little bit warm, your beautiful **homemade cotton candy frosting** is going to melt right into a sugary puddle. Nobody wants a soupy, tragic cake layer, right?
Let those cakes cool in their pans for about 10 minutes. They need that little bit of time in the metal to firm up just enough before you try to flip them out onto a wire rack. Once they are out, they must cool completely. I mean it—run your hand over them; if you sense any warmth at all, give them more time. This structural integrity is what makes this a true **showstopper baking project**!
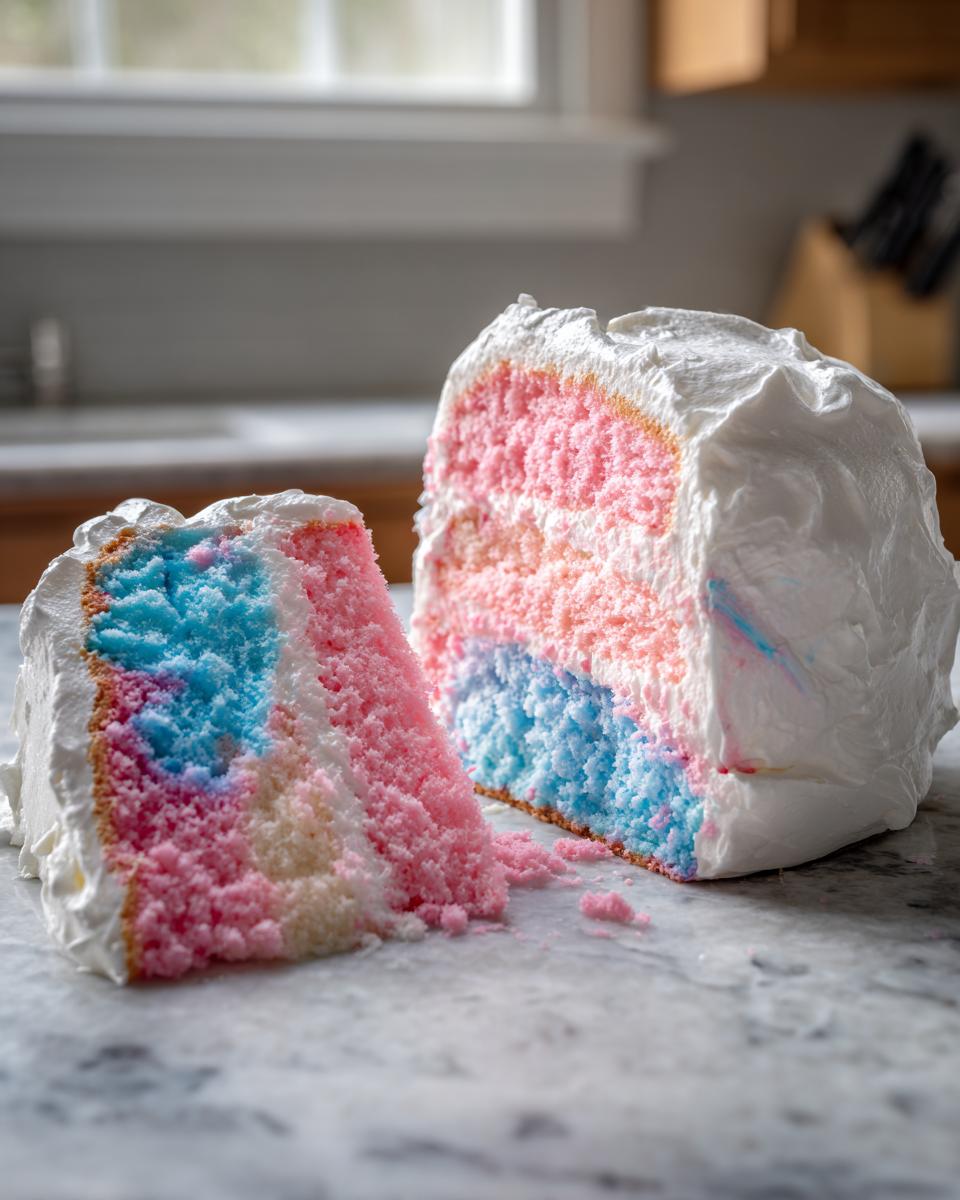
Once they are stone cold, you can start stacking. Put down your first layer—the prettiest one, obviously!—and spread a nice, even layer of that fluffy frosting over the top. Then, carefully place the next layer on straight on top, and repeat until you have your three beautiful, swirled layers stacked up high. If things look a little uneven, don’t sweat it! We’re going to cover the whole thing in frosting anyway. Once you get going like this, you’ll realize how easy this is, much like when I made my pineapple coconut dream cake.
If you want to see some other great tips on layering cakes that truly work, take a look at how the folks over at Cook or Hard recommend getting those layers perfect; their advice on cake handling is solid gold for those of us who can’t wait to dig in! See how simple it is to make something so beautiful and tasty. It builds confidence when you know the structure is sound!
Mastering the Homemade Cotton Candy Frosting
Making the cake layers is only half the battle; the frosting really ties that whimsical experience together. This **homemade cotton candy frosting** is pure butter and sugar magic, but the trick is getting that consistency just right so it spreads like silk over your beautiful pastel layers. Remember, we are going for light and fluffy here, not stiff and sticky!
First things first, make sure your butter for the frosting is perfectly softened, just like we did for the cake base. Whip that up until it’s pale and creamy. Then, gradually beat in your sifted powdered sugar. If you skip sifting, you’ll end up fighting the frosting consistency forever—we don’t have time for that!
The real star of the show, flavor-wise, is that cotton candy extract. It’s potent, so once your base frosting is mixed, taste it. Does it transport you straight back to the fairgrounds? If not, add a couple more drops! Everyone’s extract is a bit different in strength, so you have to trust your own taste buds here. That’s how we build confidence in the kitchen!
Now for spreadability. Start by adding the heavy cream one tablespoon at a time. I usually find that 3 tablespoons are the sweet spot, but if your kitchen is warmer or drier, you might need that fourth tablespoon. You are looking for a consistency that looks like it could easily stand up in stiff peaks but still flows gently when lifted. It shouldn’t slump immediately, but it shouldn’t look like cement either. If you want to see how others approach that beautiful, soft frosting for their own versions, take a peek at the tips over on Foodie Fairy; they have some seriously dreamy dessert ideas! This dreamy dessert that brings back childhood joy is exactly what we are aiming for!
Once you have that perfect texture, you can frost the cake. If you want an extra fun look, take your offset spatula and just gently swirl the top layer as you frost the exterior. You don’t need a perfectly smooth finish; a little texture just makes it look even more homemade and fun!
Tips for the Perfect Cotton Candy Cake Presentation
This cake is all about that wow factor, right? Since we built this incredible tower of fluffy, colorful layers, the final touch needs to be perfect. You put all that work into making these beautiful **nostalgic sweets**, so let’s protect them!
My one crucial piece of advice for presentation involves the topping. You absolutely must wait until the very last minute to pile on the fresh cotton candy. I mean it; the moment it hits humidity or the moisture from the frosting, it starts shrinking and melting into a sticky puddle, and that’s just sad.
If you’re making this for a party, set the finished, frosted cake out on the table, but keep the cotton candy cup ready nearby. Right before you light the candles, grab your fluff and pile it high! It creates that incredible, airy topping that looks like a sweet little cloud. It’s worth those final few seconds of preparation! For more fun topping ideas, you can always look at how I decorate my fruit pizza sugar cookie—it’s all about fun textures!
Essential Equipment for Your Cotton Candy Cake
I always say that having the right gear doesn’t make you a chef, but it sure makes baking easier! Since we are aiming for a perfect, impressive bake, let’s quickly check your kitchen to make sure you have these essentials ready to go. Remember, preparation is the key to avoiding stress later on. If you’re looking for something savory to pair with this sweet treat, you absolutely must try my recipe for crispy potato wedges later in the week!
Because this is a layer cake with specific coloring requirements, you need a couple of things that handle structure and mixing well. Don’t worry; most of these are standard kitchen tools that you probably already own!
- Electric Mixer: This is non-negotiable for getting those truly fluffy cake layers and that beautifully smooth frosting. Whether it’s a hand mixer or a stand mixer, you need the power to cream that butter and sugar until it looks like whipped clouds!
- Three 8-Inch Round Cake Pans: Since we divide the batter to color it, having three identically sized pans ensures your layers bake evenly and stack perfectly straight. If you only have two, you’ll have to bake one layer after the other, which adds time.
- Parchment Paper: This is my little safety blanket for any sticky cake. Always use it to line the bottom of the pans. It ensures a clean release of those delicate, colored layers!
- Gel Food Coloring: As we discussed, please use gel coloring, not the liquid kind that comes in those little plastic dropper bottles. Gel gives you intense color without adding unwanted moisture that messes with the precise ratios of our **cotton candy cake** batter.
- Offset Spatula: This tool is your best friend for crumb coating and spreading that **homemade cotton candy frosting** evenly over the cold layers. It helps you smooth everything out without tearing up the cake.
Having these tools out and ready before you even start measuring ingredients is how we keep this process simple and stress-free. Happy baking!
Common Questions About Making a Cotton Candy Cake
I totally get it—when you’re making something as whimsical as this, you’re going to have questions! I’ve whipped up answers to the ones I get asked most often, which will help you confidently turn out a successful, towering masterpiece. Remember, baking should be fun, not frustrating, so let’s address any potential roadblocks right now!
Can I use boxed cake mix instead of making the layers from scratch?
Listen, I developed this recipe using simple ingredients because I want to teach the *why* behind the bake, which leads to more confidence. That said, if you are absolutely pressed for time, you *can* swap in a boxed white or yellow cake mix. However, here is the catch: you won’t get that incredible lightness we achieve from properly creaming the room-temperature butter and sugar.
If you do go the box route, make sure you use the full amount of eggs the box calls for, and remember to incorporate a good splash of that cotton candy extract when adding the liquid ingredients. It won’t have the same gorgeous **fluffy cake construction**, but it will still get you those beautiful pastel swirls!
How long does the fresh cotton candy topping last once it’s on the cake?
This is the biggest bummer alert in the entire recipe, so pay attention! Fresh cotton candy is super delicate. It loves humidity about as much as a houseplant loves gravel—not at all! If you put the fresh strands on your cake more than, say, 30 minutes before serving, it will start to weep, shrink, and turn into a stiff, sticky glaze on top. We want light, airy clouds, not a melted mess!
My rule for these **nostalgic sweets** is to frost the entire cake, set it in the fridge to chill, and only pull out the cotton candy right before you bring it to the table. If you need to transport the cake, just leave the cotton candy off entirely. Trust me on this one—it preserves the magic!
What if I absolutely cannot find cotton candy extract anywhere?
It happens! Extract availability can be tricky depending on where you live. If you can’t find the specialty extract, you have a couple of options to still get a delightful experience. The simplest thing is to just double the vanilla extract in the cake layers and the frosting. It will be a strong, delicious vanilla cake, still beautiful with its colors!
Alternatively, if you want something even brighter, you can try using a combination of a tiny bit of raspberry or strawberry extract along with perhaps one teaspoon of almond extract in place of the cotton candy flavor. It won’t be *exactly* the same, but it still results in a **sweet celebration dessert** that everyone will adore! For more fun, light baking ideas, check out my recipe for sparkling honey lemonade soda to keep the festive mood going.
Can I make the cake layers ahead of time?
Absolutely, and I highly recommend it! Baking the layers a day ahead makes the assembly process so much less frantic. Once the cake layers are completely cooled, wrap each one tightly in plastic wrap—be sure they are fully cool first! Then, you can store them at room temperature for about two days, or pop them in the freezer for up to a month. If you freeze them, just let them thaw completely on the counter before unwrapping and frosting.
The *frosting* can also be made ahead and kept covered tightly in the fridge for up to a week. Just let it sit on the counter for 30 minutes to soften up before whipping it again briefly before you use it. It makes that final decorating day so much quicker! If you want professional opinions on avoiding flavor issues, take a look at what others recommend on Easy Savory Meals for their approaches to these fun recipes. The best cotton candy cake recipe sometimes needs a little ahead-of-time planning!
Storing and Serving Your Cotton Candy Cake
Okay, we’ve built this beautiful, fluffy, pastel dream—now we have to keep it looking perfect! Since this **cotton candy cake** is loaded up with that rich, sugary frosting, the refrigerator is definitely your friend for storage.
Once the cake is fully assembled and frosted—and I mean completely covered so no air gets to the layers—wrap the whole thing loosely in plastic wrap or put it under a proper cake dome. This keeps it nice and fresh! You can easily store this frosted creation in the fridge for three or four days. Now, if you need to move it, make sure you’ve chilled it for at least 30 minutes first so the frosting firms up and doesn’t slide off while you’re carrying it!
But here is the critical, final tip about serving. You remember how we talked about those lovely fresh cotton candy strands we want to put on top? That decoration is for immediate consumption only. As soon as you bring the cake out of the fridge to serve it, that’s when you pile those fluffy strands on top. If you put the cake out hours early, that moisture in the air—or even moisture coming off the cold frosting—will cause the fresh cotton candy to melt into sticky goo before anyone gets a slice!
Plan to add the fresh topping right before you announce it’s time to cut into the cake. It’s those little details that keep these gorgeous bakes looking freshly made! For some other great make-ahead tips and ideas for storing baked goods, you can always check out my notes on making carrot banana muffins, because preparing ahead of time is half the battle when you’re hosting!
Estimated Nutritional Data for This Sweet Celebration Dessert
Since we are keeping things simple here and using straightforward ingredients, I wanted to give you a general idea of what you’re looking at nutritionally for this absolutely gorgeous **cotton candy cake**. Now, I want to be completely upfront here: I am a cook, not a registered dietitian! These numbers are just estimates based on the ingredients I listed for the cake layers and the frosting.
Everything changes depending on the specific brands you use, how much frosting you generously dollop on each slice, and, let’s be honest, how thick you cut those slices! But this should give you a decent baseline for planning your lovely gathering.
Remember, this is a special occasion item—a real treat that brings joy, so we aren’t worried about spreadsheets today! But for those who like to plan, here’s a general breakdown where the serving size is one nice slice of cake:
- Serving Size: 1 slice (This really depends on how big you cut it!)
- Calories: Around 450
- Sugar: Approximately 65 grams (It is sweet, this is cake after all!)
- Fat: About 20 grams
- Saturated Fat: Roughly 12 grams
- Carbohydrates: Around 68 grams
- Protein: About 4 grams
- Cholesterol: Roughly 75 mg
Please take these numbers with a grain of salt—or maybe a pinch of glitter, since we’re making a whimsical cake! These estimates come from standard calculations of the flour, butter, and sugar content in the recipe. If you decide to add extra sprinkles or a heavier layer of that delightful **homemade cotton candy frosting**, those numbers will climb a bit, naturally. The important thing is the happiness this beautiful, colorful cake brings to the table!
Share Your Whimsical Cake Creations
Now that you’ve whipped up this incredible, show-stopping **cotton candy cake**, I genuinely can’t wait to see what you created! This is the part where we all get to celebrate together, because baking should never be a solo adventure. It’s about sharing the love, the colors, and the joy of creating something truly unique!
Seriously, if you made this cake for a birthday or just because you needed a little magic in your Tuesday, please tell me about it in the comments below! Did your swirls turn out perfectly pink and blue? Did you find the perfect cotton candy extract, or did you go with a flavor twist? Your feedback helps future bakers feel more confident about trying these fun projects. When you leave a comment, it’s like you’re popping by my kitchen for a quick chat!
I would absolutely love it if you snapped a picture of your finished dessert and shared it online. Tagging me truly makes my day because seeing my recipes come to life in *your* kitchens is why I started this whole site in the first place. I want to see every pastel layer and every fluffy topping! You can see how much fun other people are having trying out whimsical cake recipes like this one, and I want you to join the fun!
And hey, if you found this recipe helpful and want to know more about my simple approach to cooking and baking—the philosophy that keeps things stress-free—you can always read a bit more about my story here. Now go ahead—rate this recipe, leave that comment, and let’s build this community of happy, confident home bakers together!
PrintFluffy Pastel Swirl Cotton Candy Cake with Homemade Frosting
Create a visually stunning, whimsical cotton candy cake with light, fluffy layers swirled in pastel pink and blue. This recipe uses simple ingredients to deliver that nostalgic carnival flavor in a showstopper birthday cake.
- Prep Time: 30 min
- Cook Time: 30 min
- Total Time: 1 hour 5 min
- Yield: 12 servings 1x
- Category: Dessert
- Method: Baking
- Cuisine: American
- Diet: Vegetarian
Ingredients
- 1 3/4 cups all-purpose flour
- 1 1/2 teaspoons baking powder
- 1/2 teaspoon salt
- 1 cup (2 sticks) unsalted butter, softened
- 1 3/4 cups granulated sugar
- 4 large eggs, room temperature
- 1 teaspoon vanilla extract
- 1/2 teaspoon cotton candy extract (or more to taste)
- 1 cup whole milk, room temperature
- Pink gel food coloring
- Blue gel food coloring
- For the Frosting:
- 1 cup (2 sticks) unsalted butter, softened
- 4 cups powdered sugar, sifted
- 1 teaspoon vanilla extract
- 1/2 teaspoon cotton candy extract
- 2–4 tablespoons heavy cream
- Pinch of salt
- Extra cotton candy for topping
Instructions
- Preheat your oven to 350°F (175°C). Grease and flour three 8-inch round cake pans. Line the bottoms with parchment paper.
- In a medium bowl, whisk together the flour, baking powder, and salt. Set this dry mixture aside.
- In a large bowl, beat the softened butter and granulated sugar with an electric mixer until light and fluffy, about 3 minutes. This step incorporates air, which helps make your cake fluffy.
- Add the eggs one at a time, beating well after each addition. Mix in the vanilla and cotton candy extracts.
- Alternate adding the dry ingredients and the milk to the butter mixture, beginning and ending with the dry ingredients. Mix only until just combined after each addition. Do not overmix the batter.
- Divide the batter evenly into three separate bowls. Leave one bowl white. Add a few drops of pink gel coloring to the second bowl and mix gently until you have a light pink swirl. Add blue gel coloring to the third bowl and mix gently for a light blue swirl.
- Spoon the batters randomly into the prepared cake pans, alternating colors to create a marbled or swirled effect. Do not mix the colors together in the pan.
- Bake for 28 to 32 minutes, or until a wooden pick inserted into the center comes out clean.
- Let the cakes cool in the pans for 10 minutes before inverting them onto a wire rack to cool completely.
- Prepare the frosting: Beat the softened butter until creamy. Gradually add the sifted powdered sugar, mixing on low speed until incorporated.
- Add the vanilla extract, cotton candy extract, and salt. Beat on medium speed. Add the heavy cream one tablespoon at a time until you reach a smooth, spreadable consistency.
- Once the cake layers are completely cool, place the first layer on your serving plate. Spread a layer of frosting over the top. Repeat with the second and third layers.
- Frost the entire cake with the remaining cotton candy frosting. For a whimsical look, you can swirl the frosting colors slightly with an offset spatula.
- Top the finished cake with strands of fresh cotton candy just before serving.
Notes
- For the best cotton candy flavor, use a high-quality cotton candy extract. Extracts vary in strength, so taste your frosting before applying it.
- To keep the cake truly fluffy, make sure your butter, eggs, and milk are at room temperature before mixing.
- Apply the fresh cotton candy topping immediately before serving, as it dissolves quickly when exposed to humidity or moisture.
- If you want deeper pastel colors, use more gel coloring, but add it slowly to avoid thinning the batter.
Nutrition
- Serving Size: 1 slice
- Calories: 450
- Sugar: 65
- Sodium: 250
- Fat: 20
- Saturated Fat: 12
- Unsaturated Fat: 5
- Trans Fat: 0.5
- Carbohydrates: 68
- Fiber: 1
- Protein: 4
- Cholesterol: 75