
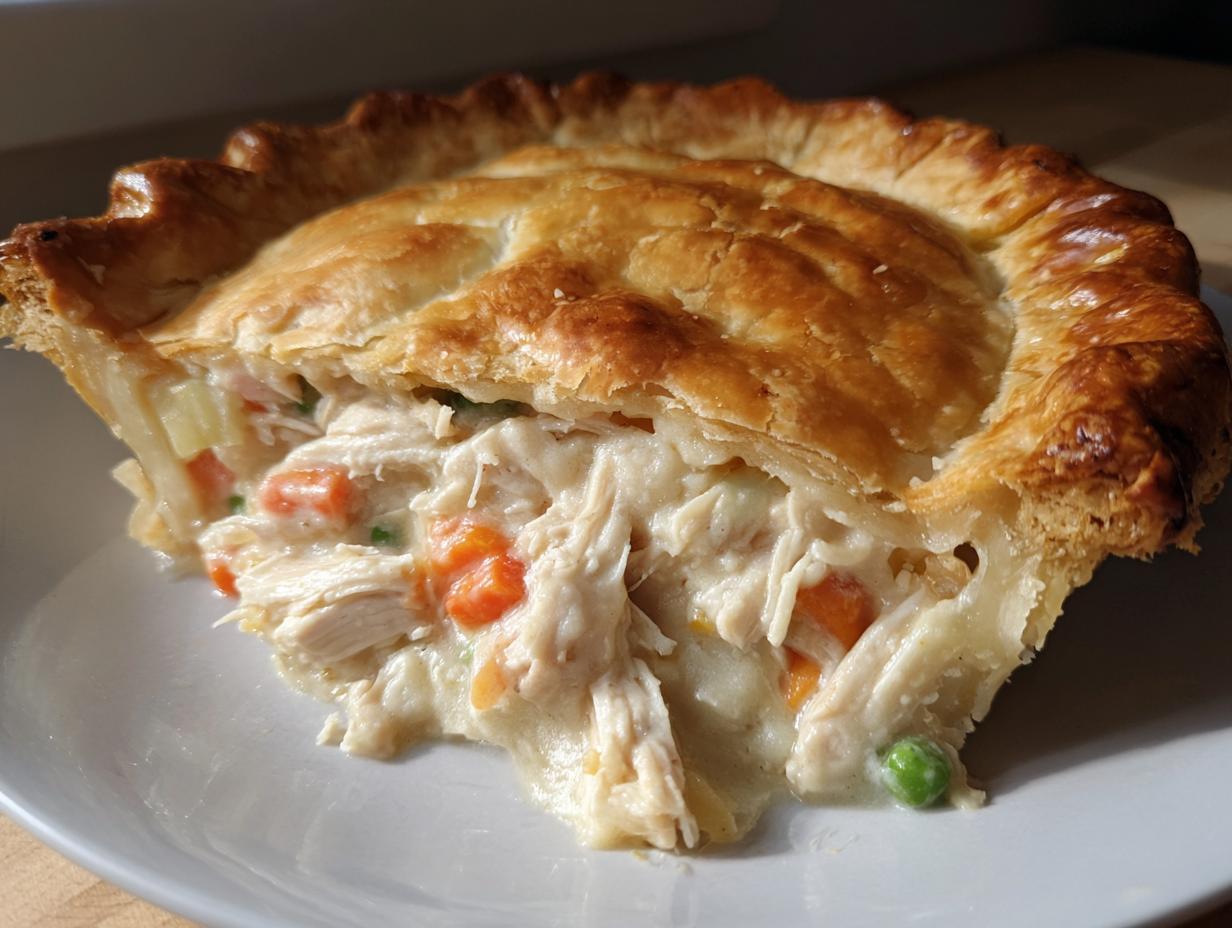
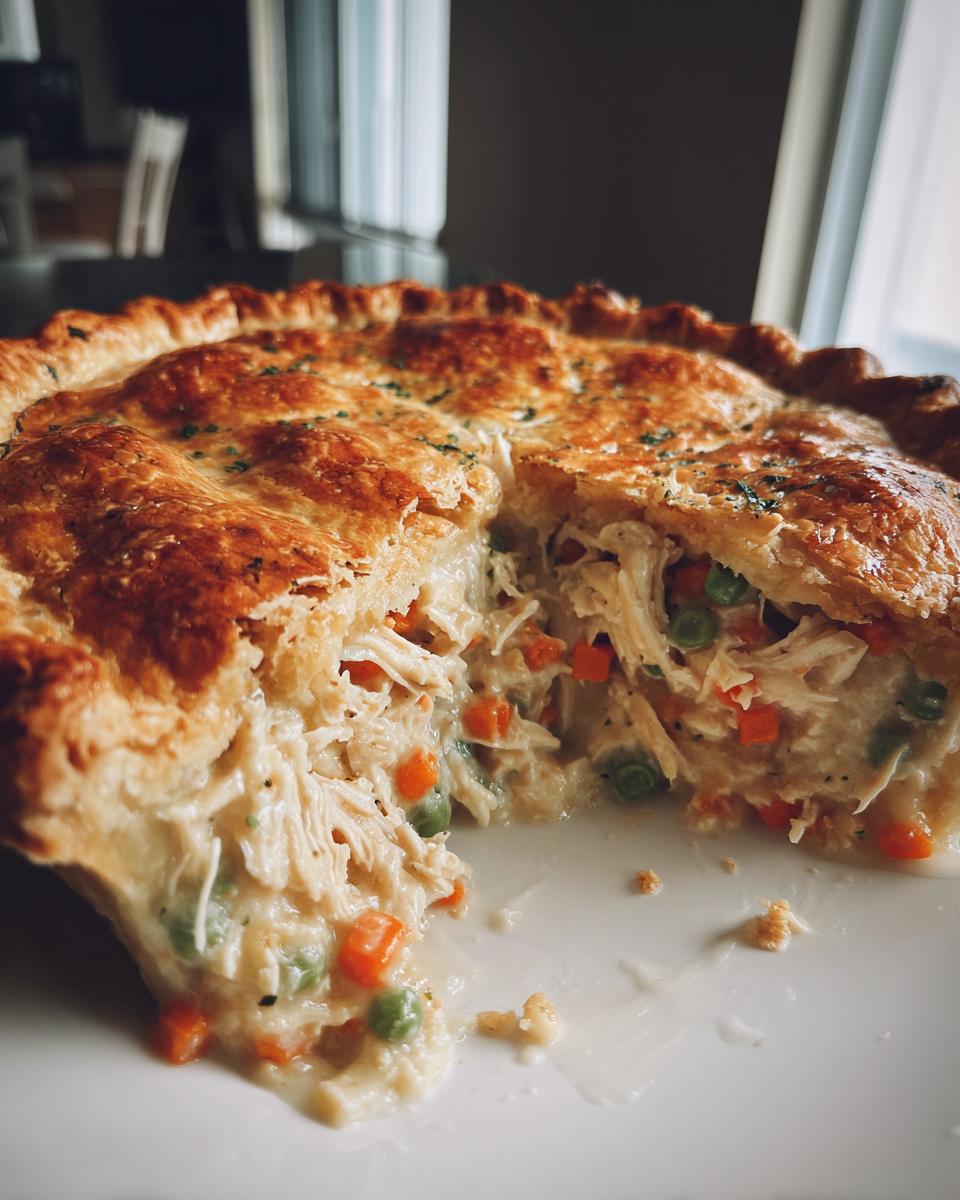
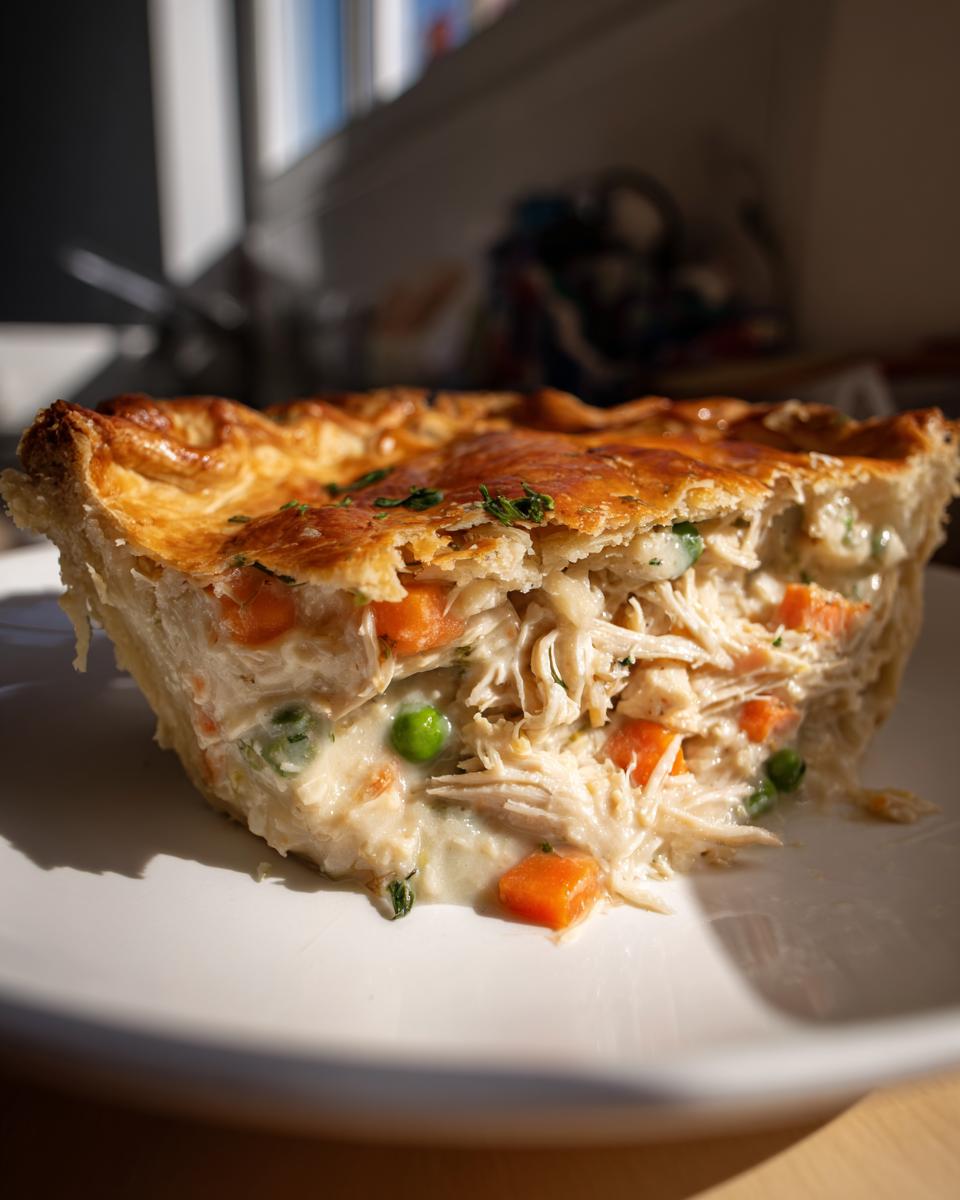
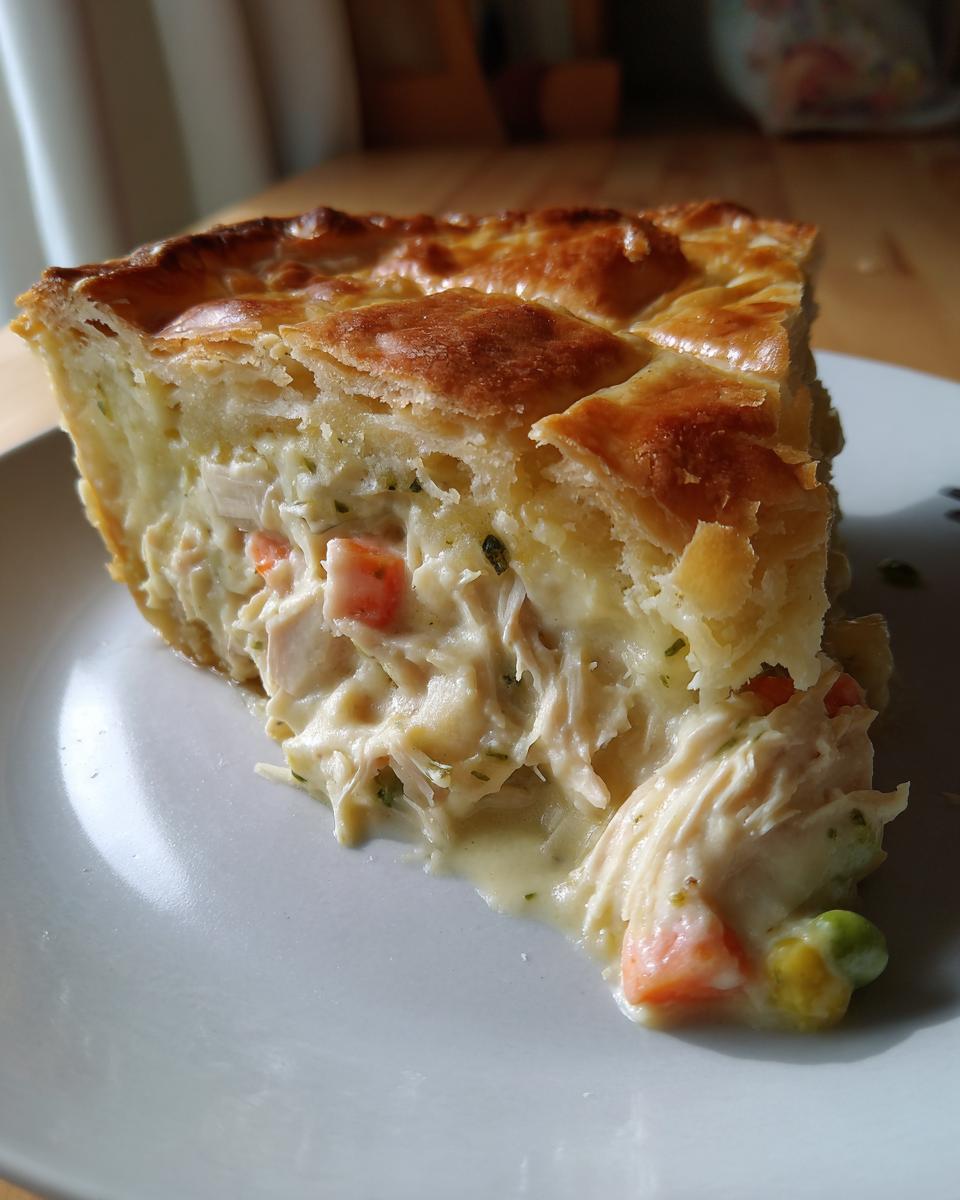
There is just nothing—and I mean *nothing*—that says ‘home’ quite like a piping hot dish of chicken pot pie pulled straight from the oven. I know the idea of making a pie entirely from scratch, especially for a weeknight dinner, can feel like a whole production. But trust me, that rich, creamy filling nestled under a buttery, flaky double crust is worth every single second. When I started Taste This Plate, my goal, coming from my grandmother’s kitchen days, was breaking down those classics so you could replicate that restaurant-quality comfort without the stress. This Ultimate Creamy Chicken Pot Pie with Flaky Double Crust isn’t just a recipe; it’s the result of me, Kate Reilly, testing time and time again until I guarantee you a flawless, soul-warming dinner.
- Why This Homemade Chicken Pot Pie Recipe Is a Family Favorite Meal
- Ingredients for the Ultimate Creamy Chicken Pot Pie
- Essential Equipment for Making Chicken Pot Pie
- How to Prepare the Best Chicken Pot Pie
- Tips for Success with Your Homemade Chicken Pot Pie
- Variations: Beyond the Classic Chicken Pot Pie
- Storage and Reheating Instructions for Leftover chicken pot pie
- Frequently Asked Questions About Making chicken pot pie
- Nutritional Estimates for This Hearty Winter Meals Classic
- Share Your Cozy Evening Meal Ideas
Why This Homemade Chicken Pot Pie Recipe Is a Family Favorite Meal
I hear it all the time: people want that nostalgic, hearty flavor, but they’re scared of making a whole pie. That’s exactly why this creamy chicken filling recipe works so perfectly.
- Maximum Comfort Food Dinner Factor: This isn’t just dinner; it’s a hug in a dish! The richness of the homemade gravy combined with tender chicken and vegetables hits that deep-down craving for something truly satisfying. It delivers that classic, old-fashioned flavor that just can’t be beaten.
- Achieving the Perfect Flaky Pie Crust Recipe: You absolutely need that buttery, shattering crust layer, and my method guarantees it. The secret, even when using refrigerated dough, is keeping the ingredients—and your hands—as cold as humanly possible while assembling. A warm crust means a tough crust, and we are aiming strictly for flaky perfection here!
Ingredients for the Ultimate Creamy Chicken Pot Pie
Okay, let’s talk about what you need to gather. When I put this list together, I kept in mind that you’re probably whipping this up on a busy weeknight, so everything should be super accessible. We aren’t trekking out to specialty shops for this one!
Remember what I always say: simple ingredients make extraordinary meals. Since we are making the filling from scratch, this list covers everything except the pie crusts; I give you two options for those below!
- 2 tablespoons unsalted butter
- 1/2 cup chopped yellow onion
- 1/2 cup chopped carrots (I dice mine small!)
- 1/2 cup frozen peas
- 1/2 cup chopped celery
- 1/3 cup all-purpose flour
- 1 1/2 cups chicken broth (I always grab the low-sodium kind so I can control the salt myself)
- 1/2 cup heavy cream (This is key for that velvety texture!)
- 1 teaspoon dried thyme
- 1/2 teaspoon salt (adjust after tasting the gravy!)
- 1/4 teaspoon black pepper
- 2 cups cooked, shredded chicken (My tip: a rotisserie chicken is your best friend here!)
- 1 box (14.1 ounces) refrigerated pie crusts (That means two ready-to-roll crusts, or use your favorite homemade recipe if you’re feeling extra ambitious!)
- 1 large egg, beaten (This is just for the pretty golden egg wash on top)
Essential Equipment for Making Chicken Pot Pie
You don’t need a whole commercial kitchen to nail this Classic Chicken Pot Pie, but having the right tools makes the difference between feeling stressed and feeling in control. I always pull these out before I even turn on the stove, just so everything is ready to go. Trust me on this one—it keeps the flow smooth when you start cooking!
Here is the short list of what you’ll want handy for this recipe:
- A reliable 9-inch pie dish. I prefer glass because I can peek underneath to see if the bottom crust is browning nicely, but ceramic works too!
- A large saucepan or Dutch oven. This is where all the magic happens when we build that creamy chicken gravy base. You need space for sautéing the veggies and whisking in the liquid without splatter!
- A sturdy whisk. You absolutely need this when you pour in the broth! Whisking constantly is the only way to guarantee a lump-free, velvety sauce. Forget the spoon here—a whisk does the heavy lifting.
- A cutting board and a sharp knife. You’ll be chopping onions, carrots, and celery, so make sure your knife is ready to go.
- A rolling pin. Even if you bought the refrigerated crusts (which, hey, no judgment here!), you might need to gently roll them out just a smidge to fit your dish perfectly.
- A small bowl and a pastry brush for that egg wash. Don’t skip the wash! It’s the little thing that makes the top crust look instantly professional and golden brown.
How to Prepare the Best Chicken Pot Pie
This is where the magic really happens! We’re going from ingredients in bowls to a bubbling, glorious dinner. Remember, we are teaching a technique here, not just reading instructions off a box! Everything moves fairly quickly once you get the gravy started, so have everything chopped and ready before you turn on the heat.
Preparing the Vegetables and Cooking the Creamy Chicken Filling
First things first: Get that oven preheated to 400 degrees Fahrenheit and grease up your 9-inch pie dish. That way, it’s ready when we need it!
Now, grab your big saucepan and melt that butter over medium heat. Toss in your onion, carrots, and celery. Let them soften up—about five to seven minutes is perfect. You want them tender, not mushy!
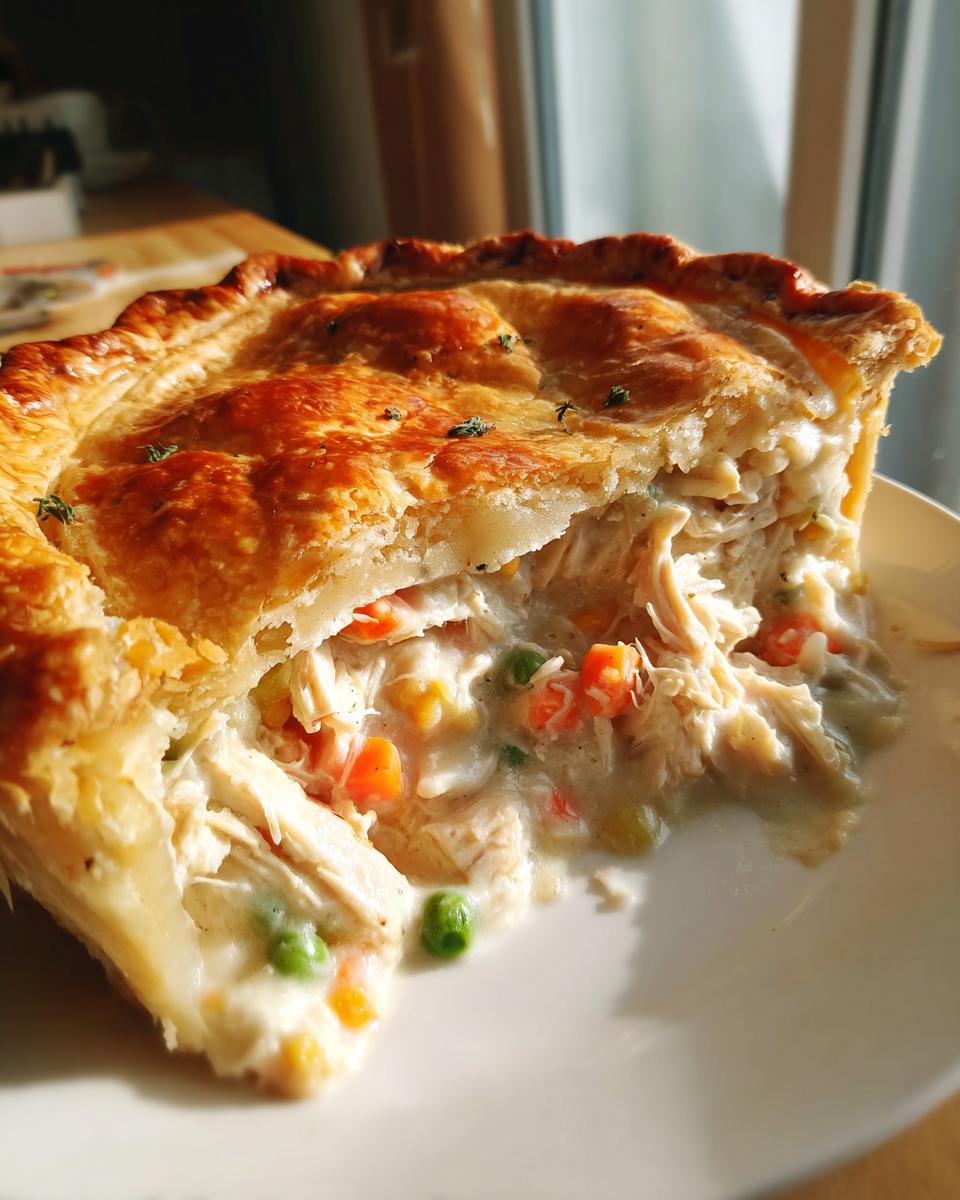
Next, sprinkle in the flour right over the veggies and stir it all around for just one minute. This cooks out that raw flour taste we don’t want. Then, slowly, slowly, whisk in that chicken broth. I mean it—whisk constantly as you pour so you don’t get any lumps! This is how you build a wonderful Chicken Gravy Recipe. Once it simmers and thickens up nicely, turn the heat way down, stir in the heavy cream, thyme, salt, and pepper. Once it’s heated through (don’t let it boil once the cream is in!), take it off the burner. Finally, fold in your shredded chicken and those frozen peas. Let this lovely filling cool down just a bit while you work on the crust.
Assembling Your Chicken Pot Pie
Time to build the vessel for this deliciousness! Lay one pie crust down in your prepared dish and trim the edges if needed. Pour all that creamy filling right over the bottom crust. Try to keep it even!
Lay that second crust right over the top of the filling. This is the fun part—crimp those top and bottom edges together firmly to seal everything in. We’re trapping all that glorious steam and flavor inside. Don’t forget to cut a few slits right in the top crust. These vents let the steam escape so your crust doesn’t blow off!
For that beautiful, golden brown finish that makes it look so professional, brush the whole top surface lightly with that beaten egg wash. Shine on, little pie!
Baking and Resting the Chicken Pot Pie
Pop that beautiful pie into the 400°F oven and bake it for about 30 to 35 minutes. You’re looking for that crust to be deeply golden and the filling underneath to be bubbling nicely. When it’s done, you must resist the urge to cut it immediately! I know, I know, the smell is killing me too. But you absolutely must let the Homemade Chicken Pot Pie rest on a wire rack for at least 15 minutes before slicing. This cooling time is crucial; it lets the gravy set up so it doesn’t all run out when you cut into it. Patience earns you a cleaner slice!
Tips for Success with Your Homemade Chicken Pot Pie
Look, I know we just walked through making this thing entirely from scratch, which feels like a commitment, but I want you to feel totally confident bringing this amazing comfort food dinner to your table. I’ve learned a few tricks over the years that keep things easy and delicious, especially when life is moving at a million miles an hour. These little insights are what take a good chicken pot pie and make it consistently great.
Shortcut: Using Rotisserie Chicken Pot Pie Hack
If you are looking for a truly quick chicken dinner idea, please, please use a rotisserie chicken! I put this tip right in the ingredients list because it’s a lifesaver. Picking up a pre-cooked bird saves you a solid 20 minutes of just standing there waiting for chicken breasts to boil or bake. You just shred about two cups off the bird, and boom—you have the chicken ready right when you need it for the filling. It tastes totally homemade, but you shave off a huge chunk of time. It’s my favorite way to make this an accessible weeknight meal.
Adapting Your chicken pot pie to a Skillet Chicken Pot Pie
Sometimes I skip the whole transfer to a pie dish thing, especially if I want fewer dishes to wash later! If you have a sturdy, oven-safe 10-inch cast iron skillet, that is the *perfect* vessel for this recipe. Honestly, a skillet gives you such an even bake, and those crispy edges? Unmatched!
Just follow the filling instructions exactly as written. Instead of lining a pie dish, you set the bottom crust right into the hot skillet (careful!). Then, you pour the creamy filling over it. You might need to watch the baking time just slightly longer than in a standard pie plate because cast iron holds heat so intensely, but generally, it’s a straightforward swap. If you’re super interested in skillet cooking, I actually have a whole post on making a delicious Slow Cooker Chicken Pot Pie, which is another completely hands-off approach!
And hey, if you want to try something totally different with the crust part, you could even use store-bought puff pastry on top instead of the traditional pie dough. Julia’s Album has a fun recipe for a Puff Pastry Chicken Pot Pie that I’ve been meaning to test out myself!
Variations: Beyond the Classic Chicken Pot Pie
The beauty of mastering a base recipe like this creamy chicken pot pie filling is that you can pivot so easily into different formats! I love being able to quickly switch gears if I’m tired of rolling out dough or if I just need a big, scoopable comfort dish. This recipe is truly the foundation for so many amazing savory pie recipes.
Making a Chicken Pot Pie Casserole
If the idea of dealing with a top crust seems like too much work, just turn it into a casserole! It’s honestly so simple. Once your filling is ready—and cooled a little, just like before—you don’t line a pie dish. Instead, pour the entire creamy mixture into a standard 8×8 or 9×13 baking dish, depending on how thick you want your final portion to be. That’s it for the bottom layer!
Instead of the second crust, you have options! You can top it with flaky biscuits (which makes it a Chicken Pot Pie with Biscuits!), or you can use crushed crackers or even potato chips for a fun crunch. If you do this, you usually don’t have to worry as much about the bottom crust getting soggy since it’s all mixed together more like a hearty bake.
Adding Different Vegetables or Herbs
I stuck to the classic onion, carrot, celery, and peas because those are the non-negotiables for traditional flavor, but don’t think you have to stop there! You can customize the veggies based on what you have in the fridge. Mushrooms are a fantastic addition—just sauté them with the onions until they release their liquid. A handful of fresh or frozen green beans also adds a great pop of color and texture.
When it comes to herbs, thyme is my main player, but if you’re aiming for that deeper, savory flavor profile, try adding about half a teaspoon of rubbed sage along with the thyme. It gives the filling a slightly more earthy, holiday feel. You know, if you want a taste of Thanksgiving in the middle of July!
Storage and Reheating Instructions for Leftover chicken pot pie
You’ve made the Best Chicken Pot Pie, and chances are, you have some glorious leftovers—if your family lets any sit, that is! Since this recipe is jam-packed with rich, creamy gravy, proper storage is key to making sure your second piece is almost as good as the first piece right out of the oven. We certainly don’t want any soggy bottoms hanging around!
If you have leftovers, first things first: make sure that pie has cooled down a bit. You never want to put piping hot food directly into sealed plastic containers or into the fridge, or you’ll end up cooking the crust from the inside out, making it a sad, steamy mess.
Once it’s cooled to room temperature (about an hour on the counter is fine), cover the pie dish tightly with plastic wrap or foil. You can keep the whole thing in the refrigerator for about three, maybe four days max. Honestly, it never lasts that long in my house!
Reheating is where we have to be smart to protect that beautiful crust. For the best results, I recommend doing it in two stages. First, cover the pie loosely with foil before putting it in a 350-degree oven. This protects the crust from drying out while the creamy filling heats back up. Let it go for 25–30 minutes—or until it’s hot through the middle.
Once it’s piping hot, take that foil off! Pop it back in the oven for about 5 to 10 more minutes. This final blast of dry heat crisps up the top crust again. If you’re just grabbing a smaller single slice, heating it in an air fryer or toaster oven works even faster than warming the whole thing up!
Frequently Asked Questions About Making chicken pot pie
When you’re making something as wonderfully comforting as our Classic Chicken Pot Pie, you sometimes end up with little questions that pop up, even after following the recipe perfectly. That’s totally normal! I’ve compiled the ones I get asked most often over here at the site to make your cooking experience totally stress-free. You deserve a flawless, hearty meal!
How do I prevent the bottom crust of my chicken pot pie from getting soggy?
Oh, the dreaded soggy bottom! It’s the number one fear when tackling any savory pie recipe. Trust me, I have faced this terror many times, but here is the technique that saves the day:
- Make Sure the Filling is Cool: This is non-negotiable. If you pour hot filling onto a cold pie crust, that steam instantly turns to condensation and soaks the bottom. Let your filling cool down for at least 20 minutes on the counter before you spoon it into the bottom crust.
- Egg White Barrier: Before you put your filling in, take a small brush and lightly paint the inside bottom crust with one beaten egg white. The egg white dries into a little waterproof seal—it’s practically invisible once baked, but it absolutely stops moisture from seeping through.
- Bake Lower: When you first put the pie in the oven, place it on the lowest rack for the first 15 minutes. This forces the heat right up into the bottom crust, helping it cook through before the top browns too much. After that 15 minutes, move it to the center rack.
Can I make this chicken pot pie ahead of time?
Absolutely! This is a fantastic recipe for meal prepping, which is great when you need quick chicken dinner ideas on a busy night. You have two main options:
Unbaked Ahead: Assemble the entire pie—bottom crust, cooled filling, top crust, egg wash—but don’t bake it. Cover it tightly with plastic wrap and foil and keep it in the fridge for up to 24 hours. When you’re ready to bake, pull it out, let it sit on the counter for 30 minutes while the oven heats up, and then bake as directed. You might need an extra 5–10 minutes of bake time since it’s going in cold.
Freezing: You can freeze the fully assembled, unbaked pie! Wrap that beauty up really tight, label it with the date, and freeze for up to three months. When you want to bake it, remove the packaging, brush with egg wash, and bake from frozen, adding about 20–30 minutes to the baking time. You might want to cover the edges with foil partway through so they don’t burn.
What is the difference between a pot pie and a casserole?
This is a great question that gets right to the heart of our comfort food variations!
A **Classic Chicken Pot Pie** is defined by its pastry shell—it’s fully encased, often with a top and bottom crust, creating a defined, sliceable structure. The filling is held entirely by that pastry, which is why we worry so much about that bottom crust!
A **Chicken Pot Pie Casserole** is much more forgiving. Instead of a fully defined crust, you usually have a bottom layer of something (sometimes a crust, sometimes just the filling itself) topped with something looser, like our recommended biscuit topping, or crushed crackers. It’s designed to be scooped directly out of the baking dish with a spoon, similar to a classic comfort food dinner bake. When you make the casserole adaptation, you focus less on keeping the layers separate and more on getting that beautiful, cheesy, fluffy topping!
If you’re looking for even more hands-off cooking, you might want to check out my ideas for a Slow Cooker Chicken Pot Pie sometime!
Nutritional Estimates for This Hearty Winter Meals Classic
Okay, let’s be real for a second. When we are making the ultimate homemade chicken pot pie, we aren’t exactly aiming for a light salad, right? This is pure, satisfying, soul-warming food—a true Hearty Winter Meals classic. We want the richness, we want the comfort, and we accept that it comes with some hearty nutrition!
I put together the estimated nutritional breakdown below, based on our specific recipe using the refrigerated pie crusts. This gives you a general idea of what you’re looking at for one generous slice (Yield: 6 servings). Remember, these numbers are just guides. If you use a super-buttery homemade crust or skip the heavy cream, your results will look a little different. These are estimates, but they show you exactly why this dish feels so satisfying!
- Serving Size: 1 slice
- Calories: 450
- Fat: 25g
- Saturated Fat: 12g
- Trans Fat: 0.5g
- Cholesterol: 85mg
- Sodium: 550mg
- Carbohydrates: 35g
- Fiber: 3g
- Sugar: 4g
- Protein: 24g
See that protein count? That means this comforting savory pie is actually quite filling! Just be mindful of that sodium if you aren’t using low-sodium broth—that’s another reason I always tell you to taste your gravy before adding the final salt!
Share Your Cozy Evening Meal Ideas
Whew! You made it! You took the plunge and created the best kind of dinner there is: a deeply comforting, homemade chicken pot pie. Now that gooey, flaky masterpiece is sitting on your counter, cooling perfectly (I hope you waited the full 15 minutes!), I want to hear all about it!
This is the part where we celebrate the everyday magic we just created together. Did the crust turn out perfectly flaky? Did the kids ask for seconds? Did you opt for the biscuit topping or stick with my favorite double crust? Don’t keep this delicious success to yourself!
I always get so excited when I see photos of my readers’ finished dishes. Head over to our social channels and tag us! We love seeing your beautiful creations, especially when that golden top crust looks just right. If you tried one of the variations, like making it a Chicken Pot Pie Casserole, let me know how that went in the comments down below!
Leaving a rating or a comment helps other home cooks who might be nervous about tackling a full pie know that they can trust this recipe. Your feedback means the world to me, Kate, and helps keep this community going—one perfect, cozy evening meal at a time. And if you ever have a question about technique or substitutions, don’t hesitate to reach out through the contact page any time!
Thank you so much for trusting Taste This Plate with your family’s dinner tonight. Happy cooking, friends!
PrintThe Ultimate Creamy Chicken Pot Pie with Flaky Double Crust

Create the ultimate comfort food with this homemade chicken pot pie. We break down the steps for a rich, creamy filling and a perfectly flaky, buttery double crust, making this a family favorite you can trust.
- Prep Time: 20 min
- Cook Time: 35 min
- Total Time: 55 min
- Yield: 6 servings 1x
- Category: Dinner
- Method: Baking
- Cuisine: American
- Diet: Vegetarian
Ingredients
- 2 tablespoons unsalted butter
- 1/2 cup chopped yellow onion
- 1/2 cup chopped carrots
- 1/2 cup frozen peas
- 1/2 cup chopped celery
- 1/3 cup all-purpose flour
- 1 1/2 cups chicken broth (low sodium)
- 1/2 cup heavy cream
- 1 teaspoon dried thyme
- 1/2 teaspoon salt
- 1/4 teaspoon black pepper
- 2 cups cooked, shredded chicken (rotisserie chicken works well)
- 1 box (14.1 ounces) refrigerated pie crusts (or your favorite homemade recipe)
- 1 large egg, beaten (for egg wash)
Instructions
- Preheat your oven to 400 degrees Fahrenheit. Lightly grease a 9-inch pie dish.
- In a large saucepan over medium heat, melt the butter. Add the onion, carrots, and celery. Cook until the vegetables soften, about 5 to 7 minutes.
- Stir in the flour and cook for 1 minute, stirring constantly. This step cooks out the raw flour taste.
- Slowly whisk in the chicken broth until the mixture is smooth. Bring the mixture to a simmer, stirring until the gravy thickens.
- Reduce the heat to low. Stir in the heavy cream, thyme, salt, and pepper. Heat through but do not boil.
- Remove the saucepan from the heat. Stir in the cooked, shredded chicken and frozen peas. Let the filling cool slightly while you prepare the crust.
- Place one pie crust into the bottom of the prepared pie dish. Trim the edges if necessary.
- Pour the cooled chicken filling evenly into the bottom crust.
- Place the second pie crust over the filling. Crimp the edges of the top and bottom crusts together to seal. Cut several slits in the top crust to allow steam to escape during baking.
- Brush the top crust lightly with the beaten egg wash for a golden finish.
- Bake for 30 to 35 minutes, or until the crust is golden brown and the filling is bubbly.
- Let the chicken pot pie cool on a wire rack for at least 15 minutes before slicing and serving. This allows the filling to set.
Notes
- For a shortcut, use 3 cups of pre-cooked chicken, such as from a rotisserie chicken. This saves about 20 minutes of prep time.
- If you prefer a biscuit topping instead of a double crust, skip the second crust and drop spoonfuls of prepared biscuit dough over the filling before baking.
- To make this a skillet chicken pot pie, use an oven-safe 10-inch cast iron skillet and adjust baking time slightly if the dish is deeper than a standard pie plate.
Nutrition
- Serving Size: 1 slice
- Calories: 450
- Sugar: 4
- Sodium: 550
- Fat: 25
- Saturated Fat: 12
- Unsaturated Fat: 13
- Trans Fat: 0.5
- Carbohydrates: 35
- Fiber: 3
- Protein: 24
- Cholesterol: 85