
When you look at those stunning, delicate French pastries in a bakery window, it’s easy to think they belong in another world—a world of professional pastry kitchens and endless precision. But I’m here to tell you that’s simply not true! Making beautiful, delicious chocolate macarons at home is absolutely within your reach, even if it feels intimidating right now. My goal here at the table is to take the mystery out of this decadent treat. We are going for that perfect trifecta: a wonderfully chewy texture, a mirror-like glossy shell, and those beautiful, ruffled ‘feet’ at the bottom. Trust me, with a few simple techniques I learned through trial and error (and trust me, there were many errors!), you can master these foolproof chocolate macarons. Forget the stress; we’re going to make some magic happen.
- Why This is the Best Chocolate Macaron Recipe for Home Bakers
- Gathering Your Ingredients for Foolproof Chocolate Macarons
- How to Make Chocolate Macarons: Step-by-Step Tutorial
- Crafting the Silky Chocolate Ganache for Your Chocolate Macarons
- Assembling and Maturing Homemade Chocolate Macarons
- Variations: Trying Hot Chocolate Macarons Recipe
- Storage and Keeping Your Chocolate Macarons Fresh
- Troubleshooting Common Issues with Chocolate Macarons
- Frequently Asked Questions About Chocolate French Pastry
- Sharing Your Decadent Chocolate Dessert Creations
Why This is the Best Chocolate Macaron Recipe for Home Bakers
I’ve tried every method out there, and honestly, the French meringue approach is the kindest to us home bakers. It’s straightforward, relying more on structure than complex syrup temperatures. That’s why I call this the best chocolate macaron recipe—it really delivers on the big promises: those gorgeous, mandatory feet, and surfaces that stay smooth instead of cracking up on us. The secret weapon? Precision. You absolutely must use a digital scale for this recipe! Eyeballing flour in a recipe this delicate just invites disaster. If you want a deep dive into achieving that chewy texture mentioned everywhere, you can look at how they manage things over at Chewy Chocolate Macaron Recipe.
Achieving Glossy Macaron Shells: The Science Behind the Shine
If you want that mirror-like finish on your chocolate macarons, it all comes down to the prep work. We sift the almond flour and cocoa powder together no less than twice. This breaks up any lumps so the batter can flow smoothly when piped. Then, during the folding—that stage we call macaronage—you are developing the structure. Folding just enough develops the strength needed for that smooth, glossy macaron shell without adding so much air that they deflate under heat. It’s a little balancing act, but once you nail the visual cue, you’re golden.
Gathering Your Ingredients for Foolproof Chocolate Macarons
Okay, let’s talk goodies! Because we are aiming for perfection with these chocolate macarons, we have to be serious about weighing everything out. Please, please pull out your kitchen scale before you start mixing anything. This recipe is based on a strict 100-gram ratio for the dry ingredients, which is how we guarantee the structure. Don’t worry about hunting down exotic supplies; everything here is pretty easy to find at a standard grocery store. If you want to see how other bakers prep for success, check out the tips linked here—they know what they’re doing! Foolproof Chocolate Macarons is the goal here.
Ingredients for Rich Chocolate Ganache Filling
This filling is what takes these shells from good to absolutely unforgettable. Creamy and deep, it makes for the perfect marriage in our macarons with ganache filling. You just need:
- 100 g semi-sweet chocolate, finely chopped
- 100 ml heavy cream
- 1 tablespoon unsalted butter
Ingredient Notes and Substitutions for Chocolate Macarons
A couple of non-negotiable steps for the best shells: first, those egg whites must be ‘aged.’ That just means you separate them a day ahead of time and let them sit covered in the fridge. It dramatically helps build a powerful meringue. Second, for the almond flour, if yours isn’t super fine, run it with the confectioners’ sugar and cocoa powder in your food processor for about 30 seconds and then sift everything together. This extra step ensures there are no gritty bits spoiling your glossy macaron shells.
How to Make Chocolate Macarons: Step-by-Step Tutorial
Alright, this is where we stop talking and start actually baking our beautiful chocolate macarons! We are following the French meringue method here because it is so dependable when you follow the steps closely. First, make sure those dry ingredients—the almond flour, powdered sugar, and cocoa powder—have been sifted together really well. You want that dark cocoa powder totally incorporated without any dry pockets lurking around. Don’t skip tossing them in with the meringue gently; we want a smooth batter, not a lumpy disaster! If you want a successful bake for these chocolate almond flour cookies, remember that preparation is everything.
Next up is the meringue. Since we used aged whites, they should whip up beautifully. Add your granulated sugar slowly until you have stiff, glossy peaks. This meringue is the backbone of the cookie, so treat it gently when you start folding in your dry mix. If you want a truly decadent chocolate dessert, remember that technique matters more than speed here. Before moving on, take a peek at how they handle the first steps over at Chocolate Macarons – Chelsweets; it’s always helpful to see another expert’s setup. Sometimes seeing the finished product helps me figure out my batter consistency, much like when I’m tackling my Classic Chocolate Chip Cookies!
The Crucial Macaronage Stage for Chewy French Macarons
This part, the macaronage, determines everything! It’s the folding process where you deflate just enough air from the meringue so it spreads properly. You need to fold that dry mix in carefully using a spatula, scraping around the bowl and then cutting through the middle. We are aiming for the “ribbon stage.” What this looks like is when the batter drips off your spatula slowly, creating a thick ribbon that smooths out back into the bowl within about 20 seconds. Honestly, I always stop folding just a second *before* I think it’s ready, because it keeps mixing as you scrape the bowl. Over-mixing removes the air needed for those perfect, chewy french macarons.
Tapping and Resting: Securing Perfect Macaron Feet
Once you’ve piped your circles onto your prepared sheets (use silicone mats, they are the best!), you need to get aggressive—gently, but aggressively! Firmly tap those baking sheets down on the counter, maybe five or six times. Seriously, hit them! This forces any sneaky air bubbles to the surface so we can pop them with a toothpick. Trapped air causes those horrible cracks! After the tapping, they need to rest. This resting is non-negotiable if you want those wonderful ruffles, those perfect macaron feet. They need to dry until they form this thin skin. If you touch one lightly and nothing sticks to your finger, they are ready to bake! Don’t rush this drying time; humidity is your enemy here.

Baking and Cooling Your Chocolate Macaron Shells
Get that oven preheated to 300 degrees F (150 degrees C). Pop those trays in, and watch them like a hawk! They usually take between 12 to 15 minutes, but ovens are funny things, right? The moment you see those ruffled edges starting to peek out at the bottom, they are close. For the final check, I like to gently nudge one—if the shell slides around on its foot, it needs another minute or two. If it stays put, take them out! For now, let them chill completely on the pan before you try peeling them off. If you pull them too early, oops, you’ve just made expensive, flat cookies!
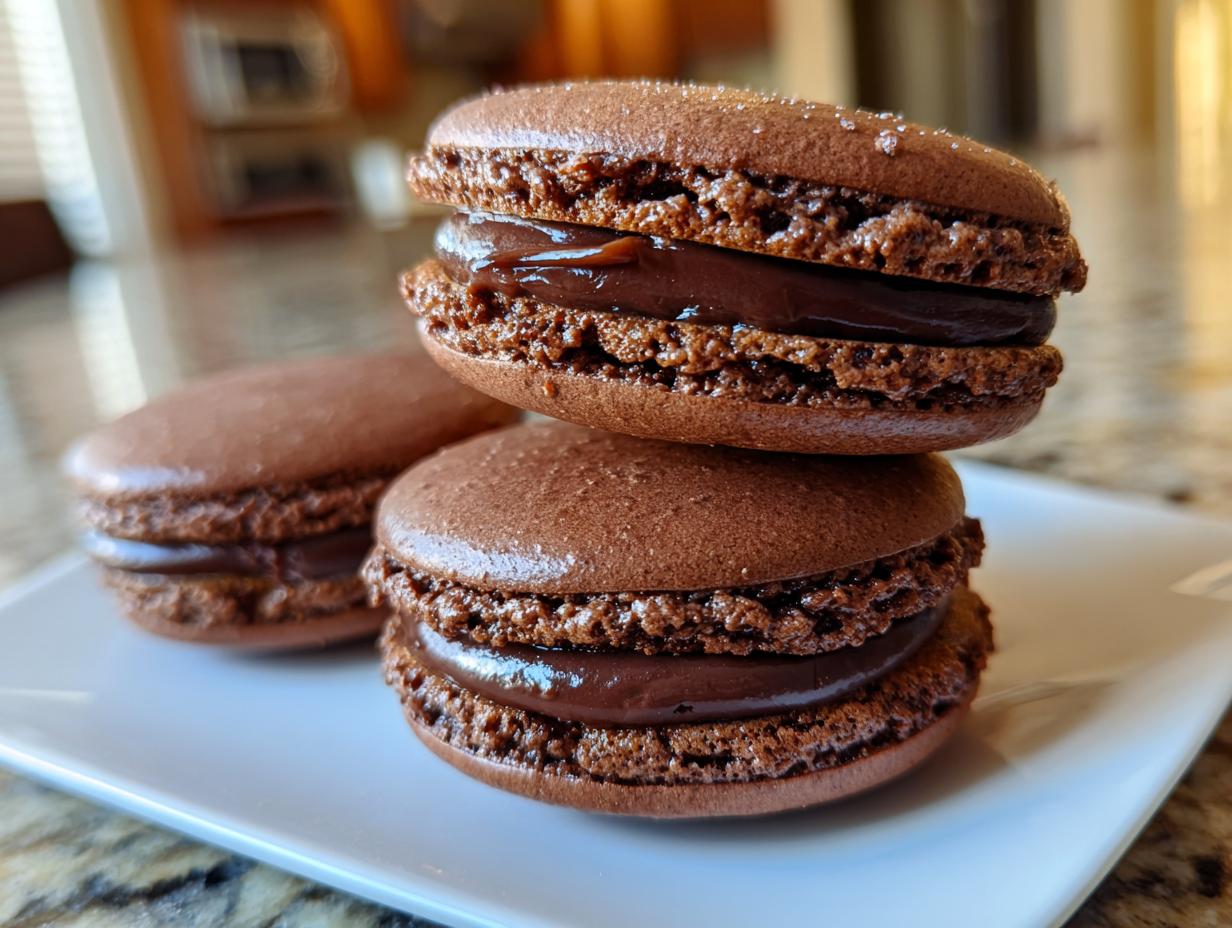
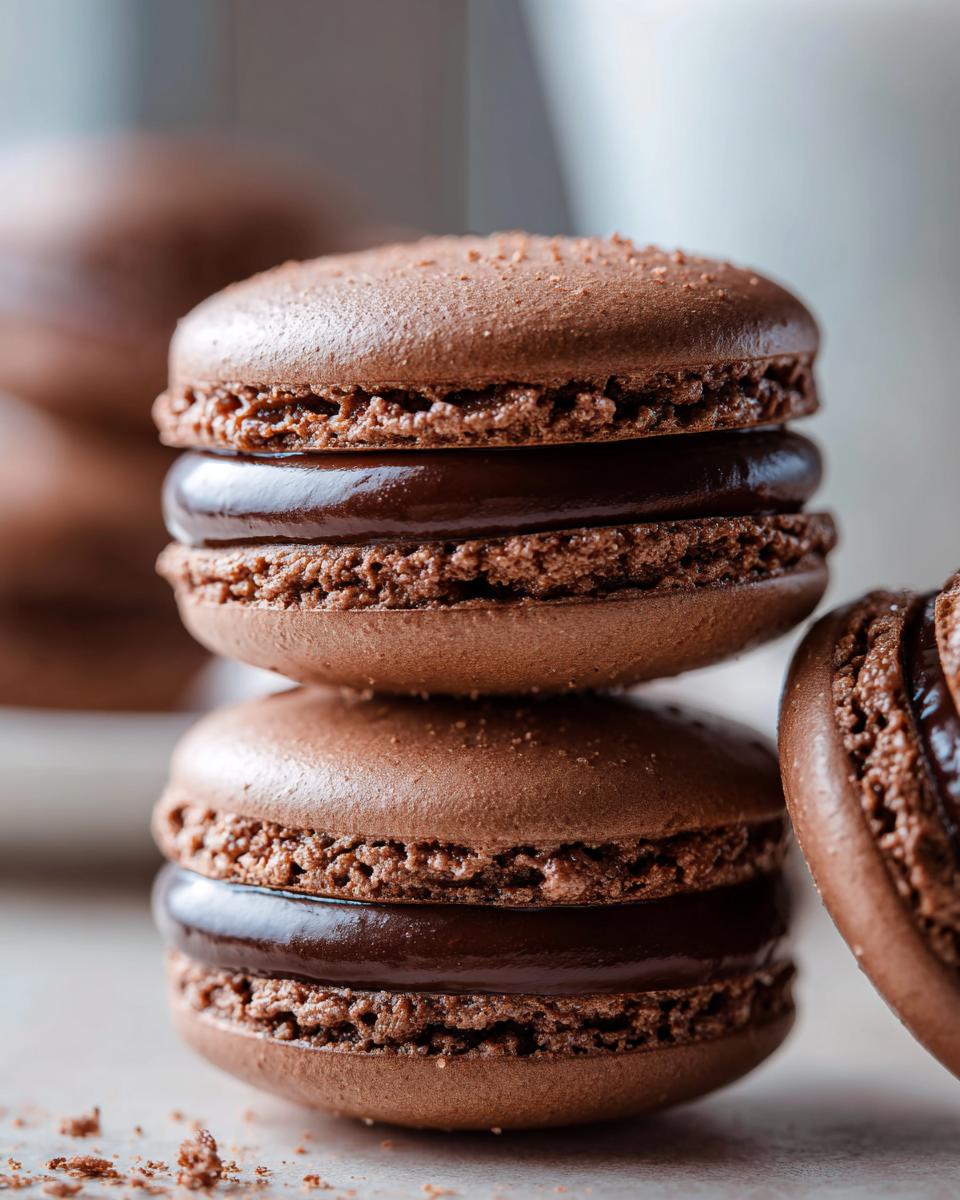
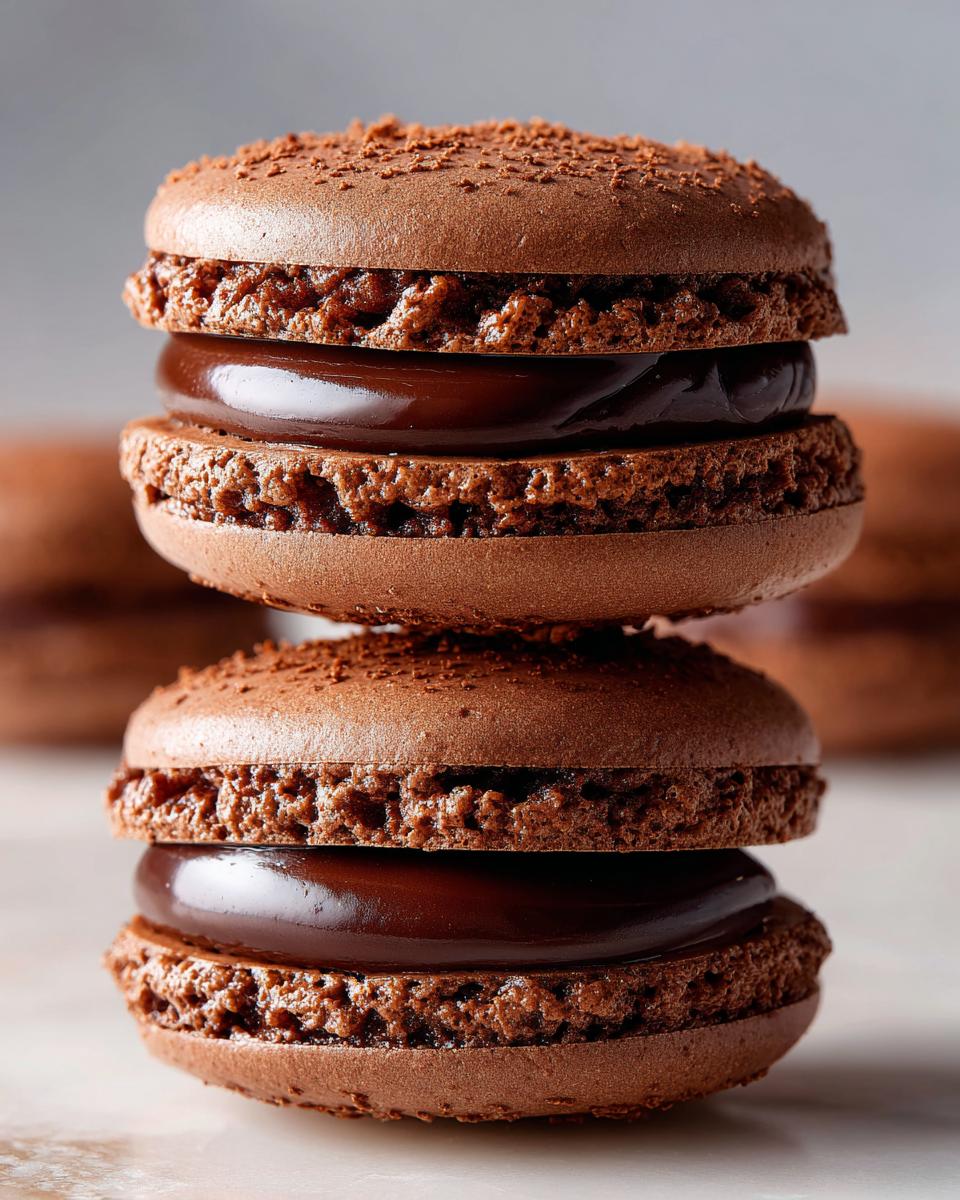
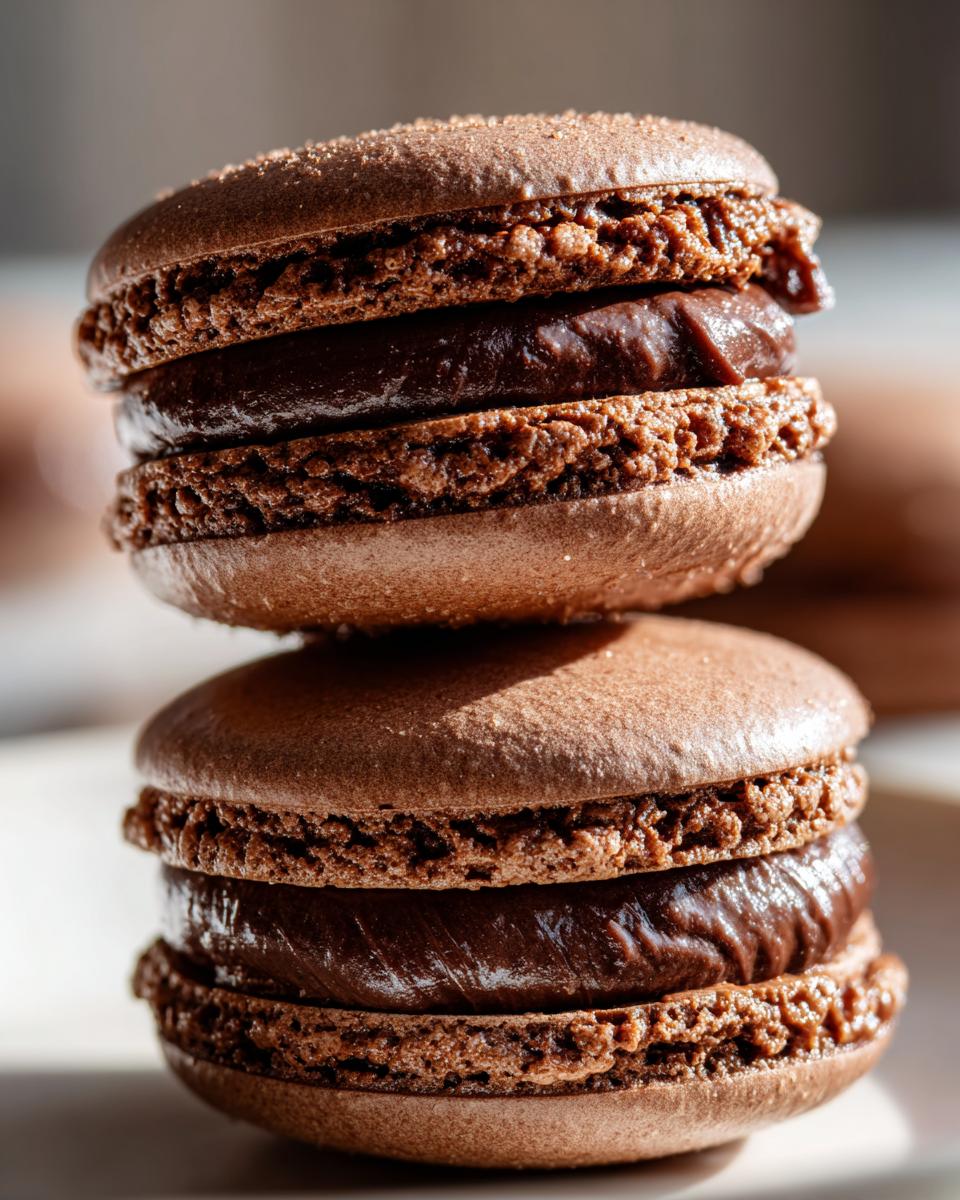
Crafting the Silky Chocolate Ganache for Your Chocolate Macarons
Now that your gorgeous little chocolate macarons shells are cooling, it’s time to make the filling that ties everything together! Honestly, this rich chocolate ganache is so simple, you’ll wonder why you ever bought fillings pre-made. We’re heating the heavy cream just until it starts to simmer—watch it carefully so it doesn’t boil over, that’s messy! Pour that hot cream right over your finely chopped semi-sweet chocolate and just let it sit for five minutes. Don’t mess with it!
After they’ve had a little soak, gently whisk it until it’s completely smooth. The final secret ingredient here is one tablespoon of butter; whisk that in last. It gives the ganache an incredible sheen and helps it set up nicely. You need to let this mixture cool until it’s thick enough to hold its shape, like heavy peanut butter, before you try filling those delicate shells. If you want more ideas on leveling up that filling game, check out the flavor inspiration over at Chocolate Ganache Macarons.
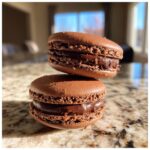
Assembling and Maturing Homemade Chocolate Macarons
Once your shells are totally cool—and I mean room temperature, no warmth left in them—it’s time for assembly! This is the fun part where the cookies finally become chocolate macarons. Just match up shells that look similar in size; nobody needs to know the secret to the perfect pair! Pipe or spread a generous dollop of that cooled ganache onto the flat side of one shell and gently press its partner on top until the filling just kisses the edges. But we aren’t eating them yet! The absolute final step, which is the hardest part of this whole process, is patience.
These need to mature in the fridge. Seriously! Put all your assembled beauties into an airtight container and let them chill for at least 24 hours. This resting time is vital because the creamy moisture from the ganache sinks into the crisp shell, which transforms the whole experience. That’s how we turn a simple cookie into one of those lovely, delicate bite sized desserts that melt perfectly in your mouth. Don’t skip this resting period, or you’ll miss out on that signature chew!
Variations: Trying Hot Chocolate Macarons Recipe
Now, once you’ve mastered the classic rich chocolate setup, we have to talk about fun holidays and seasonal bakes! If you’re looking for something extra cozy, you absolutely need to try a spin-off: the hot chocolate macarons recipe. It’s like drinking a gourmet mug of cocoa, only tiny and elegant. You can incorporate a little extra cocoa powder right into your meringue when you do the dry mix folding. That deepens the shell flavor even more.
For the filling, ditch the plain ganache just this once! Grab some marshmallow fluff, maybe even whip up a quick Swiss meringue and fold in a spoonful of fluff to make it extra airy and cloud-like. If you’re feeling really festive and want that classic look, try topping the assembled macarons with a few mini marshmallows before serving. These are perfect for colder nights. If you want a different kind of cozy treat after you’re done, my Cinnamon Roll Casserole is amazing in the winter, too! For gorgeous inspiration on nailing those festive shells, pop over to Hot Chocolate Macarons here.
Storage and Keeping Your Chocolate Macarons Fresh
So, you’ve made the perfect batches of chocolate macarons, and now you have that 24-to-48-hour chilling period to look forward to. Don’t panic about keeping them pristine! The beauty of these little delights is that they actually *prefer* being stored in the fridge. Just make sure they are in a fully airtight container. If you stack them, use a tiny piece of parchment paper between the layers so the filling doesn’t stick to the shells above. When you’re ready to serve them—maybe for a party or just a fabulous afternoon snack—pull them out about 30 minutes before eating. Letting them come up to room temperature really brings out the depth of the chocolate flavor and ensures that signature soft chew!
Troubleshooting Common Issues with Chocolate Macarons
It happens to the best of us—you think the batter is perfect, you go through all the steps, and you pull out something… less than perfect. Don’t let that get you down! Baking these homemade chocolate macarons often requires a second attempt to truly understand your oven and humidity levels. If your tops cracked everywhere, chances are they either didn’t rest long enough to form that crucial skin, or you didn’t tap the air out firmly enough before resting. Don’t worry; just tap harder next time!
Now, if you have hollow shells—that pesky gap inside the top—that usually points back to the macaronage. My guess is you under-mixed ever so slightly, or maybe your oven was too hot and baked the outside too fast! And the biggest heartbreak? No feet. If you see zero ruffle, it means one of two things: either you over-mixed the batter until it was too thin, or they weren’t rested long enough to develop that skin. Remember, these little chocolate french pastry cookies teach you patience!
Frequently Asked Questions About Chocolate French Pastry
I know questions pop up as soon as you start thinking about baking something a little challenging, like these gorgeous chocolate macarons. It’s totally normal! Having the answers ready beforehand really helps build that confidence we are aiming for in the kitchen.
Can I use regular all-purpose flour instead of almond flour?
Oh, honey, please don’t! Almond flour is everything here. Regular flour contains gluten structure, and when we mix it, it builds up too much strength, which leads to tough cookies, not those delicate, melt-in-your-mouth shells we are dreaming about. Almond flour is what keeps their texture tender and naturally chewy. If you are trying to bake successfully, sourcing that almond flour is step number one!
Why are my chocolate macaron shells cracking on top?
Cracks usually mean there was still a pocket of air trapped inside when they went into the oven. That’s why tapping the baking sheet so firmly is so important! Also, if they don’t rest long enough to form that dry skin, the steam escapes unevenly, and boom—cracksville! Make sure that skin is solid before baking for the best results.
How long do chocolate macarons need to mature in the fridge?
I always tell people to wait at least 24 hours, but honestly, they are best closer to 48 hours! The whole point of a great macaron isn’t just the crisp shell; it’s that soft, almost brownie-like chew you get when the filling moisture has had time to work its way in. It’s worth the wait, I promise. This process is key to getting that perfect texture, much like letting my Avocado Toast with Feta sit for a minute before I add the pepper!
Sharing Your Decadent Chocolate Dessert Creations
Now that you’ve navigated the marvelous, slightly finicky world of chocolate macarons, I really want to know how they turned out! Seriously, these little beauties deserve to be celebrated. If you followed along and achieved those gorgeous glossy shells and that perfect chew, please, please leave a rating for the recipe at the top of the page. It helps other bakers know they can tackle this too!
If you ran into a little snag—maybe your feet were shy or you had a few cracks—don’t keep that to yourself! Head down to the comments section and tell me what happened. We are all learning together here at the table, and sharing the challenges is sometimes more helpful than just sharing the perfect outcome. Tell me what you think of the rich chocolate ganache filling!
And if you managed to get a stunning batch perfect for a gathering or just a quiet afternoon treat, I’d absolutely love to see them. Snap a picture and share it on social media. Tag me so I can celebrate with you! There is nothing better than seeing my recipes come to life in your kitchens. If you have any lingering questions or need to reach out directly about finding the right consistency, you can always get in touch via my contact page. Happy baking, friends!
PrintFoolproof Chocolate Macarons with Rich Ganache Filling
Follow this simple recipe to make chewy chocolate macarons with glossy shells and perfect feet. This guide uses accessible ingredients for a decadent, homemade French pastry.
- Prep Time: 45 min
- Cook Time: 15 min
- Total Time: 60 min
- Yield: About 24 assembled macarons 1x
- Category: Dessert
- Method: French Meringue
- Cuisine: French
- Diet: Vegetarian
Ingredients
- 100 g aged egg whites (about 3 large eggs)
- 100 g granulated sugar
- 100 g almond flour
- 100 g powdered sugar
- 25 g unsweetened cocoa powder
- Pinch of salt
- For the Ganache Filling:
- 100 g semi-sweet chocolate, finely chopped
- 100 ml heavy cream
- 1 tablespoon unsalted butter
Instructions
- Prepare the dry ingredients: Sift the almond flour, powdered sugar, and cocoa powder together into a bowl. Discard any large pieces that do not pass through the sieve. This step is key for glossy shells.
- Make the meringue: In a clean, grease-free bowl, beat the egg whites and salt until foamy. Gradually add the granulated sugar, one tablespoon at a time, beating until stiff, glossy peaks form (French meringue method).
- Macaronage: Gently fold the sifted dry ingredients into the meringue in three additions. Use a spatula to fold the batter until it flows slowly off the spatula like molten lava, forming a ribbon that holds its shape briefly on the surface (the ribbon stage). Do not overmix.
- Pipe the shells: Transfer the batter to a piping bag fitted with a round tip. Pipe 1.5-inch circles onto baking sheets lined with parchment paper or silicone mats.
- Tap out air: Firmly tap the baking sheets several times on the counter to release trapped air bubbles. Use a toothpick to pop any remaining visible bubbles to prevent cracks.
- Rest the shells: Let the piped macarons rest at room temperature until a dry skin forms on the surface. You should be able to lightly touch the top without batter sticking to your finger. This resting time varies based on humidity.
- Bake: Preheat your oven to 300 degrees F (150 degrees C). Bake for 12 to 15 minutes. The macarons are done when they develop ‘feet’ (the ruffled base) and do not wiggle when gently nudged.
- Cool: Let the shells cool completely on the baking sheet before attempting to remove them.
- Make the ganache: Place the chopped chocolate in a heatproof bowl. Heat the heavy cream until it just simmers. Pour the hot cream over the chocolate and let it sit for 5 minutes. Stir until smooth, then whisk in the butter until fully incorporated. Let the ganache cool and thicken to a pipeable consistency.
- Assemble: Pair matching macaron shells. Pipe or spread a generous amount of cooled ganache onto the flat side of one shell and gently press another shell on top.
- Mature: Place the assembled macarons in an airtight container in the refrigerator for at least 24 hours. This allows the filling moisture to soften the shell, creating the desired chewy texture.
Notes
- For the best results, weigh all your ingredients using a digital scale. Volume measurements are not precise enough for macarons.
- If you want a deeper chocolate color, add an extra teaspoon of cocoa powder, but you may need to slightly increase the egg whites to maintain batter consistency.
- Always use aged egg whites (separated a day ahead and left covered at room temperature) for stronger meringue structure.
Nutrition
- Serving Size: 1 macaron
- Calories: 120
- Sugar: 10
- Sodium: 30
- Fat: 7
- Saturated Fat: 4
- Unsaturated Fat: 3
- Trans Fat: 0
- Carbohydrates: 13
- Fiber: 1
- Protein: 2
- Cholesterol: 10