
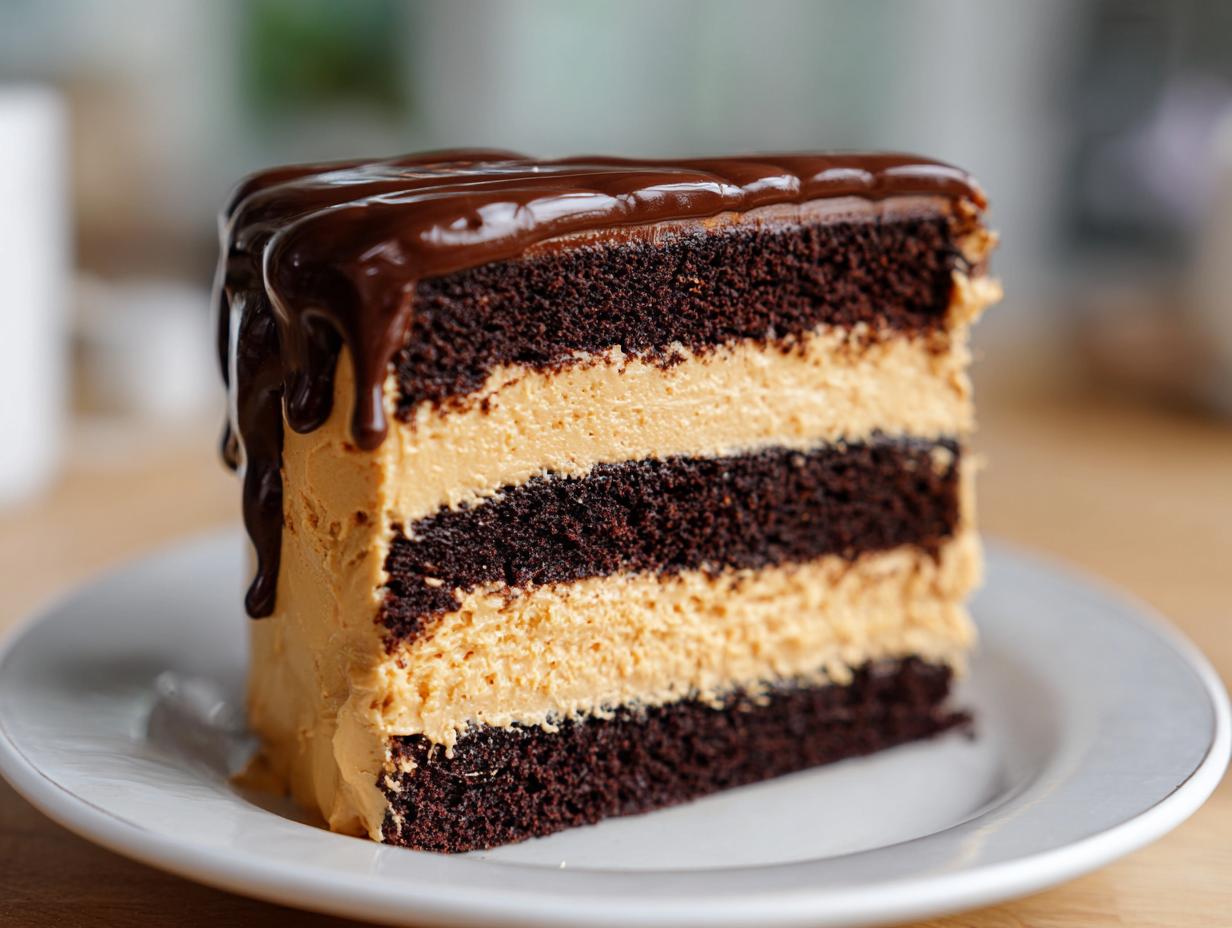
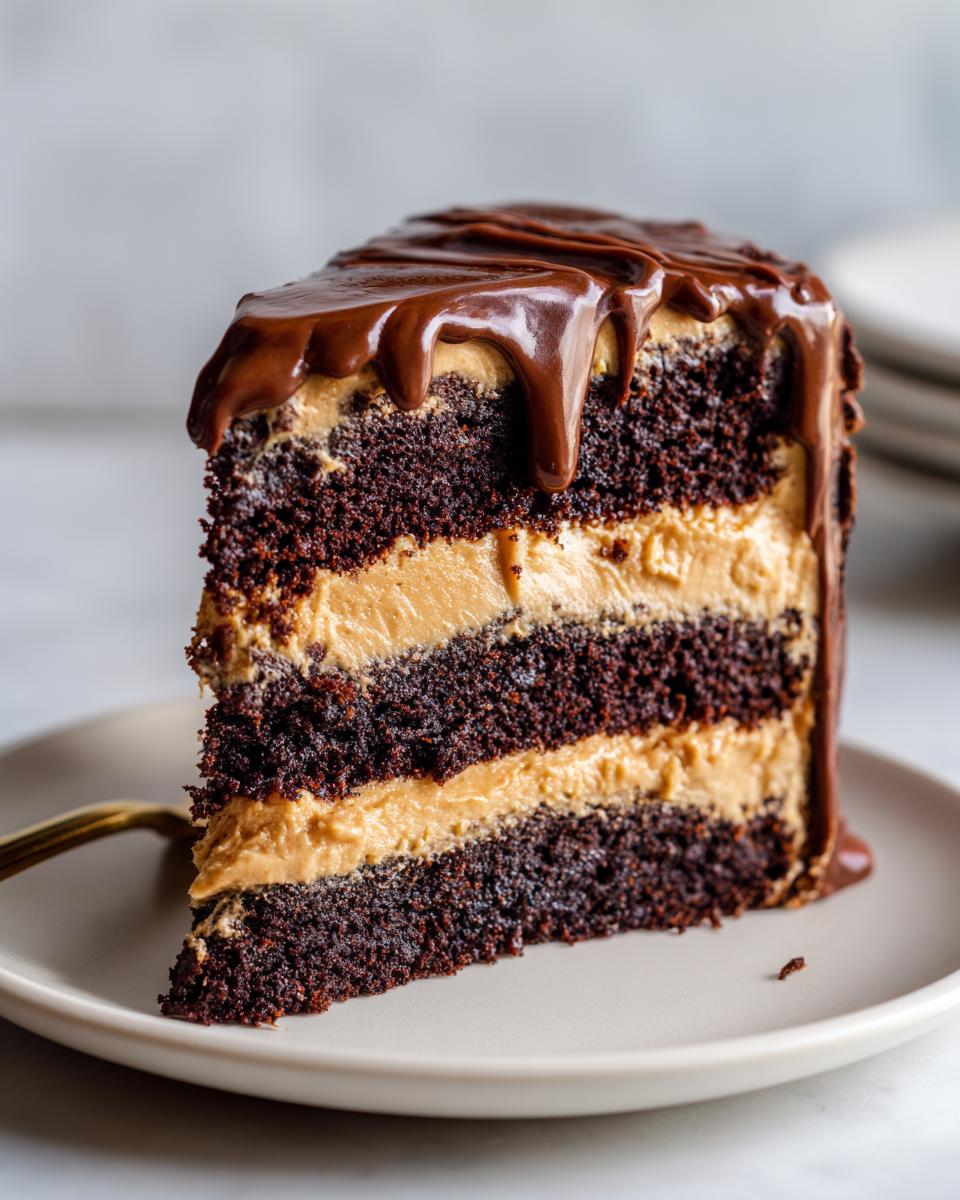
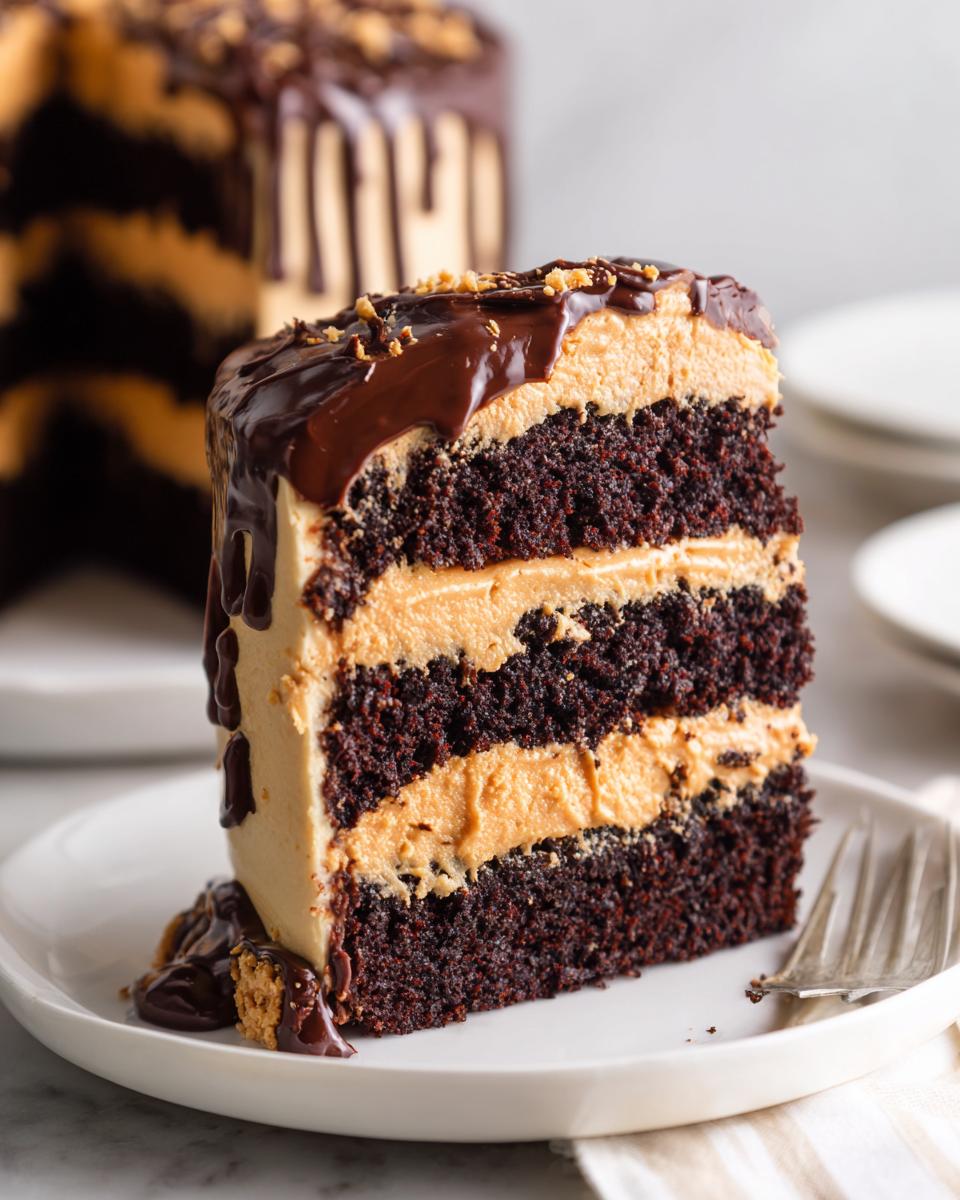
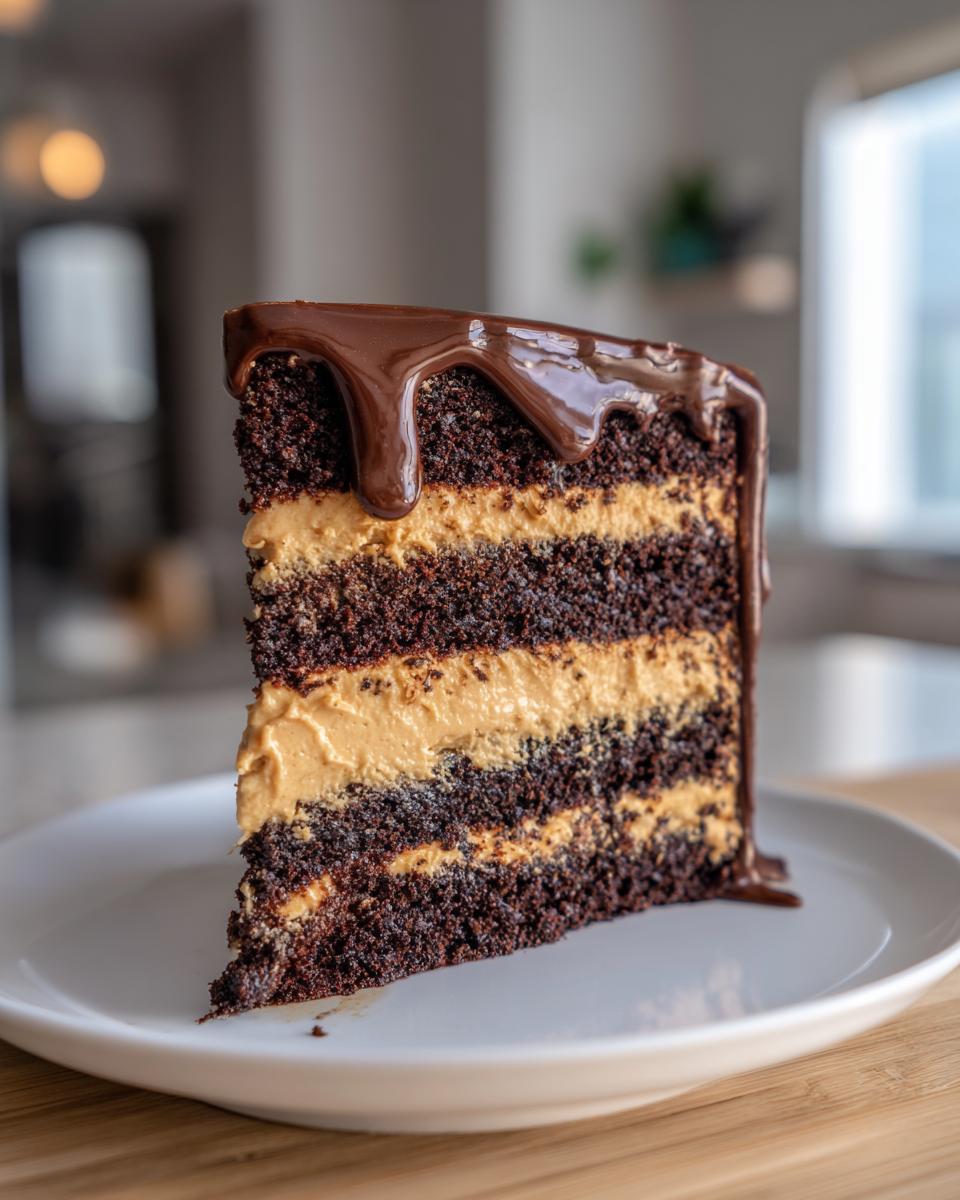
When you need a dessert that stops everyone in their tracks, forget the simple snacks—we are going straight for decadence! I spent years in my kitchen analyzing why some American classics just fall flat while others become legendary. That obsession led me right here, to what I honestly call the ultimate treat: the chocolate peanut butter cake. This isn’t just any recipe; this is the version I tested and re-tested until the chocolate layers were unbelievably moist, the peanut butter frosting was perfectly creamy, and the glossy ganache top made it a total showstopper.
Because every recipe here at Taste This Plate carries my promise to you—it’s been rigorously tested in my real, everyday kitchen. You don’t need to be a pastry chef to nail this one. We focus on keeping the main ingredients simple while using the right techniques to achieve that rich, deep flavor and texture everyone dreams about. If you’re planning a celebration, trust me, grab your mixer, because this is the one they’ll talk about for months. But before we get into the fun layering part, you should check out my method for gooey butter pecan cake if you ever need another amazing indulgence!
- Why This Chocolate Peanut Butter Cake Recipe is a Showstopper
- Gathering Ingredients for Your Chocolate Peanut Butter Cake
- Step-by-Step Instructions for the Chocolate Peanut Butter Cake Recipe
- Tips for a Perfect Chocolate Peanut Butter Cake Bake
- Variations on the Classic Chocolate Peanut Butter Cake
- Serving Suggestions for Your Rich Chocolate Dessert
- Storage and Reheating Instructions for Your Chocolate Peanut Butter Cake
- Frequently Asked Questions About This Chocolate Peanut Butter Cake
- Estimated Nutritional Data for This Decadent Dessert Recipes
- Share Your Best Peanut Butter Chocolate Cake Creations
Why This Chocolate Peanut Butter Cake Recipe is a Showstopper
When I look at the dozens of desserts I’ve perfected, this cake stands out. It hits that perfect intersection of pure indulgence and balanced flavor. It’s one of those truly decadent dessert recipes that feels like it should take all day, but we get those rich results quickly because of a few tricks I use.
- It’s genuinely a showstopper dessert—perfect for birthdays or when hosting!
- The sweet chocolate layer melts perfectly against that salty, creamy peanut butter element.
- It holds up beautifully under the weight of the frosting and ganache, making it ideal for stacking high.
Achieving the Ultimate Moist Chocolate Cake
You know how easy it is for chocolate cake to dry out? Not this one! The secret to that moist chocolate cake texture is using hot liquid—either hot water or freshly brewed coffee—right at the very end of mixing. This step seems wild, I know, but trust me, it “blooms” the cocoa powder. It deepens the chocolate flavor incredibly while ensuring the crumb stays tender and never dry, even on day three.
The Creamy Peanut Butter Frosting Difference
Forget grainy, overly sweet stuff. My goal here was a luxurious, silky texture. This creamy peanut butter frosting uses just the right ratio of softened butter to peanut butter, meaning it pipes beautifully and pairs delicately with the rich cake. It’s lighter than standard peanut butter buttercream, which keeps the entire slice from feeling too heavy.
Gathering Ingredients for Your Chocolate Peanut Butter Cake
Okay, you might think baking a two-layer chocolate peanut butter cake is intimidating, but if you have your ingredients measured out, you’re halfway there! I always lay everything out on my counter before I even preheat the oven. It keeps things moving smoothly, especially when you’re dealing with three different components: the cake, the frosting, and that gorgeous ganache topping.
Remember, using good quality ingredients is key here—it’s what pushes this from a good dessert into that fantastic, award-winning taste we’re aiming for. If you’re looking for something lighter and refreshing to serve alongside this richness later, you might want to check out my recipe for sparkling honey lemonade soda!
Ingredients for the Extra Moist Chocolate Cake Layers
These are the dry and wet items for the actual chocolate batter. Pay close attention to the coffee; it just deepens that chocolate flavor, I promise it won’t taste like a coffee cake!
- 1 3/4 cups all-purpose flour
- 1 3/4 cups granulated sugar
- 3/4 cup unsweetened cocoa powder
- 1 1/2 teaspoons baking soda
- 3/4 teaspoon baking powder
- 3/4 teaspoon salt
- 2 large eggs
- 1 cup buttermilk (this adds wonderful tang and moisture!)
- 1/2 cup vegetable oil
- 2 teaspoons vanilla extract
- 1 cup hot water or hot brewed coffee
Ingredients for the Creamy Peanut Butter Frosting
For the frosting, we need everything at room temperature so it blends beautifully into that smooth dream texture. That butter needs to be perfectly softened—not melted—to whip up right.
- 1 cup creamy peanut butter
- 1/2 cup (1 stick) unsalted butter, softened
- 3 cups powdered sugar
- 1/4 cup milk or heavy cream
- 1/2 teaspoon vanilla extract
Ingredients for the Chocolate Ganache Topping
This is the final, glossy layer that makes people grab their forks immediately. You can skip the optional topping, but honestly, adding some chopped Reese’s takes this over the top!
- 4 ounces semi-sweet chocolate chips
- 1/2 cup heavy cream
- Optional: 1/2 cup chopped peanut butter cups (for that salty crunch on top!)
Step-by-Step Instructions for the Chocolate Peanut Butter Cake Recipe
This is where the magic happens! Now that we have all our components ready—the dry ingredients waiting, the butter soft, the chocolate melted—we just need to put it all together. I’ve broken this down into four main phases so nothing gets confusing. Remember, baking is really just controlled chemistry, so following the order of operations is how we ensure this turns out to be one of the layer cake ideas you use again and again.
If you’re looking for another amazing baked good, you absolutely have to try my recipe for crispy potato wedges—they are perfect for balancing out all this sweetness!
Preparing and Baking the Moist Chocolate Cake Layers
First thing first: preheat that oven to 350°F (175°C) and get your two 8-inch pans greased and floured. Don’t skip that prep work! Start by whisking your dry ingredients—flour, sugar, cocoa, leavening, and salt—together in a big bowl. Then, beat in the eggs, buttermilk, oil, and vanilla. Keep mixing on medium for a solid two minutes, that really helps everything get incorporated.
Crucially, now you gently stir in that hot water or coffee until the batter is perfectly smooth. I need you to know, the batter will be thin, almost watery. Don’t panic! Divide it evenly and pop it into the oven for 30 to 35 minutes. You must check for doneness earlier than you think, around 30 minutes, because overbaking is the main way we lose that precious moistness.
Making the Creamy Peanut Butter Frosting
While those cakes cool down (and they need to cool completely, seriously!), you tackle the frosting. Make sure your butter is perfectly soft. Beat that butter until it’s light, then add your peanut butter and mix until combined. This is the slow part: gradually add the powdered sugar, alternating spoonfuls with the milk or cream. You want to mix until it’s fluffy and creamy, not stiff like cement! Finish with that teaspoon of vanilla and set it aside.
Creating the Glossy Chocolate Ganache Topping
For the ganache, we need high heat followed by patience. Put your semi-sweet chips in a bowl. Heat the heavy cream in a tiny saucepan until you see it just starting to bubble around the edges—don’t let it boil hard! Pour that hot cream over the chips and just let it stand for five full minutes without touching it. That waiting period lets the heat melt everything evenly. After five minutes, whisk it gently until it’s glossy and totally smooth. Let it cool a bit so it thickens up enough when you pour it.
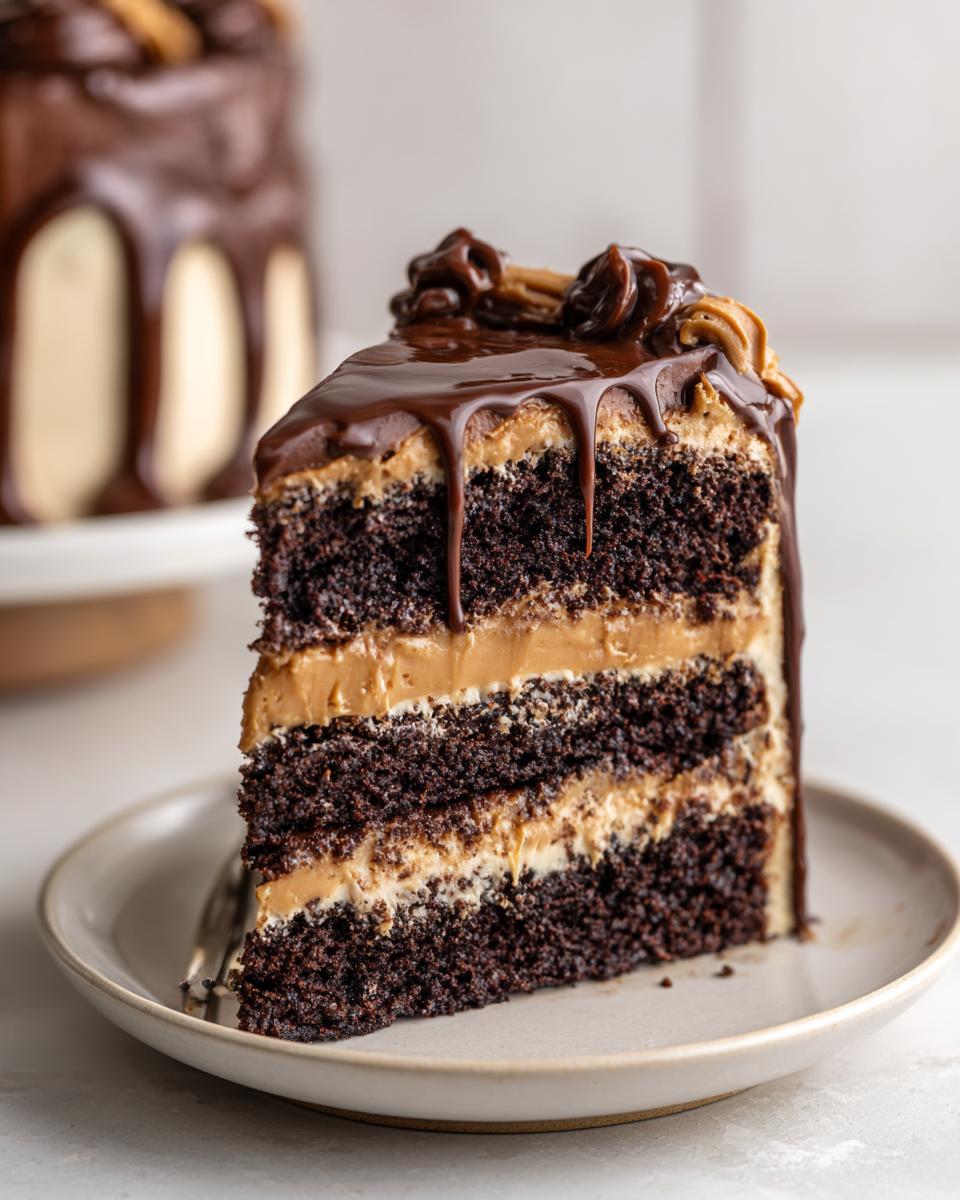
Assembling Your Ultimate Chocolate Peanut Butter Layer Cake
Time to build this beauty! Put your first cake layer down. Take about a third of that creamy peanut butter frosting and spread it evenly across the top. Place the second layer gently on top. Now, use the rest of the frosting to cover the top and sides smoothly. This is where your layer cake ideas come to life!
Finally, take that cooled ganache and pour it right over the center top, guiding it gently so it drips down the sides naturally. If you got those chopped peanut butter cups, shower them on top right away so they stick to that setting ganache. Isn’t that the prettiest rich chocolate dessert you’ve ever seen?
Tips for a Perfect Chocolate Peanut Butter Cake Bake
Okay, we’ve mixed, we’ve baked, and we’re frosting—but if you want to ensure this cake lives up to its “Ultimate” title, you need to pay attention to a few details I learned from my testing! Baking is all about temperature, people! If you skip these little pointers, you might lose that incredible moisture we worked so hard to keep in the cake.
First off, about that coffee tip. I cannot stress this enough: Using hot coffee instead of hot water isn’t just about flavor; in the recipe notes, I mention it deepens the chocolate flavor without making the cake taste like your morning cup. That depth of flavor is crucial for a rich chocolate dessert like this. Don’t worry, your cake won’t be caffeinated!
Next is the biggest pitfall for anyone making a moist chocolate cake: overbaking. Seriously, pull those layers out the second they look done. My key tip is the ‘three-check’ method I use: 1) Look for the cake pulling slightly away from the edges of the pan. 2) Gently press the center with your finger—it should spring back without leaving an indent. 3) The toothpick test should show moist crumbs clinging, not wet batter. That slight under-doneness is where the moisture lives!
When you’re working on the frosting, remember that ingredient temperature matters. If your butter is too cold, your creamy peanut butter frosting will end up lumpy instead of smooth. If the butter is warm or oily, the frosting will be soupy and won’t hold shape for stacking. Always aim for that soft, slightly cool, bendable stick of butter.
And finally, if your chocolate ganache topping starts setting up on you faster than expected while you’re frosting the sides, don’t panic-throw it out! Just put that bowl back over the warm (not hot!) water for about 30 seconds, stir, and it should flow beautifully again. It takes a little patience, but it’s worth not tearing up those beautiful cake layers. Speaking of patience, if you ever feel like your dinner needs a rich, savory balance to all this sugar, you must look into my recipe for beef garlic butter linguine!
Variations on the Classic Chocolate Peanut Butter Cake
I love the core recipe for this chocolate peanut butter cake—it is what it is, perfect and rich! But one of the best parts about baking is making a classic recipe truly your own. Since we nailed the foundational moist chocolate cake and that silky frosting, we have a fantastic canvas for playing around with flavors and textures.
This cake naturally fits into that wonderful category of sweet and salty desserts because of the peanut butter and chocolate hug, but we can push that element even further! If you’re looking for another way to bring a classic flavor into your baking rotation, don’t forget to check out my tips for perfect cranberry sugar cookies—they use a similar balance of sweet fruit and salty crunch!
The Peanut Butter Cup Takeover
If you followed the instructions, you know I gave you the option for chopped peanut butter cups on top. But why stop there? For those of you who want maximum candy impact, you can fold about half a cup of those chopped cups right into the peanut butter frosting mixture! You just have to make sure you’re using enough powdered sugar so it doesn’t get too sloppy. It’s a little heavy, but it makes for an incredible Reeses cake recipe feel!
Switching Up the Sweet and Salty Element
If peanuts aren’t your absolute favorite, try swapping out the peanut butter for another creamy nut butter. Almond butter works surprisingly well—it has a slightly earthier, less overpowering flavor profile that lets the dark chocolate shine through even more. Cashew butter is fantastic too, though it tends to be a bit sweeter naturally. Just maintain the same ratios in the frosting, and trust your taste buds!
Playing with the Chocolate Element in Your Layer Cake
Remember how we talked about using hot coffee? If you want to lean even harder into the intense chocolate flavor, ditch the standard cocoa powder and substitute some of it with dark or Dutch-processed cocoa. That will give you a darker color and a smoother richness. Alternatively, if you want to make something that feels a little closer to a quick chocolate cake baking project but still decadent, you could skip the layer cake assembly and make this into thick, deep chocolate peanut butter brownies instead!
Serving Suggestions for Your Rich Chocolate Dessert
Whew! You made it! You have this gorgeous, towering, deeply rich chocolate dessert right in front of you, ready to be devoured. But how do you serve something this spectacular? You don’t want to hide the layers or that amazing ganache drip, right? When I bake something this intense, especially when I’m baking for parties, I like to keep the sides simple so the cake does the talking.
The flavors here—deep chocolate, salty-sweet peanut butter—are so bold that they pair best with something equally classic but much lighter. This isn’t a cake that needs an extra heavy sauce; it needs a partner, not a distraction!
If you’re thinking about serving this for a big family event, here are my go-to ways to present this chocolate peanut butter cake:
- The Perfect Pour: You absolutely cannot go wrong with a hot cup of strong brewed coffee. The bitterness cuts right through the sugar of the frosting and makes the chocolate taste even deeper. I always have a thermos of black coffee ready when I slice this cake.
- Ice Cream Companions: A simple scoop of high-quality vanilla bean ice cream is heaven alongside a warm slice. The contrast between the cold, creamy ice cream and the room-temperature, dense cake is just divine.
- A Touch of Brightness: If you served this earlier in the day or want something slightly less heavy, a tall glass of something tart works miracles—like my honey lemon pink soda recipe. The citrus contrast is surprisingly refreshing against all that chocolate richness!
- Keep it Simple: Honestly, this cake is so self-sufficient. Sometimes, especially after a big meal, a small sliver of room-temperature cake with just a glass of cold milk is the best way to enjoy it. Don’t feel pressured to add toppings if the cake itself is the star!
Storage and Reheating Instructions for Your Chocolate Peanut Butter Cake
Whew! This incredible chocolate peanut butter cake is assembled! You’re looking at a massive, beautiful, frosted layer cake, and now you’re probably wondering, “How do I keep this perfection from turning into a sad, crusty mess by tomorrow?” I totally get it. Storing a cake this rich with cream cheese-based frosting requires a few special steps to keep those chocolate layers tasting as moist as they did fresh out of the oven.
The secret to keeping cake moist when frosted is managing air exposure and temperature. Since we have that yummy, but slightly delicate, peanut butter frosting, we need to treat it right. When you have leftovers of a truly decadent dessert like this, you want them to last so you can sneak bites later!
Storing Your Frosted Chocolate Peanut Butter Cake
For short-term storage—say, the next couple of days—you should keep this cake right on the counter, contrary to what many people think! Refrigeration can actually dry out cake layers faster, especially when they are already insulated by frosting. The flavor also goes a little flat in the cold.
Cover the cake loosely with a cake dome or a large, overturned bowl. If you don’t have either, you can use large strips of plastic wrap draped loosely over the top, making sure you don’t smash down the frosting. I’d aim to keep it sealed off from any strong surrounding kitchen smells, but let it sit out at cool room temperature for up to three days. Since this cake has a good amount of sugar and fat, it’s safely fine sitting out.
Freezing Leftover Cake Layers
If you bake the layers ahead of time (which I often do to make my life easier!), or if you just have too much leftover cake, freezing is your best friend. This is how you keep those moist layers perfect for weeks!
- Unfrosted Layers: Once the cakes are completely cool, wrap each layer tightly in two layers of plastic wrap, and then wrap that whole package in a layer of aluminum foil. Freeze for up to two months. Defrost them on the counter, still wrapped, for a few hours before unwrapping and frosting.
- Frosted Slices: If you’ve already assembled the cake, slice it up first! Frosting works as a fantastic sealant. Wrap each individual slice well with plastic wrap, then foil, and freeze. This is perfect for satisfying random cravings later!
The Best Way to Bring Cold Cake Back to Life
If you *did* refrigerate your beautiful creation—maybe your kitchen runs super hot—or if you pulled slices out of the freezer, bringing it back to that perfect, soft texture takes one tiny step. You want to bring the cake back to room temperature for about an hour before serving. Better yet, if you’re serving a frozen slice, you can microwave it very gently.
Microwave slices individually! Pop that slice on a paper towel on a microwave-safe plate and hit it for just 10 to 15 seconds on 50% power. That little burst of warmth softens the frosting just enough and wakes up the moisture in the chocolate cake layers perfectly. It tastes like it was just finished baking—I promise!
Frequently Asked Questions About This Chocolate Peanut Butter Cake
I always end up with a ton of questions when I try a new recipe, especially when I’m aiming for a showstopper like this! It’s totally natural. I’ve gathered the questions I usually get about this extra moist chocolate peanut butter cake right here. We want to make sure your baking results are absolutely flawless, whether this is your first time baking from scratch cake recipes or you’re a seasoned pro!
If you ever need a savory break from all this sweetness, you absolutely have to try my recipe for lemon pepper chicken thighs—it’s a lifesaver after a day of baking!
Can I make this Chocolate Peanut Butter Cake ahead of time?
Yes, you totally can! This is a lifesaver when you’re planning a big party. The best way to go is to bake the layers and let them cool completely, like fully cool. Then, wrap each layer individually. I mean, wrap it TIGHTLY—two layers of plastic wrap, maybe even a layer of foil over that. If you keep them tightly sealed, they are perfect stored at cool room temperature for about two days, or you can freeze them for up to two months. When you’re ready to frost, just unwrap them and let them sit on the counter for an hour before assembling. That way, you skip the mess of making the moist chocolate cake batter on the day of the event!
What is the best way to get a clean slice of this Layer Cake?
Oh, this is crucial for presentation! Because we use so much decadent frosting and that lovely, slightly gooey ganache, trying to slice it when it’s warm or room temperature is a recipe for disaster—you’ll just smash the layers. To get those perfectly clean slices you see in magazines, you need to chill the assembled cake. Pop the whole thing, uncovered, into the refrigerator for at least one full hour before you plan to cut it. This firms up the creamy peanut butter frosting and the ganache, allowing your knife (I highly recommend a long, thin, sharp knife that you wipe clean between cuts) to glide right through everything without smearing.
Is this considered an Easy Chocolate Dessert?
That depends on what you consider “easy”! If you mean “quick shortcuts using a box mix,” then no, this is a from scratch cake recipe and takes a bit more time than 45 minutes. However, if you define “easy” as a recipe with simple, accessible ingredients and straightforward steps that guarantee a professional, showstopper dessert result? Then, YES, it’s easy! The batters mix up quickly, it only needs one bowl for the chocolate cake, and the steps are logical. It’s not a five-minute bake, but it saves you the fuss of complicated techniques you find in professional pastry books.
Estimated Nutritional Data for This Decadent Dessert Recipes
Now, I know some of you are curious about the stats! When we are making something this deeply satisfying, we know it’s not exactly a light salad topping. This is a true indulgence, a showstopper dessert meant for celebrating! Because this chocolate peanut butter cake uses rich ingredients like real butter, oil, and peanut butter, the numbers reflect that decadence. But remember, this is just an estimate based on the ingredients I listed for one slice—and honestly, who eats just one slice of this amazingness?
Making food the way my grandmother taught me means focusing on the joy of the meal, not obsessing over the numbers, but for those who track things, here’s the baseline data. If you need something more savory after all this sugar, you really should check out my recipe for beef and bowtie pasta rolls; it’s a fantastic hearty meal!
Please keep in mind that because baking results can vary based on specific brands of cocoa powder, peanut butter brand thickness, or how heavily you load up on that optional ganache and candy topping, these figures are a guideline only. They are calculated for one standard serving of this rich chocolate dessert.
- Serving Size: 1 slice
- Calories: 550
- Sugar: 55g
- Total Fat: 34g
- Saturated Fat: 12g
- Carbohydrates: 60g
- Protein: 8g
- Sodium: 350mg
See? It’s a treat! We earn every single calorie when this amazing cake is involved. Just bake it with love, and enjoy every bite!
Share Your Best Peanut Butter Chocolate Cake Creations
Now comes my favorite part! You’ve put in the time, you’ve mixed the batter, you’ve wrestled with the ganache, and you have created this magnificent, towering chocolate peanut butter cake. I truly believe that sharing food is showing love, and I can’t wait to see what you created in your own happy kitchen!
Whether you kept your frosting smooth and elegant or packed that optional peanut butter cup crumble on top, please tell me all about it! Did the hot coffee trick work for you? Did your family fight over the last slice? That feedback is gold to me because it helps me know that this recipe works just as well in your home as it does in mine.
Don’t forget to leave a star rating right at the top of the page if you loved this decadent dessert recipe. Just a quick note about your experience tells me if I should keep tweaking things, or if we nailed the absolute best peanut butter chocolate cake recipe out there. I read every single comment personally!
If you took pictures—and I really hope you did because these cakes are gorgeous—tag me online! Sharing these homemade successes is what this is all about. If you need more inspiration on how I developed my cooking confidence, you can always read a little more about my philosophy on the About Me page. And hey, if you are looking for another incredible layer cake idea to try next, check out this fantastic guide on making a peanut butter chocolate layer cake from my blogging friend!
Thank you again for baking with me today. Happy cooking, and I hope this ultimate chocolate cake brings lots of smiles to your table!
PrintExtra Moist Chocolate Peanut Butter Layer Cake with Creamy Frosting and Ganache
Make this rich, decadent chocolate peanut butter layer cake. It features extra moist chocolate layers, smooth peanut butter frosting, and a glossy chocolate ganache topping, making it a perfect showstopper dessert.
- Prep Time: 25 min
- Cook Time: 35 min
- Total Time: 60 min
- Yield: 12 servings 1x
- Category: Dessert
- Method: Baking
- Cuisine: American
- Diet: Vegetarian
Ingredients
- 1 3/4 cups all-purpose flour
- 1 3/4 cups granulated sugar
- 3/4 cup unsweetened cocoa powder
- 1 1/2 teaspoons baking soda
- 3/4 teaspoon baking powder
- 3/4 teaspoon salt
- 2 large eggs
- 1 cup buttermilk
- 1/2 cup vegetable oil
- 2 teaspoons vanilla extract
- 1 cup hot water or hot brewed coffee
- 1 cup creamy peanut butter (for frosting)
- 1/2 cup (1 stick) unsalted butter, softened (for frosting)
- 3 cups powdered sugar (for frosting)
- 1/4 cup milk or heavy cream (for frosting)
- 1/2 teaspoon vanilla extract (for frosting)
- 4 ounces semi-sweet chocolate chips (for ganache)
- 1/2 cup heavy cream (for ganache)
- Optional: 1/2 cup chopped peanut butter cups (for topping)
Instructions
- Preheat your oven to 350°F (175°C). Grease and flour two 8-inch round cake pans.
- In a large bowl, whisk together the flour, sugar, cocoa powder, baking soda, baking powder, and salt for the cake.
- Add the eggs, buttermilk, oil, and vanilla extract to the dry ingredients. Beat with an electric mixer on medium speed for two minutes.
- Carefully stir in the hot water or coffee until the batter is smooth. The batter will be thin.
- Divide the batter evenly between the prepared cake pans. Bake for 30 to 35 minutes, or until a wooden pick inserted into the center comes out clean.
- Let the cakes cool in the pans for 10 minutes before inverting them onto a wire rack to cool completely.
- Prepare the peanut butter frosting: Beat the softened butter until creamy. Add the peanut butter and beat until combined. Gradually add the powdered sugar, alternating with the milk, until the frosting is smooth and fluffy. Stir in the vanilla extract.
- Prepare the chocolate ganache: Place the chocolate chips in a heatproof bowl. Heat the heavy cream in a small saucepan until it just begins to simmer. Pour the hot cream over the chocolate chips. Let stand for 5 minutes, then whisk until smooth and glossy. Let cool slightly until it thickens to a spreadable consistency.
- Assemble the cake: Place one cooled cake layer on a serving plate. Spread about one-third of the peanut butter frosting evenly over the top. Place the second cake layer on top.
- Frost the top and sides of the cake with the remaining peanut butter frosting.
- Pour or spread the slightly cooled chocolate ganache over the top of the cake, allowing some to drip down the sides.
- If using, sprinkle chopped peanut butter cups over the top before the ganache sets.
Notes
- Using hot coffee instead of hot water deepens the chocolate flavor without making the cake taste like coffee.
- For extra moist layers, do not overbake the cakes. Check them starting at 30 minutes.
- If the ganache sets too quickly, warm it gently for a few seconds to restore flow.
Nutrition
- Serving Size: 1 slice
- Calories: 550
- Sugar: 55
- Sodium: 350
- Fat: 34
- Saturated Fat: 12
- Unsaturated Fat: 18
- Trans Fat: 0.5
- Carbohydrates: 60
- Fiber: 3
- Protein: 8
- Cholesterol: 55