

There’s just nothing that says coziness quite like the smell of apples and warm cinnamon swirling through your house, right? When I develop a quick bread recipe, I always aim for what everyone secretly wants: incredible moisture that lasts for days. That’s why I spent so much time perfecting this recipe because it delivers everything people want in a classic, comforting apple bread, but we’re calling it the Super Moist Amish Apple Fritter Bread. Trust me, this one is fully tested, stripped down to the essential steps, and designed for real home kitchens like mine to produce extraordinary results. We focus entirely on keeping that crumb absolutely tender! If you want to know more about why we obsess over testing recipes here at Taste This Plate, check out our notes on why we bake!
- Why This Super Moist Amish Apple Bread Recipe Works (E-E-A-T)
- Gathering Ingredients for Your Homemade Apple Bread
- Step-by-Step Instructions for Easy Apple Bread
- Tips for the Best Apple Bread Success
- Variations and Serving Suggestions for Apple Cinnamon Bread
- Storage and Freezing Your Apple Bread
- Frequently Asked Questions About This Apple Bread
- Estimated Nutritional Data for This Apple Bread
- Share Your Homemade Apple Bread Experience
Why This Super Moist Amish Apple Bread Recipe Works (E-E-A-T)
When you search for the best apple bread, what you really want is zero sadness in the final slice—no dry edges, no crumbly texture. We get it! That’s why this isn’t just any Moist Apple Bread Recipe; it’s designed to conquer dryness. I’ve tested dozens of quick bread variations, and the few key changes I made result in a truly superior loaf every time. Skip the guesswork; these proven techniques are why people keep coming back to this version.
The Secret to Tender Apple Bread Texture
- We start by creaming the butter and sugar till it’s light. That process whips air in there, which is crucial for a lighter crumb structure.
- We beat the eggs in one by one. Slow and steady wins this texture race!
- The real hero here is the sour cream or Greek yogurt. The fat and acidity tenderize the flour immediately, resulting in that incredibly soft, Tender Apple Bread crumb that holds together perfectly when you slice it.
Using Fresh Apples for Maximum Flavor in Your Apple Bread
Forget those dried-out little pieces you sometimes see in recipes. If you want that real, authentic autumnal bite in your apple bread, you have to use fresh fruit. I recommend using Granny Smith apples because they are tart and hold their shape beautifully even after an hour in the oven, or Honeycrisp if you want a bit more sweetness.
Dicing them finely before tossing them in that brown sugar and cinnamon mix means every single bite of your finished loaf gets apple goodness without huge soggy pockets! It really makes all the difference.
Gathering Ingredients for Your Homemade Apple Bread
Okay, this is the fun part! Remember my philosophy: Simple Ingredients, Extraordinary Meals. Every single thing on this list is something you should be able to grab easily at your standard grocery store. You won’t need to hunt down specialty items, which keeps your Homemade Apple Bread night simple and stress-free. Get your measuring cups ready for this cozy masterpiece!
For the Apple Bread Batter
- 2 cups all-purpose flour
- 1 teaspoon baking soda
- 1/2 teaspoon salt
- 1 teaspoon ground cinnamon (this is the base spice!)
- 1/4 teaspoon ground nutmeg
- 1/2 cup unsalted butter, softened
- 1 cup granulated sugar
- 2 large eggs
- 1 teaspoon vanilla extract
- 1/2 cup sour cream or plain Greek yogurt
- 1 1/2 cups peeled and finely diced fresh apples (about 2 medium apples)
For the Cinnamon Swirl and Glaze
This is where the ‘fritter’ flavor really comes in! Don’t skip these parts; they make the loaf special.
- 1/2 cup brown sugar, packed (for coating the apples generously)
- 1 tablespoon ground cinnamon (this is the heavy-duty spice for the swirl)
- 1/2 cup powdered sugar (sifted is always better for smooth glazes!)
- 2 tablespoons milk or cream (you might need a tiny bit more or less for the glaze consistency)
Step-by-Step Instructions for Easy Apple Bread
We promised easy, and that’s exactly what you’re getting! While this Super Moist Amish Apple Bread ends up tasting like it took you all day, the method is straightforward. We rely on simple creaming techniques and careful layering to get that dreamy Cinnamon Swirl Apple Bread look without any mess. Just follow these steps precisely, and you’ll nail that bakery-quality loaf on your first try. If you’ve ever made my banana muffins, you’ll recognize the pattern!
Preparing the Oven and Dry Mix for Apple Bread
First things first, let’s get organized. Preheat your oven to 350°F (175°C) right away so it’s ready when your batter is mixed. Next, get your standard 9×5 inch loaf pan greased up well and then floured. Don’t skip the flouring after greasing, especially with a loaf this rich!
In a medium bowl, take your flour, baking soda, salt, the first measure of cinnamon, and nutmeg. Give this a good whisk right now. Whisking the dry stuff means the leavening agents (that’s the baking soda) are evenly distributed, which is super important for a level rise. Set that bowl aside for a minute.
Mixing the Wet Ingredients and Folding
Now for the creamy part! In a big bowl, use your hand mixer on medium speed to cream that softened butter and granulated sugar until it looks light and fluffy—almost pale yellow. This takes a couple of minutes! Then, beat in those eggs, one at a time, waiting about 30 seconds between each addition. After the eggs are incorporated, mix in your vanilla and that amazing sour cream or yogurt. You want it just combined; don’t beat it into submission!
On low speed, gradually add your dry ingredients to the wet mix. Stop mixing the second the last streaks of flour disappear. Seriously, overmixing bread batter is how you get tough, dense loaves. You want this light!
In a separate little bowl, toss your finely diced apples together with the brown sugar and the swirl cinnamon until they are completely coated. This step is key to developing flavor!
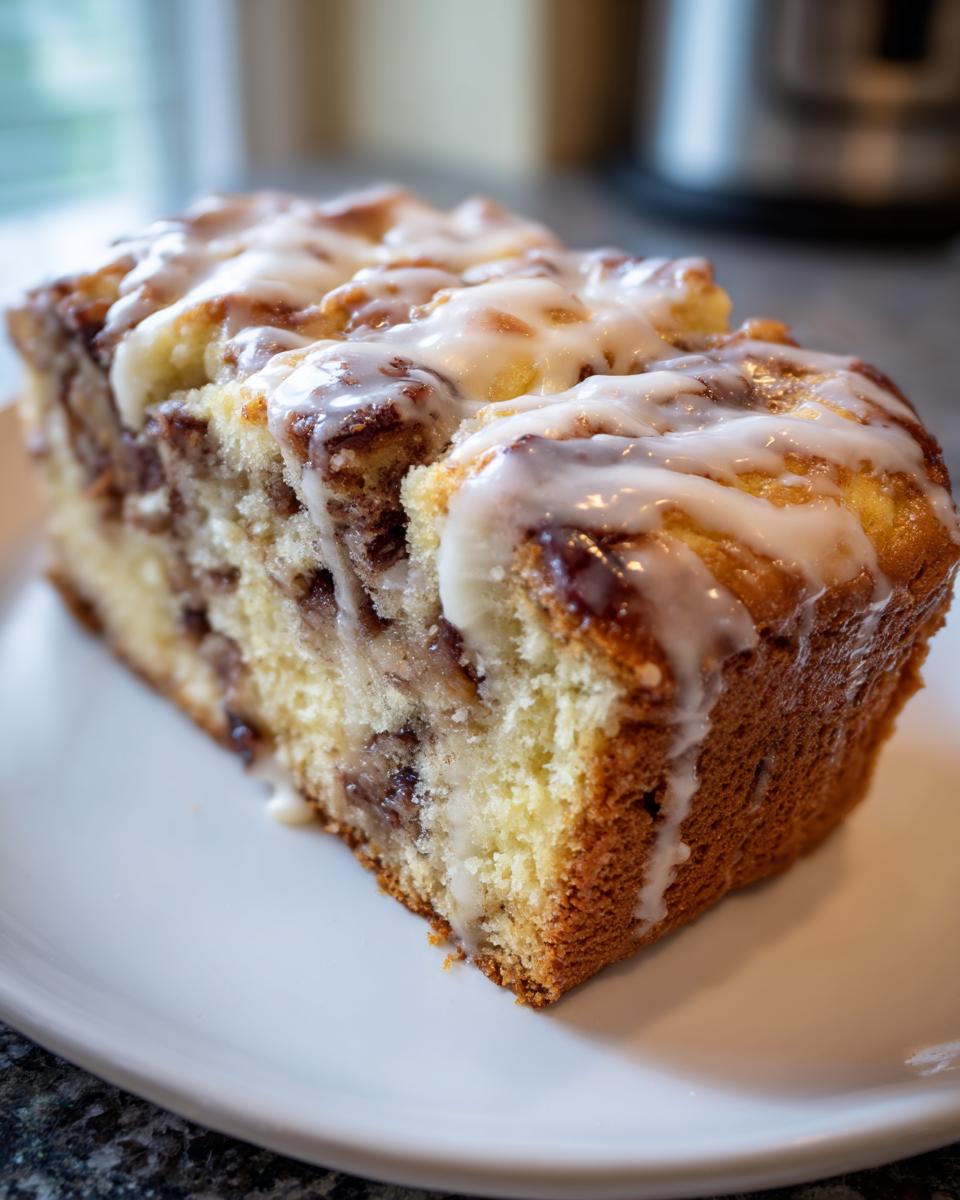
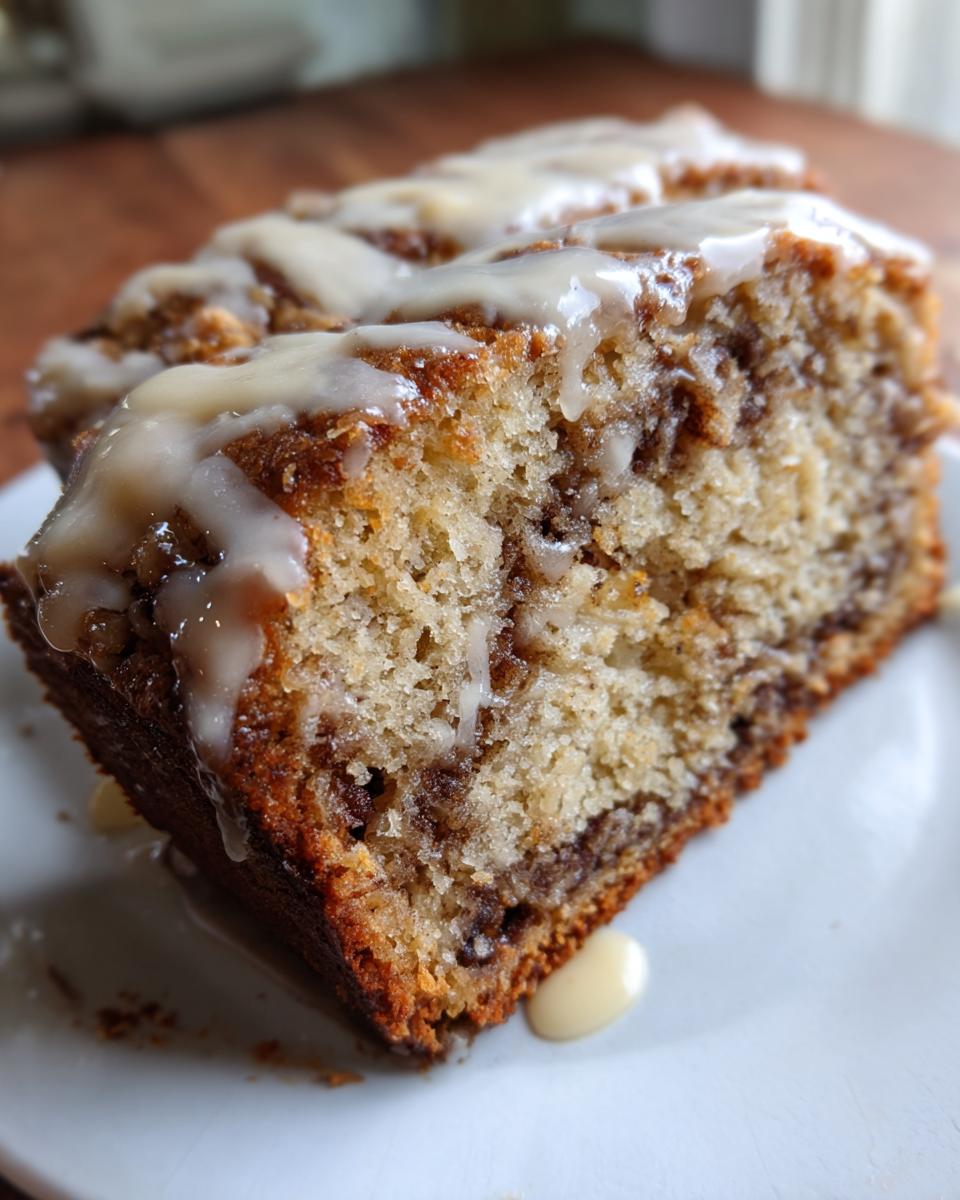
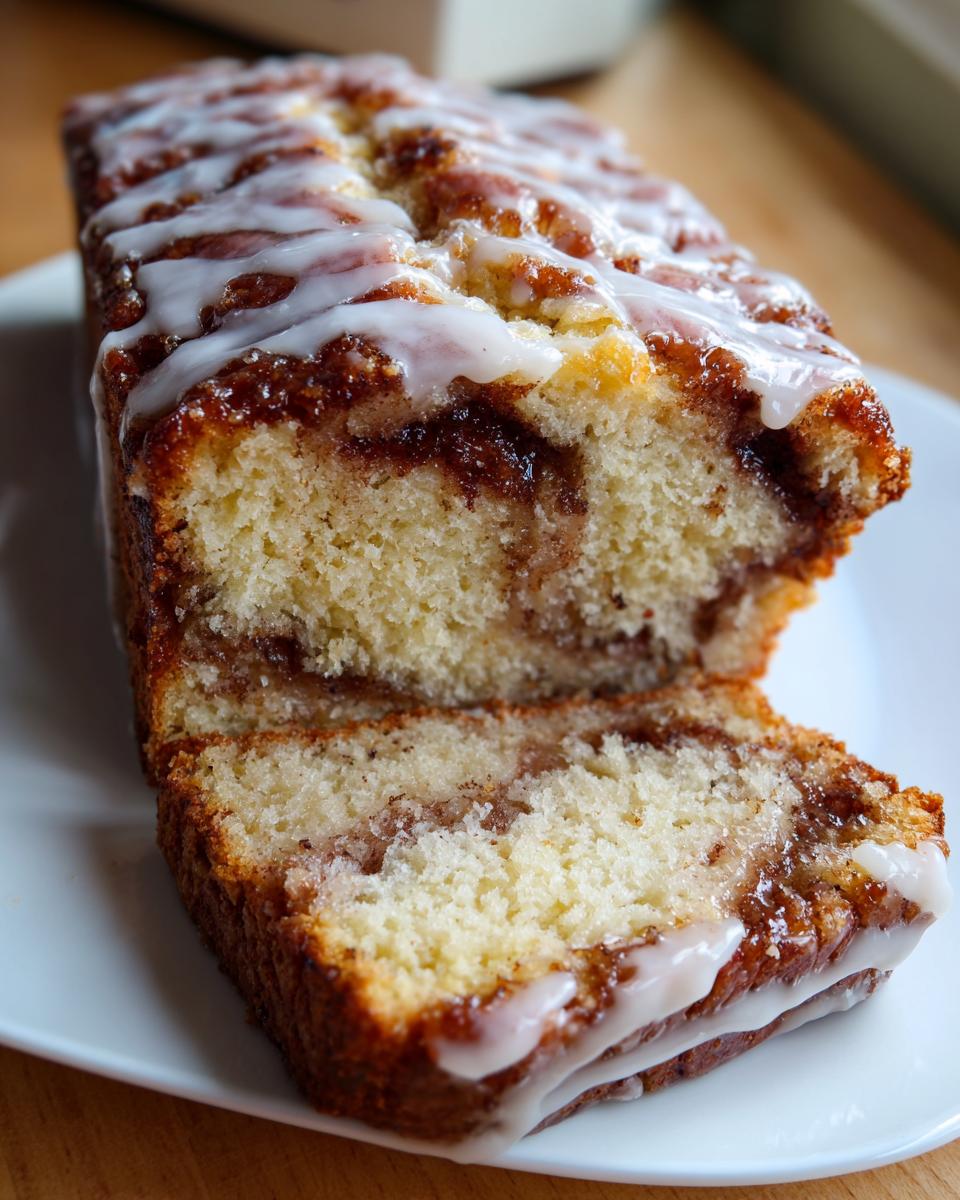
Layering and Baking Your Cinnamon Swirl Apple Bread
This is the magic layering step that gives you that gorgeous swirl. Pour about half of your batter into your prepared loaf pan. Sprinkle half of your cinnamon-apple mixture evenly over that layer. Then, gently pour the remaining batter on top, and finish by spreading the rest of your spiced apples over the very top.
Bake this beauty for a good 55 to 65 minutes. Here’s a pro tip: after about 40 minutes, check the crust. If it already looks nice and golden brown but the center still feels a little wobbly, loosely tent a piece of foil over the top. This stops the top from burning while the inside finishes setting up. You aren’t deep-frying these like the classic fritters, so we need to protect that top crust!
Cooling and Applying the Glazed Apple Bread Topping
Once that skewer comes out clean, take the bread out of the oven. You absolutely MUST let it cool in the pan for a full 15 minutes before you even think about trying to take it out. If you rush this, the bread can crumble—we are aiming for that moist structure, remember? After 15 minutes, invert it onto a wire rack to cool completely.
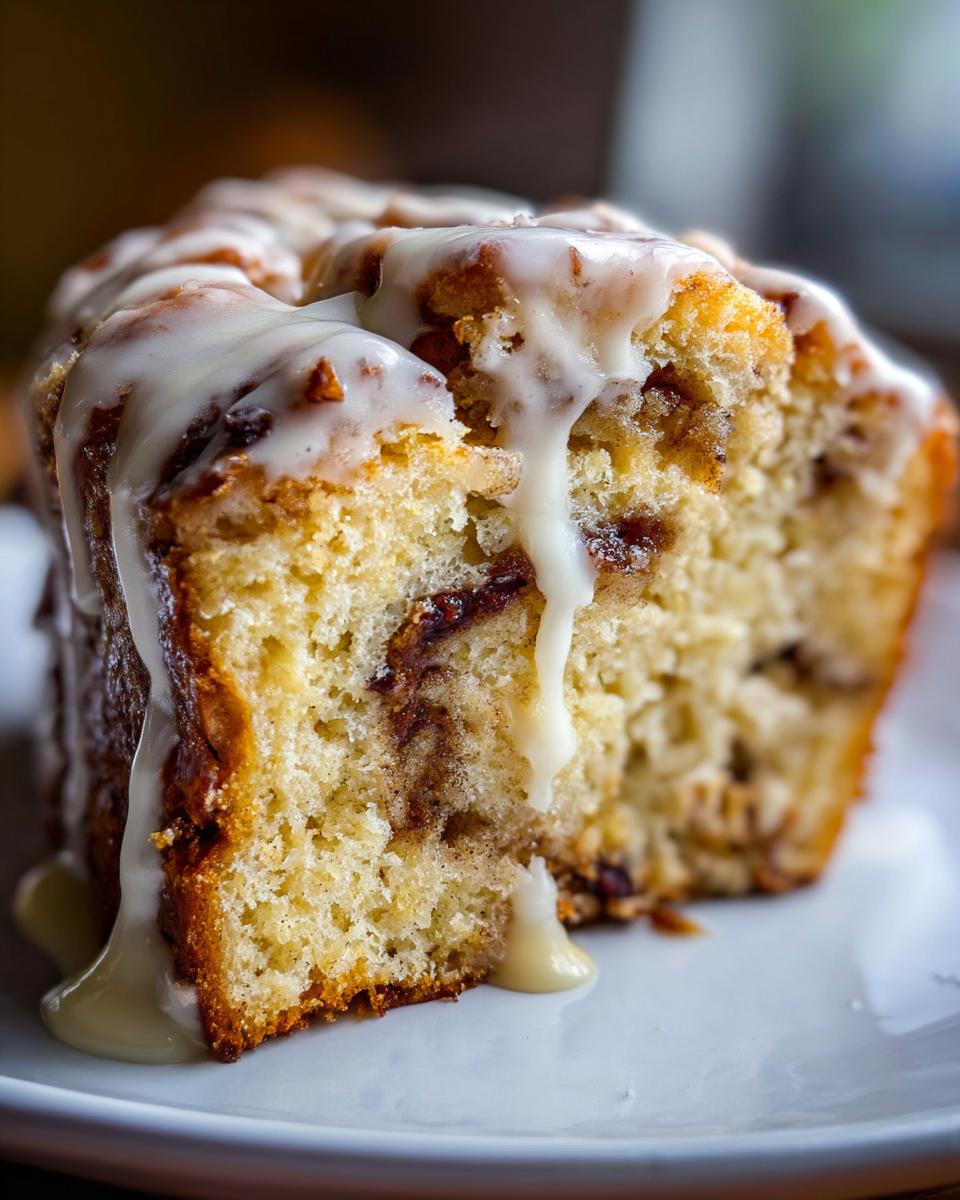
While it’s cooling, whisk together your powdered sugar and the milk or cream until you get a thick but still pourable consistency. You want it thick enough to sit on the bread but thin enough to actually drape down the sides. Once the bread is totally cool—and I mean totally cool, or the glaze will just melt right off—drizzle that sweet topping all over. Get the recipe details here if you want to see how other dedicated bakers tackle this style!
Tips for the Best Apple Bread Success
I’ve made enough quick breads in my life to know where things go wrong, and usually, it’s not the recipe card itself—it’s the little details we skip! Early on, I used to pull my apple bread out of the oven and let it cool completely on the counter. Sound logical, right? Wrong! The steam trapped inside turns the base gummy, and you lose that perfect, airy crumb structure we worked so hard for.
That’s why the 15-minute cool-down *inside* the pan is non-negotiable. It lets the steam redistribute gently before the bread fully sets on the rack. This single change turned several of my early loaves from “good” to “call the neighbors and offer slices” worthy!
- Don’t Substitute Your Apples: Using baking apples like Granny Smith or Honeycrisp is crucial not just for flavor but for structure. Softer apples, like McIntosh, tend to break down into mush when baked this long, muddying your beautiful cinnamon swirl layers. Stick to the firm ones!
- Use Room Temperature Dairy: Make sure your sour cream or yogurt is sitting out on the counter with your butter for at least thirty minutes before you start mixing. Cold dairy shocks the creamed butter, causing the batter to curdle slightly. When the batter separates, you get those annoying little tunnels or denser pockets, and we want soft tenderness throughout!
- Check Those Spices: Cinnamon makes or breaks this recipe, honestly. If your ground cinnamon has been sitting in the cabinet since last Thanksgiving, it might be dull. A quick smell test—if it doesn’t smell potent and sweet, grab a fresh jar. You can find my tips for getting the best flavor out of all your baking spices over here on my banana bread post, which uses similar spice rules.
- Leveling the Pan: If your loaf always seems to rise higher on one side, that means your oven rack isn’t level! I always keep a few thin wooden shims handy to adjust the oven rack slightly so the heat hits the loaf evenly. It prevents that slanted bake you sometimes see when people post their gorgeous bakes online, like the ones I saw over on Pinterest!
Variations and Serving Suggestions for Apple Cinnamon Bread
This recipe is wonderful as is—it’s the ultimate fall comfort food—but baking is all about making things your own, isn’t it? Once you’ve mastered the base loaf, you definitely need to start playing around with it. Think about these ideas the next time you want to shake up your routine for a cozy weekend breakfast or a special dessert.
Making a Spiced Apple Bread Variation
If you want to bump up that cozy factor, adding nuts is always a winner. Pecans or walnuts are perfect additions here. I suggest toasting about 1/2 cup of either nut lightly before folding them into the batter right alongside the apples. Toasting them just unlocks so much more of that earthy flavor, making the whole loaf taste richer!
For spice elevation, try adding a half teaspoon of cardamom along with your cinnamon in the batter. Cardamom brings this wonderful, slightly floral citrus note that pairs surprisingly well with the warm apple and brown sugar. It takes it from a classic Fall Baking Recipe to something just a tiny bit unexpected and fancy!
Serving This Sweet Loaf Recipes for Brunch
How you serve this Sweet Loaf Recipe totally dictates the mood! If you’re having it for a casual snack, that simple vanilla glaze is just perfect drizzled on top. But if you’re presenting this for a Sunday brunch spread, we can definitely dress it up.
- Try serving thick slices still slightly warm alongside a big dollop of lightly sweetened whipped cream. It melts just a little bit into the crumb, which is honestly divine.
- If you decided to skip the vanilla glaze, you could whip up a quick, tangy cream cheese frosting instead. That little bit of tang cuts through the sweetness beautifully.
- Honestly, my favorite way to enjoy a slice of this Breakfast Bread Idea is simply cut thick, slathered with real salted butter, and eaten while standing over the counter with a piping hot mug of coffee. That’s pure happiness right there. If you have some leftover soup from earlier in the week, check out our savory options like our Fall Pasta Salad for a surprisingly good contrast!
Storage and Freezing Your Apple Bread
So, you’ve baked the best loaf ever! Congrats! The great news is that because of that sour cream magic, this bread lasts longer than most others. At room temperature, covered loosely on the counter, it stays wonderfully moist for two or even three days. If you want to save some for later—and I highly suggest you do—it freezes like a dream!
Wrap the completely cooled apple bread tightly first in plastic wrap, and then wrap that package in aluminum foil. This double-layer protection is what keeps freezer burn away. It’ll taste just as fresh when thawed in about three hours on the counter. Keep making batches now while apples are in season because you won’t want to run out of this Moist Apple Bread Recipe.
Frequently Asked Questions About This Apple Bread
I get so many questions once people see how perfectly this loaf turns out! Most of them revolve around keeping the texture just right or swapping out ingredients. I always tell people that if you follow the formula for moisture retention, you can’t go wrong. It’s easier than you think!
Can I use applesauce instead of fresh apples in this apple bread?
Oh, I know it’s tempting to just drain a jar of applesauce in there, but I strongly advise against it for this specific recipe. When you use fresh, diced apples, they bake up nicely and release their moisture slowly, which helps create those fantastic pockets of flavor and keeps the bread structure firm. Applesauce is already quite wet and acts more like a liquid sweetener. If you absolutely must substitute, you should swap out the applesauce for about half the amount of the sour cream/yogurt in the recipe! Otherwise, your beautiful apple bread might deflate into a sad, slightly sweet puddle because the batter becomes too thin.
What is the best way to get the Amish Apple Fritter Bread glaze right?
The glaze needs to be gorgeous, right? It’s the final touch for that Amish Apple Fritter Bread feel. The secret here is slow addition of liquid and complete cooling. Whisk your powdered sugar really well first to break up any lumps. Then, add your milk or cream just a teaspoon at a time. You’re looking for a consistency that is thick enough that when you lift your whisk, it falls back into the bowl in ribbons—not running off like water, but not sitting in a solid mound either.
And the most important rule: the bread MUST be totally cool before you drizzle. I mean *completely cool*. If there’s even a hint of warmth left, that glaze melts right into the crust instead of sitting on top looking pretty and slightly cracked, which is what we want for that signature look. If you love glazes, you might also want to check out how I make my topping for my apple crumble!
How do I prevent my apple bread from sinking in the middle?
This is almost always an oven issue or a freshness issue with your baking soda. First, always make sure your baking soda is fresh! If it’s old, it won’t give your loaf the lift it needs, and the heavy mix of apples and sugar will pull the center down. Second, check your oven temperature! Quick breads rely on a stable, hot temperature to set quickly around the edges before they bake through the middle.
If your oven runs hot or unevenly (and most home ovens do!), you’ll see the top brown too fast, which makes you pull it out early, leading to a sunken center. Make sure your oven rack is level before you even start, and don’t be afraid to use that foil tenting trick I mentioned earlier if the top is getting too dark, like when I mentioned this in my instructions, which you can check out if you need a refresher!
Estimated Nutritional Data for This Apple Bread
Here is the estimated nutritional breakdown for one slice of this incredibly satisfying apple bread. Remember what Kate always says? We focus on simple, real ingredients here, so this information is based on using standard measurements from the recipe above. Because we are all about transparency and trust here at Taste This Plate, please know these numbers are educated estimates based on the ingredients used in our testing—they aren’t lab-certified, of course!
- Serving Size: 1 slice
- Calories: 320
- Fat: 16g
- Saturated Fat: 9g
- Carbohydrates: 44g
- Sugar: 30g (That’s where that delicious glaze and brown sugar swirl comes in!)
- Protein: 4g
- Fiber: 2g
- Sodium: 210mg
Keep in mind that if you switch to a richer ingredient like full-fat Greek yogurt instead of sour cream—or if you skip the glaze because you prefer just a dusting of sugar—these numbers will certainly change. But trust me, whether you are having this slice for breakfast or as a dessert, it’s worth every single comforting calorie!
Share Your Homemade Apple Bread Experience
Now that you’ve made this incredibly moist, cozy loaf, I absolutely need to know what you think! We pour so much energy into recipe testing here because we want to make sure every home baker walking away with a result that feels like a huge win. Did you use Granny Smiths? Did the kids devour the glaze before you could photograph it? Tell me everything!
Please take a moment to leave a rating down below—even a quick five-star nod tells me you loved this Apple Bread just as much as my family does. And if you ran into any snags or had a brilliant variation that I haven’t thought of yet, please drop a comment! I read every single one, because connecting with you and answering your baking questions is what it’s all about. You can always reach out via my contact page here if you can’t find the comment box.
Baking is always better when shared. I can’t wait to see your beautiful loaves dominating your fall tables this year!
PrintSuper Moist Amish Apple Fritter Bread with Cinnamon Glaze

Bake this incredibly moist Amish Apple Fritter Bread. It features fresh apples, a rich cinnamon swirl, and a sweet vanilla glaze, making it a perfect comfort food for breakfast or dessert.
- Prep Time: 20 min
- Cook Time: 60 min
- Total Time: 80 min
- Yield: 1 loaf (about 10 servings) 1x
- Category: Breakfast
- Method: Baking
- Cuisine: American
- Diet: Vegetarian
Ingredients
- 2 cups all-purpose flour
- 1 teaspoon baking soda
- 1/2 teaspoon salt
- 1 teaspoon ground cinnamon
- 1/4 teaspoon ground nutmeg
- 1/2 cup unsalted butter, softened
- 1 cup granulated sugar
- 2 large eggs
- 1 teaspoon vanilla extract
- 1/2 cup sour cream or plain Greek yogurt
- 1 1/2 cups peeled and finely diced fresh apples (about 2 medium apples)
- 1/2 cup brown sugar, packed
- 1 tablespoon ground cinnamon (for swirl)
- 1/2 cup powdered sugar (for glaze)
- 2 tablespoons milk or cream (for glaze)
Instructions
- Preheat your oven to 350°F (175°C). Grease and flour a standard 9×5 inch loaf pan.
- In a medium bowl, whisk together the flour, baking soda, salt, 1 teaspoon cinnamon, and nutmeg. Set aside.
- In a large bowl, cream together the softened butter and granulated sugar until light and fluffy. Beat in the eggs one at a time, then mix in the vanilla extract and sour cream until just combined.
- Gradually add the dry ingredients to the wet ingredients, mixing on low speed until just incorporated. Do not overmix.
- In a separate small bowl, toss the diced apples with the brown sugar and 1 tablespoon of cinnamon until evenly coated. Gently fold the apple mixture into the batter.
- Prepare the cinnamon swirl: Take about one-third of the batter and mix it with a small amount of extra cinnamon sugar if desired, or simply layer it. Pour half the batter into the prepared loaf pan. Sprinkle half of the remaining cinnamon-apple mixture over the batter. Top with the remaining batter and the rest of the apples.
- Bake for 55 to 65 minutes, or until a wooden skewer inserted into the center comes out clean. If the top browns too quickly, loosely tent it with foil after 40 minutes.
- Let the bread cool in the pan for 15 minutes before inverting it onto a wire rack to cool completely.
- Make the glaze: Whisk together the powdered sugar and milk until smooth. Drizzle the glaze over the cooled bread before slicing and serving.
Notes
- For the moistest results, use Granny Smith or Honeycrisp apples, as they hold their shape well during baking.
- If you want a richer flavor, substitute 1/4 cup of the all-purpose flour with cake flour.
- This bread freezes well once completely cooled and wrapped tightly in plastic wrap and foil.
Nutrition
- Serving Size: 1 slice
- Calories: 320
- Sugar: 30g
- Sodium: 210mg
- Fat: 16g
- Saturated Fat: 9g
- Unsaturated Fat: 7g
- Trans Fat: 0.2g
- Carbohydrates: 44g
- Fiber: 2g
- Protein: 4g
- Cholesterol: 55mg