
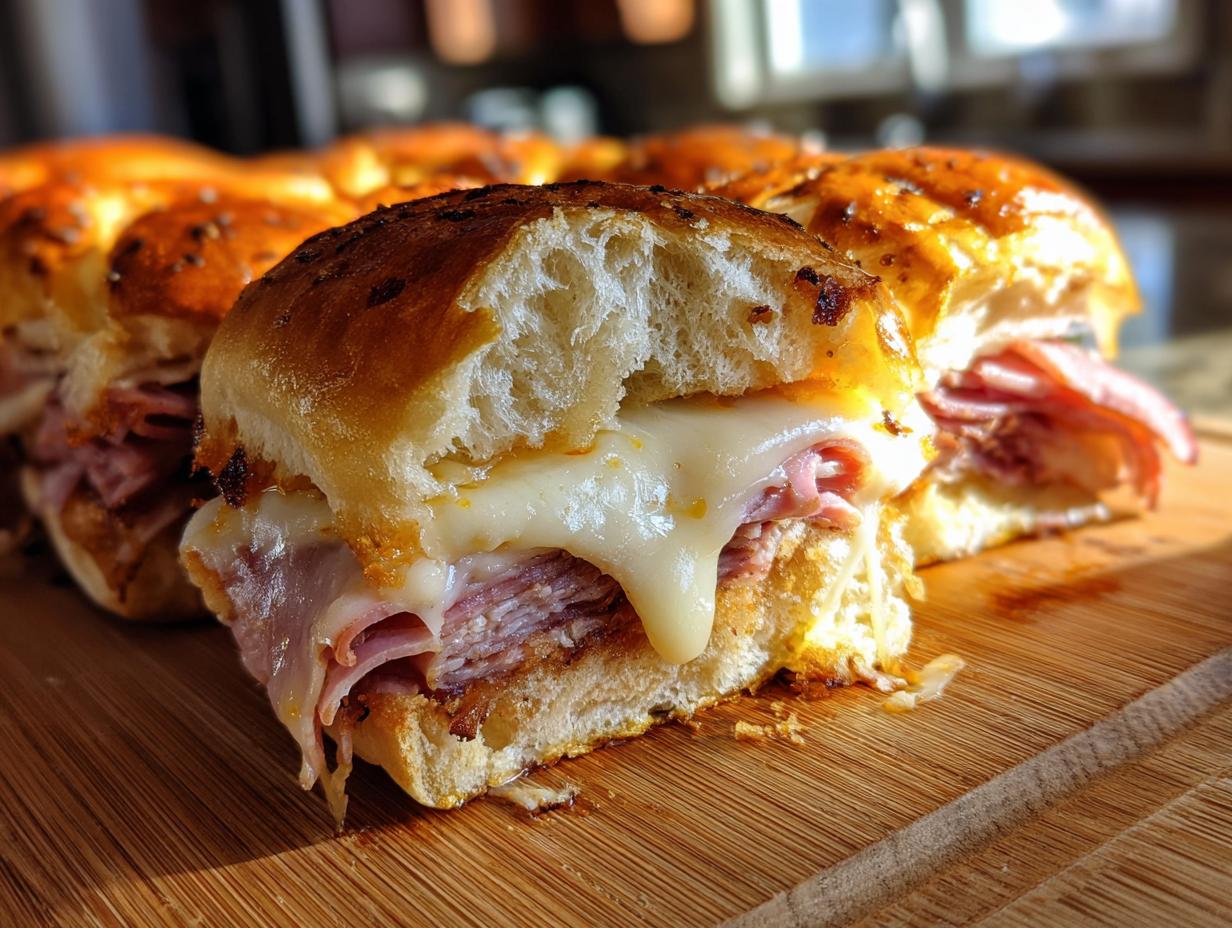
Okay, let’s talk about the ultimate easy-peasy party pleaser: Ham and Cheese Sliders! Seriously, if you’re looking for a way to wow your friends and family without breaking a sweat, these little sandwiches on squishy Hawaiian rolls are it. They’re practically magic for potlucks, game days, or just because. My favorite part? That irresistible buttery mustard glaze that gets everything all golden and delicious. It totally reminds me of Kate’s philosophy at Taste This Plate – simple ingredients making truly memorable meals. I’ve tested these time and time again in my own kitchen, and trust me, they *always* disappear in a flash!
- Why You'll Love These Ham and Cheese Sliders
- Ingredients for Perfect Ham and Cheese Sliders
- Essential Equipment for Making Ham and Cheese Sliders
- How to Prepare These Delicious Ham and Cheese Sliders
- Tips for Making the Best Ham and Cheese Sliders
- Make-Ahead and Storage for Your Ham and Cheese Sliders
- Variations for Your Ham and Cheese Sliders
- Serving Suggestions for Ham and Cheese Sliders
- Frequently Asked Questions About Ham and Cheese Sliders
- Nutritional Information for Ham and Cheese Sliders
- Share Your Ham and Cheese Slider Creations!
Why You’ll Love These Ham and Cheese Sliders
Seriously, these little sliders are a lifesaver for any gathering. You’ll totally get why they’re a go-to:
- Crazy Simple to Make: You can whip these up in no time, even if you’re not a kitchen whiz.
- Super Speedy: All the prep and baking takes less than an hour, making them perfect for last-minute get-togethers.
- Unbeatable Flavor: That buttery, slightly tangy mustard glaze is just divine with the sweet rolls, salty ham, and melty Swiss.
- Ultimate Versatility: They’re fantastic as party sandwiches, essential make ahead appetizers, and a total hit for game day!
- Crowd-Pleaser Guaranteed: Honestly, who doesn’t love a warm, gooey ham and cheese sandwich? Everyone devours these!
- Make-Ahead Magic: You can totally prep these ahead of time – less stress on the day of your event!
Ingredients for Perfect Ham and Cheese Sliders
Alright, getting the best ham and cheese sliders starts with the right players. You won’t believe how simple this list is! Here’s what you’ll need:
- 1 (12 count) package dinner rolls (like those sweet Hawaiian rolls, they’re the best here!)
- 12 slices deli ham (get good quality stuff, it makes a difference!)
- 6 slices Swiss cheese (or whatever your favorite melty cheese is, but Swiss is classic!)
- 1/2 cup (1 stick) unsalted butter, melted (gotta have that buttery goodness!)
- 1 tablespoon Dijon mustard (for that little tangy kick)
- 1 teaspoon Worcestershire sauce (trust me, this is a secret weapon!)
- 1/2 teaspoon garlic powder
- 1/4 teaspoon salt
- 1/4 teaspoon black pepper
Essential Equipment for Making Ham and Cheese Sliders
You don’t need a fancy setup for these sliders. Just grab a trusty baking sheet (big enough for all 12 rolls!), a little small bowl for mixing that amazing glaze, and some aluminum foil to keep things nice and steamy while they bake. Seriously, that’s pretty much it!
How to Prepare These Delicious Ham and Cheese Sliders
Okay, let’s get these sliders made! It’s honestly way easier than you think, and the payoff is HUGE. Following these steps will get you those perfect, gooey, golden-brown beauties every single time. I’ve found that doing things in this order really makes a difference, especially when you’re juggling everything else for a party!
Preparing the Rolls and Glaze
First things first, you gotta get that oven preheating to 350°F (175°C). While it warms up, grab your whole package of dinner rolls and slice them right in half, horizontally. It’s like a giant, sweet bun cutting board! Then, in a small bowl, whisk together that glorious glaze: the melted butter, Dijon mustard (that little tang is crucial!), Worcestershire sauce (don’t skip it – it adds a depth of flavor!), garlic powder, salt, and pepper. It smells SO good already!
Assembling Your Ham and Cheese Sliders
Now for the fun part – building these bad boys! Lay out the bottom halves of your rolls on a baking sheet. Top each one with a slice of that deli ham, then a slice of Swiss cheese. After the cheese, add another slice of ham. You want a good amount of ham and cheese so every bite is amazing!

Then, carefully place the top halves of the rolls back on. They’ll look a little tall, but don’t worry, they all come together!
Baking the Sliders to Golden Perfection
This is where the magic happens. Pour that buttery mustard glaze evenly all over the tops of the assembled sliders. Get it everywhere!

Then, cover the whole baking sheet REALLY well with aluminum foil. This traps all the steam and makes sure everything gets wonderfully warm and melty. Pop it into the oven for about 15 minutes. After that, take off the foil and let them bake for another 5 to 10 minutes, just until the tops are golden brown and that cheese is oozing out.
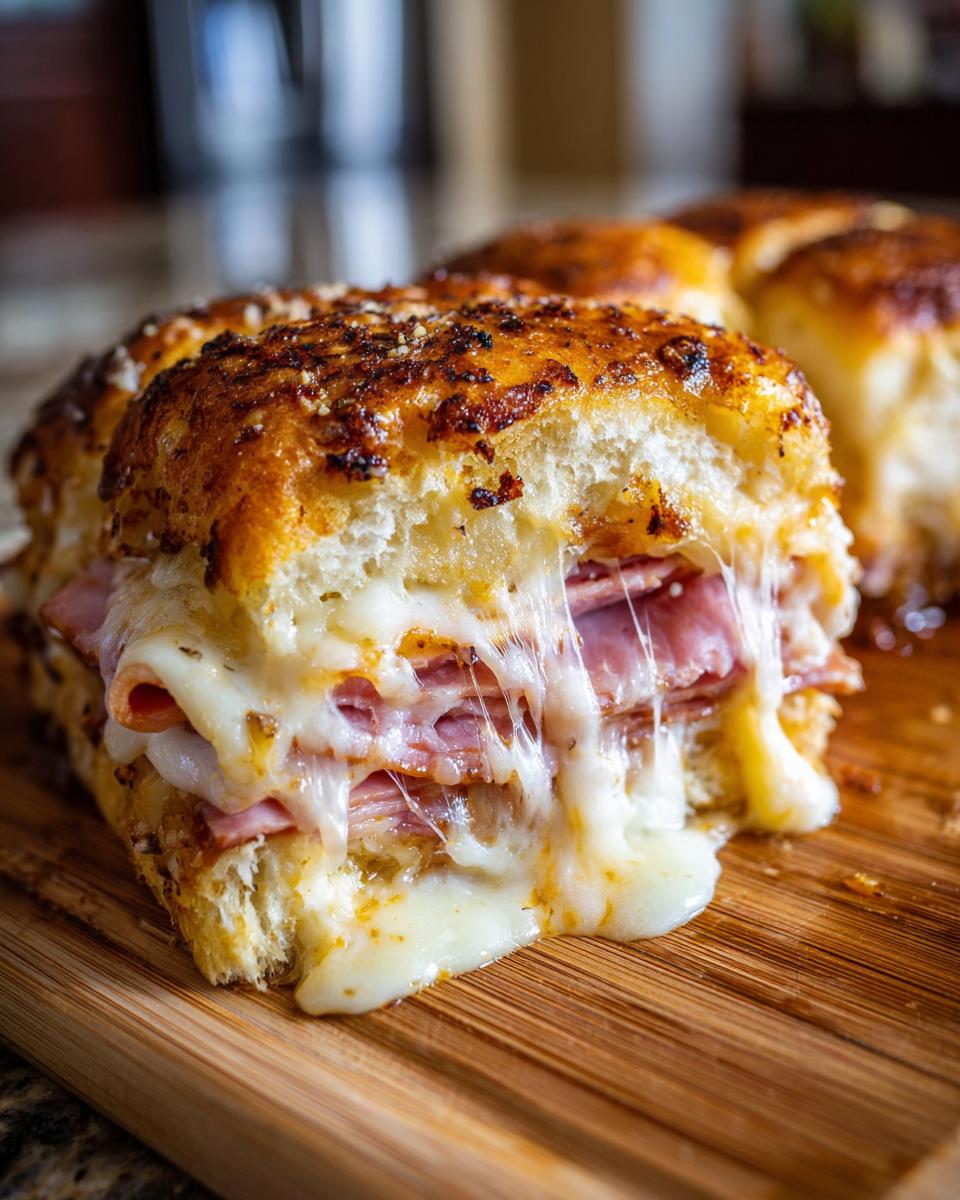
Let ’em rest for a few minutes before you slice into that perfect pull-apart goodness!

Tips for Making the Best Ham and Cheese Sliders
Okay, let’s make sure these sliders are absolutely knock-your-socks-off amazing every single time! Here are a few little tricks I’ve picked up:
- Quality Counts: Use good quality deli ham and Swiss cheese. It really makes a difference in the final flavor!
- Don’t Skimp on the Glaze: Drizzle that buttery mixture all over the tops of the rolls. It’s what makes them golden and delicious, so make sure every roll gets some love!
- Gentle on the Rolls: When you slice the rolls, be gentle. You want them to hold their shape. Same goes for assembling; don’t squish them down too much before baking.
- Watch for Browning: Keep an eye on them when the foil is off. Ovens vary, and you want that perfect golden brown, not burnt!
Make-Ahead and Storage for Your Ham and Cheese Sliders
The best part about these sliders? You can totally get them ready ahead of time! If you’re hosting or bringing them to a party, assemble them up to 24 hours in advance. Just place the assembled sliders on your baking sheet, cover the whole thing super tightly with plastic wrap or foil, and pop them in the fridge. When you’re ready to bake, just remove the plastic wrap.
You’ll want to add maybe 5 to 10 extra minutes to the covered baking time since they’re starting out chilled, making sure they get good and warm. Once baked and cooled a bit, leftovers are amazing too! Store any extras in an airtight container at room temperature for a day or two, or pop them in the fridge for longer. Reheat gently in the oven or even a toaster oven to get that crispy, gooey goodness back!
Variations for Your Ham and Cheese Sliders
While these classic Swiss and ham sliders are totally dreamy as is, don’t be afraid to get creative! You can totally mix things up to make them your own. Try swapping out the Swiss cheese for sharp cheddar, provolone, or even pepper jack if you like a little heat. Instead of plain ham, maybe dig into some smoked turkey or even pulled pork! And for the glaze? A touch of honey or a swirl of spicy brown mustard could be amazing. Really, the possibilities are endless, and it’s all about making them perfect for *you*!
Serving Suggestions for Ham and Cheese Sliders
These sliders are total rockstars on their own, but they also play well with others! They’re absolutely perfect as little bites for your next big game day party or as part of a spread of delicious tailgate food. They’re also fantastic alongside a big salad or a cup of hearty soup for a super satisfying lunch!
Frequently Asked Questions About Ham and Cheese Sliders
Got questions about these amazing little ham and cheese sliders? I’ve totally got you covered! Let’s dive into some common things people ask:
Can I use a different type of bread instead of Hawaiian rolls?
You know, while Hawaiian rolls are my absolute favorite for their sweet, soft texture, you could totally use other similar slider buns or even dinner rolls! Just make sure they’re soft enough that they won’t get too tough when you slice them horizontally. You might need to adjust the baking time a little depending on the bread – keep an eye on them!
How do I prevent the bottoms of the sliders from getting soggy?
This is a super common worry, but honestly, that buttery mustard glaze helps caramelize the bottoms just enough! The key is the foil cover during the first part of baking; it kind of steams them without making them *wet*. Also, make sure you don’t let them sit for too long after baking before serving, as the moisture from the ham and cheese can sometimes soften the bottom rolls over time. If you’re making them ahead, storing them covered but not sealed airtight can help a bit too.
Can I freeze these ham and cheese sliders?
Freezing these sliders after they’ve been baked isn’t typically recommended because the bread can get a bit mushy when thawed. However, you *can* assemble them completely (before baking) and freeze them! Wrap them really well in plastic wrap and then foil, and freeze for up to a month. When you’re ready to bake, thaw them overnight in the fridge and then bake as usual, adding a bit more time to the covered baking stage.
What other cheeses work well for these sliders?
Swiss is a classic for a reason, but don’t stop there! Provolone is fantastic and melts beautifully. A sharp or mild cheddar adds a lovely tang. If you’re feeling adventurous, Gruyere gives a delicious nutty flavor. Sometimes I even mix a couple of cheeses together, like Swiss and cheddar, for an extra layer of yumminess. Just make sure it’s a cheese that melts well!
Nutritional Information for Ham and Cheese Sliders
This nutritional information is just an estimate, ya know? Since we all use slightly different ingredients and brands, your sliders might come out a little bit different. But generally, you’re looking at about 250 calories, 15g of fat (that’s about 7g saturated), 12g of protein, and 15g of carbs per slider. It’s always good to remember that this can change depending on the ham, cheese, and even the type of rolls you use!
Share Your Ham and Cheese Slider Creations!
Alright, now that you’ve got the lowdown on these amazing ham and cheese sliders, I’d LOVE to hear about yours! Did you try them for a game day? A family party? Let me know in the comments below how they turned out! If you snapped a pic, don’t forget to tag us on social media – seeing your kitchen creations is seriously the highlight of my day!
PrintHam and Cheese Sliders

Easy ham and cheese sliders baked on Hawaiian rolls with a buttery mustard glaze. Perfect for parties, tailgates, or any gathering.
- Prep Time: 15 min
- Cook Time: 20 min
- Total Time: 35 min
- Yield: 12 sliders 1x
- Category: Appetizer
- Method: Baking
- Cuisine: American
- Diet: Vegetarian
Ingredients
- 1 (12 count) package dinner rolls (like Hawaiian rolls)
- 12 slices deli ham
- 6 slices Swiss cheese
- 1/2 cup (1 stick) unsalted butter, melted
- 1 tablespoon Dijon mustard
- 1 teaspoon Worcestershire sauce
- 1/2 teaspoon garlic powder
- 1/4 teaspoon salt
- 1/4 teaspoon black pepper
Instructions
- Preheat your oven to 350°F (175°C).
- Slice the dinner rolls in half horizontally.
- Place the bottom halves of the rolls on a baking sheet.
- Layer 6 slices of ham on top of the bottom roll halves.
- Place 3 slices of Swiss cheese over the ham.
- Layer the remaining 6 slices of ham on top of the cheese.
- Place the top halves of the rolls over the ham.
- In a small bowl, whisk together the melted butter, Dijon mustard, Worcestershire sauce, garlic powder, salt, and pepper.
- Pour the butter mixture evenly over the tops of the sliders.
- Cover the baking sheet tightly with aluminum foil.
- Bake for 15 minutes.
- Remove the foil and bake for another 5-10 minutes, or until the tops are golden brown and the cheese is melted.
- Let the sliders rest for a few minutes before slicing and serving.
Notes
- For make-ahead convenience, assemble the sliders up to 24 hours in advance. Cover tightly and refrigerate. Bake as directed, adding a few extra minutes to the covered baking time.
- You can substitute cheddar cheese or provolone for Swiss cheese if desired.
- Add a sprinkle of poppy seeds to the butter mixture for extra flavor.
Nutrition
- Serving Size: 1 slider
- Calories: 250
- Sugar: 5g
- Sodium: 600mg
- Fat: 15g
- Saturated Fat: 7g
- Unsaturated Fat: 8g
- Trans Fat: 0g
- Carbohydrates: 15g
- Fiber: 1g
- Protein: 12g
- Cholesterol: 40mg