
If you’re anything like me, party planning can sometimes feel like a fun idea until it’s time to figure out the appetizers. We all need those showstoppers that look fancy but take almost zero brainpower, right? Well, I have found my secret weapon, and I am so excited to share it with you today. Forget fussy dips or complicated hors d’oeuvres; we are making the ultimate Italian pinwheels!
These aren’t just any tortilla roll ups; these are packed with all the zesty, savory goodness of a classic Italian deli sub, ready to impress everyone at your next gathering. In my kitchen, my goal is always simple, trustworthy food, and these cold cut pinwheels deliver big flavor without stress. They are perfect for when you need a make-ahead appetizer that you can truly set and forget until the doorbell rings. Trust me, these will become a staple on your platter!
- Why These Italian Pinwheels Recipe Are Your New Go-To Party Finger Food
- Gathering Ingredients for Your Italian Pinwheels
- How to Prepare Ultimate Italian Pinwheels
- Tips for Success Making Perfect Italian Pinwheels
- Storage and Make Ahead Appetizers Instructions for Italian Pinwheels
- Variations for Your Deli Meat Pinwheels
- Serving Suggestions for Bite Sized Italian Snacks
- Frequently Asked Questions About Italian Pinwheels
- Estimated Nutritional Data for Italian Pinwheels
- Share Your Homemade Italian Pinwheels
- Estimated Nutritional Data for Italian Pinwheels
- Share Your Homemade Italian Pinwheels
Why These Italian Pinwheels Recipe Are Your New Go-To Party Finger Food
When I bring these Italian pinwheels recipe to a friend’s house, I know they’ll be the first tray cleared. Why do I love them so much? Because they nail that sweet spot between looking spectacular and being incredibly easy to pull off. You need food that looks like you spent all day on it, but really, you spent most of the time just waiting!
- They are party finger food superstars—no forks required!
- The flavor profile mimics that perfect Italian sub you crave.
- They are genuinely one of the best make ahead appetizers out there.
Let’s dive into why this specific recipe works magic every single time.
Make Ahead Appetizers Perfection
This is where we save the day, folks. You mix the filling, layer everything up, and then wrap those tortilla logs up tight. They absolutely *must* chill. Don’t try to rush it! That mandatory chilling time is what firms everything up so when it comes time to slice your italian pinwheels, you get those beautiful, clean spirals instead of a sloppy mess. I usually make mine the night before a party.
Authentic Italian Sub Flavors in Every Bite
The flavor is just spot on. We’re using real provolone, good salami, and pepperoni, but the real secret is that zesty cream cheese spread. Those little bits of pepperoncini give you that kick, and the Italian seasoning hits all the right savory notes. They taste exactly like grabbing the best sandwich from the deli, concentrated into one perfect little bite-sized snack!
Gathering Ingredients for Your Italian Pinwheels
When I develop a recipe here at Taste This Plate, my first thought is always: can you grab this at your regular grocery store? Yes, you absolutely can for these Italian pinwheels! We’re keeping this simple and vibrant. The spread is what really brings the zesty kick, and the meats are layered thin so they roll up without tearing the tortilla. You won’t need any specialty equipment, just a bowl and a clean space to roll everything out. If you decide to throw together a quick salad to go alongside this appetizer, you can check out my favorite side dishes for pairing ideas!
For the Zesty Cream Cheese Pinwheels Spread
This is the flavor foundation, so take note of the prep here. Make sure the cream cheese is fully softened—it makes mixing so much easier—and drain those peppers well!
- 8 ounces cream cheese, softened
- 1/4 cup mayonnaise (it helps keep the spread smooth!)
- 1 tablespoon Italian seasoning
- 1 teaspoon garlic powder
- 1/2 teaspoon dried oregano
- 1/4 cup sun-dried tomatoes packed in oil, drained and finely chopped
- 1/4 cup pepperoncini peppers, drained and finely chopped
- 1/4 cup fresh basil, finely chopped
For the Tortilla Roll Ups Italian Style Assembly
We need four large tortillas—the 10-inch ones are best for a good, tight roll. Remember, thin layers are key here for the best final presentation!
- 4 large (10-inch) flour tortillas
- 4 ounces provolone cheese, thinly sliced
- 4 ounces ham, thinly sliced
- 4 ounces salami, thinly sliced
- 4 ounces pepperoni, thinly sliced
- 1/2 cup shredded lettuce (this is totally optional, but I like the crunch!)
How to Prepare Ultimate Italian Pinwheels
Okay, we have all our beautiful ingredients ready to go. This part is where the assembly happens, and I’m going to walk you through it step-by-step. When you’re dealing with cold cut pinwheels, the order and how tightly you roll make all the difference in the final presentation. If you want those Instagram-worthy spirals, you have to follow these steps exactly! I actually saw a great technique over at The Soccer Mom Blog that cemented my approach to rolling tightly.
Creating the Flavorful Cream Cheese Base
First things first, let’s make that zesty spread. Grab a medium bowl. You want to beat that softened cream cheese until it’s totally smooth—no lumps! Then, mix in the mayo, Italian seasoning, garlic powder, and oregano. Once that mixture is uniform and creamy, it’s time to fold in your flavor bombs: the finely chopped sun-dried tomatoes, the drained pepperoncini, and that fresh basil. Give it a gentle stir just to combine everything. Wow, that smells already amazing!
Layering and Tightly Rolling the Cold Cut Pinwheels
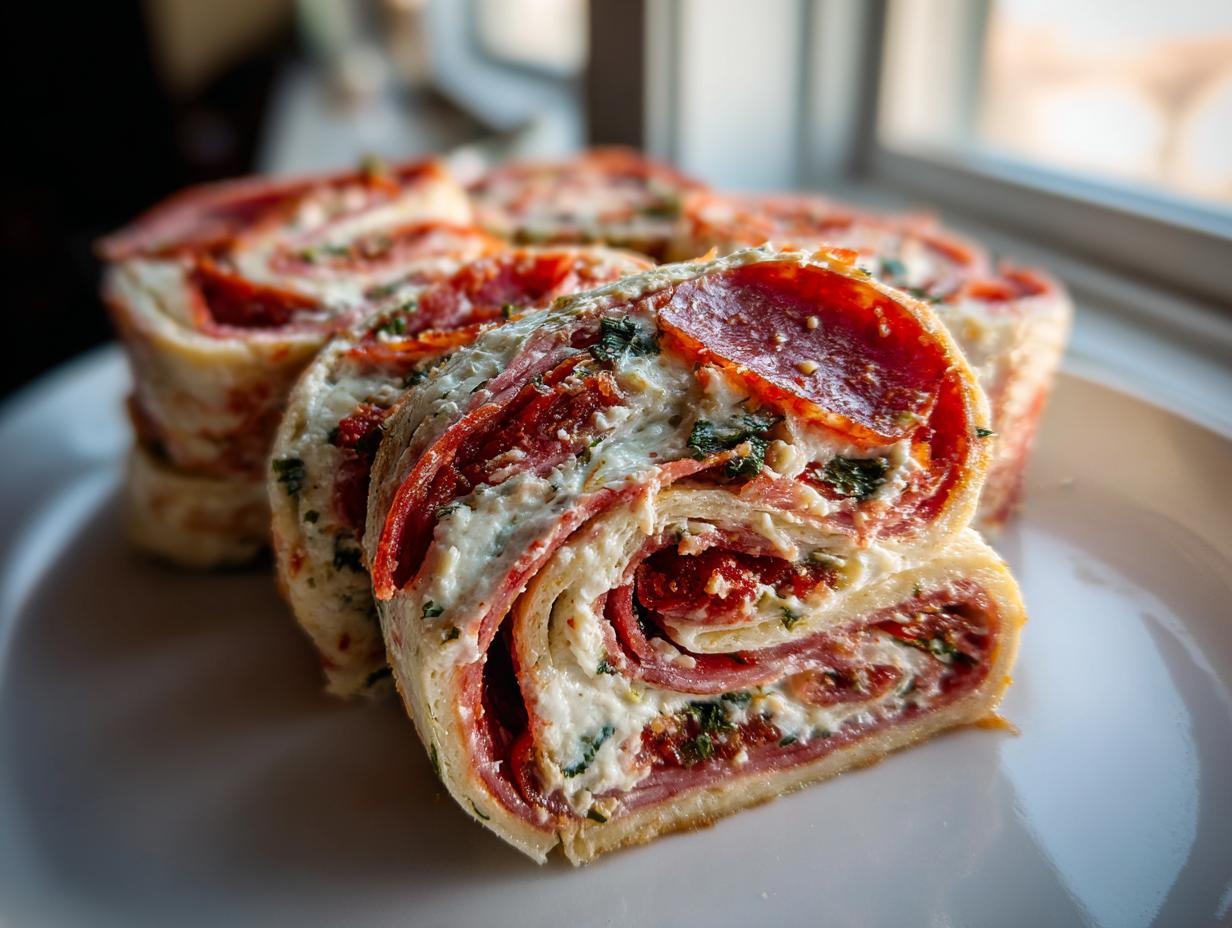
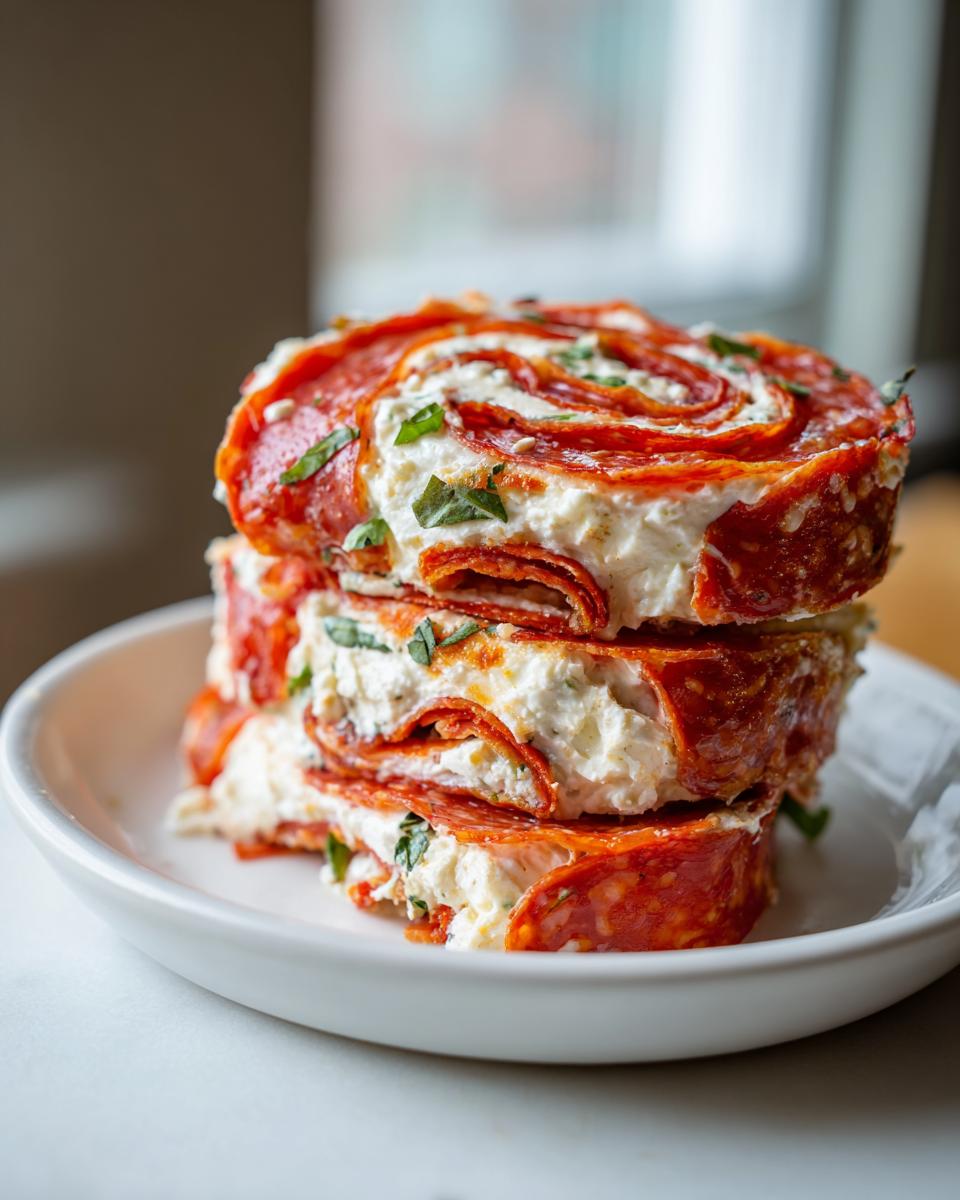
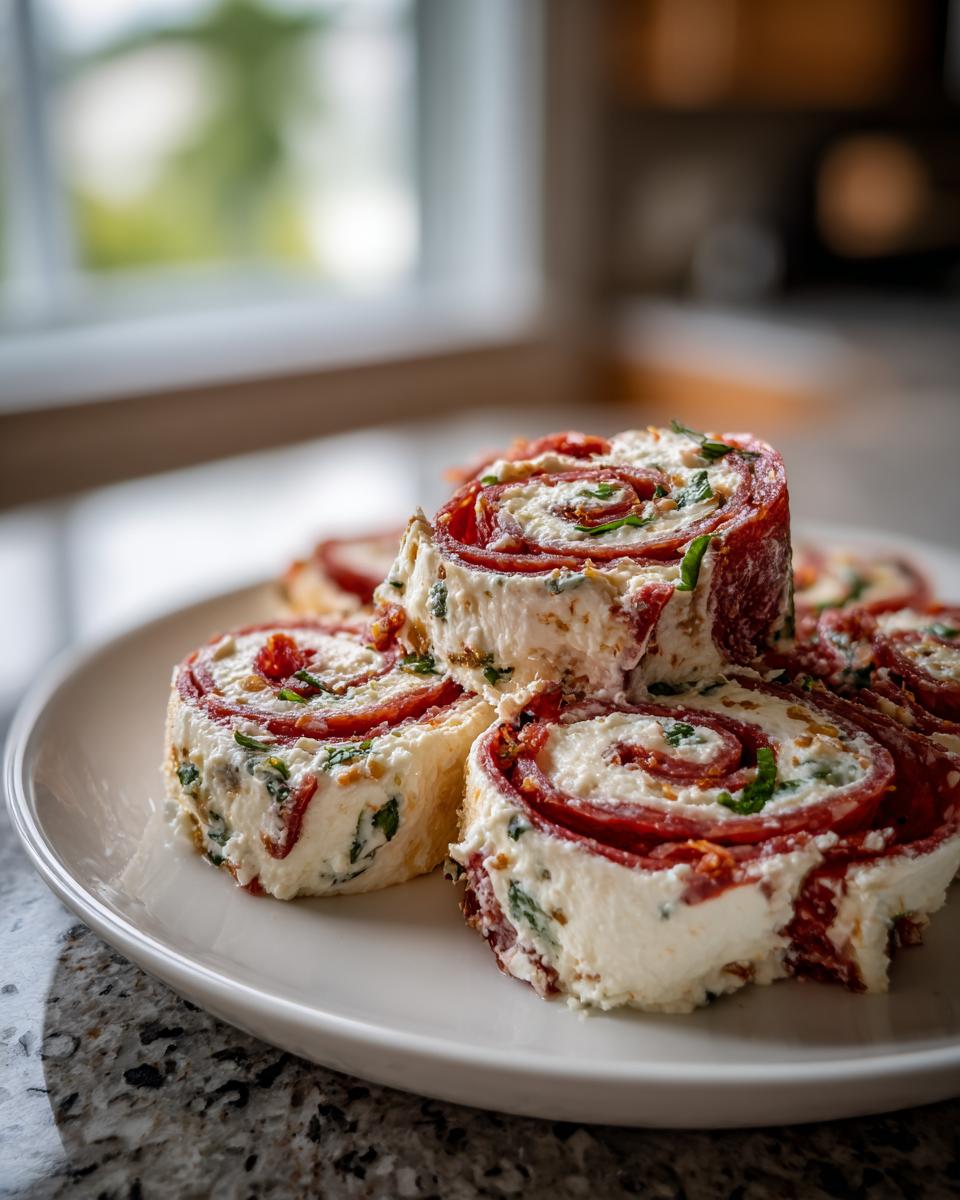
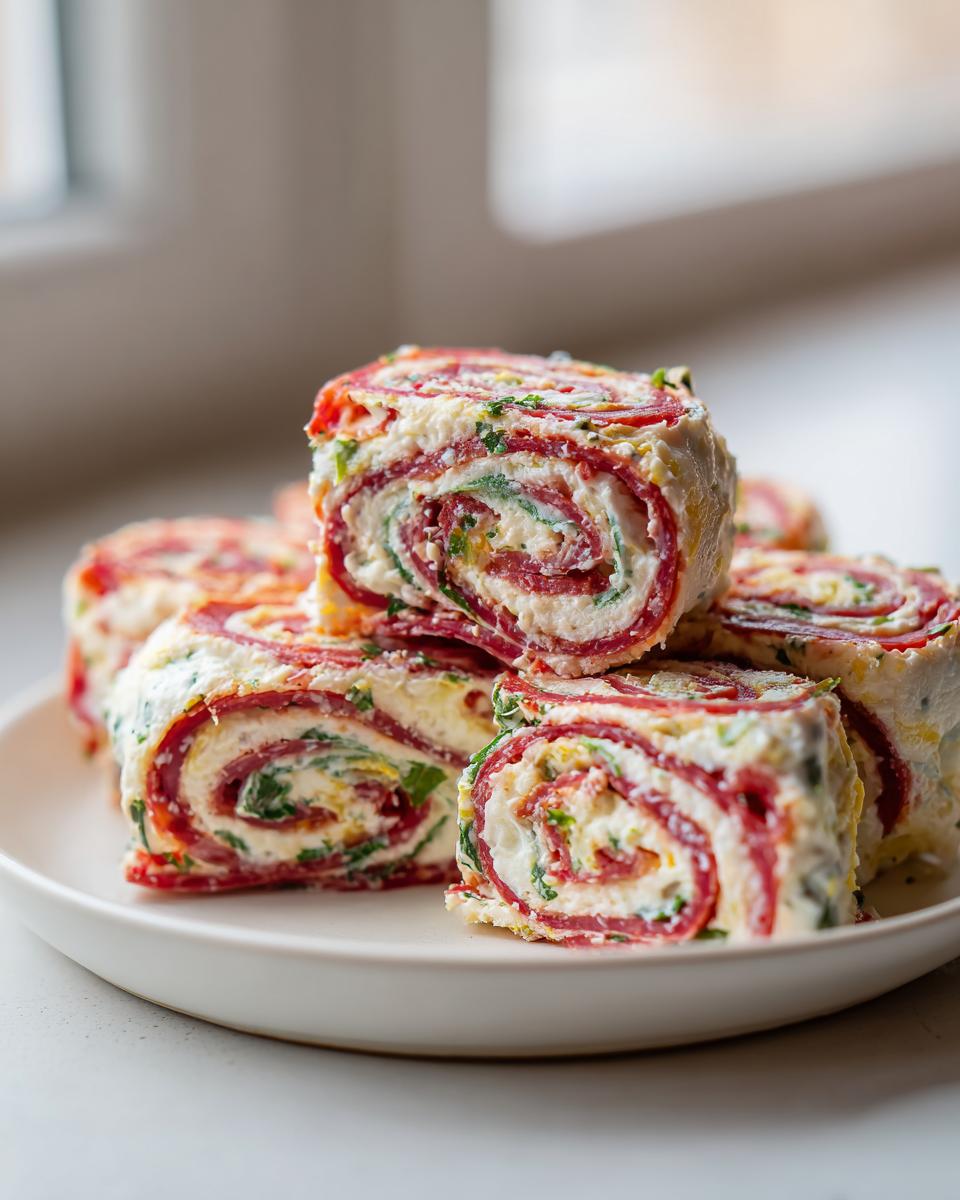
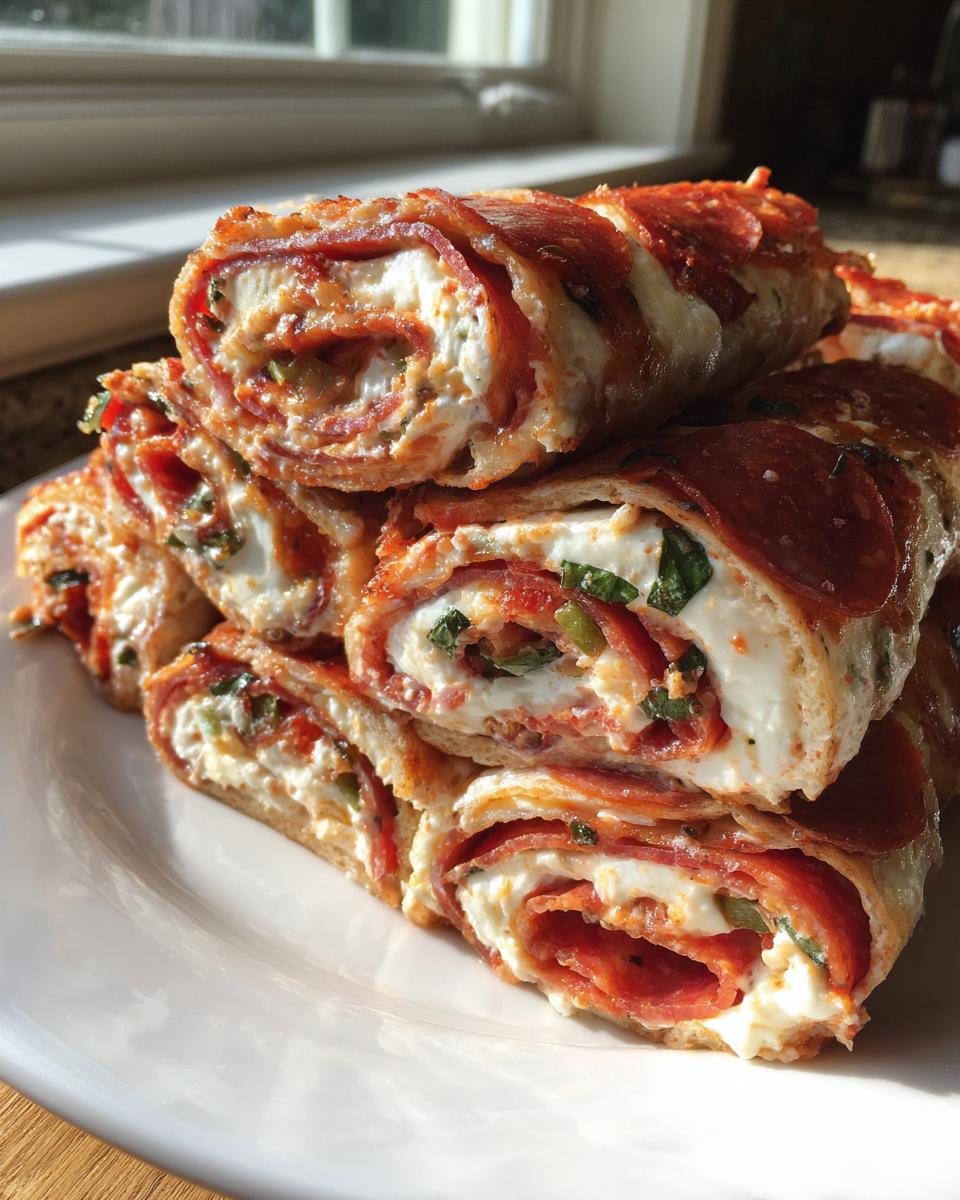
Lay out one of your big tortillas. Take about a quarter of that fantastic spread and cover the whole surface—but leave a tiny edge bare around the perimeter, it helps seal the deal! Next, pop down a layer of provolone. Then, scatter your meats evenly: ham, salami, pepperoni. If you’re using lettuce, sprinkle a little on top now. Now for the critical part: starting from one side, roll it up as tight as you possibly can without ripping the tortilla. You want zero air gaps in there! Once rolled, wrap that log tightly in plastic wrap. These italian pinwheels need to hold that shape!
The Essential Chill Time for Perfect Slicing
This step is non-negotiable, trust me on this one. Wrap up all four of your log beauties and pop them straight into the fridge. You need a minimum of two hours, but honestly, four hours or even overnight is better. Why? Because chilling solidifies that cream cheese mixture and firms up the meat. If you try to slice these warm, you end up with mushy fillings squishing out everywhere. When they are ice cold, you can use a sharp knife to slice them into perfect, neat little 1-inch bite sized Italian snacks. For more portable meal ideas that also benefit from an overnight chill, check out my tips on lunch ideas!
Tips for Success Making Perfect Italian Pinwheels
You’ve got the spread made and the logs rolled—that’s the hard part done! But just like any good recipe, there are little know-how moments that take these Italian pinwheels from good to absolutely unforgettable. I learned these tricks the hard way, especially when I was catering my neighbor’s retirement party and almost ruined all the rolls by trying to skip the chilling step. Never again!
When I was first figuring out the perfect tightness for the roll, I’d inevitably end up with an air bubble right in the middle of the log. I finally realized you have to start the roll slowly, pulling the tortilla back ever so slightly as you go, almost like you’re tucking in a very large burrito. It sounds silly, but once you get that first perfect, compact turn, the rest of the roll stays tight. If you need another amazing idea for portable eats, check out the tips over at Maple & Mango!
Achieving Clean Slices on Your Italian Pinwheels
Okay, so your logs are cold. Perfect. Now, grab your sharpest, thinnest knife. A bread knife or a serrated utility knife often works better than a big chef’s knife here because it saws through the spiral without squishing it downwards. The key is to slice quickly and confidently—don’t hesitate! If the blade starts getting sticky from the cheese or meat juices halfway through a cut, just quickly wipe the knife off with a damp paper towel before starting the next slice. That little bit of maintenance keeps your cuts looking sharp for the platter.
Ingredient Temperature Check
This seems simple, but temperature control is everything when you’re dealing with layers like this. Remember, we need that cream cheese pinwheels spread to be very soft when mixing—that ensures you incorporate the herbs and tomatoes evenly without tearing the tortilla later. However, keep your deli meats and cheese in the fridge until the absolute last second before layering them onto the spread. You want them cold and firm when they hit that slightly softer spread. That temperature difference between the cold meats and the room-temp spread helps everything “set” nicely during the tight roll, improving structure for those beautiful bite sized Italian snacks.
Storage and Make Ahead Appetizers Instructions for Italian Pinwheels
This is truly the best part of making these Italian pinwheels—they fit perfectly into almost any party timeline because they are designed to be made ahead! When it comes to appetizers, the less I have to worry about on the day of the party, the better. I want to be enjoying my guests, not frantically spreading cream cheese.
You have a couple of options here, depending on how organized you like to be. Since the main goal is preventing sogginess, keeping things chilled and wrapped is always the safest bet! For make-ahead appetizers, timing everything out makes you look like a kitchen wizard!
If you want to get them done completely ahead of time, you can store the wrapped logs in the refrigerator for up to 24 hours. Seriously, this holds up beautifully. The plastic wrap keeps everything sealed tight so the flour tortillas don’t dry out or absorb any funny fridge smells. When you’re ready to serve them for your breakfast or brunch gathering, just unwrap, slice, and arrange them on a platter. It’s like cheating!
Now, if you slice them first—say you cut them into little spirals the night before—they are still pretty good for about 4 to 6 hours in the fridge, but I wouldn’t push it past that. Once they are sliced, the exposed filling starts to dry out a little at the edges. For those deli meat pinwheels to shine, they need that minimal exposure time right before serving. If you’re planning a big event, stick to rolling them whole and slicing right before guests arrive!
Variations for Your Deli Meat Pinwheels
Part of my cooking philosophy here at Taste This Plate is making sure you never have to stress about finding a niche ingredient. If you don’t love provolone, or maybe you just want to try shaking things up for your next batch of Italian pinwheels, we can absolutely customize this! These deli meat pinwheels are so flexible—it’s all about building those layers of flavor you love in an Italian sub.
I recently tried swapping out a few things just to see what would happen, and frankly, it was delicious. You should never feel locked into a recipe, especially when it comes to simple party food. If you’re looking for more inspiration on appetizers like this, take a peek at some great ideas over at Kroll’s Korner!
Switching Up the Cheese in Your Italian Pinwheels
Provolone is classic, but that sharp, salty punch of Swiss cheese is fantastic next to ham and salami, if you ask me. It melts just a little better, too, even when served cold! Or maybe you prefer something milder? Monterey Jack is super creamy and lets the flavor of the pepperoncini and Italian seasoning really shine through. You could even use a mix of two cheeses if you can’t decide! Just make sure whatever cheese you choose is thinly sliced so it doesn’t create any bulk that messes up your tight roll.
Vegetarian Tortilla Roll Ups Italian Style Option
Not everyone eats cured meats, and that’s totally fine! You can transform these into beautiful vegetarian tortilla roll ups Italian style in seconds. The key is replacing the savory, salty meat flavor with something equally potent. Instead of the ham, salami, and pepperoni, skip right to laying down a layer of roasted red peppers (make sure they are well-drained!), some marinated artichoke hearts, and maybe some thinly sliced fresh mozzarella if you want an extra layer of soft cheese. It gives you that bright, tangy flavor profile without any meat at all!
Serving Suggestions for Bite Sized Italian Snacks
Now that you have mastered making the absolute best Italian pinwheels, the natural next question is, what should I serve them with? These little spirals are already packed with so much flavor—salty meats, zesty pepperoncini, creamy cheese—that they really don’t *need* anything else. They stand perfectly well on their own as the star of your next party platter.
But if you want to stretch your spread a little further or add some contrasting textures, I have a few favorite things that pair beautifully with these savory little bites. Remember, we’re keeping things easy here, so no complicated side dishes required!
For a really light, palate-cleansing pairing, try serving them alongside some simple raw veggies. Think crunchy celery sticks, carrot sticks, or maybe even some thin slices of bell pepper. They offer a great textural contrast to the soft tortilla and creamy filling of the bite sized Italian snacks.
If you are worried about having a slightly dry edge on a pinwheel that sat out for a little while, a nice, simple dip isn’t a bad idea. But instead of heavy ranch, stick to something bright that complements that Italian seasoning. A simple olive tapenade is lovely, or you could take a high-quality jar of marinara sauce, warm it slightly, and serve it as a very rustic dipping sauce. It feels fancy, but it’s just opening a jar and warming it up!
Alternatively, if you are planning a bigger spread for a game day or a larger event, these cold cut pinwheels work wonderfully next to something acidic to cut through the richness of the meat and cheese. A simple pasta salad featuring olives and marinated vegetables, or even just a bowl of marinated mozzarella balls, is always a huge hit. It completes the whole Italian sub vibe without requiring you to actually make subs!
Frequently Asked Questions About Italian Pinwheels
It’s funny how even the simplest recipes can bring up questions once you start digging in! Since these Italian pinwheels are so popular for parties and lunches, I get a bunch of questions about making them flexible for different needs. Since I want you to feel super confident making these for your next event, let’s tackle the most common things people ask about these little beauties.
Can I make these Easy Pinwheel Sandwiches with different tortillas?
Oh yes, you certainly can! Flour tortillas are my go-to because they are sturdy, they have a nice neutral flavor, and they roll up like a dream. But if you want to switch it up, spinach tortillas are gorgeous and add a little color to your presentation, though they are sometimes a tiny bit less flexible in rolling evenly. Whole wheat tortillas work fine too, but sometimes they can tear a little easier, especially if they are a bit older. Whatever you choose, make sure you warm the tortilla slightly—just 10 seconds in the microwave—before spreading the filling. It makes them much more pliable and keeps them from cracking when you start your tight roll!
What is the best way to pack these for Lunchbox Pinwheels?
This is important! If you’re making these as lunchbox pinwheels for school or work, you absolutely must follow the note I included in the recipe: don’t slice them until you are ready to pack them! If you slice them the night before and pack them already cut, the exposed edges of the meat and cream cheese can get a little tacky or dry out, and the tortilla can start to get soggy from the moisture in the filling. Keep the logs whole, chill them all day, and then, right before you pack the lunch, slice them into those perfect spirals, wrap them loosely in a paper towel, and pop them in a container. They stay fresh and firm that way!
Are these Italian Sub Roll Ups suitable for Game Day Snacks?
Are you kidding me? These Italian sub roll ups were practically invented for game day! They are handheld, they don’t require anyone getting up to refill a dip, and they look fantastic piled high on a platter when everyone is watching the big game. They are the perfect quick appetizer recipe because you make them the day before! I usually surround my platter of these with a bowl of salty pretzels and maybe some good quality olives. The saltiness of the pretzels complements the zesty filling perfectly. If you run into any questions while you’re testing out your recipe for the big game, feel free to get in touch with me over at the contact page!)
Estimated Nutritional Data for Italian Pinwheels
When we talk about party food, we know we aren’t focused on counting every single nutrient, but I certainly believe in transparency! Knowing what’s in your food—even a delicious appetizer—is part of being a confident cook. These figures are estimates based on the ingredients listed above and my guidelines for a standard serving size. Remember, these are estimates, and your exact numbers will depend on the specific brands of meat and tortillas you use for your cold cut pinwheels.
For this recipe, we estimated a serving size of two small pinwheels:
- Serving Size: 2 pinwheels
- Calories: 185
- Fat: 14g
- Saturated Fat: 6g
- Carbohydrates: 6g
- Protein: 9g
- Sodium: 450mg
See? Not too bad for an appetizer loaded with cheese and deli meats! They offer a decent amount of protein to keep folks satisfied while mingling!
Share Your Homemade Italian Pinwheels
I truly hope that making these cream cheese pinwheels brings a little bit of ease and a whole lot of flavor to your next gathering. My goal with every recipe here at Taste This Plate is to give you something delicious that you can create without stress, and these appetizers definitely fit the bill!
Once you’ve made them—and trust me, these Italian pinwheels are hard to resist eating half of before they even hit the serving platter—I would absolutely love to hear what you thought! Did you stick to the additions in the spread, or did you try swapping in different meats? We build this community around sharing what works in a real home kitchen, so please don’t be shy!
If you have a minute, leave a rating right below this section so other readers know how much you loved them. And if you snap a picture of your beautifully sliced rolls, feel free to tag us or reach out through my About Page! Seeing your beautiful results is the best part of my day, and it proves that anyone can be a confident cook.
Happy Cooking,
Kate Reilly
PrintUltimate Make-Ahead Italian Sub Pinwheels with Herbed Cream Cheese

Make these easy Italian pinwheels using classic deli meats, cheese, and a zesty cream cheese spread. They are perfect party finger food that you can prepare in advance.
- Prep Time: 25 min
- Cook Time: 0 min
- Total Time: 2 hours 25 min
- Yield: 48 pinwheels 1x
- Category: Appetizer
- Method: No Bake
- Cuisine: Italian
- Diet: Vegetarian
Ingredients
- 1 (8 ounce) package cream cheese, softened
- 1/4 cup mayonnaise
- 1 tablespoon Italian seasoning
- 1 teaspoon garlic powder
- 1/2 teaspoon dried oregano
- 1/4 cup finely chopped sun-dried tomatoes (packed in oil, drained)
- 1/4 cup finely chopped pepperoncini peppers (drained)
- 1/4 cup finely chopped fresh basil
- 4 large (10-inch) flour tortillas
- 4 ounces thinly sliced provolone cheese
- 4 ounces thinly sliced ham
- 4 ounces thinly sliced salami
- 4 ounces thinly sliced pepperoni
- 1/2 cup finely shredded lettuce (optional)
Instructions
- In a medium bowl, combine the softened cream cheese, mayonnaise, Italian seasoning, garlic powder, and oregano. Mix until smooth.
- Stir in the chopped sun-dried tomatoes, pepperoncini peppers, and fresh basil into the cream cheese mixture. This is your zesty spread.
- Lay one flour tortilla flat on a clean surface. Spread about one-quarter of the cream cheese mixture evenly over the entire surface of the tortilla, leaving a small border on the edges.
- Layer one-quarter of the provolone cheese over the spread.
- Layer one-quarter each of the ham, salami, and pepperoni evenly over the cheese. If using lettuce, sprinkle a thin layer over the meat.
- Starting from one edge, tightly roll the tortilla into a compact log. Wrap the log tightly in plastic wrap.
- Repeat the process with the remaining three tortillas and fillings.
- Refrigerate the wrapped logs for at least 2 hours, or up to 24 hours, to allow them to firm up. This step is key for clean slicing.
- When ready to serve, unwrap the logs and use a sharp knife to slice each log into 1-inch thick pinwheels.
- Arrange the Italian pinwheels on a platter and serve immediately.
Notes
- For the best flavor, use high-quality deli meats.
- If you are making these for a lunchbox, slice them just before packing to prevent the tortilla from getting soggy.
- You can substitute the cream cheese spread with softened goat cheese mixed with pesto for a different flavor profile.
Nutrition
- Serving Size: 2 pinwheels
- Calories: 185
- Sugar: 1
- Sodium: 450
- Fat: 14
- Saturated Fat: 6
- Unsaturated Fat: 8
- Trans Fat: 0.5
- Carbohydrates: 6
- Fiber: 0.5
- Protein: 9
- Cholesterol: 35