

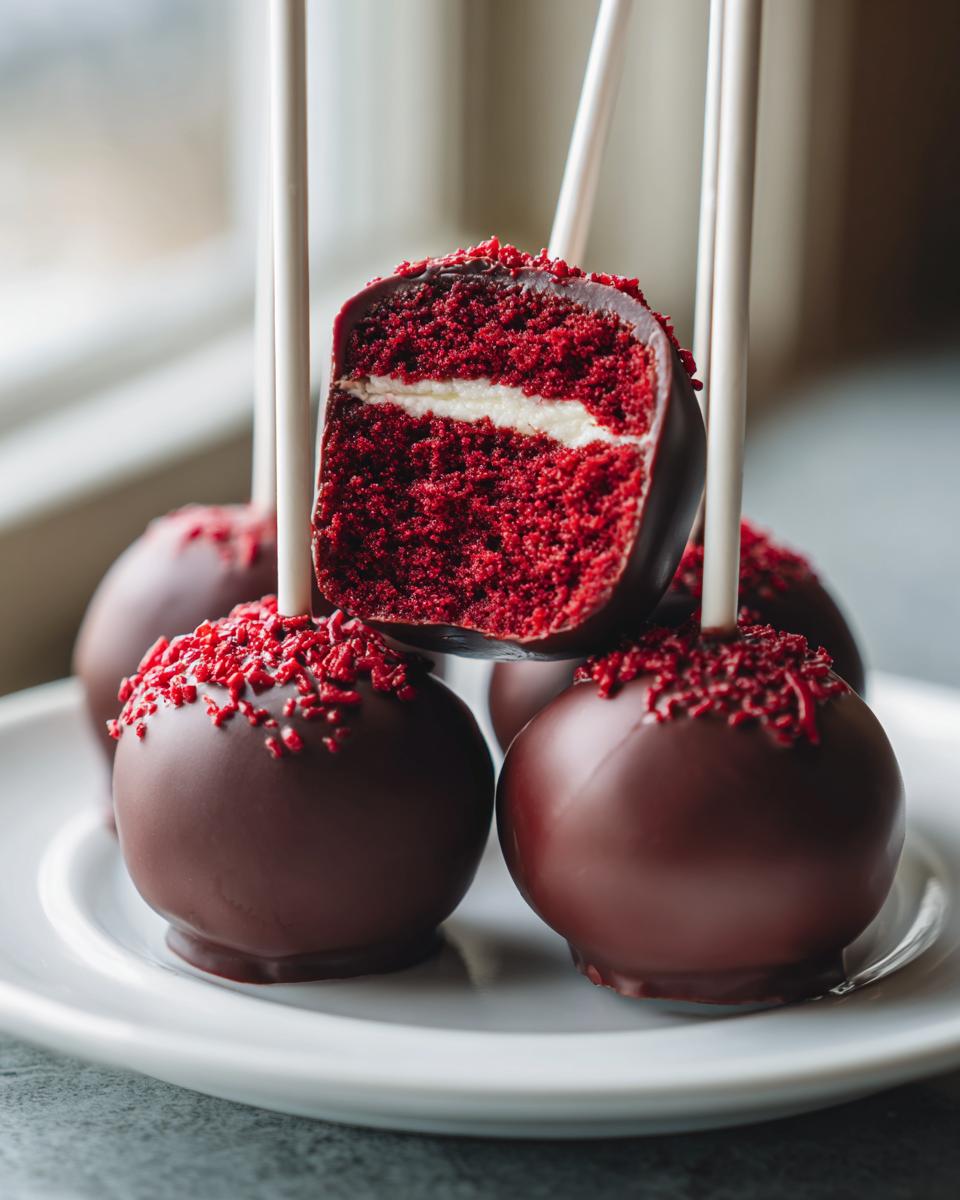
Oh, I just adore anything bite-sized! They’re just so perfectly festive, aren’t they? When you need something decadent but don’t want to cut a whole cake, these **red velvet cake pops** are the absolute answer. Honestly, I spent ages trying to get this texture right because the biggest crime in the world is a dry cake ball, especially when you’re dealing with that gorgeous red velvet flavor.

But don’t you worry! I cracked the code. My favorite version uses this simple hack where we tweak the standard box mix and use real cream cheese filling to bind it all together. This recipe is my tried-and-true promise that you will get pops that are outrageously moist, every single time. We’re talking about going from box mix to show-stopping dessert without any fuss. If you’re looking for the best dessert ideas for your next gathering, you definitely want to check out my collection of favorite desserts.
- Why This Is the Best Red Velvet Cake Pops Recipe
- Ingredients for Perfect Red Velvet Cake Pops
- Step-by-Step Tutorial: How to Make Red Velvet Cake Pops
- Expert Tips for Perfect Red Velvet Cake Pops Every Time
- Variations: Festive Red Velvet Dessert Ideas
- Storage and Serving Suggestions for Your Red Velvet Cake Pops
- Common Questions About Red Velvet Cake Pops
- Nutritional Estimates for Red Velvet Cake Pops
- Share Your Decadent Cake Pops Creations
Why This Is the Best Red Velvet Cake Pops Recipe
I totally get why people avoid making homemade cake pops sometimes. They can be fussy, and that dreaded dry center can ruin everything! But this recipe? It skips all that nonsense. This isn’t just another recipe; it’s a blueprint for success, especially when you’re aiming for those truly irresistible, sweet little treats you see everywhere.
When I developed this, I was aiming for my own personal gold standard. Now they are among my favorite festive dessert pops!
Achieving Ultra Moist Red Velvet Cake Pops
The first thing you need to know is that we are hacking the box mix! It’s our little secret for getting really **moist red velvet cake pops** without spending hours baking from scratch. The trick is two-fold: first, we use slightly less liquid than the box tells you to. That makes the cake naturally denser, not fluffy like a layer cake.
Second, we use cream cheese frosting as our binder instead of plain buttercream or extra melted chocolate. Cream cheese is already rich, so it keeps the crumbs super tender. It basically glues the cake together while infusing moisture, which is exactly what we want!
The Ease of This Easy Cake Pop Recipe
Don’t stress about making everything from zero! This is a fantastic, **easy cake pop recipe** because we start with a quality red velvet box mix—no shame in that game! It saves you time, but we’re upgrading the result so nobody can tell it wasn’t entirely from scratch. You get all the rich flavor and the perfect texture without any of the complicated measuring for flour and cocoa.
It’s reliable, speedy, and perfect for when you need a big tray of gorgeous, **bite sized red velvet treats** ready for a last-minute party!
Ingredients for Perfect Red Velvet Cake Pops
Okay, let’s talk about what you need to gather up. Remember, we’re keeping this simple but delivering maximum flavor and moisture here. Think of assembling these ingredients like setting up a perfect little art station for your **cream cheese cake pops**.
I always lay everything out before I start baking the cake. It just makes the whole process smoother, and trust me, less mess equals less stress!
Cake Base and Cream Cheese Cake Pops Binder
This is where the magic starts—the base needs to be sturdy enough to roll but moist enough to melt in your mouth. You’ll need the basics to get that gorgeous red velvet flavor right.
- One whole box of the 15.25 oz red velvet cake mix. Don’t panic, we doctor this up!
- Whatever the box calls for in terms of eggs, oil, and water. (Except wait on the water, we’re cutting that back—I’ll tell you exactly how much in the instructions!)
- One full cup of cream cheese frosting. Store-bought is totally fine here, or you can make your own if you’re feeling ambitious. This is your secret weapon binder!
Chocolate Coating and Decoration for Red Velvet Cake Pops
We need something smooth to encase our beautiful red interior. Melted chocolate is always the star, but you need the right consistency so you aren’t wrestling with thick goo.
- About 12 ounces of good quality melting wafers or candy coating. Dark or white chocolate both work great depending on your preference for contrast.
- Optional, but I recommend it: just one tiny teaspoon of coconut oil or vegetable shortening. This thins that chocolate just enough so you get smooth **chocolate coated cake pops** instead of thick lumps.
- Cake pop sticks, of course!
- Whatever makes you happy for decorating—think red sprinkles or maybe a contrasting white chocolate drizzle.
Step-by-Step Tutorial: How to Make Red Velvet Cake Pops
Alright, buckle up, because watching these come together is the fun part! This whole process is part of my favorite **tutorial how to make cake pops** because it turns a simple cake into pure, delicious magic. It’s all about managing temperature and texture here, so stick with me!
Baking and Crumbing the Red Velvet Cake
First things first: bake that cake so it’s dense! As I mentioned before, follow the box directions but use about one cup of water total—we want it slightly firmer than usual. Once that gorgeous red cake is completely cooled down (and I mean *completely*, no warm centers allowed!), it’s time to crumble. Grab a big bowl and squish that cake right down into fine crumbs. Seriously, take the time to pick out any super dark, hard edges from the bottom or top. Those dry bits just suck up the rich cream cheese frosting and make your final pop dense instead of perfectly tender.
Mixing, Chilling, and Rolling Your Red Velvet Dessert Bites
Now for the binder! Dump that cup of cream cheese frosting right into your cake crumbs. Mix it well, using your hands is best here, until it finally sticks together nicely when you squeeze a bit. It should feel like thick modeling dough. Cover that bowl up—we need a quick break! Chill the mixture for at least 30 minutes in the fridge. This makes rolling so much easier. Once chilled, roll them out into little uniform balls, about an inch and a half wide. Then, pop the whole sheet into the freezer—this freezing step is crucial for success! If you’re looking for more great ideas for small appetizers, you should definitely explore my thoughts on appetizers and snacks.
Mastering the Chocolate Dipping for Homemade Cake Pops
While the little balls are chilling solid, melt your chocolate wafers gently. Remember that secret weapon? Stir in that tiny bit of coconut oil or shortening. It makes the chocolate flow like silk; you won’t get those thick, cracked shells on your **homemade cake pops**! This step is crucial if you want that professional look, much like the ones shared over at Restless Chipotle.

Take the sticks, dip the tip in the melted chocolate only an inch deep—that’s your glue! Push that stick into a frozen ball and immediately pop it back in the freezer for five minutes. That little chocolate cement needs to set hard. Once it’s set, dip the whole ball in the chocolate, let the excess drip off by tapping the stick gently, and then decorate immediately before the coating sets. Place them upright in a block of foam to set completely. That’s it for your perfectly coated **red velvet dessert bites**!
Expert Tips for Perfect Red Velvet Cake Pops Every Time
I know we’ve covered the basic steps, but perfecting any dessert—even **red velvet cake pops**—comes down to knowing how to handle the minor disasters! If you’re aiming for the very **best red velvet cake pop recipe**, you need to know what to do when things go just a little sideways. Trust me, I’ve fought with sticky dough more times than I care to admit over at my kitchen.
These little tips saved me when I was first testing out this recipe for a big gathering. You can find more ideas on handling tricky baking situations over in my guide to those tricky egg bites—baking is all about troubleshooting!
Troubleshooting Common Red Velvet Cake Pops Issues
If your smooth chocolate coating starts cracking as it sets, nine times out of ten it means your cake balls weren’t fully frozen when you dipped them. A rock-solid ball keeps the warm chocolate coating from shocking the cold cake, which prevents the crack! If the balls are falling off the sticks, you probably didn’t use enough chocolate ‘glue’ when inserting the stick, or maybe you dipped before the glue set for those 5 minutes.
Now, if your dough mix is just too sticky even after chilling, don’t panic about throwing it out! Instead of adding more frosting (which would make them too soft), just pop the entire sticky bowl back into the freezer for another 20 minutes. That little bit of extra chill time makes rolling manageable again!
Making Red Velvet Cake Pops for Parties
When you’re stacking these up for **cake pops for parties**, presentation matters just as much as moisture! If you’re making huge batches, keep the finished pops stored in a large, airtight container in the fridge until about an hour before the party starts. Cold cake pops hold their shape best.
Need a beautiful display? Don’t just use a block of foam! Try baking a small, dense layer cake and using that as the base to stick your pops into—it looks so much classier. If you want to see incredible, rich results, check out the beautiful work over on Pretty Pastelitos detailing their decadent approach!
Variations: Festive Red Velvet Dessert Ideas
Even though these **red velvet cake pops** are perfect straight out of the chocolate coating, who doesn’t love shaking things up a bit? When you’ve mastered the base recipe, you can start thinking about what holidays or parties you’re dressing them up for next. I love having tons of **red velvet dessert ideas** ready to go, especially when I’m baking for an event!
I’ve got a whole folder of fun ideas for holiday treats, including great patterns for cranberry sugar cookies, but these pops adapt so well to different seasons. Here are a couple of simple tweaks that will change the whole vibe of your dessert!
Coatings Beyond Standard Chocolate
Most of mine get dipped in plain milk or dark chocolate because I love that contrast against the deep red interior. But if you’re aiming for a specific theme, the coating is your canvas! For something super sweet and romantic, try dipping them in white chocolate melting wafers and adding a drop of red gel food coloring to tint them a lovely soft pink. These make the prettiest **valentine cake pops**, honestly, everyone loves that soft color palette!
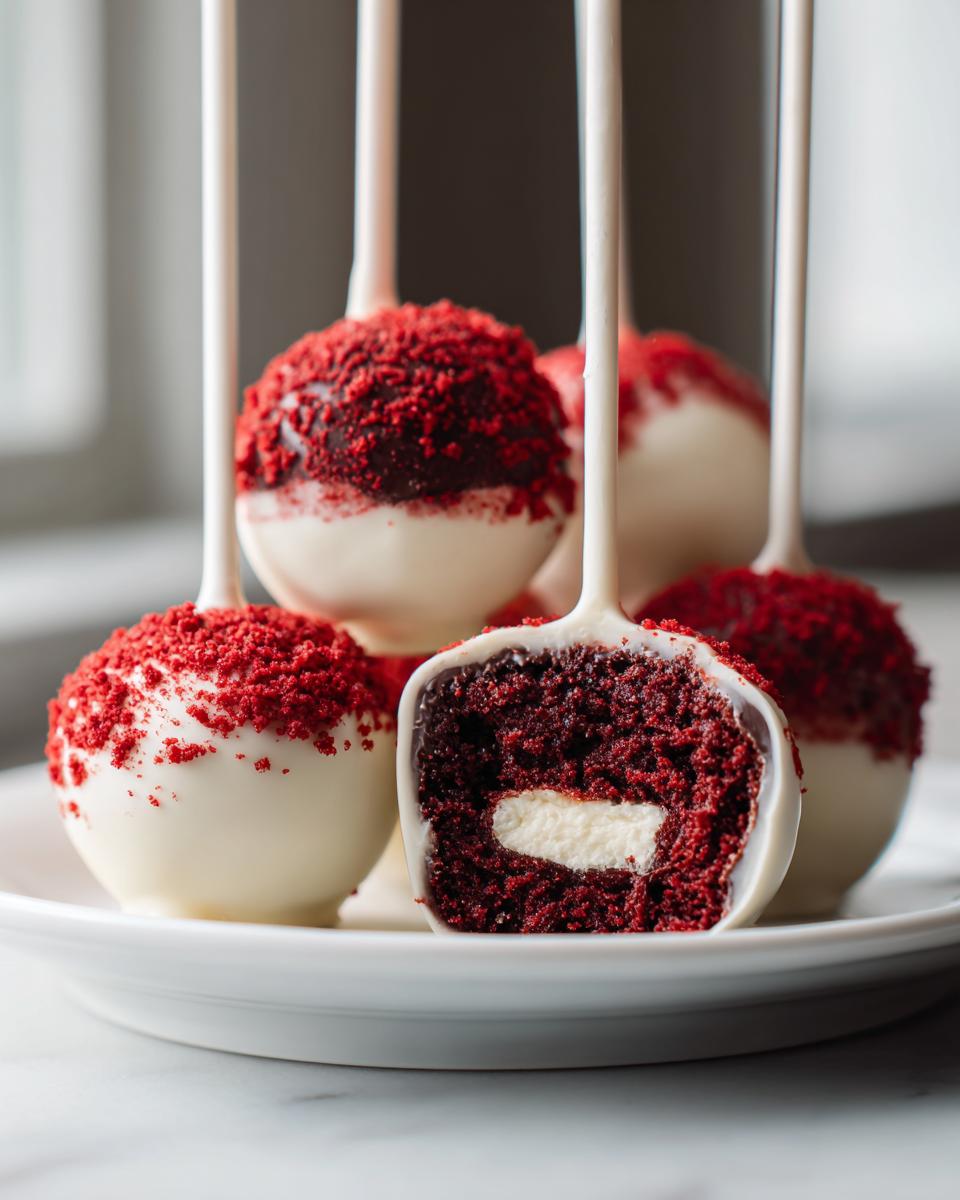
Or, if you want a bolder statement, go for the dark chocolate coating. The slight bitterness of a higher quality dark chocolate contrasts so beautifully with the sweet cake and tangy cream cheese filling. It’s a surprisingly sophisticated flavor profile for something so small!
Alternative to Cake Pops: Red Velvet Truffles
Sometimes I’m just not feeling the sticks, you know? Maybe the presentation calls for something a little more classic, or maybe you are just running low on cake pop sticks—it happens! In that case, you can skip the whole dipping process and make delicious **red velvet truffles** instead. It’s so simple!
Just roll your chilled cake and frosting mixture into balls like normal, but instead of freezing them for dipping, just set them on wax paper. Then, instead of dipping them in melted chocolate, you can roll them immediately in powdered sugar for a velvety finish or maybe even sifted unsweetened cocoa powder for an intense chocolate hit. They look just as stunning on a platter, and nobody complains about getting an extra bite!
If you want to see how beautifully rich other people make these, take a peek at the gorgeous homemade jobs shared by Molly’s Home Guide!
Storage and Serving Suggestions for Your Red Velvet Cake Pops
We finally made these beautiful, decadent little balls, and now the last thing we want is to ruin them by storing them incorrectly! Keeping cake pops fresh is actually pretty simple, but you do need to respect the chocolate coating and the inside crumble. You want the inside to stay moist, but the outside needs to stay firm and crack-free.
When I’m making these for a party, I always consider the serving temperature because it really affects the flavor and texture. If they get too warm, the chocolate melts and gets messy, and if they get too cold, the creamy center firms up too much. Luckily, these delicious treats are pretty resilient if you follow a couple of easy rules.
Keeping Your Bite Sized Red Velvet Treats Fresh
So, should they live in the fridge or on the counter? That depends on how long you need to keep them! Because we used that rich cream cheese frosting inside, refrigeration is actually the safest bet for long-term storage of your **bite sized red velvet treats**.
For short-term storage—say, if you are bringing them to an event or just keeping them for a couple of days—store them in an airtight container in the refrigerator. Make sure they aren’t touching each other or they’ll smear the pretty coating! They’ll be good for about 5 days this way. If you need to store them longer than that, freezing is an option, but always let them thaw in the fridge for a few hours before serving.
Here’s my serving temperature tip: If they’ve been chilled, pull the container out about 30 to 45 minutes before you plan to serve them. That gives the creamy interior time to soften perfectly back up. Trust me, that slight warmth brings out the tangy richness from the cream cheese filling. If you’re looking for other great tips on timing your food prep, I wrote a whole piece on prepping things like avocado toast for optimal freshness!
Common Questions About Red Velvet Cake Pops
I know when you’re looking at a recipe, especially one claiming to be the “best” or “moistest,” you probably have some nagging little questions. That’s totally normal! I’ve answered the top things people always ask me about making these **red velvet cake pops**. We want flawless results, after all!
If you want to know more about my whole cooking philosophy and why I test things so rigorously, you can always check out my About Me page. But for now, let’s get these FAQs sorted out!
Can I skip the cream cheese frosting in this red velvet cake pops recipe?
Oh, please don’t! I totally get wanting to simplify, but the cream cheese frosting isn’t just for flavor here; it’s the structural glue and the main moisture provider for our **cream cheese cake pops**! If you skip it and try to use plain cake crumbs mixed with maybe just a splash of milk, you end up with something truly dry and crumbly.
And trust me, those crumbs will never hold their shape well enough for dipping. The frosting has the perfect fat and sugar content to bind everything into that dense, rollable dough. It’s non-negotiable for success!
How long do red velvet cake pops last?
Because we are using real dairy (that cream cheese frosting), we need to treat them carefully. If you keep them sealed tightly in an airtight container, they will stay fantastic in the refrigerator for about five to maybe six days. They freeze wonderfully, too, if you need to make them way ahead of time for a big event!
But the very best flavor and texture are definitely in the first three days. As mentioned earlier, just pull them out about 45 minutes before serving if they’ve been chilling. That way, these **festive dessert pops** aren’t too hard when you bite into them!
What is the secret to preventing my cake pops from cracking?
This is one of the easiest fixes once you know the temperature rule! The secret is making sure your cake ball is fully frozen—I mean frozen solid! If the cake ball is even a little bit soft when you dip it into the warm, melted chocolate coating, the temperature difference causes the coating to contract too quickly and just snap right off.
So, make sure your balls are rock hard from the freezer. The chocolate itself should be perfectly smooth (that’s why we added that tiny bit of oil!). As soon as you pull the frozen pop out of the chocolate bath, tap gently to let the excess drip off, and you should get a smooth, shiny, crack-free shell every single time.
Nutritional Estimates for Red Velvet Cake Pops
Now, I want to be super clear about this part. When you’re making something this decadent and delicious, the nutrition facts aren’t exactly the main reason we bake them, right? But since I believe in being transparent about what we’re putting into our bodies—even when it comes to **decadent cake pops**—I’ve got some estimates for you.
Please remember, these numbers are just an approximation! Since we’re using a box mix and store-bought frosting, and the exact amount of chocolate coating sticks to the pop versus dripping into the bowl changes things, your actual numbers might vary a bit. If you’re looking to talk more about food prep and balancing meals, feel free to reach out via my contact page!
Here’s what you can generally expect per single, glorious cake pop:
- Serving Size: 1 pop
- Calories: Around 250
- Sugar: About 25 grams (Yes, it’s a treat!)
- Fat: Roughly 15 grams total
- Protein: About 3 grams
- Carbohydrates: Roughly 28 grams
It’s a sweet treat, designed for celebrations, so enjoy it for what it is: a wonderfully **bite sized red velvet treat** made with love. Don’t stress the numbers!
Share Your Decadent Cake Pops Creations
Well, we made it to the end! We’ve baked, chilled, mixed, and dipped, and now you have a tray full of perfect, **moist red velvet cake pops**. The best part of being in the kitchen, though, isn’t just eating the goodies yourself—it’s sharing that joy!
I truly hope you try this recipe out, whether you’re prepping for a huge birthday bash or just need a little burst of red velvet happiness on a Tuesday. I absolutely love hearing from you all. Did the box mix hack work magic for you? Did you go bold with dark chocolate or keep it classic white?
Please leave a rating right down below this post; it helps other home cooks know this recipe is worth their time. If you snapped a picture of your final, beautiful **red velvet dessert bites**, tag me on social media! I get so much joy seeing how everyone styles these. I’m always gathering new inspiration, and I look at everything you share!
If you want to stick around and check out some great ways to start your day after all that sugar, take a peek at my favorite breakfast and brunch recipes! And if you’re looking for more incredible inspiration for **easy dessert for celebrations**, you should definitely see what others are doing, like the amazing presentation tips found on Baking Taste. Happy baking, friends!
PrintULTRA Moist Red Velvet Cake Pops (Using Cream Cheese Filling & Box Mix Hack)

Make perfectly moist red velvet cake pops every time using this simple recipe that hacks a box mix and incorporates cream cheese for the best texture. These bite-sized treats are coated in smooth chocolate and are ideal for parties or celebrations.
- Prep Time: 45 min
- Cook Time: 30 min
- Total Time: 1 hour 45 min
- Yield: 24 pops 1x
- Category: Dessert
- Method: No Bake (after initial cake baking)
- Cuisine: American
- Diet: Vegetarian
Ingredients
- 1 box (15.25 oz) red velvet cake mix
- Ingredients listed on cake mix box (usually eggs, oil, water)
- 1 cup cream cheese frosting (store-bought or homemade)
- 12 oz melting wafers or chocolate candy coating (white or dark)
- 1 teaspoon coconut oil or vegetable shortening (optional, for thinning chocolate)
- Cake pop sticks
- Optional: Red sprinkles or white chocolate drizzle for decoration
Instructions
- Prepare the cake: Bake the red velvet cake according to the package directions, but reduce the liquid slightly (use 1 cup of water instead of the amount listed on the box) to promote a denser, moister crumb. Let the cake cool completely.
- Crumble the cake: Once cool, crumble the entire cake into fine crumbs in a large bowl. Discard any hard edges or burnt spots.
- Mix the filling: Add the cream cheese frosting to the cake crumbs. Mix thoroughly with your hands or a sturdy spoon until the mixture is fully combined and holds together when pressed. This mixture should resemble thick dough.
- Chill the dough: Cover the bowl and refrigerate the mixture for at least 30 minutes. Chilling makes the mixture easier to roll and prevents crumbling.
- Roll the pops: Remove the mixture from the refrigerator. Roll the dough into uniform balls, about 1 to 1.5 inches in diameter. Place the balls on a parchment-lined baking sheet.
- Freeze the balls: Place the baking sheet in the freezer for at least 1 hour until the balls are firm. This step prevents them from falling off the sticks during dipping.
- Prepare for dipping: Melt the chocolate coating wafers according to package directions. If the chocolate is too thick, stir in the coconut oil or shortening to reach a smooth, dippable consistency.
- Dip the pops: Dip the tip of a cake pop stick into the melted chocolate and insert it about halfway into a frozen cake ball. This acts as glue. Return the pops to the freezer for 5 minutes to set the stick.
- Coat the pops: Dip the entire cake ball into the melted chocolate, rotating the stick to coat evenly. Gently tap the stick against the side of the bowl to let excess chocolate drip off.
- Decorate: Immediately apply sprinkles or drizzle with contrasting chocolate while the coating is still wet.
- Set: Place the finished cake pops upright in a styrofoam block or cake pop stand to allow the coating to set completely before serving.
Notes
- For extra moisture, you can substitute half of the required liquid in the cake mix with buttermilk.
- If you prefer a richer flavor, use dark chocolate coating instead of white chocolate.
- To prevent cracking in the coating, make sure your cake balls are fully frozen before dipping them into the warm chocolate.
Nutrition
- Serving Size: 1 pop
- Calories: 250
- Sugar: 25
- Sodium: 180
- Fat: 15
- Saturated Fat: 8
- Unsaturated Fat: 7
- Trans Fat: 0.5
- Carbohydrates: 28
- Fiber: 1
- Protein: 3
- Cholesterol: 30