
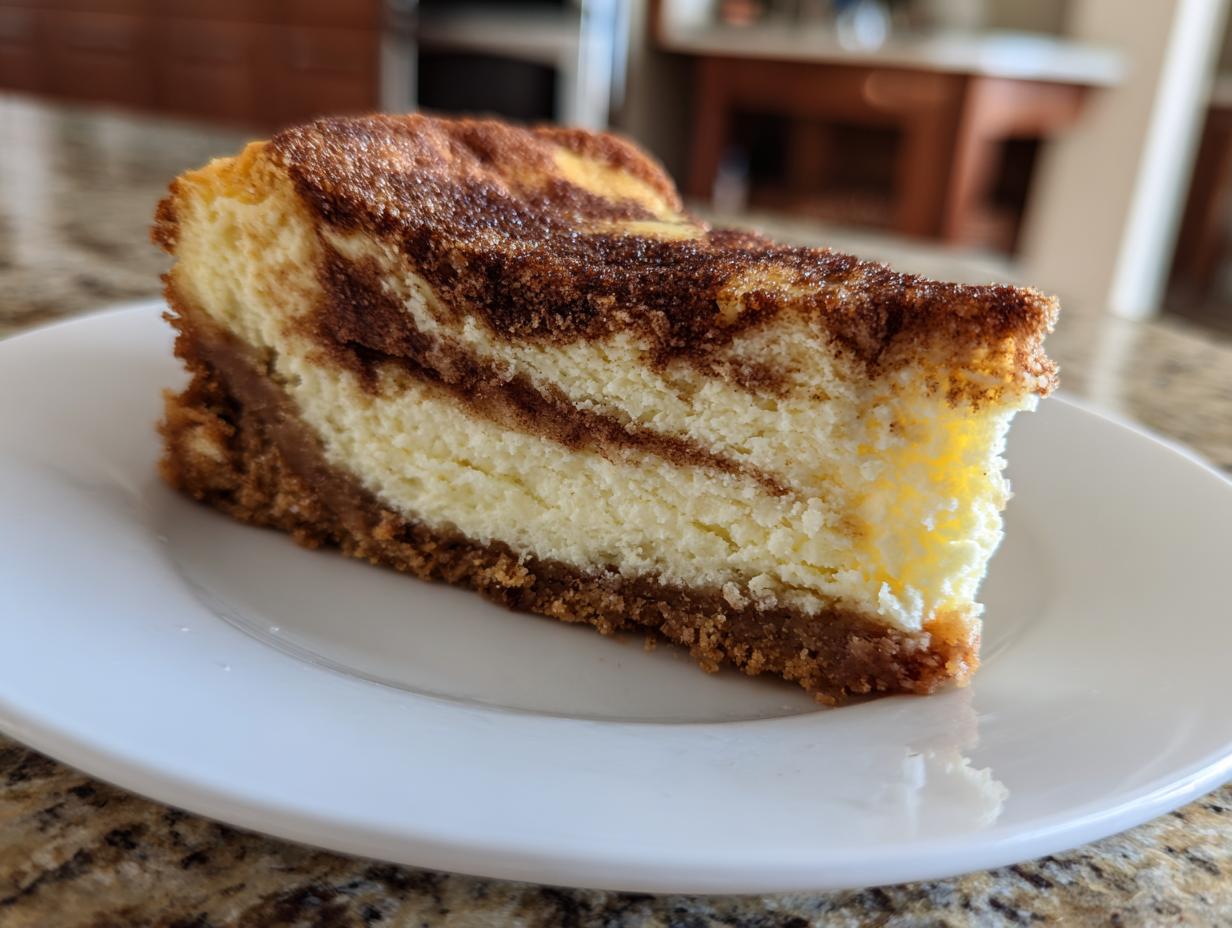
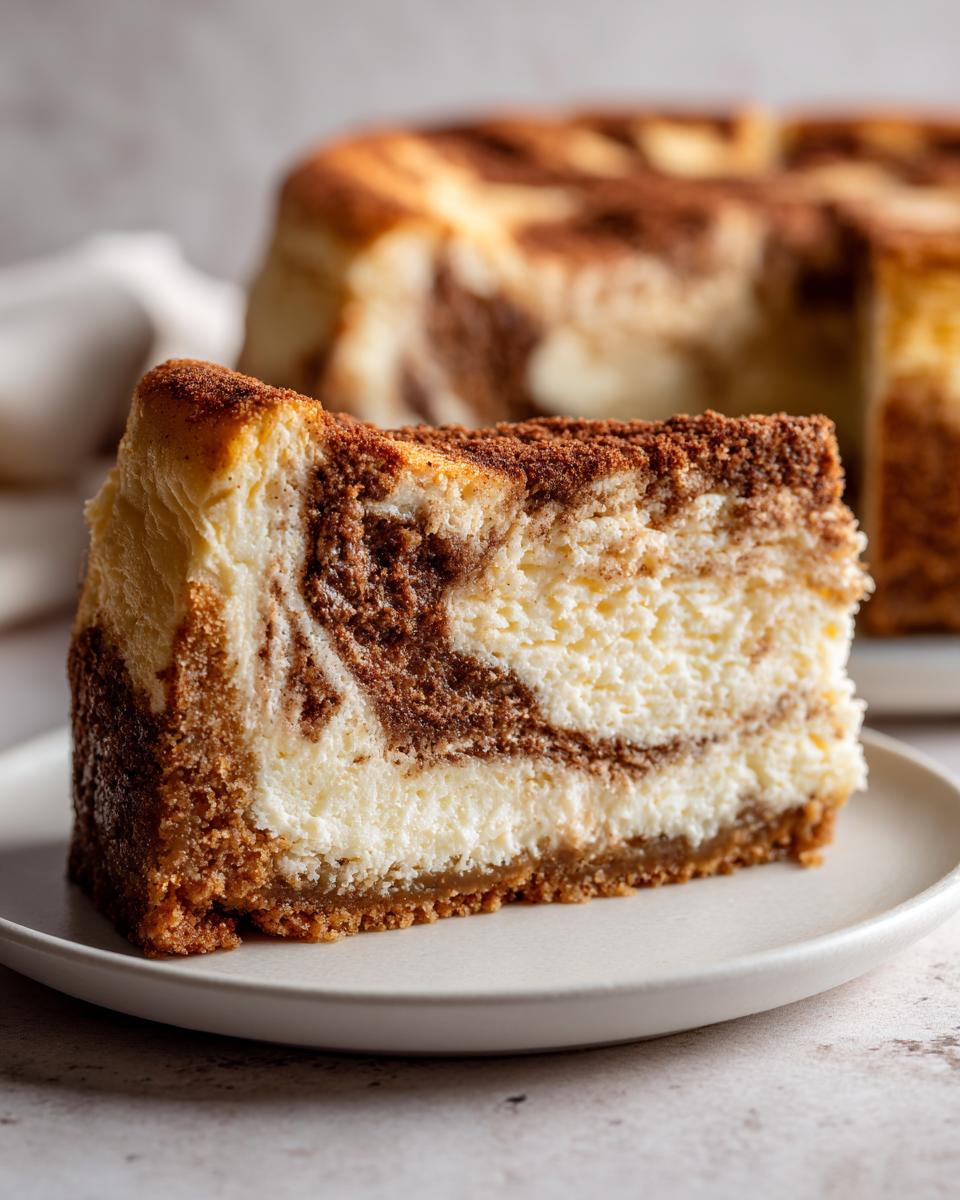
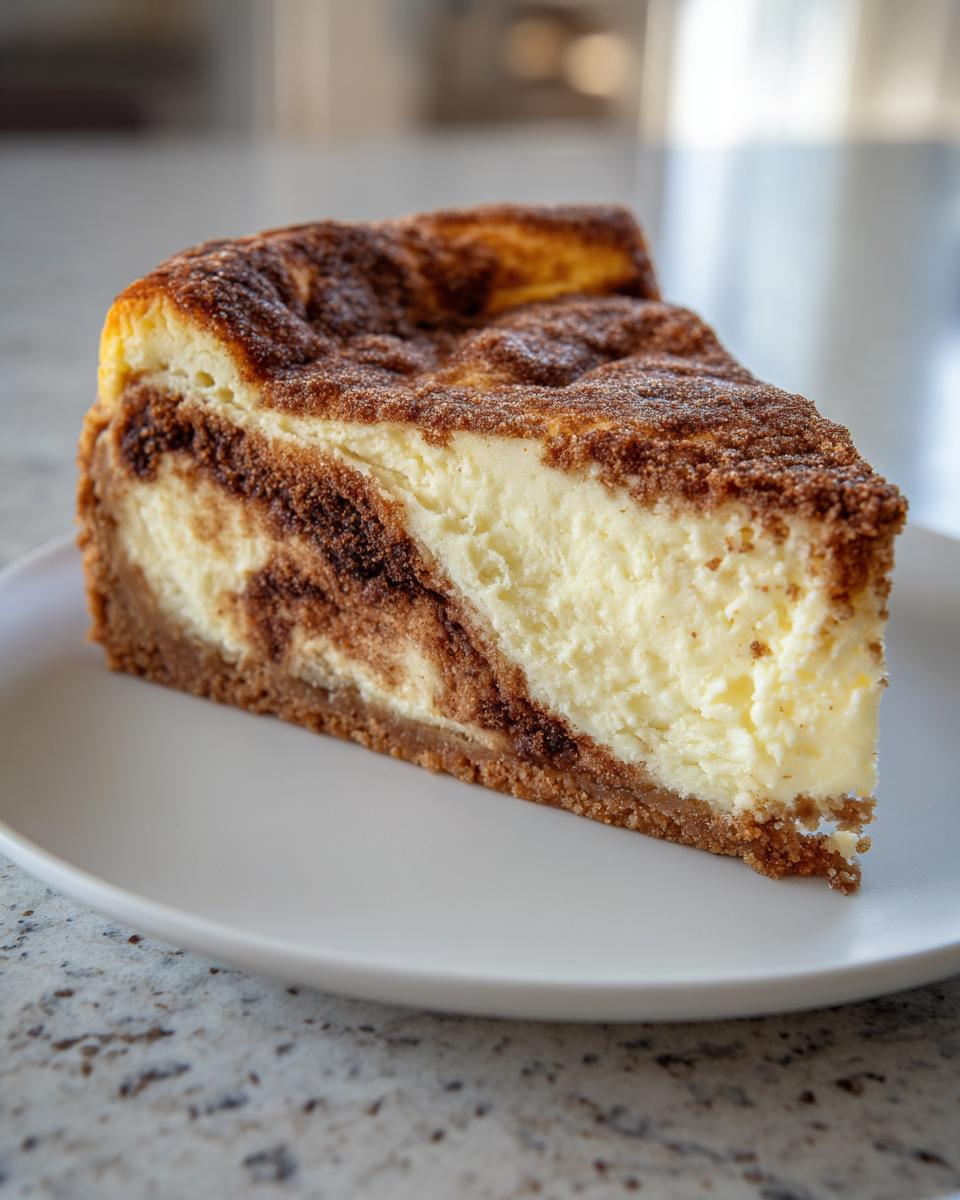
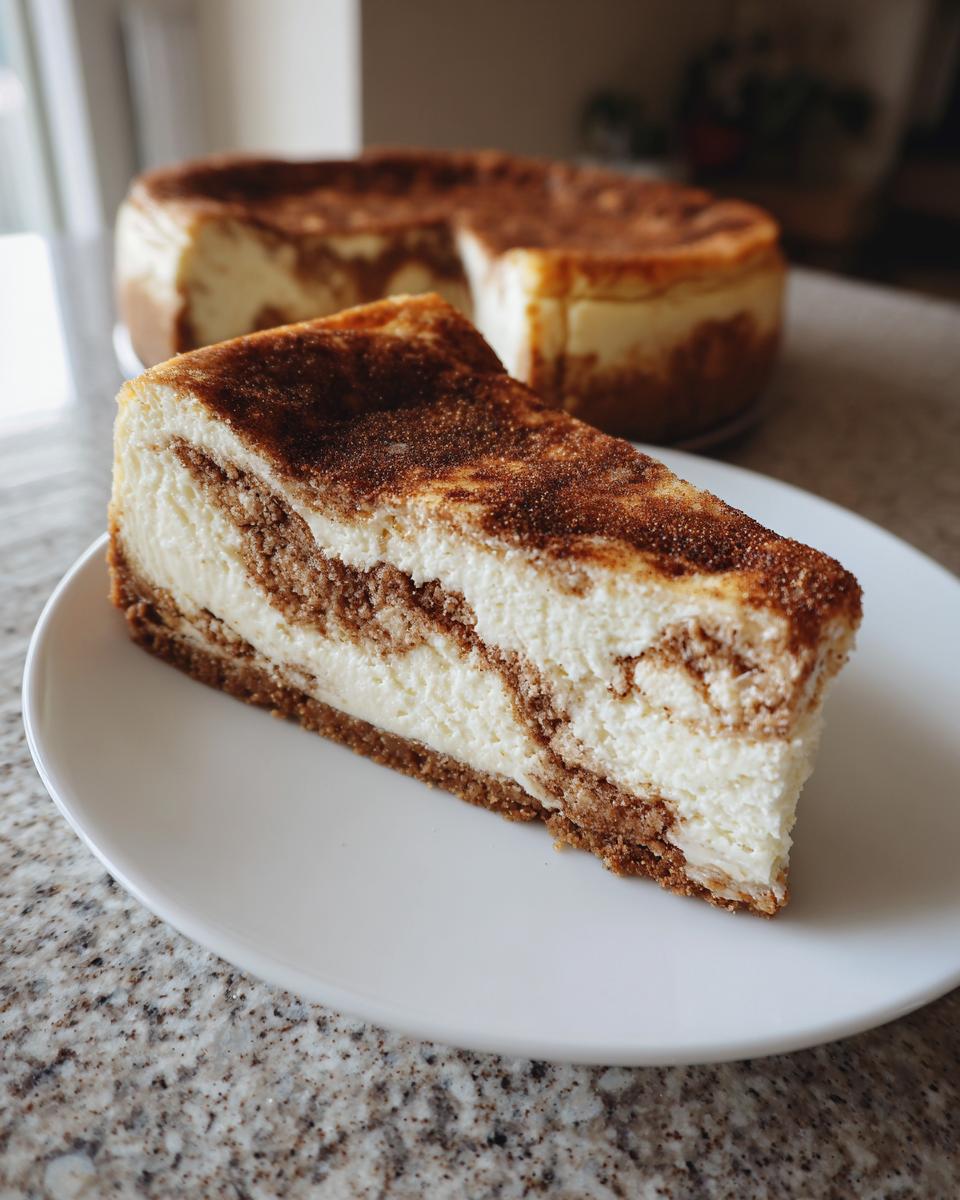
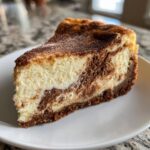
If you’re anything like me, you believe the best moments in the kitchen come when two incredible desserts decide to have a baby! That’s exactly what happened here. I am obsessed with finding ways to take big, comforting flavors and give them an elegant twist. This ultimate baked snickerdoodle cheesecake recipe is the result of that quest. It brings together that buttery, spiced perfection of a snickerdoodle cookie with the signature tang of a truly creamy cheesecake. Trust me, this is the showstopper dessert you need for Christmas or Thanksgiving this year. It’s rich, it’s velvety, and it captures everything I love about blending classic, tried-and-true flavors.
- Why This Snickerdoodle Cheesecake Recipe is Your New Favorite Holiday Dessert
- Gathering Ingredients for Your Snickerdoodle Cheesecake
- Step-by-Step Instructions for the Best Snickerdoodle Cheesecake Recipe
- Tips for a Perfect Snickerdoodle Cheesecake Every Time
- Serving Suggestions for This Cinnamon Sugar Dessert
- Storage and Reheating Instructions for Your Snickerdoodle Cheesecake
- Frequently Asked Questions About Snickerdoodle Cheesecake
- Estimated Nutritional Value for Snickerdoodle Cheesecake
- Share Your Snickerdoodle Cheesecake Masterpiece
- Estimated Nutritional Value for Snickerdoodle Cheesecake
- Share Your Snickerdoodle Cheesecake Masterpiece
Why This Snickerdoodle Cheesecake Recipe is Your New Favorite Holiday Dessert
When I first landed on the concept for this snickerdoodle cheesecake, I knew I had to nail the texture. I spent weeks testing everything from the crust ratio to the cooling time because when you bring a dessert to the table during the holidays, it needs to be perfect. This isn’t just any dessert; it quickly became my go-to best holiday cheesecake alternative. You’ll find that every ingredient works together to deliver an unforgettable experience.
- You get that signature creamy texture that cheesecake lovers crave.
- The cinnamon swirl sinks in beautifully, giving you pockets of warm spice in every bite.
- I’ve included a foolproof water bath technique that guarantees a smooth, crack-free top.
If you want to see more showstoppers, check out my other favorite holiday dessert bakes over at my dessert page!

The Secret to a Velvety Cheesecake Filling
Listen close, because this is where most people go wrong with cheesecake, and we aren’t going to have that happen here! To achieve that perfectly velvety cheesecake filling, ingredient temperature is everything. You absolutely must have your cream cheese at true room temperature—soft enough that your finger leaves an easy imprint without having to push. Also, your eggs need to be room temperature! Cold eggs hitting that soft cream cheese batter causes lumps, and lumps lead to uneven baking and, eventually, cracks. Take the extra 30 minutes to let things sit out; it pays off tenfold in creaminess.
Gathering Ingredients for Your Snickerdoodle Cheesecake
Okay, now that we know the texture is going to be amazing, let’s talk about what we need! Having everything ready before you start mixing is the key to keeping that batter smooth and avoiding over-stressing the mixer. It’s the secret to guaranteeing an indulgent baked goods experience, especially since we want that perfect crust on our snickerdoodle cheesecake.
For the Cheesecake with Cookie Crust
For the base, you need just simple, accessible ingredients. You can use classic graham crackers, but if you have any leftover snickerdoodles from when you were testing recipes (or just because you like to snack!), feel free to crush those up instead. It adds such a lovely echo of flavor right from the bottom layer.
- 1 1/2 cups graham cracker crumbs (or crushed snickerdoodle cookies)
- 1/4 cup granulated sugar
- 6 tablespoons unsalted butter, melted
For the Creamy Cinnamon Cheesecake Filling
This section has the heart of the flavor! Remember, those cream cheese packages must be completely softened. The spices here—that mix of cinnamon and nutmeg—are what push this over the edge from being just a cheesecake into the world of cozy cinnamon sugar dessert territory.
- 3 (8 ounce) packages cream cheese, softened
- 1 1/2 cups granulated sugar
- 1/4 cup all-purpose flour
- 1 teaspoon vanilla extract
- 1/2 teaspoon ground cinnamon
- 1/4 teaspoon ground nutmeg
- 4 large eggs
- 1/2 cup sour cream
For the Cinnamon Swirl Topping
This crumble topping is crucial; it’s not just for sprinkling on top after baking! We use half of it layered *inside* the cheesecake to create that beautiful center swirl. The most important thing here is that the butter needs to be very cold so you get those nice, distinct crumbs instead of a paste.
- 1/2 cup packed light brown sugar
- 1 tablespoon all-purpose flour
- 1 teaspoon ground cinnamon
- 2 tablespoons cold unsalted butter, cut into small pieces
Step-by-Step Instructions for the Best Snickerdoodle Cheesecake Recipe
Alright, this is the moment! We’ve gathered our ingredients, and now we put it all together. Making a proper cheesecake takes patience, but if you follow these exact steps for the snickerdoodle cheesecake, you’re going to get a beautiful, sliceable dessert. Don’t skip the water bath; it’s our shield against cracks and dry edges. You can check out my tips for flawless eggs if you like to be extra careful before you start mixing! You can see my general tips on handling eggs here, though these are going into a richer mix.
Preparing the Crust and Water Bath Setup
First things first, let’s get the oven ready. Preheat it to 325 degrees F. You need a 9-inch springform pan, and we need to protect it from water intrusion. Wrap the outside of the pan tightly with heavy-duty aluminum foil—I usually use two big sheets layered crisscrossed, just to be safe. This foil shield is what lets us use the water bath properly.
Next, mix up that crust in a medium bowl: graham cracker crumbs, the 1/4 cup of sugar, and that melted butter. Press it down firm on the bottom of your wrapped pan. Pop that crust into the oven and bake it for just 10 minutes. Once it’s done its little initial bake, pull it out and let it cool down while you work on the rest of the magic.
Making the Cinnamon Swirl Topping
Before we touch the main batter, let’s whip up that crumbly topping! Grab a small bowl and whisk together the light brown sugar, 1 tablespoon of flour, and 1 teaspoon of cinnamon. Now, take those cold butter pieces and cut them right into that sugar mixture. You can use a pastry blender, but honestly, using your fingertips to pinch and rub the butter in until it looks like coarse sand or tiny pebbles is much faster and more fun. Set that spice crumb aside.
Mixing the Velvety Cheesecake Filling
This is the point where texture is everything! In your big mixer bowl, beat that softened cream cheese until it is genuinely smooth—no lumps allowed! *Then*, slowly mix in the 1 1/2 cups of sugar and the 1/4 cup of flour until it’s *just* combined. Next come the flavorings: vanilla, the 1/2 teaspoon of cinnamon, and the nutmeg. Mix until that aromatic scent starts filling your kitchen!
Now for the eggs. This is important: add them one at a time. Mix on low speed, and only mix until you see that single egg disappear into the batter. If you beat them in too fast or too long, you incorporate too much air, and that leads to the dreaded pancake flatness or cracks. Finally, gently stir in the sour cream until the whole mixture looks homogenous. That’s it—stop mixing!
Assembling and Baking the Snickerdoodle Cheesecake
Time to layer! Pour half of that gorgeous batter mixture right over your cooled crust. Next, take half of that reserved cinnamon swirl topping and sprinkle it evenly over the batter. Don’t press it; just let it rest there. Then, pour the remaining cheesecake batter over that layer, and top it all off with the rest of the cinnamon crumble topping.
Now for the water bath: place the foil-wrapped springform pan inside a larger roasting pan. Carefully pour hot water into the roasting pan until it comes about halfway up the sides of the springform pan. Slide the whole setup into the oven and bake for 60 to 75 minutes. When it’s done, the edges should look firm, but if you give the pan a gentle nudge, the center two inches should still wiggle just a tiny bit. That wiggle means it’s cooked perfectly—it will set as it cools.
The Essential Slow Cooling Method
Do not take it out yet! The biggest mistake people make is pulling a hot cheesecake straight into cool air. You’ll ruin all that hard work. Once the bake time is up, turn the oven OFF, but leave the cheesecake inside! Prop the oven door open just a crack—I use the handle of a wooden spoon—and let it sit in that residual heat for a full hour. After that hour, you can take it out of the water bath and let it cool completely on a wire rack. Only then do you wrap it up and chill it for a minimum of six hours, but honestly, overnight chilling gives you the absolute best flavor and texture for this showstopper dessert.
Tips for a Perfect Snickerdoodle Cheesecake Every Time
I know we just went through a lot of steps, but I promise these extra pointers are what separate a good cheesecake from the *best* cheesecake. Because we are aiming for that ultimate, rich, showstopper result, taking a little extra care now saves you any disappointment later! Every part of this snickerdoodle cheesecake relies on small details, so let’s talk about how to guarantee success.
Crust Variations: Graham Crackers vs. Cookies
I listed graham crackers in the recipe breakdown because they are easy and they provide that perfect buttery balance that lets the cinnamon filling shine. However, if you want to really double down on that cookie flavor, you absolutely should crush up actual snickerdoodle cookies and use them for your base! It makes the experience even more authentic as a true cheesecake with cookie crust hybrid. If you do use cookies, you might notice they are a little sweeter than graham crackers, so you might want to skip adding that extra 1/4 cup of sugar to the crust mix and just use the crumbs and butter. It’s a small tweak, but it makes a difference!
Converting This Snickerdoodle Cheesecake Recipe to Bars
If you’re having a massive gathering, or maybe you just prefer something easy to handle—I totally get it! Cheesecake bars are wonderful, especially when you want to serve a crowd without needing a fancy knife for perfect slices. If you want to turn this into easy cheesecake bars, you’ll need to adjust your pan. Instead of the 9-inch springform, grab a 9×13 inch baking dish. You’ll press your crust into the bottom of that pan, just like before. Here’s the trickiest part: the baking time changes because the depth is different. Start checking around the 40 to 50-minute mark instead of going for the full 75 minutes. It should still have that slight wiggle in the center when you gently nudge it.
And remember what I noted before: for bars, parchment paper is your best friend. Line that 9×13 pan with parchment so that the edges hang over the sides a little bit. That way, once it’s chilled completely, you can just use the parchment as handles to lift the entire block out, and then slice it cleanly. For more ideas on incredible layered desserts, you should peek at my chocolate chip cheesecake—it follows a similar layered logic!
If you loved how the cinnamon and sugar came together here, you might want to check out the full recipe breakdown on the Moms’ site for more timing details right here!
Serving Suggestions for This Cinnamon Sugar Dessert
Now that you’ve managed the water bath and chilled this magnificent creation, it’s time to present it! This cinnamon sugar dessert is already a powerhouse on its own, but just taking one extra second to garnish makes all the difference, especially if this is going on your holiday table.
Because the filling is so rich and the topping has that lovely crunch, I always like to keep the accompanying elements light and creamy. Don’t drown out that lovely spiced flavor!
- A simple spoonful of homemade whipped cream is perfect. It just adds a cloud-like texture next to the dense cheesecake. If you happen to have some extra honey butter scraps from another recipe, a tiny dollop of that on the side is incredible, too! You can grab my easy recipe for that whipped spread here if you want to try it.
- If you’re serving this after a big Thanksgiving meal, a drizzle of quality caramel sauce works wonders—it really leans into that warm brown sugar note from the topping.
- For serving in the afternoon or after dinner, this pairs beautifully with rich, black coffee or a spiced chai latte. The warmth of the drink contrasts so nicely with the cool, creamy texture of the chilled cheesecake.
Remember, the swirl topping is already gorgeous, so you don’t need much else on the plate. A light dusting of powdered sugar right before serving is sometimes all the sparkle this showstopper truly needs!
Storage and Reheating Instructions for Your Snickerdoodle Cheesecake
You know I always preach about making things ahead of time, especially for big holiday meals. That long chill time we talked about? It’s actually a blessing in disguise because this snickerdoodle cheesecake tastes even better the next day! Once it’s fully chilled and set, you need to treat it right to keep that creamy texture perfect.
The best way to store this is to cover the entire springform pan (or if you’ve transferred it to a serving plate, cover it loosely with plastic wrap extending over the sides). Keep it tucked away nicely in the refrigerator. Because of the sour cream and eggs, I wouldn’t recommend keeping it longer than 4 to 5 days. After that, the texture starts to change, and we want that velvety bite every single time!
Now, let’s talk about reheating—and this is a tricky one for cheesecake. If you’re planning on eating this as a cold dessert (which is really how it shines!), you should never reheat the whole thing. Suddenly warming up a cheesecake messes with the structure, and you’ll end up with a soupy mess, which is the opposite of what we want! If, by some wild chance, you happen to have a small sliver left over, and you absolutely need it warm, I say slice off just that piece. You can microwave that single portion for maybe 10 to 15 seconds on 50% power. It warms it just enough to take the chill off, but you have to eat it right away. Frankly, though, I just enjoy the leftovers cold, maybe with an extra cup of coffee!
Frequently Asked Questions About Snickerdoodle Cheesecake
It’s natural to have questions when you’re trying a new hybrid dessert, especially something as spectacular as this snickerdoodle cheesecake! I’ve gathered the questions I get most often from folks who are nervous about cracking or wondering about shortcuts. Don’t worry; we’re going to make sure you feel confident before you even turn on the oven.
Can I make a No Bake Snickerdoodle Cheesecake?
That’s a great question! I know sometimes we just don’t want to turn on the oven, especially around the holidays when the kitchen is already busy. While you absolutely *can* find No Bake Snickerdoodle Cheesecake recipes out there, this specific recipe relies on eggs and baking time to achieve that signature, dense, and ultra-creamy texture. To make this recipe no-bake, you’d have to swap out the eggs and sour cream for stabilizers like gelatin or heavy amounts of whipped cream, and honestly, the result just isn’t the same rich experience. I highly recommend taking the time for the bake; that water bath method makes it surprisingly reliable!
How do I prevent cracks in my cheesecake?
This is the number one fear, right? I spent ages perfecting this part, and I can guarantee you success if you stick to two main rules. First, the water bath is non-negotiable! It keeps the temperature around the cheesecake gentle and humid. Second, the slow cool-down is your best friend. Don’t ever pull it straight from the heat. Turning the oven off and leaving the door cracked for a full hour lets the cake descend gradually into room temperature. Do those two things, and you are virtually guaranteed that smooth, unblemished top for your Festive Cinnamon Desserts!
What is the best way to get that cinnamon swirl effect?
This is where the magic happens in the middle! We separate that cinnamon crumb topping into two portions, remember? When you pour the first half of the batter over the crust, you sprinkle half of that topping right on top. Then, you add the second layer of batter, and *then* the second half of the topping. As the cheesecake bakes, the creamy batter naturally rises up slightly around those heavier crumb clusters, creating that beautiful, organic swirl effect through the center. If you want some quick, easy snack ideas while you wait for the cheesecake to chill, pop over and check my appetizers and snacks page!
If you’re reading about this for the first time and want to see another take on a snickerdoodle crust, you can check out the recipe details on this site for comparison: foodyboo.
Estimated Nutritional Value for Snickerdoodle Cheesecake
As we always say around here, baking is for enjoyment, not for counting every tiny ingredient, but sometimes it’s nice to have a general idea! Keep in mind that since this is such an indulgent baked goods option, the numbers reflect that creamy, rich goodness. These figures are just estimates based on the standard ingredients list we used in the trial kitchen.
- Serving Size: 1 slice
- Calories: 450
- Sugar: 38g (That cinnamon sugar is calling your name!)
- Fat: 28g
- Carbohydrates: 42g
- Protein: 7g
This data is purely approximate, and if you swap the graham crackers for snickerdoodles, those numbers will nudge a bit differently. Enjoy it!
Share Your Snickerdoodle Cheesecake Masterpiece
Honestly, the best part of sharing these recipes is hearing from you about how they turned out! Once you’ve successfully navigated the water bath and proudly presented this amazing snickerdoodle cheesecake at your next gathering, I want to hear about it. Did your family fall in love with the cinnamon swirl? Did you manage to keep your hands off of it while it chilled?
Please save the recipe, and more importantly, leave a rating and review right down below. Knowing that my tested techniques worked perfectly in your home kitchen means the world to me—it’s why I do this! If you run into any trouble at all, or if you just want to tell me how much your family loved this incredible Thanksgiving Dessert Mashup, please don’t hesitate to reach out on the contact page!
PrintUltimate Creamy Snickerdoodle Cheesecake Recipe
Create this showstopper dessert that blends the creamy richness of classic cheesecake with the warm, spiced flavor of snickerdoodle cookies. This recipe features a buttery crust and a velvety cinnamon-swirl filling, making it the best holiday cheesecake for Christmas or Thanksgiving.
- Prep Time: 30 min
- Cook Time: 75 min
- Total Time: 8 hours 45 min
- Yield: 12 servings 1x
- Category: Dessert
- Method: Baking
- Cuisine: American
- Diet: Vegetarian
Ingredients
- 1 1/2 cups graham cracker crumbs (or crushed snickerdoodle cookies)
- 1/4 cup granulated sugar
- 6 tablespoons unsalted butter, melted
- 3 (8 ounce) packages cream cheese, softened
- 1 1/2 cups granulated sugar
- 1/4 cup all-purpose flour
- 1 teaspoon vanilla extract
- 1/2 teaspoon ground cinnamon
- 1/4 teaspoon ground nutmeg
- 4 large eggs
- 1/2 cup sour cream
- For Cinnamon Swirl Topping:
- 1/2 cup packed light brown sugar
- 1 tablespoon all-purpose flour
- 1 teaspoon ground cinnamon
- 2 tablespoons cold unsalted butter, cut into small pieces
Instructions
- Preheat your oven to 325 degrees F. Wrap the outside of a 9-inch springform pan tightly with heavy-duty aluminum foil to prepare for a water bath.
- Prepare the crust: In a medium bowl, mix the graham cracker crumbs, 1/4 cup sugar, and melted butter until combined. Press the mixture firmly into the bottom of the prepared springform pan. Bake for 10 minutes. Let the crust cool while you prepare the filling.
- Prepare the cinnamon swirl topping: In a small bowl, combine the brown sugar, 1 tablespoon flour, and 1 teaspoon cinnamon. Cut in the 2 tablespoons of cold butter using a pastry blender or your fingers until the mixture resembles coarse crumbs. Set this aside.
- Prepare the cheesecake filling: In a large bowl, beat the softened cream cheese with an electric mixer until smooth. Gradually beat in the 1 1/2 cups sugar and 1/4 cup flour until just combined. Mix in the vanilla extract, 1/2 teaspoon cinnamon, and nutmeg.
- Beat in the eggs one at a time, mixing only until each egg is incorporated. Gently mix in the sour cream until the batter is smooth. Do not overmix the batter once the eggs are added.
- Pour half of the cheesecake batter over the cooled crust. Sprinkle half of the reserved cinnamon swirl topping evenly over the batter. Pour the remaining cheesecake batter over the top. Sprinkle the remaining cinnamon swirl topping over the surface.
- Place the foil-wrapped springform pan into a larger roasting pan. Carefully pour hot water into the roasting pan until the water reaches about halfway up the sides of the springform pan. This water bath helps the cheesecake bake evenly and prevents cracking.
- Bake for 60 to 75 minutes. The edges should look set, but the center 2 inches should still wiggle slightly when gently nudged.
- Turn off the oven, but leave the cheesecake inside with the oven door propped open slightly (use a wooden spoon handle) for 1 hour. This slow cooling prevents sudden temperature changes that cause cracks.
- Remove the cheesecake from the water bath and foil. Cool completely on a wire rack, then chill in the refrigerator for at least 6 hours, or preferably overnight, before serving.
Notes
- For a truly indulgent experience, use crushed snickerdoodle cookies instead of graham crackers for the crust.
- If you prefer bars, press the crust into a 9×13 inch pan and bake the filling for about 40-50 minutes, then chill thoroughly before cutting.
- To achieve a velvety cheesecake filling, make sure your cream cheese and eggs are at true room temperature before mixing.
Nutrition
- Serving Size: 1 slice
- Calories: 450
- Sugar: 38g
- Sodium: 280mg
- Fat: 28g
- Saturated Fat: 17g
- Unsaturated Fat: 11g
- Trans Fat: 0.5g
- Carbohydrates: 42g
- Fiber: 1g
- Protein: 7g
- Cholesterol: 110mg