
There’s something truly magical about pulling a loaf of bakery-quality bread straight out of your own oven, isn’t there? That deep, rich, chocolatey aroma that fills the entire house? If you’ve ever looked at a beautiful, glossy loaf of chocolate babka in a glass case and thought, “I could never make that,” I’m here to tell you that you absolutely can. This is my recipe for The Ultimate Homemade Chocolate Babka, built around getting that wonderfully soft brioche dough just right, ensuring those stunning, visible swirls don’t disappear when you bake it.

When I first started tackling these yeast breads, I was intimidated by the braiding, but trust me, once you see how simple the steps are, you’ll feel like a total pro. Baking something this show-stopping at home, knowing you made the dough from scratch, is such a huge confidence boost. Ready to create bakery magic this weekend? You can find more of my favorite impressive-but-totally-doable recipes over here at our dessert section!
- Why This Homemade Chocolate Babka Recipe Works (Tips for Success)
- Ingredients for the Ultimate Chocolate Babka
- Step-by-Step Instructions for Your Chocolate Babka Dough Tutorial
- How to Braid Babka: Mastering the Swirl Technique
- Applying the Babka with Syrup Glaze for Shine and Moisture
- Storage & Reheating Instructions for Your Chocolate Babka
- Troubleshooting Common Issues When Making Chocolate Babka
- Serving Suggestions for This Chocolate Dessert Loaves
- Frequently Asked Questions About Making Chocolate Babka
- Share Your Best Chocolate Babka Experience
Why This Homemade Chocolate Babka Recipe Works (Tips for Success)
So, what makes this recipe stand head and shoulders above the ones you grab last minute? It really comes down to two things: the texture of the dough and the quality of that glorious filling. We aren’t aiming for a dry, crumbly loaf here; we want something rich enough to eat for dessert but tender enough to enjoy with coffee the next morning. When you master a chocolate babka like this, you realize it’s all about respecting the process.
- The dough needs patience! Yeast breads thrive on time and gentle handling, especially when you are working with so much fat.
- We use two types of chocolate in the filling—chopped bittersweet for texture and cocoa powder for deep color!
- Don’t skip the syrup! That final step is what keeps this bread moist for days.
Achieving the Soft Brioche Bread Recipe Texture
This is pure science, folks. For that famously pillowy, soft brioche bread recipe texture, you absolutely must add the softened butter slowly—one piece at a time—after the dough has already developed some structure. If you dump it all in at once, the dough just turns into a greasy, unhappy mess. Adding it slowly allows the gluten strands to absorb the fat without breaking, which is key for that perfect lift and tenderness later on.
The Secret to a Decadent Chocolate Swirl Bread
The filling is intense, but it has to behave itself during the roll and braid. Our filling isn’t just melted chocolate; it’s a thick, almost fudgy paste thanks to the combination of cocoa, powdered sugar, and melted butter. We need it thick enough so it stays put inside the dough layers. When you use good quality bittersweet chocolate in the mix, that swirl doesn’t just look good—it tastes like the deepest, richest chocolate you can imagine. If you need a quick refresher on making rich chocolate additions, check out my post on creamy hot chocolate—similar focus on deep flavor here!
Ingredients for the Ultimate Chocolate Babka
Okay, let’s talk what you need to pull this off. You know I always preach about using quality ingredients—since this loaf has so few components, every single one shines through! Don’t sweat it if these quantities look big; this is a substantial, bakery-style loaf we are making here. Remember to get your eggs out early so they are truly room temperature; it helps them incorporate into that rich dough much better.
Here is what you need broken down by section:
Dough Ingredients
- 1 cup whole milk, warmed to 105-115°F (It needs to be warm for the yeast, but too hot will kill it—gently warm, trust me!)
- 2 1/4 teaspoons active dry yeast
- 1/2 cup granulated sugar, divided
- 3 large eggs, room temperature
- 1 teaspoon vanilla extract
- 1 teaspoon salt
- 4 1/2 cups all-purpose flour, plus more for dusting
- 1 cup (2 sticks) unsalted butter, softened and cut into pieces (This is where the richness comes from!)
Rich Chocolate Filling for Bread
- 1 cup powdered sugar
- 1/2 cup unsweetened cocoa powder
- 1/2 cup (1 stick) unsalted butter, melted
- 4 ounces bittersweet chocolate, finely chopped (I like using 60-70% so it’s intense!)
For the Babka with Syrup Glaze
- 1/4 cup water
- 1/2 cup granulated sugar
Step-by-Step Instructions for Your Chocolate Babka Dough Tutorial
Alright, this is the main event! Making the chocolate babka dough involves a little more fuss than a standard sandwich loaf because we are building a very rich brioche structure. But I promise, the payoff is worth every second you spend getting the dough right. We start small, just like with any good yeast bread dessert recipe.
First things first, we need to wake up that yeast. In a little bowl, mix your warmed milk—it should feel just slightly warm, not hot to the touch—the yeast packet, and just one tablespoon of your sugar. Let that sit for about ten minutes until it gets frothy. If nothing happens? Dump it, start over, your yeast is dead, honey!
Next, into the stand mixer bowl they go! Combine your flour, the remaining sugar, salt, eggs, and vanilla. Pour in that foamy yeast mixture. Start it on the lowest speed until it looks shaggy. This is the initial mix before we start adding all that butter goodness.
Making and Kneading the Soft Brioche Dough
This step is where we build structure. Turn your mixer up to medium-low. Now, you’re going to add that one cup of softened butter, piece by piece. Seriously, add a chunk, wait until it’s mostly combined, then add the next one. If you stop the mixer every time you add butter, it helps them incorporate smoothly. This might take a good 8 to 10 minutes of dedicated kneading time. Don’t rush it! We need strong gluten development here, or the whole loaf collapses later. You want it smooth, elastic, and slightly tacky when you poke it.
Preparing the Rich Chocolate Filling for Bread
While that gorgeous dough is getting a good workout, let’s whip up the filling. You want this to be decadent, right? So we’re mixing the powdered sugar, all that cocoa powder, the melted butter, and the finely chopped bittersweet chocolate. Whisk that until it’s completely smooth. Remember, if your filling is too soupy, it’ll leak out everywhere when you try to braid it, making a huge mess on your baking sheet. We want a thick, luxurious paste that spreads easily but holds its shape. If you ever need inspiration for deep chocolate flavor, think about the richness in my chocolate bourbon pecan pie—similar flavor intensity here!
How to Braid Babka: Mastering the Swirl Technique
Okay, deep breath! This is the part everyone gets nervous about, but mastering how to braid babka is what turns a nice loaf into that show-stopping masterpiece you’ve been dreaming of. We are aiming for maximum swirl visibility, remember? After your dough has finished its first nap, gently deflate it and turn it out onto a floured surface. Roll it out until you have a big, even rectangle—about 12 by 18 inches is usually perfect for a standard loaf pan.
Now, take that decadent chocolate filling you made and spread it out absolutely perfectly. Make sure you leave about an inch border bare along one of the long edges. That bare strip is your seal! Once spread, start rolling the dough up tightly from the long side opposite that bare edge, making a neat log. Pinch that end seam closed really well. If you want the layers to scream for attention, the next step is crucial.
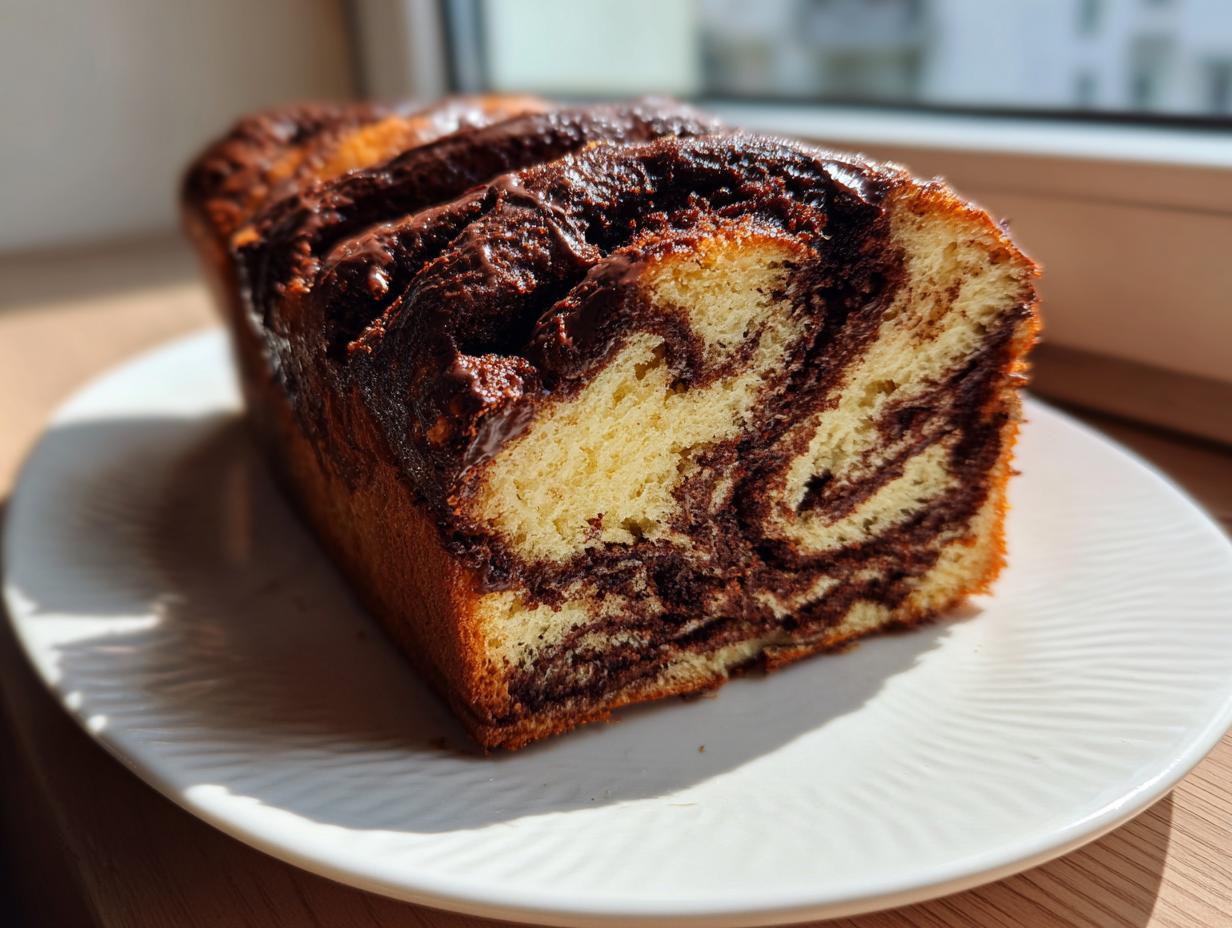
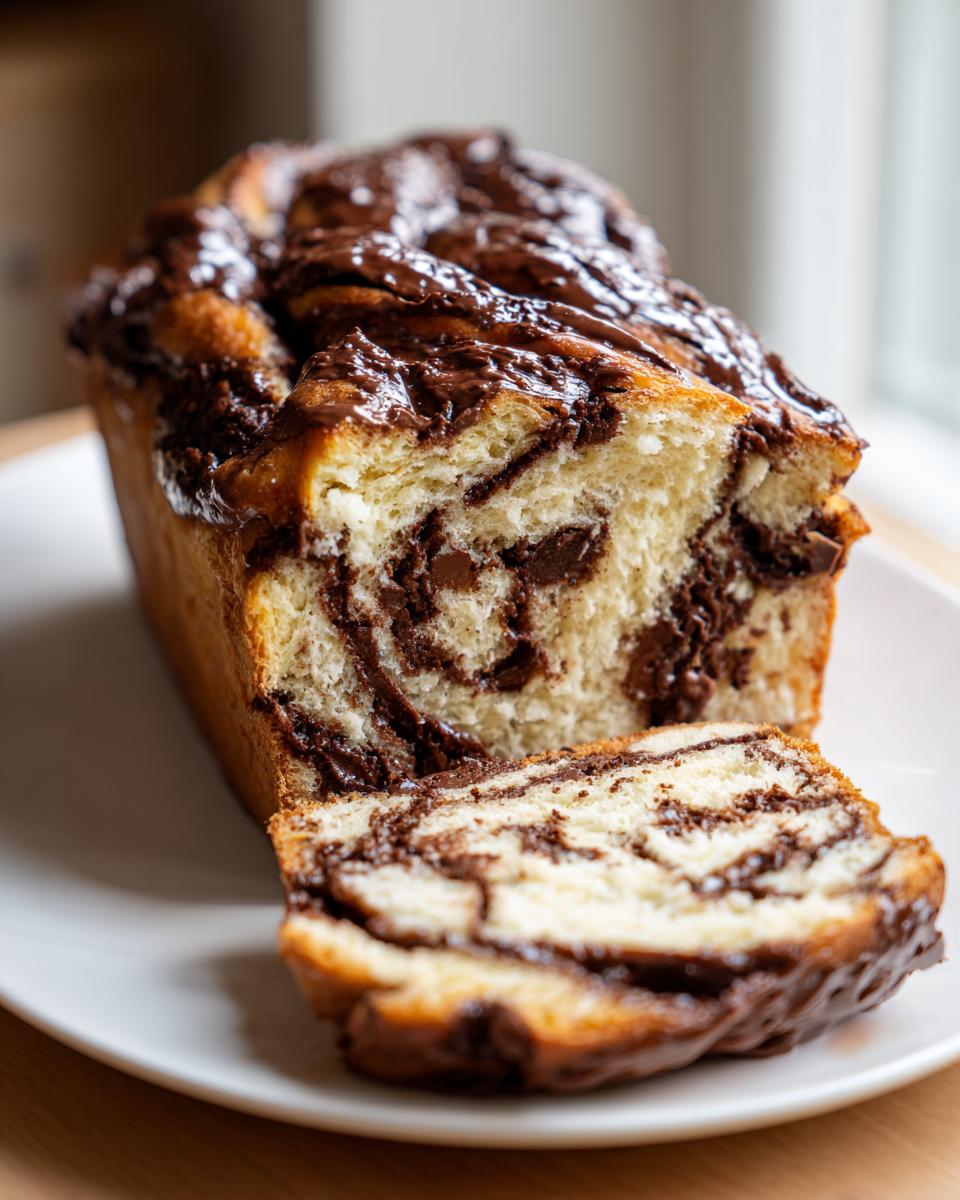
Grab a sharp knife—this is key—and slice that log right down the middle, lengthwise. You are literally cutting through the dough and the filling, exposing all those beautiful dark layers! Lay the two cut halves side-by-side, making sure the cut, layered sides are facing up so they are visible to the world! Then, twist those two halves together. Be gentle but firm, keeping the cut sides facing outward as much as you can. This twisting motion is what creates that signature look for your Decadent Chocolate Swirl Bread.

Once twisted, carefully lift the whole thing and place it into your greased 9×5-inch loaf pan. If you want something closer to a fluffy, homemade frosting texture in your bread, you need this next step!
Second Rise and Baking the Chocolate Babka Loaf
Don’t just shove this puffy beauty into the oven right away! Babka needs a second rise, or ‘proof.’ Cover it loosely with plastic wrap or a clean towel and let it sit in a warm spot for about 45 to 60 minutes. It should look noticeably puffy and soft. While that’s happening towards the end of the rise time, go ahead and preheat your oven to 350°F (175°C). Over-proofing can cause it to collapse, and under-proofing leads to a dense loaf, so watch it closely!
Bake it for about 35 to 45 minutes. If you see the top getting too dark before the center is done—and trust me, the sugar content makes it brown fast—just drape a little piece of aluminum foil loosely over the top. That way, the inside can finish cooking without burning the crust. I always check external sources like this one while I bake to make sure my timing looks right for my specific oven!
Applying the Babka with Syrup Glaze for Shine and Moisture
Okay, folks, we are at the home stretch! The babka is baked, it’s golden brown, and it smells heavenly, but we are not finished yet. This next move is the secret weapon for getting that professional, moist-on-the-inside, glossy-on-the-outside look you see at the fancy bakeries. This is the step that truly elevates your chocolate babka from ‘homemade good’ to ‘professional-level pastry.’
While the loaf is still piping hot—and I mean *immediately* upon pulling it out of the oven—you need your simple sugar syrup ready to go. Remember, we made this just by boiling water and sugar until clear? Grab a pastry brush and get to work! You need to bathe that top surface completely with the hot syrup.
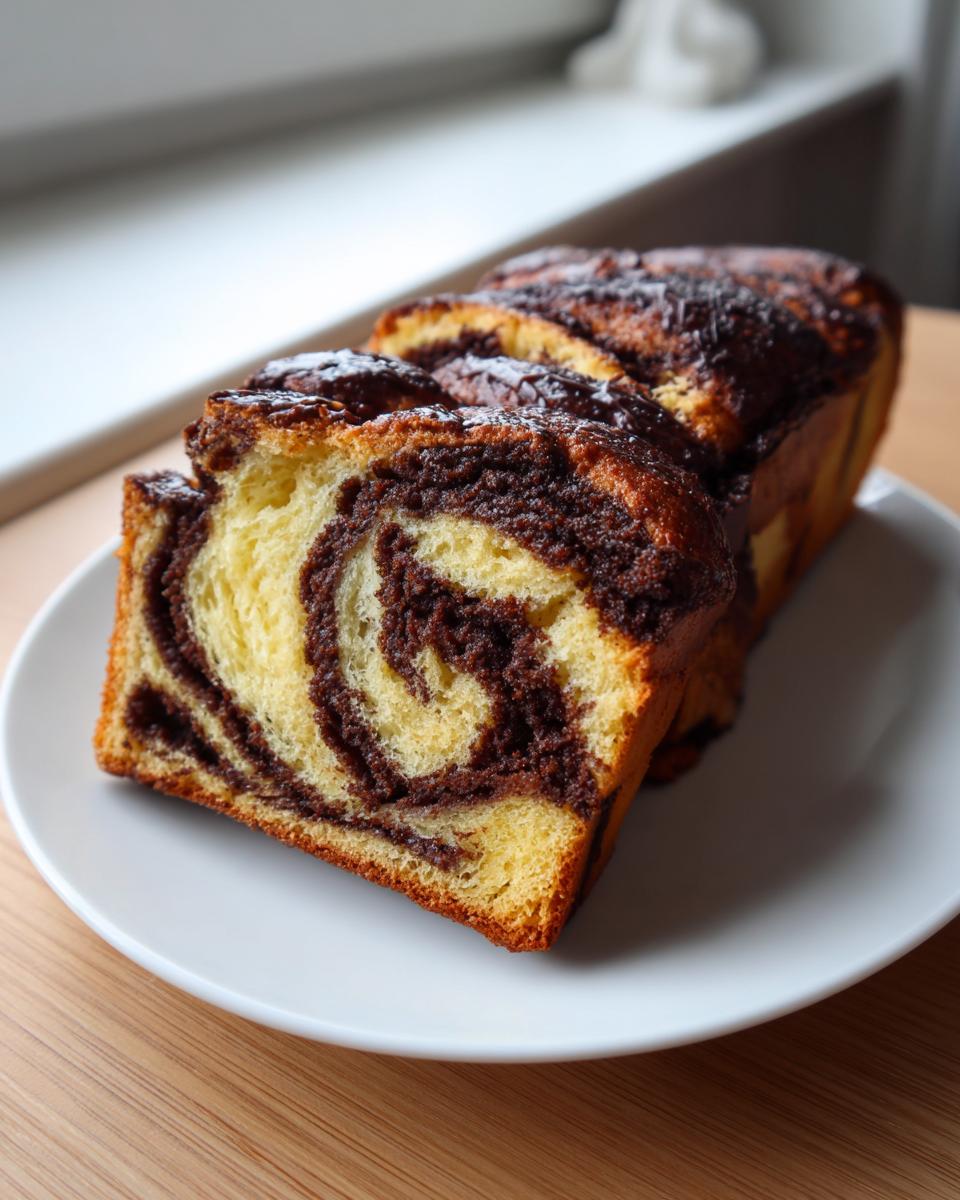
Brush it on liberally, making sure every little nook and cranny of those beautiful swirls gets coated. The heat from the bread sucks up that liquid instantly. Don’t hold back! This syrup does two vital things: first, it locks in any remaining steam, ensuring your bread stays incredibly moist, and second, it dries into this gorgeous, shiny lacquer that gives you those promised glossy layers. It’s honestly such a simple trick, but it makes all the difference for your final loaf!
After you’ve brushed on all that delicious soak, let the loaf sit in the pan for about 15 minutes. This initial rest allows the loaf to firm up just enough before you try to move it. Then, carefully turn it out onto a wire rack to cool completely. That shine will set beautifully as it cools down!
Storage & Reheating Instructions for Your Chocolate Babka
We went to all this trouble to get such a tender, moist crumb, so naturally, we want this beautiful chocolate babka to stay perfect! The biggest fear with any sweet yeast bread is waking up the next day only to find it’s gotten a little dry. But don’t worry, because we have practical ways to keep that moisture locked in, whether you plan to eat it all weekend or you want to bake ahead!
For short-term storage (up to three days), the trick is coverage. Once the babka is completely cool—and I mean totally cool, otherwise you cause steam and sogginess—wrap it tightly. I like to use plastic wrap first, followed by a layer of aluminum foil. Never store leftover babka in the fridge! The cold air zaps the moisture right out of yeasted doughs, and we don’t want that. If you want ideas for keeping other cakes moist, sometimes I use techniques similar to what I do for my apple bundt cake, focusing on a good seal.
If you are baking this for the holidays or a big brunch and need to make it even further ahead, freezing is your best friend. You can freeze the entire, completely cooled loaf, or slice it first. If you slice it, stack the pieces with a small square of parchment paper between them so they don’t stick together—brilliant for quick breakfasts later! Wrap the whole package tightly as I mentioned before, and it will keep beautifully for up to two months. You can find other great tips about storing sweet breads over on this site too!
When you’re ready to enjoy that frozen loaf, just pull out the slices you need. You can let them thaw on the counter for an hour or two, or reheat them slightly. A quick 10 seconds in the microwave is perfect for bringing back that fresh-baked softness, making it taste like you just pulled it out of the oven!
Troubleshooting Common Issues When Making Chocolate Babka
Listen, I bake every single day, and even *I* have days where the dough just refuses to cooperate! That’s totally normal, especially with rich breads like this one. Don’t panic if things look a little off; we just need to diagnose the issue and apply a little home-baking know-how. We’re using simple science here to fix common headaches like sticky dough or that awful leak during the braid.
Why is My Dough Not Rising?
This is usually one of two culprits when dealing with a very rich dough like our brioche. First, check your yeast activation again. Did the milk feel too hot when you added the yeast? Yeast is funny; if the temperature is much over 120°F, you’ve killed your little workers, and they won’t produce the gas needed for that glorious rise. Always aim for that sweet spot between 105°F and 115°F.
The second reason is the richness itself. Because we put in so much butter and so many eggs to make the dough tender, the dough has a lot of weight to lift. It *will* take longer to rise than a lean French bread. If your kitchen is cold, you need to give it extra time—maybe two hours instead of 90 minutes for that first nap. Don’t try to rush it with a hotter oven, or you risk deflating the structure prematurely!
If the filling starts leaking out during the braid before baking, that means the dough was either too warm when you rolled it, or your filling wasn’t thick enough! If the filling gets gooey, pop the whole thing—dough and all—into the fridge for 15 minutes to firm up before you try rolling or braiding again. That chill buys you time!
Serving Suggestions for This Chocolate Dessert Loaves
So, you’ve got this incredible, rich, swirled loaf sitting on your counter. Now what? This isn’t just a breakfast item, though nobody is stopping you from tearing off a corner first thing in the morning! A chocolate dessert loaves like this one truly shines when you pair it right.
For a weekend brunch situation, it’s practically mandatory to serve it warm, maybe with just a little sliver of good, unsalted butter melting into the cracks. If you’re setting up a big spread, feel free to check out my favorite brunch recipes for other ideas to complement this bread. It looks amazing beside some fresh fruit!
When it comes to dessert, this babka is dense and rich enough to stand on its own. But if you want to go wild, a tiny scoop of high-quality vanilla bean ice cream or even some salted caramel sauce drizzled over a warm slice is pure heaven. It’s decadent, but hey, that’s why we bake, right?
And of course, any rich pastry demands a great beverage pairing. Skip the weak stuff! This loaf demands a strong cup of coffee, maybe an Americano or a good dark roast—you need that bitterness to cut through the sweetness and chocolate richness. If you prefer tea, go for something robust like an English Breakfast. For evening servings, a nice, dark coffee liqueur poured over ice would turn this into a sophisticated post-dinner treat. If you’re looking for cocktail ideas to serve alongside it, I keep my best ideas rounded up in the drinks section!
If you made this as a showstopper for a holiday baking recipe collection, don’t be afraid to slice it thin and serve it on a beautiful platter. It really is stunning enough to be the star of dessert itself!
Frequently Asked Questions About Making Chocolate Babka
I get so many messages once people start baking this recipe, which is fantastic! It shows you’re getting into the rhythm of yeast bread dessert recipes. Here are the sticking points I hear about most often when folks try to achieve that perfect loaf.
Can I make the chocolate babka dough ahead of time?
Yes, absolutely! I built this recipe to be flexible for your weekend baking projects. If you are looking for that Overnight Babka Dough Prep, you can complete steps 1 through 3—that whole mixing and kneading process—and then pop the dough into the fridge for 8 to 12 hours. The cold slows the yeast down, letting the flavor deepen beautifully overnight. Just remember to pull it out about an hour before you plan to start rolling and filling so it warms up enough to be pliable again!
What is the difference between babka and challah?
That’s a great question people ask about fluffy chocolate bread sometimes! The main difference is the inside. Challah is traditionally a beautiful, braided loaf made without dairy or eggs (though many modern recipes include them), and it’s usually served plain or dipped. Babka, on the other hand, is defined by its rich, buttery interior—it’s closer to a sweet brioche—and it *must* have a filling swirled all the way through before braiding. So, while the braiding technique might look similar, the babka loaf is way more decadent because of all that chocolate!
How do I ensure my babka is a ‘Bakery Style Chocolate Loaf’?
If you want that envy-inducing beautiful finish that screams Bakery Style Chocolate Loaf, you need two things locked down. First, your chilling and braiding technique must be neat enough so that when you slice the log open, you have distinct, clear layers exposed. Second, and this is non-negotiable: the syrup glaze! It’s Step 11 in the directions. Brushing that hot sugar syrup all over the hot loaf when it comes out of the oven seals in the moisture and creates that shiny, slightly sticky top crust that bakery loaves have. Skipping the syrup means you skip the shine!
If you’ve managed to avoid making any messy mistakes, you can use the leftover rich chocolate filling straight away in my recipe for creamy peanut sauce… just kidding! Stick to the chocolate, but know that clean technique makes all the difference here.
Share Your Best Chocolate Babka Experience
Now, you’ve got the knowledge, you’ve got the recipe, and you’ve hopefully got a loaf of the most incredible chocolate babka cooling on your counter right now. That feeling when you slice into it and see those gorgeous, dark, buttery swirls? That’s why we bake, isn’t it?
I truly want to hear all about your success! Did the braid turn out perfectly on the first try? Did your kitchen smell like the best bakery in the city? Please, don’t keep that delicious success to yourself. Leave a rating right here on the recipe card—it helps me know which recipes are truly hits in your homes!
If you ended up taking a picture of your show-stopping loaf, I would be absolutely delighted to see it! You can share pictures or just tell me about your experience in the comments below. Seriously, hearing your stories about enjoying this as a holiday baking recipe centerpiece or a weekend treat makes my day so much better.
If you ran into trouble or have a question that wasn’t covered in the FAQ, please don’t hesitate to reach out. Drop me a line through the contact page. Knowing what works and what trips people up helps me make this recipe even better for the next person tackling their first moist swirled sweet bread!
Happy baking, my friends. I hope this babka brings a little bit of warmth and sweetness to your table!
PrintThe Ultimate Homemade Chocolate Babka: Perfect Soft Brioche Dough & Decadent Swirl Technique
Create a bakery-style Chocolate Babka at home using a rich, soft brioche dough. This recipe gives you step-by-step guidance to achieve beautiful, glossy swirls and a moist crumb that surpasses store-bought versions. It is a perfect weekend baking project or holiday treat.
- Prep Time: 45 min
- Cook Time: 45 min
- Total Time: 3 hr 30 min
- Yield: 1 loaf (about 10 servings) 1x
- Category: Dessert
- Method: Baking
- Cuisine: Jewish/Eastern European
- Diet: Vegetarian
Ingredients
- 1 cup whole milk, warmed to 105-115°F
- 2 1/4 teaspoons active dry yeast
- 1/2 cup granulated sugar, divided
- 3 large eggs, room temperature
- 1 teaspoon vanilla extract
- 1 teaspoon salt
- 4 1/2 cups all-purpose flour, plus more for dusting
- 1 cup (2 sticks) unsalted butter, softened and cut into pieces
- 1 cup powdered sugar (for filling)
- 1/2 cup unsweetened cocoa powder (for filling)
- 1/2 cup (1 stick) unsalted butter, melted (for filling)
- 4 ounces bittersweet chocolate, finely chopped (for filling)
- 1/4 cup water (for syrup)
- 1/2 cup granulated sugar (for syrup)
Instructions
- Activate the yeast: In a small bowl, combine the warm milk, yeast, and 1 tablespoon of the sugar. Let stand for 5-10 minutes until foamy.
- Make the dough: In the bowl of a stand mixer fitted with the dough hook, combine the flour, remaining sugar, salt, eggs, and vanilla extract. Pour in the yeast mixture. Mix on low speed until a shaggy dough forms.
- Knead the dough: Increase the speed to medium-low and knead for 5 minutes. Gradually add the softened butter, one piece at a time, waiting until each piece is incorporated before adding the next. Continue kneading for 8-10 minutes until the dough is smooth and elastic.
- First rise: Place the dough in a lightly oiled bowl, turning to coat. Cover and let rise in a warm place for 1.5 to 2 hours, or until doubled in size.
- Prepare the filling: While the dough rises, whisk together the powdered sugar, cocoa powder, melted butter, and chopped bittersweet chocolate in a bowl until smooth. Set aside.
- Shape the dough: Gently punch down the risen dough. Turn it out onto a lightly floured surface. Roll the dough into a large rectangle, approximately 12×18 inches.
- Spread the filling: Spread the chocolate filling evenly over the dough, leaving a 1-inch border along one long edge bare.
- Roll and slice: Starting from the long edge opposite the bare border, tightly roll the dough into a log. Pinch the seam closed. Using a sharp knife, slice the log lengthwise down the center, exposing the layers.
- Braid the babka: Lay the two halves side-by-side, cut sides facing up. Twist the two halves together, keeping the cut sides exposed as much as possible to create the swirl effect. Pinch the ends together.
- Second rise: Carefully transfer the braided dough to a greased 9×5-inch loaf pan. Cover loosely and let rise for 45-60 minutes, or until puffy. Preheat your oven to 350°F (175°C) during the last 15 minutes of the rise.
- Bake: Bake for 35-45 minutes, or until golden brown and cooked through. If the top browns too quickly, loosely tent it with foil.
- Make the syrup: While the babka bakes, combine the water and 1/2 cup sugar in a small saucepan. Bring to a boil, stirring until the sugar dissolves. Remove from heat.
- Glaze: Immediately upon removing the babka from the oven, brush the hot syrup evenly over the entire top surface. Let the babka cool in the pan for 15 minutes before transferring it to a wire rack to cool completely.
Notes
- For an overnight dough prep, complete steps 1-3, then place the dough in the refrigerator for 8 to 12 hours after the first rise. Bring it to room temperature for 1 hour before proceeding to step 4.
- This recipe yields a moist swirled sweet bread; do not overbake to maintain tenderness.
- Store leftover babka tightly wrapped at room temperature for up to 3 days. You can freeze cooled, unglazed babka tightly wrapped for up to 2 months.
Nutrition
- Serving Size: 1 slice
- Calories: 450
- Sugar: 35g
- Sodium: 280mg
- Fat: 25g
- Saturated Fat: 15g
- Unsaturated Fat: 10g
- Trans Fat: 0.5g
- Carbohydrates: 50g
- Fiber: 3g
- Protein: 8g
- Cholesterol: 75mg