
There is honestly nothing that beats the sound of slicing into a loaf of freshly baked bread. Seriously, it’s the best sound in the world! I know so many people who think making amazing, rustic loaves involves complicated kneading techniques or long, tiring kitchen sessions. But I’m here to tell you, forget all that stress! This Easy No-Knead Garlic Parmesan Herb Bread is my absolute favorite way to prove that incredibly flavorful, unbelievably crusty bread can be made by anyone, even if you’ve never touched yeast before. It’s truly simple, letting time do all the hard work for you!
- Why This Garlic Parmesan Herb Bread Recipe Works So Well
- Gathering Your Ingredients for Flavorful Bread
- Step-by-Step Instructions for Perfect No Knead Bread
- Tips for Making the Best Artisan Bread at Home
- Serving Suggestions for Your Garlic Parmesan Bread
- Storage and Reheating Instructions for Leftover Bread
- Frequently Asked Questions About This Bread Recipe
- Estimated Nutritional Data for This Bread
- Share Your Homemade Bread Creations
Why This Garlic Parmesan Herb Bread Recipe Works So Well
When I set out to create my go-to recipes, I wanted results that looked professional but required zero fuss. That’s what this bread delivers! The reason this particular method is so foolproof comes down to two amazing things working together. It taps into the power of slow chemistry rather than brute force, making it a truly reliable option for easy bread baking.
The Magic of No Knead Bread
Forget wrestling with sticky dough! The secret here is time. We use a small amount of yeast and let it hang out for almost a day. This long, slow fermentation is what develops that amazing, complex flavor and builds the structure. It’s science, not strength—the gluten develops all on its own while you’re sleeping or getting on with your day. Isn’t that neat? This method is so dependable, I always point people toward tutorials like one I saw on The Flourishing Abode when they ask about getting started with No Knead Dutch Oven Bread.
Achieving Bakery-Style Crust with a Dutch Oven Bread
If you want that gorgeous, shatteringly crusty bread you see in fancy shops, you need steam. That’s where the trusty Dutch oven steps in. By baking the dough covered inside that heavy pot, we trap the moisture escaping from the bread itself. This steam keeps the outer layer soft just long enough to expand up high before it sets, giving you that perfect bakery look without needing a professional oven setup.
Gathering Your Ingredients for Flavorful Bread
For us, the best part of cooking is realizing you don’t need specialty stores to make something spectacular. This savory bread relies on pantry staples dressed up with some fresh flavor makers. I always make sure I have everything out before I start mixing the dough, just like when I’m making my Garlic Parmesan Mashed Potatoes—it keeps things calm! Remember, simple ingredients shine when you treat them right.
Essential Components for the Bread Dough
For the base, you’ll want three cups of either all-purpose or dedicated bread flour; either one works wonderfully here. You need just a teaspoon and a half of salt, which is important for structure, and a mere quarter teaspoon of instant yeast. Seriously, that’s all the leavening we use! Mix these dry things together, then add a cup and a half of cool water. That’s it for the actual dough!
Creating the Garlic Parmesan Herb Topping
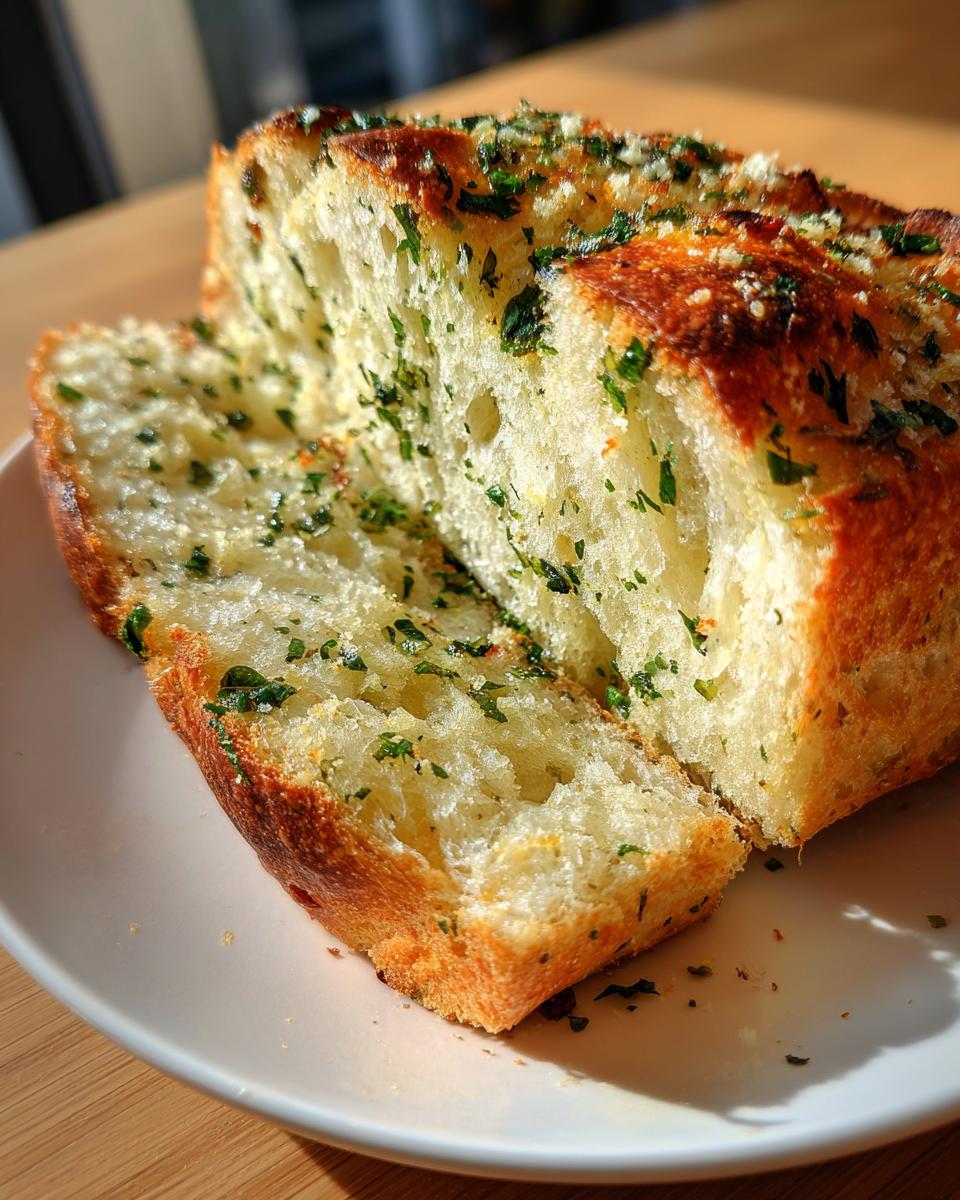
This is where the flavor explosion happens! Melt down four tablespoons of unsalted butter—don’t skimp on the real stuff here. To that, we toss in four cloves of garlic, which you’ll want to mince until they are practically liquid. Don’t forget the richness from a quarter cup of grated Parmesan cheese, and for that green pop, chop up two tablespoons of fresh parsley and mix in a tablespoon of dried Italian herbs. That topping is everything!
Step-by-Step Instructions for Perfect No Knead Bread
Okay, here is where the actual hands-on work comes in, and trust me, it’s minimal! Getting the timing right here is key to that amazing crumb structure in your final loaf of bread. Follow these steps exactly, and you’ll have the best side dish waiting for your next bowl of chili or maybe an amazing pasta dish, like my favorite Beef Garlic Butter Linguine!
Mixing and the Long Rest for Your Bread
First things first: grab that large bowl. Whisk your flour, salt, and instant yeast together until they are happy and combined. Then, pour in your cool water. That’s it! You are going to mix this using just a wooden spoon until you can’t see any dry flour spots anymore. It needs to look shaggy and messy—that’s success! Cover it up tight with plastic wrap and leave it somewhere at room temperature for a good 12 to 18 hours. This long rest period is what makes this No Knead Bread recipe special, so don’t rush it! We need that time for flavor to build.
Preparing the Dough and Preheating the Dutch Oven Bread
When that dough has finally bubbled up beautifully, it’s time to work! About 30 minutes before you plan to bake, start making your topping. In a tiny bowl, mix up that melted butter, minced garlic, parsley, and Italian herbs. Now, this next part is important: place your Dutch oven—lid and all—into the cold oven. Set the temperature to 450°F (232°C) and let everything heat up together. While that’s warming, gently scrape your sticky dough onto a floured surface and just fold it over itself a few times to make a rough ball shape.
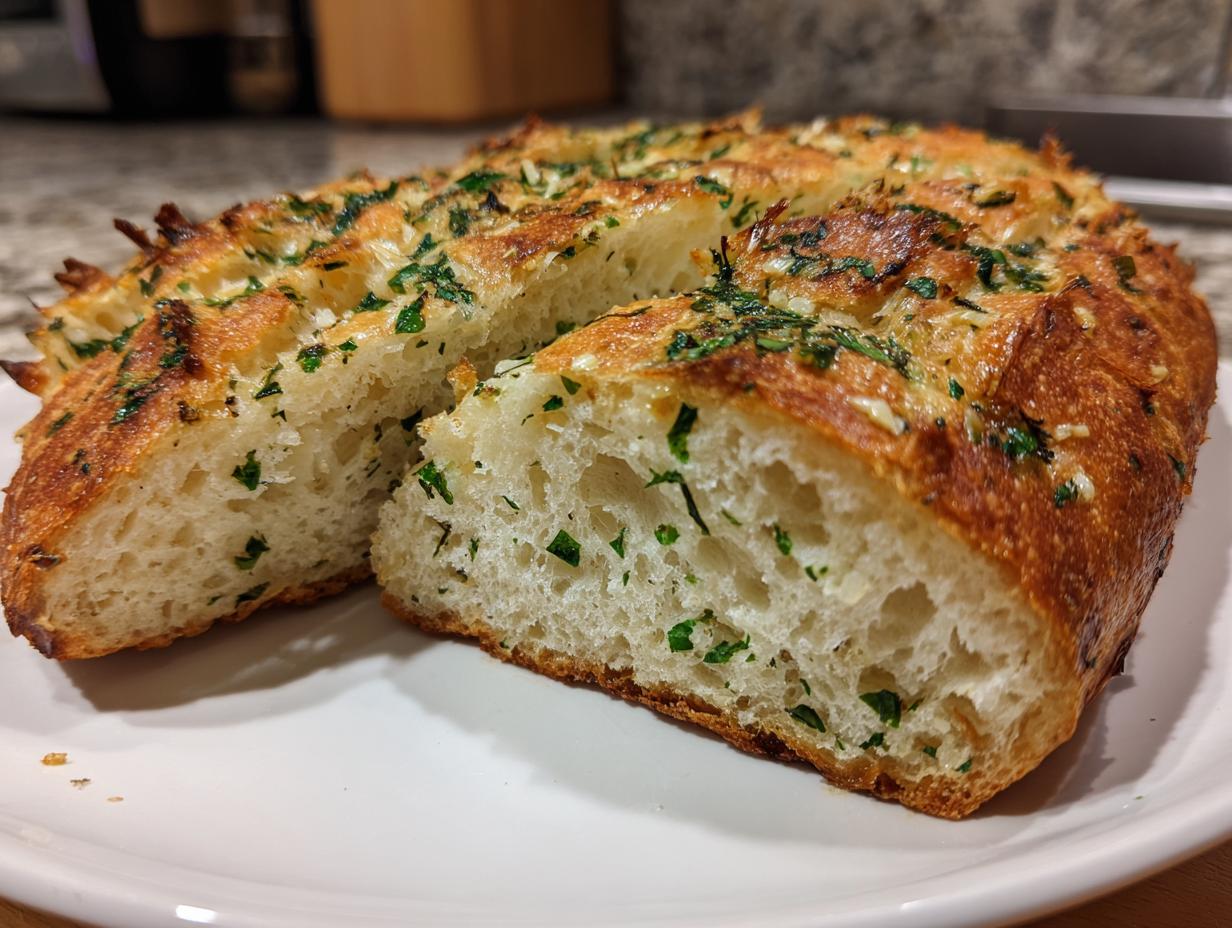
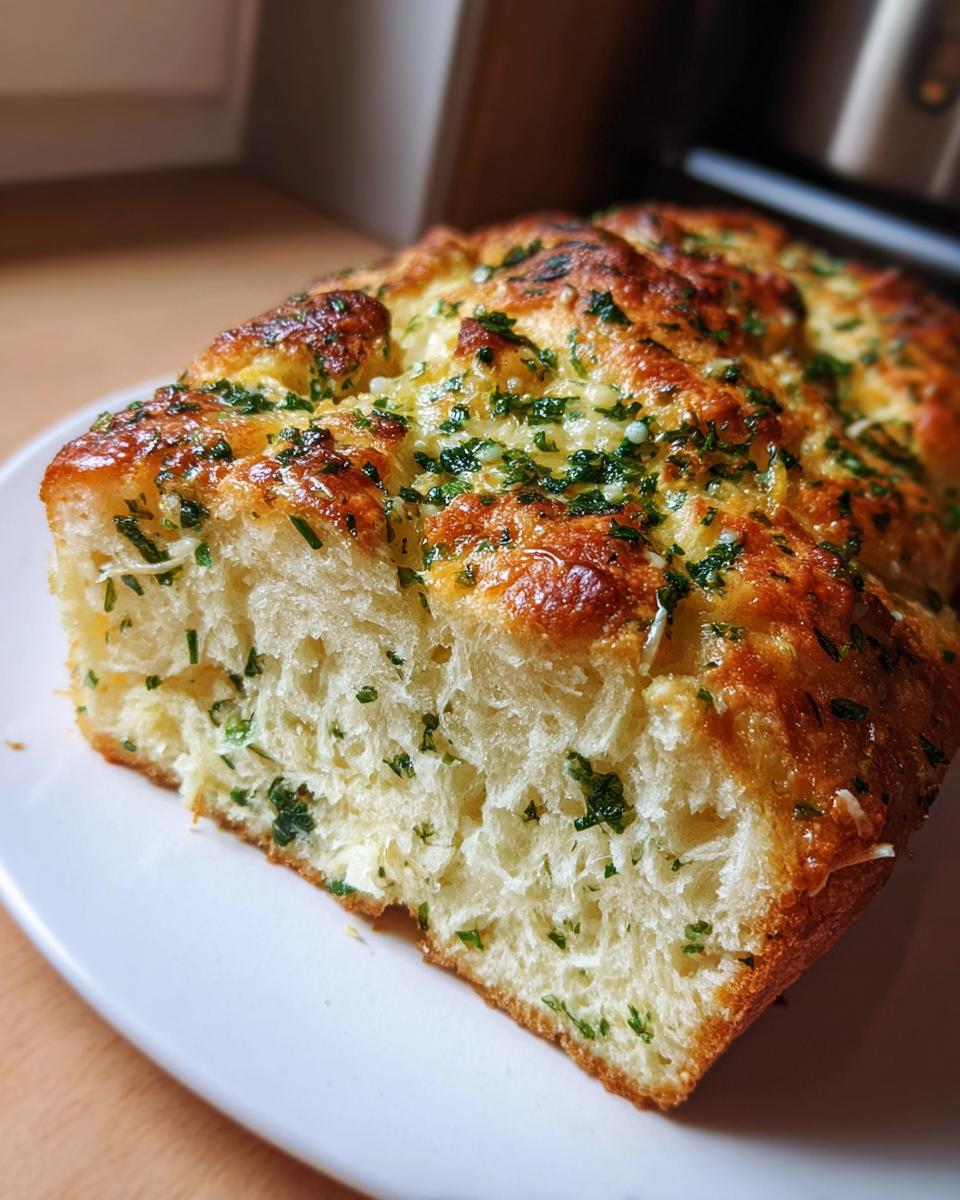
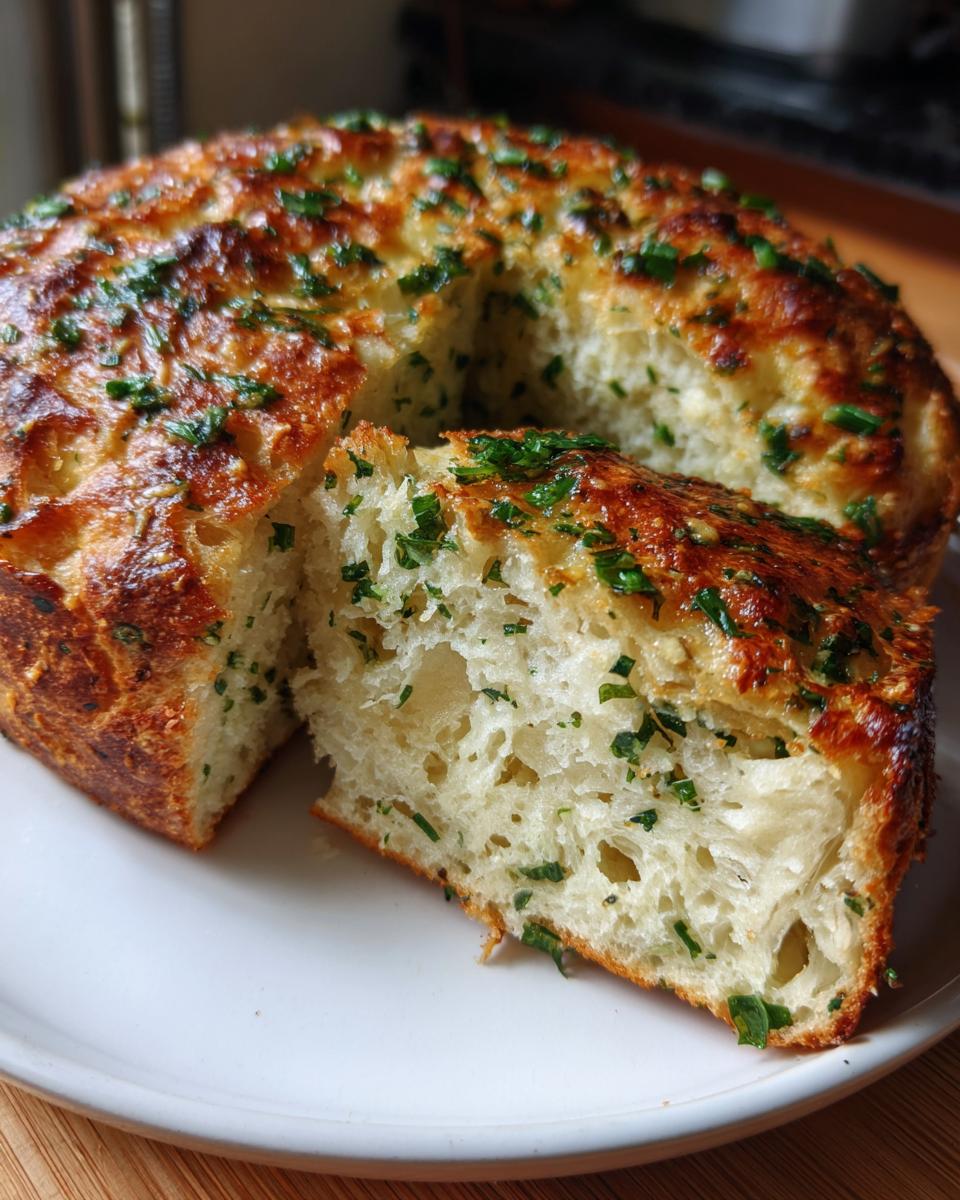
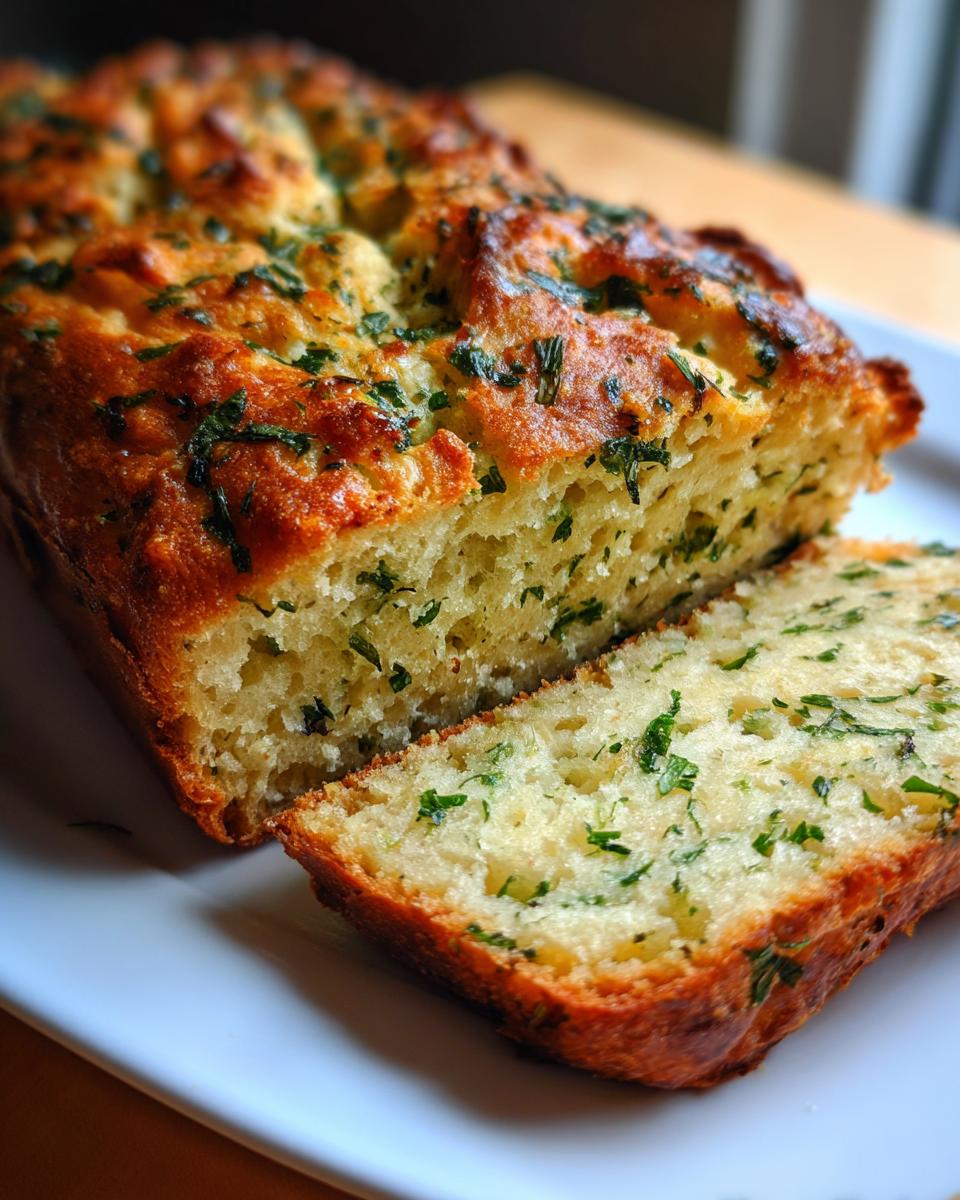
Baking and Finishing Your Flavorful Bread
Once the oven is fully hot, carefully take out that super hot Dutch oven. Gently lift your dough ball and drop it right into the pot. Pop that lid back on and bake it for 30 minutes exactly. This locks in the steam! After that half-hour, take the lid off. Now, paint that beautiful garlic herb butter all over the top of your loaf and shower it with Parmesan cheese. Pop it back, uncovered, for another 10 to 15 minutes until that crust is deep brown and the cheese is sizzling. Remember to carefully remove the finished bread and let it cool on a wire rack before you dare slice into the best homemade loaf you’ve ever made.
Tips for Making the Best Artisan Bread at Home
Making this delicious bread is simple, but just like any good family recipe, a few little secrets can bump it up from great to absolutely unforgettable. These aren’t complicated tricks, they are just little pointers I picked up over time that help achieve that real bakery quality, turning out a perfect rustic bread loaf every single time. If you want to dive deeper into the techniques that create incredible flavor in an artisan bread, check out some tips I saw shared by Bitezly for their Artisan Bread Recipe.
Extending the Flavor Development of Your Bread
Now, remember how we talked about that long, slow rest? You can actually take that technique even further if you want your bread flavor to deepen! If you plan ahead, once your dough has rested for the initial 12 to 18 hours, cover it tightly again and tuck it into the back of the refrigerator. You can let it chill out there for up to three full days. This slow, cold fermentation really enhances those subtle sour notes and makes the final product taste like it’s been proofing for days!
Alternative Baking Methods for Homemade Bread
I absolutely adore my Dutch oven; it’s critical for that domed top and crackly crust on this bread. But life happens, right? If your Dutch oven is dirty or just doesn’t fit in your oven, don’t panic! You can still bake this dough. Place a pizza stone or even a heavy baking sheet in the oven while it preheats, just like normal. When you add the dough, toss a few ice cubes onto the hot bottom of the oven beneath the stone or tray to create that necessary initial burst of steam. I will say, though, the crust won’t be quite as uniform or thick as the one you get from a sealed pot, but it will still be marvelous homemade bread.
Serving Suggestions for Your Garlic Parmesan Bread
This savory loaf is so flexible, it really makes any meal feel like a celebration! Of course, dipping it into a big bowl of hearty soup is always a winner—it’s the perfect tool for soaking up every last drop. If you are planning a gathering soon, you absolutely have to try this bread alongside a big pot of my famous Potluck Chili. It’s also fantastic served warm, sliced thick, with just a drizzle of good olive oil, or as a slightly upscale side to any weeknight pasta dish. Honestly, once you smell that garlic and Parmesan baking, you won’t have any bread left to serve!
Storage and Reheating Instructions for Leftover Bread
Even if this whole loaf disappears immediately (which I wouldn’t judge!), if you somehow end up with extra bread, we need to make sure it stays good. Store any leftovers tightly wrapped in plastic wrap or put them in an airtight container at room temperature for about two days. Do not stick it straight into the fridge; that just makes it go stale faster! If you want to bring that crust back to life—and trust me, you do—just give it a quick blast in a 350°F oven for about five minutes. That slight heat wakes up the crust again!
Frequently Asked Questions About This Bread Recipe
It is so common to have questions when you move away from standard recipes into the world of **No Knead Bread**! That long rest period throws people off, but trust me, once you see the result, you’ll be hooked on this kind of **homemade bread recipe**. Here are a few things I hear most often when people are trying this out for the first time. If you’re moving on to something sweet next, like my Carrot Banana Muffins, you might have similar questions about technique!
Can I use active dry yeast instead of instant yeast in this bread?
You absolutely can, but you must give that yeast a little bit of wake-up time first! Instant yeast goes straight into the dry ingredients, but active dry yeast needs to be bloomed. Take about a quarter cup of the water required for the recipe, warm it slightly—not hot, just warm to the touch—and sprinkle the yeast over it along with just a tiny pinch of the sugar you’d normally use in a sweet bread. Let it sit for about 5 to 10 minutes until it gets frothy. Once it looks like bubbly foam, you can mix that mixture into your dry ingredients. It’s an extra little step, but active dry yeast needs that hug to get going!
What if I want a different flavor profile, like a sweet bread?
Oh, I love that you’re already thinking about customizing! If you are dreaming of something like a **Cinnamon Swirl Bread** instead of this savory loaf, it’s actually really straightforward. You’d just need to completely skip the garlic, Parmesan, and Italian herbs obviously. For the sweet version, replace the melted butter topping with softened butter mixed generously with cinnamon and brown sugar. You can even add some chopped nuts or dried fruit to the main dough just after the long rest. It’s the same amazing **Artisan Bread** technique, just a totally different flavor direction!
How long does this homemade bread recipe take if I don’t count the resting time?
This is the best part for those looking for **easy bread baking** during a busy weeknight! If you don’t count that hands-off 12 to 18-hour rest, the actual hands-on time is super quick. We’re talking maybe 10 minutes to whisk the dry ingredients and mix in the water, and then another 5 to 10 minutes to shape the dough and prep the topping just before baking. Then you have about 40 to 45 minutes in the hot oven. So, start to finish when you’re actively working? We are looking at just over an hour for this incredible loaf of **bread**!
Estimated Nutritional Data for This Bread
I always try to keep things simple in the kitchen, and that includes how we look at the nutrition. When you’re making your own **bread** from scratch, you know exactly what’s going into it, which is a huge win. However, just remember that these numbers are based on the specific ingredients listed—like the amount of butter for that gorgeous garlic topping—and what serving size we used to calculate it. This is just a general guideline for this amazing loaf!
Here is what you can generally expect for one slice of this Garlic Parmesan Herb Bread:
- Serving Size: 1 slice
- Calories: 220
- Fat: 8g (with 4g being saturated)
- Carbohydrates: 34g
- Protein: 6g
- Sugar: 1g
- Fiber: 1g
- Sodium: 350mg
- Cholesterol: 15mg
It’s a hearty slice, for sure! But that beautiful crust and rich flavor, thanks to the Parmesan and herbs, are totally worth it for turning an ordinary dinner into something memorable. When you trust the ingredients you put in, you can better trust the final results you see on the table.
Share Your Homemade Bread Creations
Now that you have this amazing, fragrant loaf of savory bread cooling on your rack, the best part is getting to share it! I truly believe that the memories we make around food are as important as the food itself. So please, don’t keep this masterpiece a secret in your kitchen!
If you tried this No-Knead Garlic Parmesan Herb Loaf, please come back and leave a star rating. Your feedback is what helps other home cooks realize just how achievable great bread baking can be. It’s such a confidence booster to see that someone else successfully made something wonderful!
Even better, snap a picture of your **crusty bread**—maybe you used it to wipe up sauce from a great dinner, or perhaps you just admired that golden top—and share it on social media. Tag us so I can see it! Knowing that my recipes travel from my kitchen to yours, creating community and happiness, is honestly the reason I started Taste This Plate in the first place. You can read a little more about my journey and community focus on our About Page! Happy baking, friends, and thank you for cooking with me!
PrintEasy No-Knead Garlic Parmesan Herb Bread
Create a crusty, soft, and flavorful artisan bread at home without any kneading. This recipe uses simple ingredients to make a delicious Garlic Parmesan Herb Bread perfect for any meal.
- Prep Time: 10 min
- Cook Time: 45 min
- Total Time: 13 hours 55 min
- Yield: 1 loaf 1x
- Category: Side Dish
- Method: Baking
- Cuisine: American
- Diet: Vegetarian
Ingredients
- 3 cups all-purpose or bread flour
- 1 1/2 teaspoons salt
- 1/4 teaspoon instant yeast
- 1 1/2 cups cool water
- 4 cloves garlic, minced
- 1/4 cup grated Parmesan cheese
- 2 tablespoons fresh parsley, chopped
- 1 tablespoon dried Italian herbs
- 4 tablespoons unsalted butter, melted
Instructions
- In a large bowl, whisk together the flour, salt, and yeast.
- Add the cool water and mix with a wooden spoon until just combined into a shaggy dough. Do not knead.
- Cover the bowl tightly with plastic wrap and let it rest at room temperature for 12 to 18 hours. The dough will become bubbly and increase in volume.
- About 30 minutes before baking, prepare the topping: In a small bowl, mix the melted butter, minced garlic, parsley, and Italian herbs. Set aside.
- Lightly flour a work surface and gently scrape the dough out. Fold the dough over itself a few times to form a rough ball.
- Place a large Dutch oven with the lid on inside your oven. Preheat the oven to 450°F (232°C).
- Carefully remove the hot Dutch oven from the oven. Lift the dough and gently place it inside the hot pot.
- Cover the Dutch oven with the lid and bake for 30 minutes.
- Remove the lid. Brush the top of the loaf generously with the garlic herb butter mixture and sprinkle evenly with the Parmesan cheese.
- Return the uncovered Dutch oven to the oven and bake for an additional 10 to 15 minutes, or until the crust is deep golden brown and the cheese is melted and bubbly.
- Carefully remove the bread from the Dutch oven and let it cool on a wire rack before slicing.
Notes
- For an even crustier exterior, you can let the dough rest in the refrigerator for up to 3 days after the initial rise.
- If you do not have a Dutch oven, you can bake this on a baking stone or sheet pan, but the crust will be less uniform.
- This bread is excellent served warm alongside your favorite pasta dishes or soups.
Nutrition
- Serving Size: 1 slice
- Calories: 220
- Sugar: 1
- Sodium: 350
- Fat: 8
- Saturated Fat: 4
- Unsaturated Fat: 4
- Trans Fat: 0
- Carbohydrates: 34
- Fiber: 1
- Protein: 6
- Cholesterol: 15