
Don’t you just walk into those amazing little Italian bakeries and automatically crave those piped, delicate cookies that practically dissolve the second they hit your tongue? I swear, the desire for those genuine, bakery style butter cookies is what sent me deep down the recipe rabbit hole years ago. My mission, as always, was cracking the code to that signature melt-in-your-mouth texture right here in a regular home kitchen. I remember bringing a batch of these Italian butter cookies to a work potluck, and the compliments were amazing—but the best part was seeing people’s surprise when I told them I made them myself. It’s proof that incredible taste doesn’t need fancy equipment or a pastry degree; it just needs the right technique.
- Why This Bakery Style Italian Butter Cookies Recipe Works (E-E-A-T)
- Gathering Ingredients for Authentic Italian Butter Cookies
- How to Make Italian Butter Cookies: Step-by-Step Instructions
- Baking Tips for Perfect Melt in Your Mouth Cookies
- Elevating Your Italian Butter Cookies with Variations
- Storage and Keeping Your Italian Butter Cookies Fresh
- Frequently Asked Questions About Easy Italian Cookies Homemade
- Estimated Nutritional Information for Classic Italian Pastry Cookies
- Share Your Homemade Italian Butter Cookies Creations
Why This Bakery Style Italian Butter Cookies Recipe Works (E-E-A-T)
When I first started baking these, I realized they are totally different from a chewy chocolate chip cookie. To get that true, light crumb—the kind that makes you say “wow”—you have to respect the base ingredients. We nail the authenticity because we use a balance of both confectioners’ sugar and a touch of that rich vanilla, plus that hint of almond extract that gives them that classic Italian bakery flavor.
The real ticket to success, though, isn’t just the ingredients; it’s patience. Skipping the chilling step? That’s how you end up with pale, flat puddles instead of gorgeous swirls. That chill time firms up the butter just enough so they keep their shape while baking, guaranteeing those perfect melt in your mouth cookies you’re hoping for.
The Secret to Tender Butter Cookies Texture
The structure of these tender butter cookies is all about air pockets. You absolutely must cream the softened butter and powdered sugar until they’re fluffy and pale—don’t rush this part! That action gently whips air into the fat, which keeps the final texture delicate. Once you add the flour, you switch to low speed and stop mixing the second it all comes together. Overmixing activates the gluten in the flour, and guess what that gives you? Tough cookies! We want tender, flaky results every time.
Gathering Ingredients for Authentic Italian Butter Cookies
Okay, now for the fun part: getting everything together! Since these cookies are so simple in concept—mostly butter, sugar, and flour—the quality of what you buy really shines through. There’s nowhere for timid flavors to hide, so we want the good stuff. I’ve laid out exactly what you need below. Since this is a short ingredient list, I want you to use the best pure extracts you can find. That’s what separates the bakery-style cookies from the good-enough-at-home ones.
Here is the lineup for about three dozen authentic Italian cookies:
- 1 cup unsalted butter, softened (Remember, butter is key to flavor!)
- 1 cup confectioners’ sugar (Also called powdered sugar)
- 1 large egg yolk (Just the yolk! This adds richness without too much liquid.)
- 1 teaspoon pure vanilla extract (Don’t skimp here!)
- 1/4 teaspoon almond extract (This is the signature flavor!)
- 2 cups all-purpose flour
- 1/4 teaspoon salt
- 1/2 cup melted semi-sweet chocolate (only if you plan on dipping later)
- 1/4 cup finely chopped nuts or sprinkles (totally optional for decorating)
Ingredient Notes and Substitutions for Italian Butter Cookies
Let’s talk quality control for a second. When a recipe relies this heavily on vanilla and almond, you absolutely want to use the pure versions. The imitation stuff tastes harsh and artificial, and that’s not the delicate flavor we are going for here.
If you had to make a quick switch, I get it! If you’re out of almond extract, you can boost the vanilla up to 1 1/4 teaspoons total, but you’ll lose that classic tang. Also, if you’re looking for tips on how to handle other basic baking ingredients like flour, I always keep handy tips on my baking fundamentals page.
One last note: I specified only the egg yolk. We save the white because adding a whole egg can make the dough wetter than we want for piping these buttery Italian shortbread style cookies.
How to Make Italian Butter Cookies: Step-by-Step Instructions
Alright, let’s get down to the process of how to make Italian butter cookies that look exactly like they came straight from the display case! Don’t feel intimidated by the pastry bag; it’s actually easier than rolling out dough, I promise. Remember, we want these to be beautiful swirls, not just basic drop cookies. Start by getting your butter and sugar perfectly creamed—that light, fluffy base we talked about is essential. If you want to brush up on general creaming techniques, I have tips over on my post about making the best buttercream because the principle is the same!
Next, we mix in the flavorings and then slowly bring in the flour and salt until it just barely comes together into a soft, manageable dough. That’s it for the mixing!
The next stage is crucial for that bakery look, so pay close attention here:
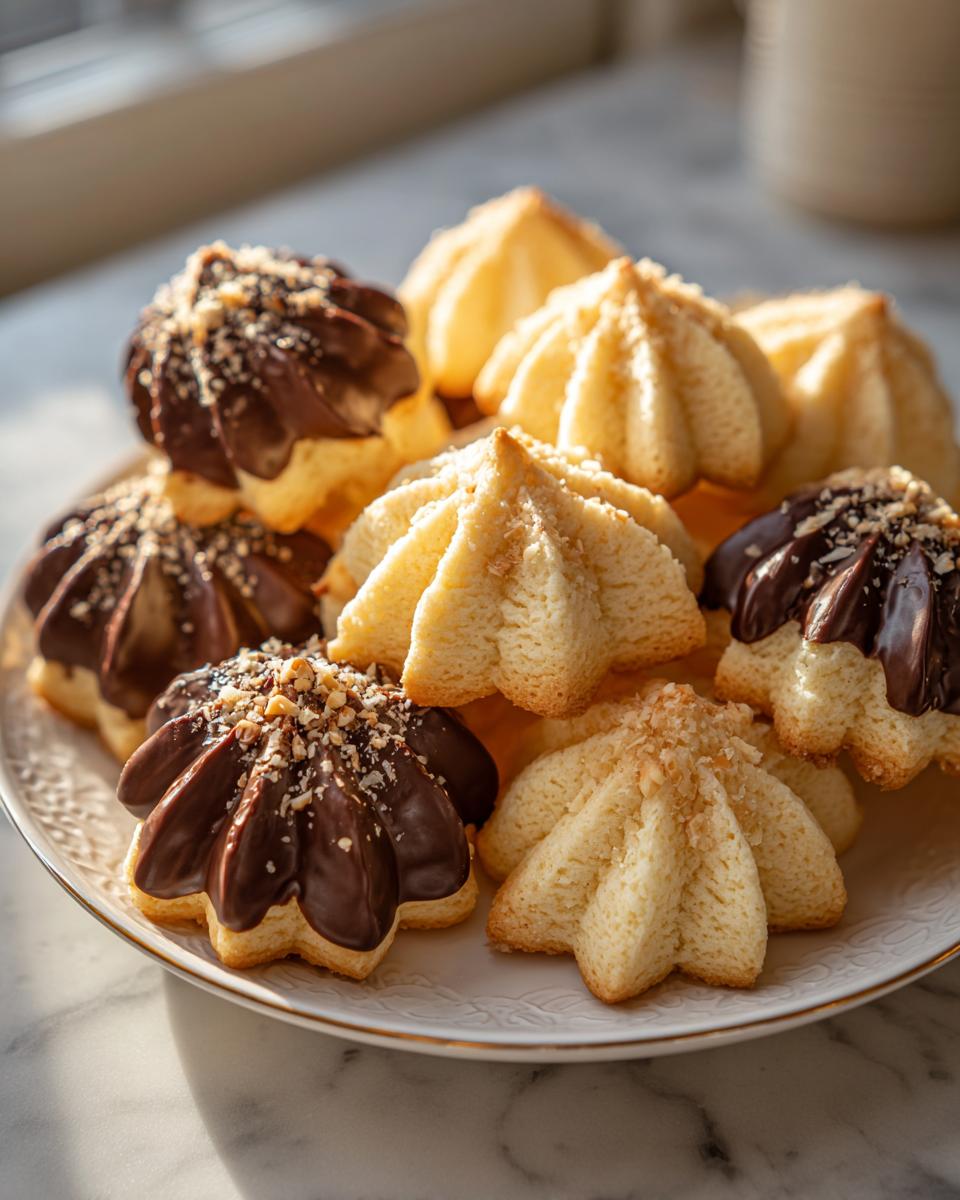
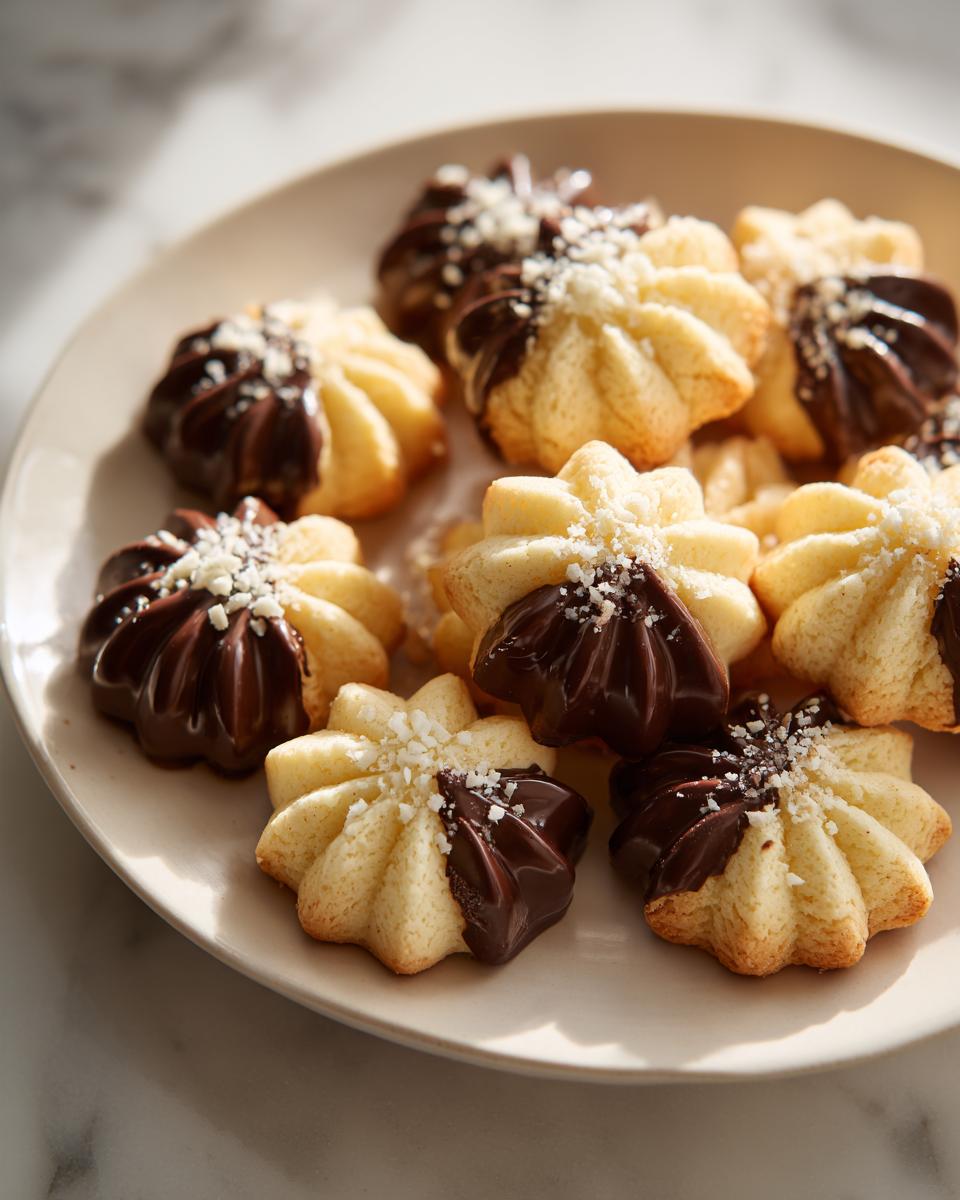
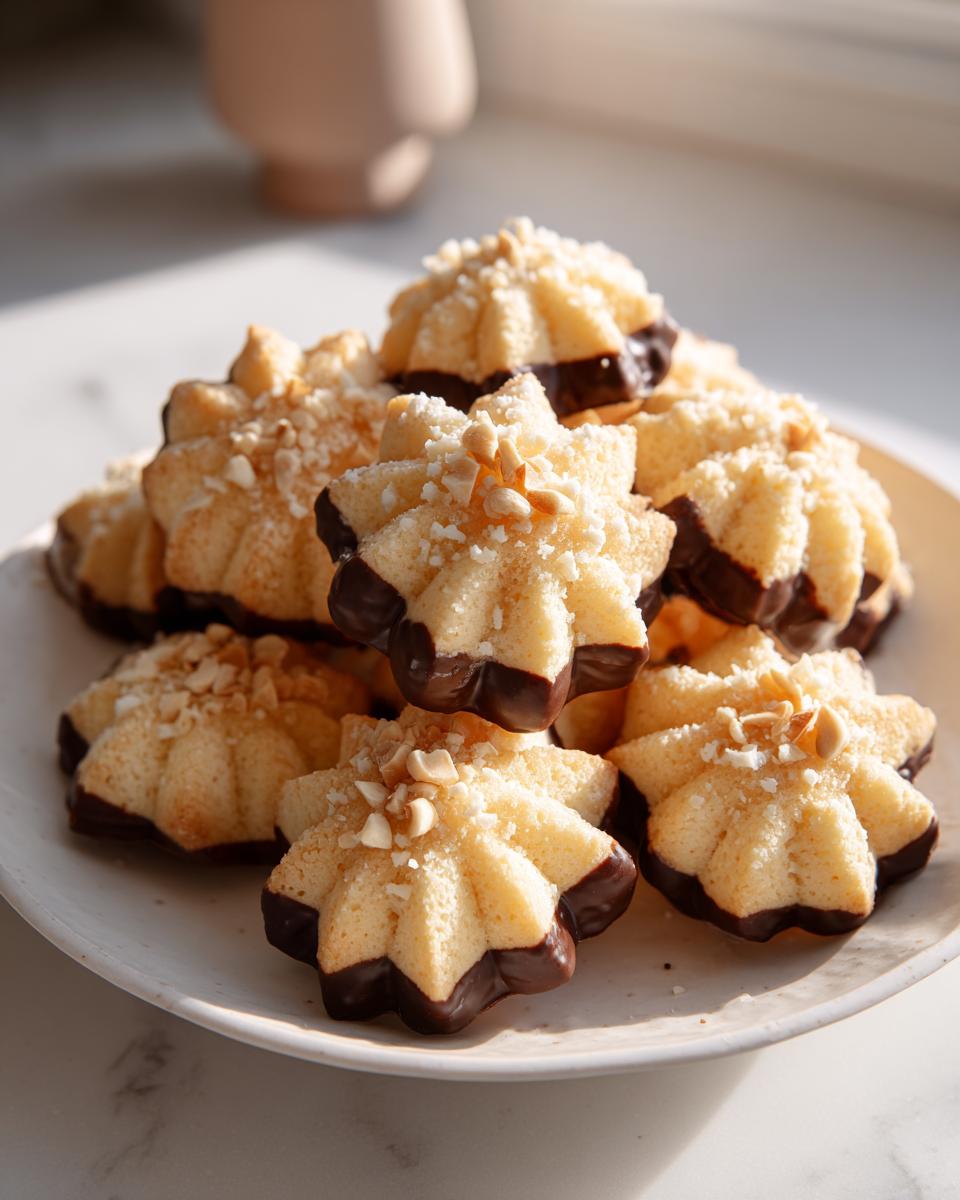
- Get your pastry bag ready with that big star tip—the big ones, like a Wilton 1M or 2D, create those deep ridges that look so professional.
- Load the dough gently into the bag. Hold the bag vertically right over your parchment-lined sheet.
- Pipe little 1.5-inch swirls or rosettes. You need to apply steady pressure, then quickly twist your hand up and away to release the dough cleanly. Leave about an inch between each one because they will spread just a tiny bit!
Piping and Chilling Your Italian Butter Cookies Dough
This is the step that separates good cookies from *great* ones. See how pretty those piped swirls look? They look great now, but if you bake them right away, they’ll totally slump into sad, flat disks in the oven. We need structure!
I want you to slide those trays right into the refrigerator for at least 30 minutes. You aren’t trying to freeze them solid, you just need that butter to firm up again so the piped shape holds tight when it meets the heat. This chilling is what locks in that classic swirl shape and prevents your easy Italian cookies homemade from looking messy. Trust me on this—it’s worth the wait before they hit the 350°F oven!
Baking Tips for Perfect Melt in Your Mouth Cookies
Baking is chemistry, but when it comes to these delicate cookies, it’s mostly about paying attention to the visual cues. Since we used confectioners’ sugar, these cookies don’t brown deeply like other shortbreads; they stay wonderfully pale. That’s mostly because of the low amount of eggs and the high-fat content from the butter.
You’re aiming for 350°F (175°C). It’s a moderate heat that allows the inside to cook through before the delicate edges burn. You’ll need to watch them like a hawk after about the 10-minute mark because every oven is a little different. For the best results, you want them to bake just until the edges look set—they should show a hint of color, maybe a touch pale gold, but the very center of the swirl should still look soft, almost the same color as when they went in.
If you wait until the whole cookie is golden brown, I guarantee you won’t get those incredible melt in your mouth cookies we are dreaming of! They will be crispier, which is fine for other shortbreads, but not for these authentic Italian cookies. As soon as the edges look firm, pull them out. Seriously, a 30-second difference can change the whole texture.
Let them sit on that hot baking sheet for a good five minutes before you try to move them. Trying to handle them too soon is just asking for breakage. They firm up beautifully as they cool on the rack, setting that tender crumb structure perfectly.
Elevating Your Italian Butter Cookies with Variations
Part of the fun with these simple Italian butter cookies is that the basic dough is a blank canvas! Once you’ve mastered that perfect, delicate base, you can totally dress them up. My favorite way to celebrate during the holidays is to create a mixed platter, offering a few different looks. You can make classic thumbprints filled with jam, or you can go for the showstopper: chocolate dipping!
Remember those notes about jam fillings? If you skip the big star tip and just pipe small circles, you create two little sandwiches you can fill with raspberry jam once they cool down. It makes them taste even richer!
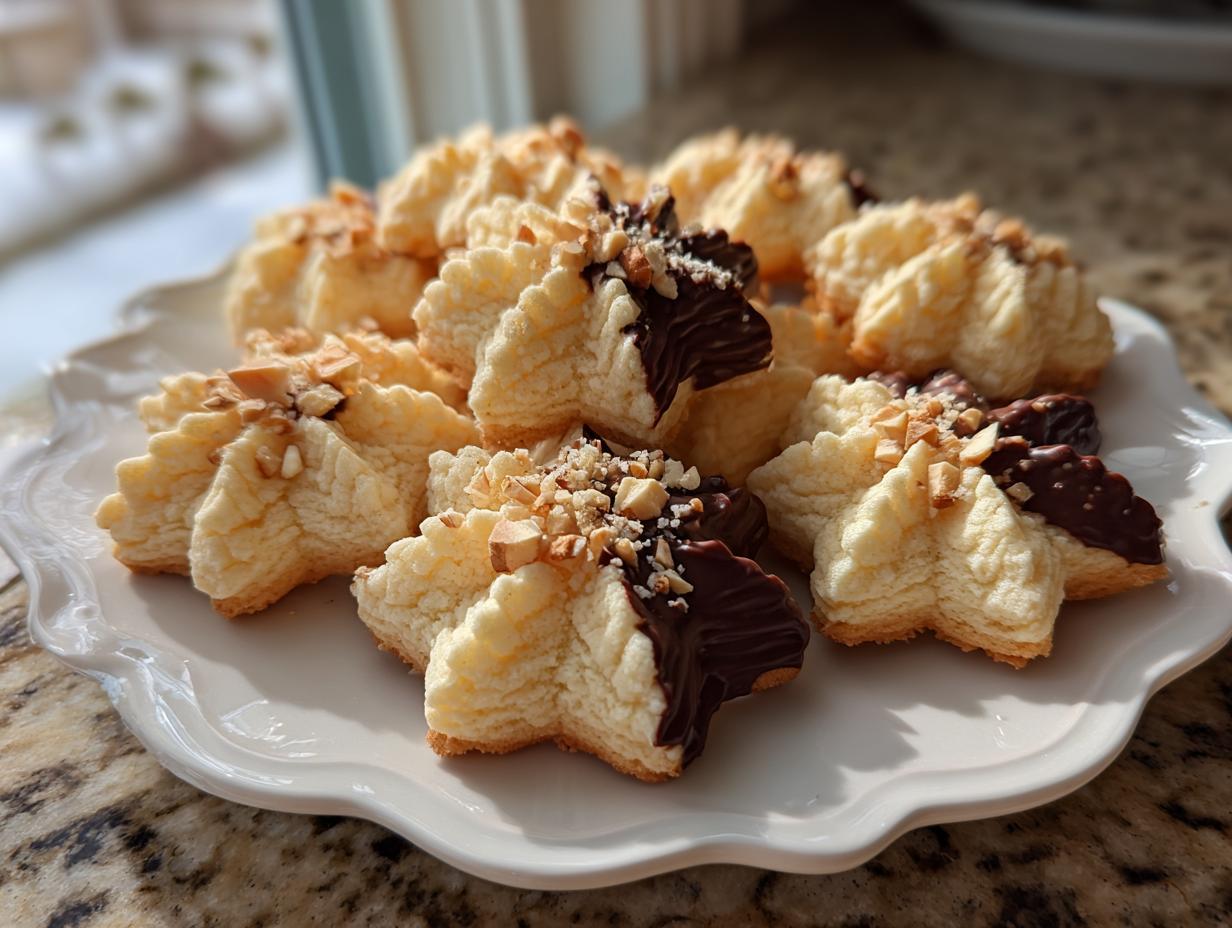
Chocolate Dipped Cookies Recipe: Finishing Touches
If you want that beautiful, slightly fancy finish you see in the bakeries, you have to try dipping them.
This is my quick process for a professional-looking finish. First, make sure your cookies are completely cool—if they are even a tiny bit warm, the chocolate will just slide right off! Melt your semi-sweet chocolate gently. I usually do this in short bursts in the microwave, stirring well in between so it doesn’t scorch. Once it’s smooth, take a cooled cookie, hold it by the edge, and dip about one-third of it into the melted chocolate.
Lift it out, let the extra drip off for a second, and then immediately lay it on parchment paper. Now is the time to sprinkle on some chopped nuts or colorful sprinkles if you like! This is a wonderful chocolate dipped cookies recipe variation. If you want to see my technique for chocolate work in other recipes, check out how I handle chocolate for my pecan pie—the melting principle is the same!
Storage and Keeping Your Italian Butter Cookies Fresh
Now that you’ve made these gorgeous, delicate treats, the absolute last thing you want is for them to go stale before you can enjoy them all! Since these are pure butter cookies, they definitely need a little TLC to keep that wonderful fresh-from-the-oven texture. The good news is that because they are low in moisture, they actually keep pretty well, which is why they are such a fantastic option for traditional Italian Christmas cookies that you want to bake ahead of time.
The key here is containment. You must store them in an airtight container. If you leave them exposed, the butter flavor fades fast and they will absorb moisture straight from the air, making them soft when you wanted them tender and crumbly. I usually layer mine with a piece of wax or parchment paper between the layers to keep the swirls from sticking together, especially if some are dipped in chocolate!
They are perfect for making in advance, too. These buttery Italian shortbread style cookies will last beautifully at cool room temperature for about a week. If you’re batch baking for the holidays and need them to last longer—and you absolutely should make big batches!—they freeze wonderfully.
Just arrange the cooled cookies in a single layer in a freezer-safe container or heavy-duty zip-top bag. I always recommend adding a layer of parchment between the cookies before sealing it up tight. They keep really well in the freezer for up to three months. When you want to serve them, just transfer the container to the counter to thaw completely before opening the lid. That thawing process lets any condensation form on the container, not your beautiful cookies!
Frequently Asked Questions About Easy Italian Cookies Homemade
I know you might have a few lingering questions when trying a new recipe, especially when you’re aiming for that specific bakery quality. I’ve gathered the most common things people ask when they are first trying out these easy Italian cookies homemade. Hopefully, this clears up any last hesitations so you can get baking!
What exactly is the role of the almond extract?
This is what makes them feel genuinely authentic! Vanilla is great, but almond extract is the traditional secret weapon in many Southern Italian pastry recipes. It doesn’t necessarily make the cookie taste like almonds, but it adds a beautifully complex, warm background note that cuts through the richness of the butter. I promise, don’t leave it out if you can help it!
Can I use a cookie press instead of a pastry bag?
Absolutely, you can! If you don’t have a pastry bag handy or you prefer the classic ridged shape of buttery Italian shortbread, a cookie press works perfectly well, just like when making Spritz cookies. You might need to make sure your dough is slightly cooler than usual if you are using the press, as the mechanism can sometimes warm the dough up quickly while you work. Just ensure you chill the formed cookies right after pressing them onto the sheet!
Is the chilling step really necessary for these cookies?
Yes, yes, a thousand times yes! I know waiting is the hardest part, especially when you have a fresh batch of dough ready to go, but this is non-negotiable if you want that bakery look. The dough for these Italian butter cookies is very high in butter. If the butter is soft when it goes into the oven, the cookies will spread outwards before they have a chance to set up vertically, turning your pretty swirls into flat discs. Thirty minutes in the fridge is all it takes to firm everything up, ensuring they bake up beautifully high and tender.
Can I substitute butter with margarine in this Italian Butter Cookie Recipe?
Oh, honey, please don’t! I really suggest you stick to unsalted butter for this Italian Butter Cookie Recipe. Margarine is mostly water and vegetable oils, and it simply doesn’t brown or cream the same way real butter does. Butter provides the rich flavor we want, yes, but more importantly, its fat structure is crucial for creating those airy pockets that lead to that signature *melt-in-your-mouth* texture. If you use margarine, you risk getting a greasier, flatter cookie that won’t have the right snap or flavor!
How long do these cookies typically last?
They are surprisingly durable! Since they don’t have a lot of extra liquid or leavening, they hold their shape and flavor well. Stored in an airtight container (and kept away from strong smells, like onions or spices!), they should keep their perfect texture for about 7 to 10 days at room temperature. They are the perfect make-ahead treat for when you need simple snacks for a crowd!
Estimated Nutritional Information for Classic Italian Pastry Cookies
I always include a quick look at the numbers for those of you tracking things! Now, I have to give you the usual little disclaimer: since these are homemade, using real butter and pure extracts, this is just an estimate. But it gives you a good baseline on what you’re enjoying in each one of these beautiful classic Italian pastry cookies.
Based on the recipe details provided, here is the general breakdown per cookie (assuming you get about 3 dozen total):
- Calories: Around 120
- Total Fat: Approximately 8 grams
- Carbohydrates: About 11 grams
- Sugar: Roughly 9 grams (mostly from the confectioners’ sugar!)
- Protein: A small boost at 1 gram
See? These are rich because they are pure butter cookies—that’s where the flavor lives! They are a wonderful indulgence when paired with your afternoon coffee. Remember, this is an estimate, so treat it as a helpful guide rather than a strict count!

Share Your Homemade Italian Butter Cookies Creations
Well, that’s it! You’ve officially mastered the art of the bakery style butter cookie. Seriously, take a moment to admire those perfect swirls. My favorite part of sharing these recipes is seeing what you all create in your own kitchens. When I look back at my grandmother’s kitchen, it wasn’t just about the food; it was about the joy of making something delicious for the people you love.
I would absolutely love to hear how these came out for you. Did you stick to the simple vanilla? Did you go all out with the chocolate dipping and sprinkles? Don’t be shy—drop a rating below! If you’ve been baking for a while, let me know your favorite way to serve these melt in your mouth cookies with your coffee or tea. Your tips help the whole community!
If you snap a picture of your beautiful platter of Italian butter cookies, please tag me on social media! I always try to share my favorites on my stories. And if you run into any snags or questions while you’re trying out this recipe for the first time, please leave a comment below or shoot me a note through the contact page. I’m here to help you get that flawless result every single time.
Thank you so much for joining me in the kitchen today. Happy baking, and I can’t wait to see your creations!
PrintBakery-Style Italian Butter Cookies: Melt-In-Your-Mouth Recipe

Make authentic, tender Italian Butter Cookies at home. This recipe delivers the rich, buttery flavor and delicate texture you find in the best Italian bakeries, perfect for holidays or tea time.
- Prep Time: 20 min
- Cook Time: 12 min
- Total Time: 62 min
- Yield: About 3 dozen cookies 1x
- Category: Dessert
- Method: Baking
- Cuisine: Italian
- Diet: Vegetarian
Ingredients
- 1 cup unsalted butter, softened
- 1 cup confectioners’ sugar
- 1 large egg yolk
- 1 teaspoon pure vanilla extract
- 1/4 teaspoon almond extract
- 2 cups all-purpose flour
- 1/4 teaspoon salt
- 1/2 cup melted semi-sweet chocolate (for dipping, optional)
- 1/4 cup finely chopped nuts or sprinkles (for decorating, optional)
Instructions
- In a large bowl, beat the softened butter and confectioners’ sugar together with an electric mixer until the mixture is light and fluffy. This step incorporates air for a tender cookie.
- Beat in the egg yolk, vanilla extract, and almond extract until just combined. Scrape down the sides of the bowl as needed.
- In a separate medium bowl, whisk together the flour and salt.
- Gradually add the dry ingredients to the wet ingredients, mixing on low speed until a soft dough forms. Do not overmix.
- Transfer the dough to a pastry bag fitted with a large star tip (like Wilton 1M or 2D). This creates the classic swirl shape.
- Pipe 1.5-inch swirls or rosettes onto baking sheets lined with parchment paper. Leave about 1 inch between cookies.
- Chill the piped cookies in the refrigerator for at least 30 minutes. Chilling helps the cookies hold their shape during baking.
- Preheat your oven to 350°F (175°C).
- Bake the chilled cookies for 10 to 12 minutes, or until the edges are set and very lightly golden. The centers should remain pale.
- Let the cookies cool on the baking sheet for 5 minutes before carefully transferring them to a wire rack to cool completely.
- If desired, dip half of each cooled cookie into melted semi-sweet chocolate. Immediately sprinkle with chopped nuts or sprinkles before the chocolate sets.
Notes
- For a true bakery texture, use room temperature butter that is soft but not greasy.
- If you do not have a pastry bag, you can press the dough through a cookie press fitted with a star disk, similar to making Spritz cookies.
- To make jam-filled cookies, pipe small circles instead of swirls. After baking and cooling, sandwich two cookies together with a small amount of raspberry or apricot jam.
- For an extra layer of flavor, substitute 1/4 teaspoon of the vanilla extract with lemon zest.
Nutrition
- Serving Size: 1 cookie
- Calories: 120
- Sugar: 9
- Sodium: 35
- Fat: 8
- Saturated Fat: 5
- Unsaturated Fat: 3
- Trans Fat: 0
- Carbohydrates: 11
- Fiber: 0
- Protein: 1
- Cholesterol: 25