
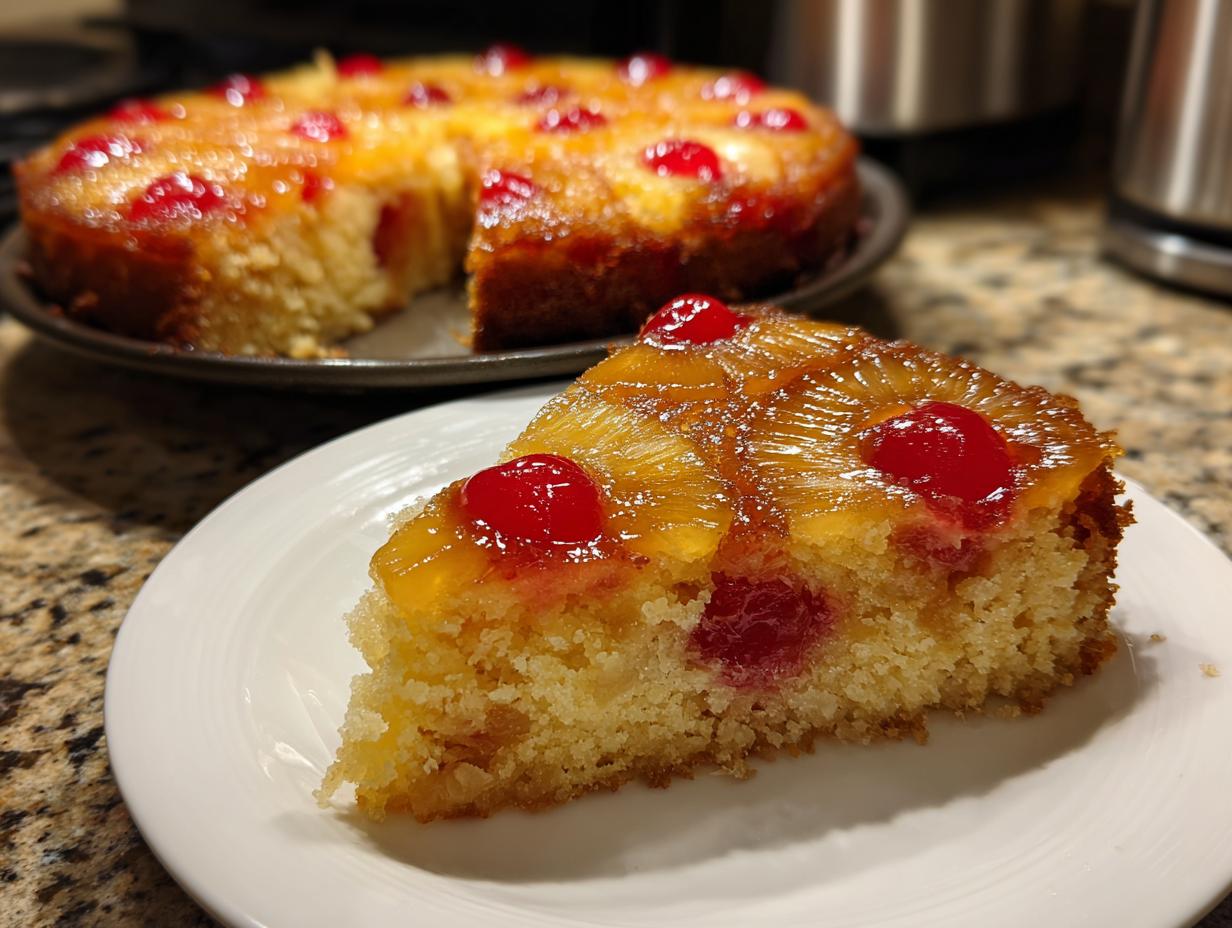
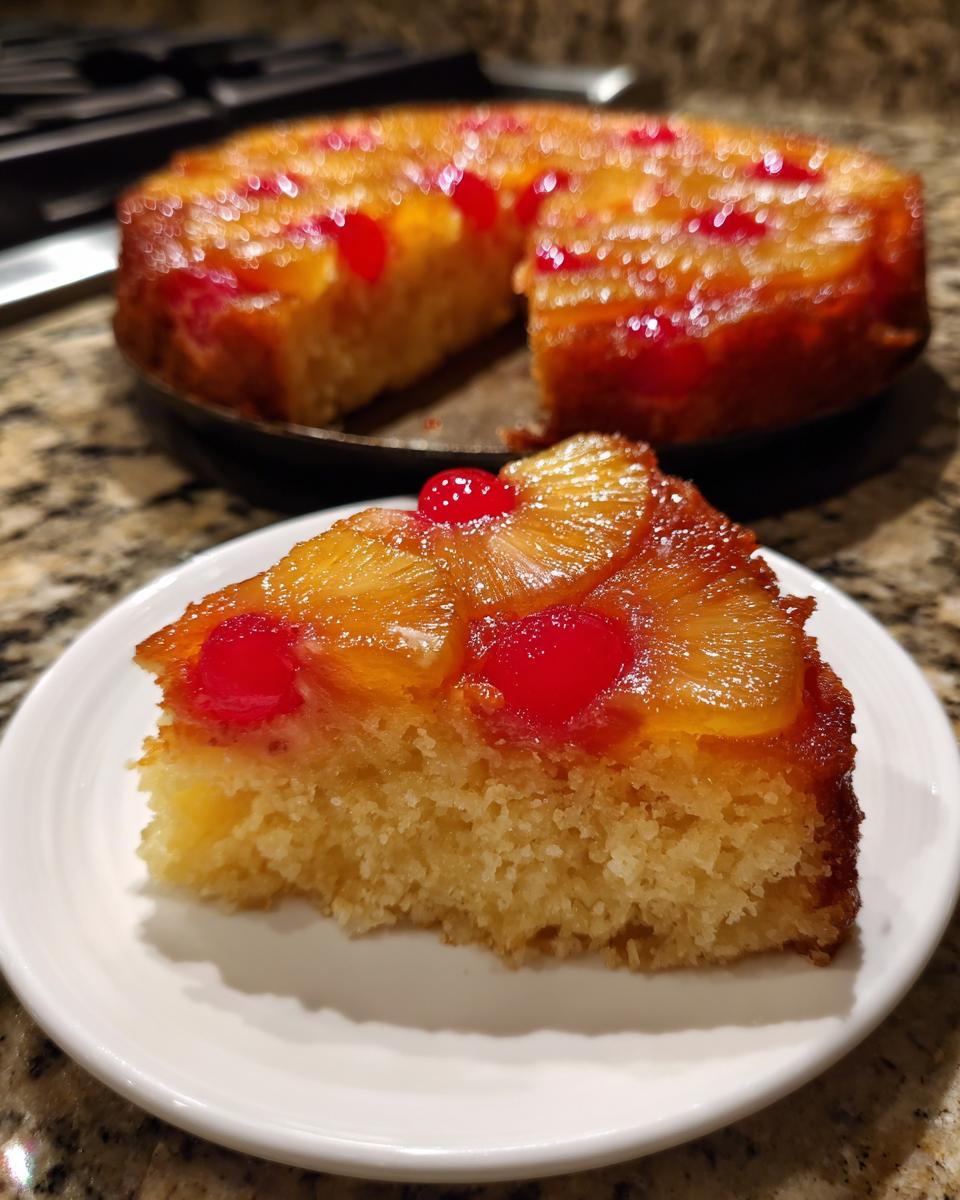
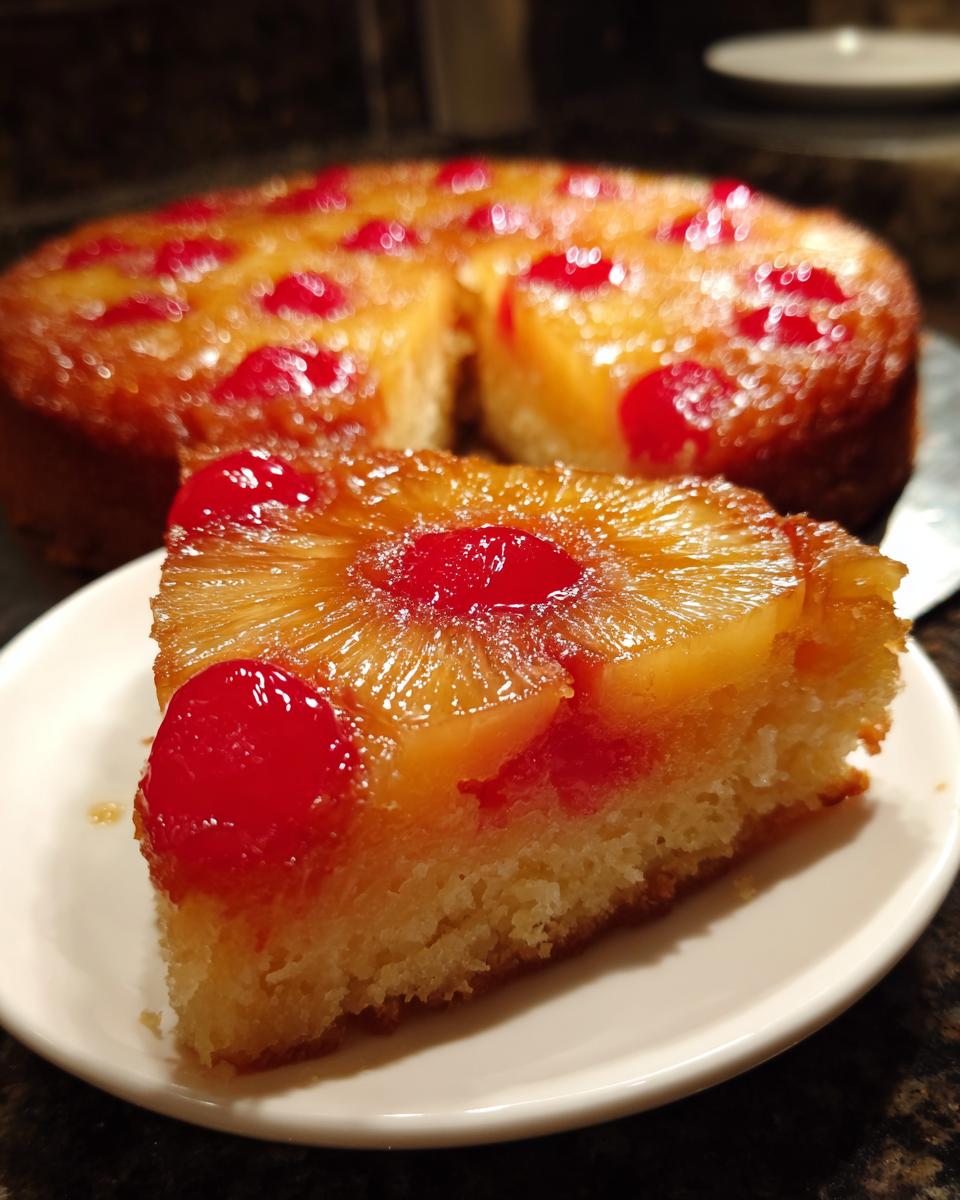
Is there any dessert that screams ‘Sunday dinner’ or ‘special celebration’ quite like a pineapple upside down cake? It just brings me right back to my grandmother’s table every time. We’re talking about that incredible moment when you flip the pan and reveal perfectly glossy, golden rings glistening with caramel. I know so many great recipes rely on shortcuts, but if you want that perfectly moist, buttery texture that truly sings, you need to bake it from scratch. This isn’t just an easy recipe; this is the reliable, tried-and-true method I use myself for family gatherings, and trust me, it guarantees results that taste like pure nostalgia.
We’re going old school here, only using ingredients you probably already have, but doing it the way that ensures everything stays wonderfully soft. You won’t be disappointed with this version of the classic! If you’re looking for other desserts that bring that amazing comfort factor, you might want to check out my recipe for gooey butter pecan cake.
- Why This Classic Pineapple Upside Down Cake Recipe Works (The Secrets to Moisture)
- Ingredients for Your Homemade Pineapple Cake
- Step-by-Step Instructions for the Best Pineapple Upside Down Cake Recipe
- Adapting Your Pineapple Upside Down Cake for Different Pans
- Tips for Success with Any Retro Fruit Cake
- Flavor Variations for Your Pineapple Upside Down Cake
- Storage and Reheating Instructions for This Buttery Pineapple Dessert
- Frequently Asked Questions About the Pineapple Upside Down Cake
- Nutritional Estimate for This Simple Caramel Topping Cake
- Nutritional Estimate for This Simple Caramel Topping Cake
Why This Classic Pineapple Upside Down Cake Recipe Works (The Secrets to Moisture)
Look, you can use cake mix, and I get the appeal for a quick fix, but if you want a truly show-stopping, unbelievably moist pineapple upside down cake, you have to start from scratch. That richness comes from two main places: the topping and the batter itself. First, that gorgeous, dark topping—we let that beautiful brown sugar melt right into the butter before it even sees the oven. That creates that deep, almost toffee-like caramel layer that keeps the fruit luscious.
But the real secret, the one I learned after a few too many dry cakes, is using the reserved pineapple juice! Instead of just shaking off the fruit, we whisk that sweet juice right into the milk designated for our batter. It adds a subtle fruity tang and keeps the cake crumb unbelievably tender as it bakes. It’s a small step that makes a huge difference in the final texture.
Expert Tips for a Perfect Caramelized Topping
The topping is where people usually get nervous, right? Flipping it upside down is dramatic, and no one wants cake stuck to the pan! My biggest piece of advice here is the temperature. Make sure that initial layer of melted butter and brown sugar is spread evenly across the bottom of your 9-inch pan. Don’t skimp!
Once that’s set, arrange your pineapples snugly. If you see any gaps, that’s where you nestle those cherries. Don’t worry about them sinking; they are sitting right on top of the sugar layer. Bake it until it’s done—and I mean *done*—and then—this part is critical—let it cool for exactly five minutes before you flip. If you wait too long, the caramel sets up like glue. If you rush it, the topping sloshes out. Five minutes is the sweet spot for lifting that pan clean off!
Ingredients for Your Homemade Pineapple Cake
Creating this Homemade Pineapple Cake from scratch is truly satisfying because every single item on this list is affordable and easy to find. No specialty store trips needed here—just good, honest ingredients that make for an extraordinary result. I always lay everything out before I start, just like in a test kitchen, because that organization is half the battle!
You will notice we use butter twice—once melted for the topping and once softened for creaming into the cake batter. That’s intentional and part of what makes this dessert so wonderfully buttery. Before you jump in, get your pineapple slices drained well, but make sure you save that juice; it is going right into the batter to keep things light and airy. It’s also a good time to make sure your butter for the batter is truly softened—you should be able to easily press a finger into it. While you’re looking at pantry items, don’t forget to check out my recipe for pear preserves recipe if you need another simple fruit-based treat!
- 1/2 cup unsalted butter, melted
- 3/4 cup packed light brown sugar
- 1 (20 ounce) can pineapple slices in juice, drained (reserve juice)
- 14 maraschino cherries, drained
- 1 1/2 cups all-purpose flour
- 1 teaspoon baking powder
- 1/4 teaspoon salt
- 1/2 cup unsalted butter, softened
- 3/4 cup granulated sugar
- 2 large eggs
- 1 teaspoon vanilla extract
- 1/2 cup milk
- 1/4 cup reserved pineapple juice
Step-by-Step Instructions for the Best Pineapple Upside Down Cake Recipe
Okay, let’s get down to business and make this incredible pineapple upside down cake happen! The beautiful thing about this recipe is that once the topping is arranged, the rest of the process moves really quickly. I always make sure my oven is hot and ready to go before I even touch the fruit, because we don’t want any sitting around while things melt or separate. Remember that we are aiming for something utterly luscious, so pay close attention to the merging of the wet and dry ingredients in the batter steps!
Once everything is mixed, assembly is fast, and then it’s straight into the heat. Don’t forget to check out my guide for an easy apple crumble recipe if you need another simple crowd-pleaser!
Preparing the Fruit Layer
First things first, preheat your oven to 350 degrees F, and you’ll want that 9-inch round cake pan ready. Now, for the showstopper: Pour the 1/2 cup of melted butter right into the bottom of that pan. Don’t brush it around, just let it sit there. Sprinkle the 3/4 cup of packed brown sugar evenly right over that melted butter—don’t leave any bare spots!
Next up is the fruit. Make sure your pineapple slices are drained well, but save that juice! Arrange the slices nicely across the sugar layer. Then, take one maraschino cherry and tuck it right into the center hole of every pineapple ring. Any extra cherries? Just pop them into the empty spaces between the rings. It looks so pretty, and you can already smell that tropical candy scent!
Mixing the Buttery Cake Batter
Time for the cake itself. In one bowl, whisk together your flour, baking powder, and salt—that’s your dry team. Set them aside for a minute.
In your big mixing bowl, you’re going to cream the 1/2 cup of softened butter with the granulated sugar until it looks pale and wonderfully fluffy. This is seriously important—don’t rush this creaming part! Beat in your eggs one at a time, followed by that teaspoon of vanilla.
Now, here’s the technique: Whisk your milk and that reserved pineapple juice together in a little bowl. You need to alternate adding the dry mixture with this milk mixture to the butter mixture. Always start and end with the dry ingredients. But seriously, mix only until everything is *just* combined. If you see a streak or two of flour, stop mixing! Overmixing develops gluten, and we absolutely do not want a tough cake here; we want soft and tender.
Baking and Flipping Your Pineapple Upside Down Cake
Carefully spoon that beautiful batter over your arranged fruit layer. Be gentle, spread it out slowly so you don’t accidentally knock a pineapple ring out of place. Pop it into the preheated oven for about 35 to 40 minutes. It’s done when a wooden pick comes out clean from the center. Now comes the anxious part!
Let the cake cool in the pan on a wire rack for just five minutes. I know, it feels like forever! But you must wait that tiny bit so the caramel doesn’t run everywhere. After five minutes, grab your serving plate, place it upside down over the pan, hold them tightly with oven mitts, and *flip it*! Take a deep breath. I always hold my breath during the flip, but it works! If a rogue cherry jumps ship, don’t panic—just gently tuck it back into its spot on top.
Adapting Your Pineapple Upside Down Cake for Different Pans
This core recipe is sturdy and delicious, which means we can totally play around with the pan size without needing a whole new recipe! I love that people are thinking beyond the standard 9-inch round, especially when making this for a big crowd or when you want something a little easier to serve. It’s so satisfying to see this bright, tropical flavor shining in different presentations. If you’re feeling inspired to stick with different tropical flavors, my pineapple coconut dream cake is another must-try!
Baking a Showstopping Pineapple Bundt Cake
If you want that gorgeous, swirled presentation only a Bundt pan can give you, you’re going to need slightly more topping material because the surface area is bigger. My recipe notes suggest increasing that initial buttery brown sugar layer by about 50% to ensure the entire bottom is covered beautifully. Make sure you grease and flour that Bundt pan really well—seriously, don’t skip that step; those flutes grab onto caramel!
Because the cake itself is deeper in a Bundt pan, you might need to add a little extra batter, or you might just find the bake time extends a little bit. Keep an eye on it around the 50-minute mark. You’ll likely need to let it cool for just a few minutes longer than the round pan before you attempt the big flip, maybe closer to 7 or 8 minutes, to let that thick caramel layer set up just right.
Making Individual Pineapple Upside Down Cupcakes
Oh, I adore making these individual pineapple cakes! They are just the cutest things for parties or when you don’t want anyone slicing into a big dessert. This is where things get really fast. You still follow the exact same ingredient list for the batter, but the topping setup changes completely.
For cupcakes, you’ll want to line your muffin tin first. Then, instead of melting butter for the whole pan, you’ll put about a teaspoon of the melted butter mixture (butter and brown sugar) into the bottom of each liner. Top that with one small piece of pineapple slice and a single cherry nestled right in the middle. Since these are shallower, the baking time drops significantly—usually down to 18 to 22 minutes. You get all that amazing caramelized goodness in a perfect, single-serving bite! If you want a full guide on creating these individual treats, this is a fantastic place to start: Individual Mini Pineapple Upside Down Cakes.

Tips for Success with Any Retro Fruit Cake
Even when we are making a deeply nostalgic dessert, small refinements can take the result from ‘good’ to ‘absolutely unforgettable.’ Since this cake relies so heavily on that beautiful fruit and caramel layer, paying attention to a couple of ingredient details makes all the difference. I always use room temperature eggs when assembling the batter, even though the recipe doesn’t explicitly call for it—it just helps everything emulsify better when mixing with the creamed butter and sugar.
Also, let’s talk about those eggs again. For the lift in the cake, we rely on the creaming method, but if your eggs are cold, they actually start to solidify the softened butter you so carefully whipped earlier! Always give your eggs about 30 minutes onto the counter before you plan to use them. It’s a small habit that keeps your batter smooth and airy.
One thing I noticed over the years is that the quality of the canned pineapple really impacts the final flavor. If you can, look for pineapple slices packed in 100% juice rather than heavy syrup. The syrup tends to bake into a candy glaze that can be a bit too sweet when combined with all that brown sugar we use in the topping. Juice blends better with the batter!
And finally, if you ever end up with a cake that stuck slightly to the pan, don’t panic! That hot caramel can be tough. If the initial flip isn’t perfect, let the pan sit on the counter for another 10 minutes. Usually, that extra sitting time allows residual heat to gently loosen the bond. If that still doesn’t work, just place the base of the pan into a shallow pan of hot water for about 60 seconds. That gentle steam often releases even the stickiest toppings. If you are looking for other warming, comforting recipes, you might enjoy my thoughts on maple mustard pork tenderloin!
Flavor Variations for Your Pineapple Upside Down Cake
While this cake is famous for its classic simplicity, sometimes you just want to jazz things up a bit, right? I’ve found that tweaking just one element can give this familiar pineapple upside down cake a whole new personality. Since we are already using brown sugar for that gorgeous caramel base, leaning into deeper, warmer flavors works really well.
One of my favorite little tricks, especially if I’m making this for a slightly more grown-up gathering, is adding a teaspoon of dark rum directly into that melted butter and brown sugar mixture before spreading it in the bottom of the pan. It boosts the complexity of the caramel flavor beautifully. If you want to see a fantastic recipe that embraces that richer addition, check out this idea for a Brown Sugar & Rum Pineapple Upside Down Cake!
If you’re not into rum, don’t worry! I also love to throw a little warmth straight into the cake batter itself. Try whisking about a half teaspoon of ground cardamom in with your flour, baking powder, and salt. Cardamom is just magical with pineapple—it gives the cake a subtle, almost floral spice note that complements the bright fruit without overpowering it. It’s a simple swap that my friends always rave about!

We created this recipe to be the perfect base for anything, though! If you’re looking for other ways to bring those comforting, spiced flavors into your baking rotation, you absolutely have to try my recipe for a spooky cinnamon rolls smoothie when you need a completely different kind of treat.
Storage and Reheating Instructions for This Buttery Pineapple Dessert
Because this cake has that rich, buttery topping, storage is pretty straightforward! If you plan on eating the whole thing in a day or two, just leave it covered loosely on the counter. Honestly, this buttery pineapple dessert tastes best when it’s just at room temperature.
If you need to save leftovers longer, pop it into the fridge, but you absolutely must reheat it before serving. A quick 15 seconds in the microwave per slice warms up that buttery caramel layer perfectly and softens the crumb right back up. Don’t forget to check out my homemade granola recipe for another simple kitchen staple!
Frequently Asked Questions About the Pineapple Upside Down Cake
Can I use fresh pineapple instead of canned slices?
That’s a great question! You absolutely can use fresh pineapple, but you have to treat it a bit differently than the canned rings. Fresh pineapple has more moisture, and we don’t want the topping getting watery. If you use fresh, I highly recommend slicing it and then sautéing those rings briefly in a little butter and brown sugar right on the stovetop until some of that liquid cooks off.
This pre-cooking step mimics what the oven does, but it gives you more control. You’ll still follow the recipe in terms of laying them out, but because you’ve already cooked out some liquid, you might find the cake cooks slightly faster. It’s worth the extra skillet work for that super fresh tang!
Is it possible to use cake mix for this dessert?
Yes! If you’re short on time, transforming this into a quicker treat is totally doable—it’s actually super popular! If you opt for a yellow or white cake mix, just drain your pineapple really well. Then, follow the topping preparation exactly as written in the recipe (melted butter and brown sugar). When it comes to the cake portion, prepare the box mix according to the package directions, but substitute half of the required liquid with the reserved pineapple juice. That simple swap keeps that signature moisture in your Quick Pineapple Dessert!
What is the best pan size if I don’t have a 9-inch round?
The specified 9-inch round pan is ideal because it gives us that perfect cake height that cooks evenly in about 40 minutes. If you’re going larger, like a 9×13 inch baking dish (which is great for a bigger family gathering!), just spread the melted butter and brown sugar thinly across the bottom. Since that cake layer will be much shallower, the baking time will drop significantly—probably down to 25 to 30 minutes. Keep an eye on it, because we want that golden top, not a burnt one!
My fruit stuck to the bottom! How do I prevent this next time?
That’s the biggest fear when baking any Retro Fruit Cake! If the fruit stuck, it usually means either you flipped the cake too late, or the butter/sugar layer wasn’t thick enough to insulate the fruit from the batter. Remember, that five-minute cooling window is vital. If you wait longer than that, the caramel hardens around the fruit right onto the aluminum of the pan. Next time, ensure you used the full 1/2 cup of melted butter and 3/4 cup of *packed* brown sugar!
If you’re looking for some other easy-to-handle recipes that always turn out right, my recipe for avocado toast with feta is surprisingly versatile!
Nutritional Estimate for This Simple Caramel Topping Cake
I always offer my sweet recipes with the understanding that these are estimates—I mean, everyone likes a slightly bigger drizzle of caramel, right? But based on the core recipe ingredients listed above, here is a rough idea of what one slice of this Simple Caramel Topping Cake might look like. Keep in mind that the rich butter content makes it decadent, but that’s what makes it so good!
- Serving Size: 1 slice
- Calories: 350
- Sugar: 30g
- Sodium: 250mg
- Fat: 17g
- Saturated Fat: 10g
- Carbohydrates: 48g
- Protein: 4g
This is definitely a treat meant to be savored! Enjoy every bite.
PrintClassic Moist Pineapple Upside Down Cake
Make this classic, moist pineapple upside down cake from scratch. This recipe delivers a buttery cake base topped with perfectly caramelized pineapple rings and cherries, a nostalgic dessert everyone loves.
- Prep Time: 15 min
- Cook Time: 40 min
- Total Time: 55 min
- Yield: 8 servings 1x
- Category: Dessert
- Method: Baking
- Cuisine: American
- Diet: Vegetarian
Ingredients
- 1/2 cup unsalted butter, melted
- 3/4 cup packed light brown sugar
- 1 (20 ounce) can pineapple slices in juice, drained (reserve juice)
- 14 maraschino cherries, drained
- 1 1/2 cups all-purpose flour
- 1 teaspoon baking powder
- 1/4 teaspoon salt
- 1/2 cup unsalted butter, softened
- 3/4 cup granulated sugar
- 2 large eggs
- 1 teaspoon vanilla extract
- 1/2 cup milk
- 1/4 cup reserved pineapple juice
Instructions
- Preheat your oven to 350 degrees F. You will need a 9-inch round cake pan.
- Pour the 1/2 cup melted butter into the bottom of the cake pan. Sprinkle the 3/4 cup brown sugar evenly over the butter.
- Arrange the pineapple slices on top of the brown sugar mixture. Place one maraschino cherry in the center of each pineapple ring, and place any remaining cherries in the spaces between the rings.
- In a medium bowl, whisk together the flour, baking powder, and salt. Set this dry mixture aside.
- In a large bowl, use an electric mixer to beat the 1/2 cup softened butter and granulated sugar together until the mixture is light and fluffy, about 3 minutes.
- Beat in the eggs one at a time, mixing well after each addition. Mix in the vanilla extract.
- In a small bowl, whisk together the milk and the reserved pineapple juice.
- Gradually add the dry ingredients to the wet ingredients, alternating with the milk mixture, beginning and ending with the dry ingredients. Mix only until just combined; do not overmix the batter.
- Carefully spoon the cake batter over the pineapple and cherry layer in the pan, spreading it gently to cover the fruit evenly without disturbing the arrangement.
- Bake for 35 to 40 minutes, or until a wooden pick inserted into the center comes out clean.
- Let the cake cool in the pan on a wire rack for 5 minutes.
- Place a serving plate or platter upside down over the cake pan. Wearing oven mitts, carefully flip the pan and plate over together. Lift the pan off the cake. If any fruit sticks, gently place it back onto the cake.
- Serve warm or at room temperature.
Notes
- For a Bundt pan, increase the topping ingredients (butter and brown sugar) by 50% and arrange the fruit in the bottom of the greased and floured Bundt pan. You may need to increase the cake batter slightly or use a slightly denser cake mix if adapting this way.
- To make individual pineapple cakes or cupcakes, line a muffin tin with liners. Place a small piece of pineapple and a cherry in the bottom of each liner before filling two-thirds full with batter. Baking time will reduce to about 18-22 minutes.
- For a richer caramel flavor, add 1 teaspoon of dark rum to the melted butter and brown sugar topping mixture before spreading it in the pan.
Nutrition
- Serving Size: 1 slice
- Calories: 350
- Sugar: 30
- Sodium: 250
- Fat: 17
- Saturated Fat: 10
- Unsaturated Fat: 7
- Trans Fat: 0.5
- Carbohydrates: 48
- Fiber: 1
- Protein: 4
- Cholesterol: 85