
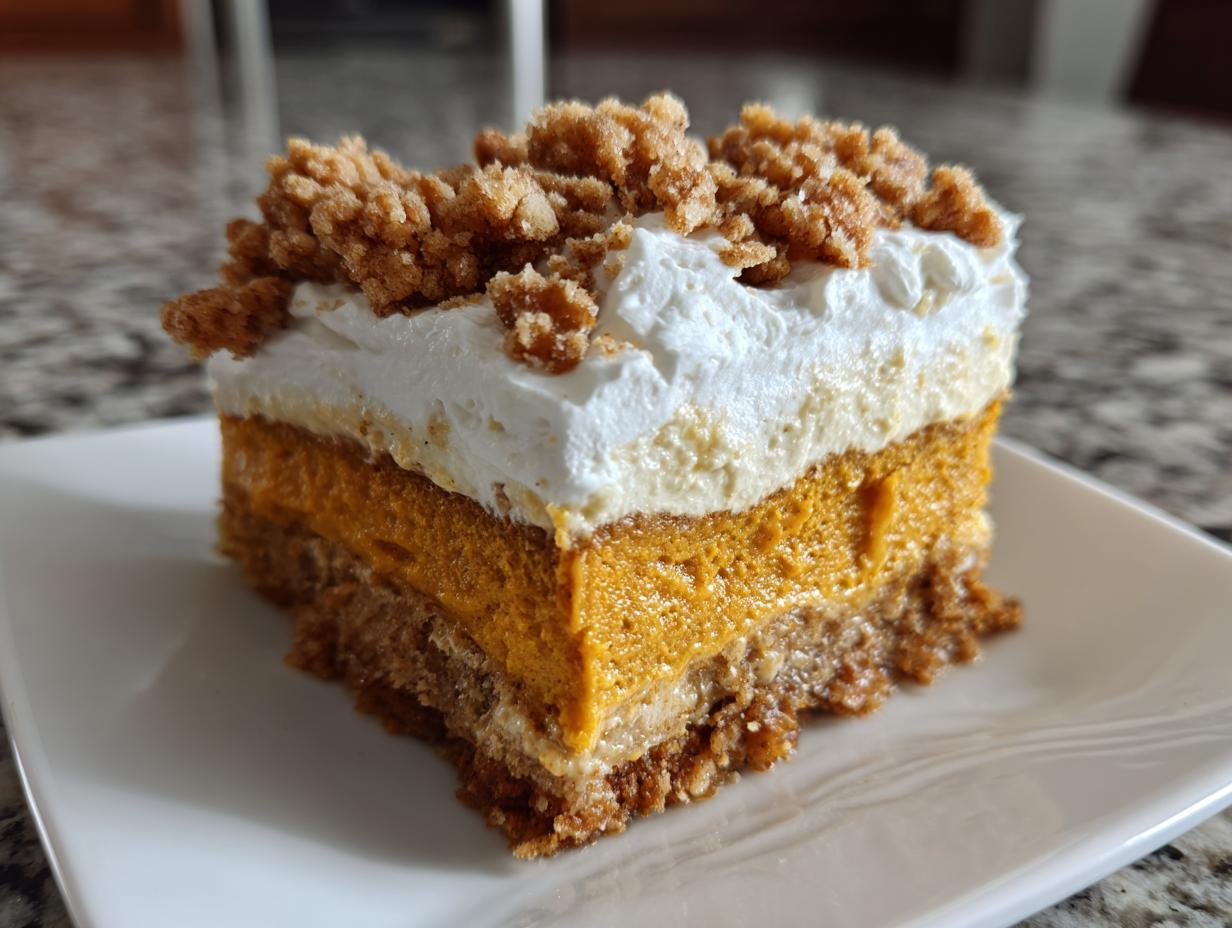
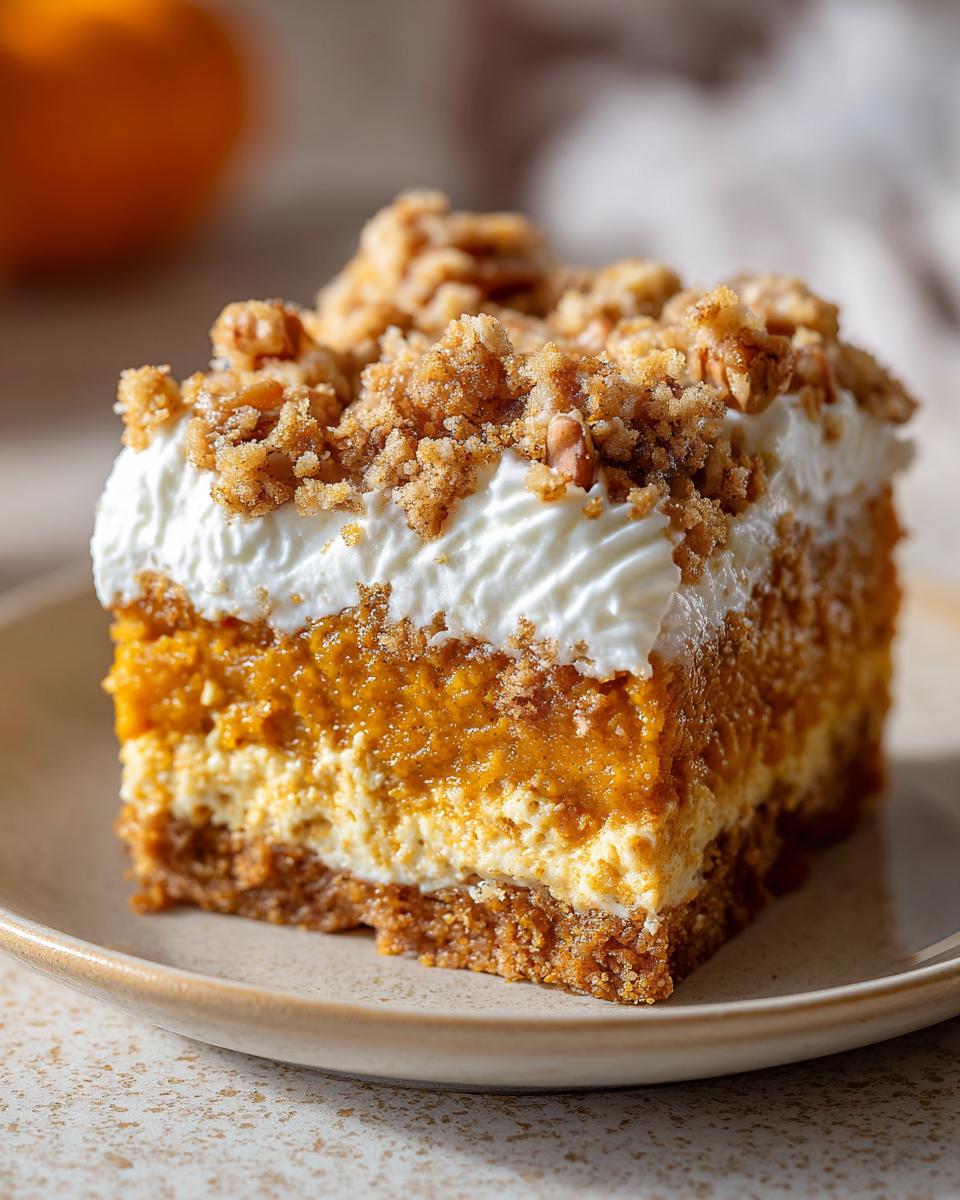
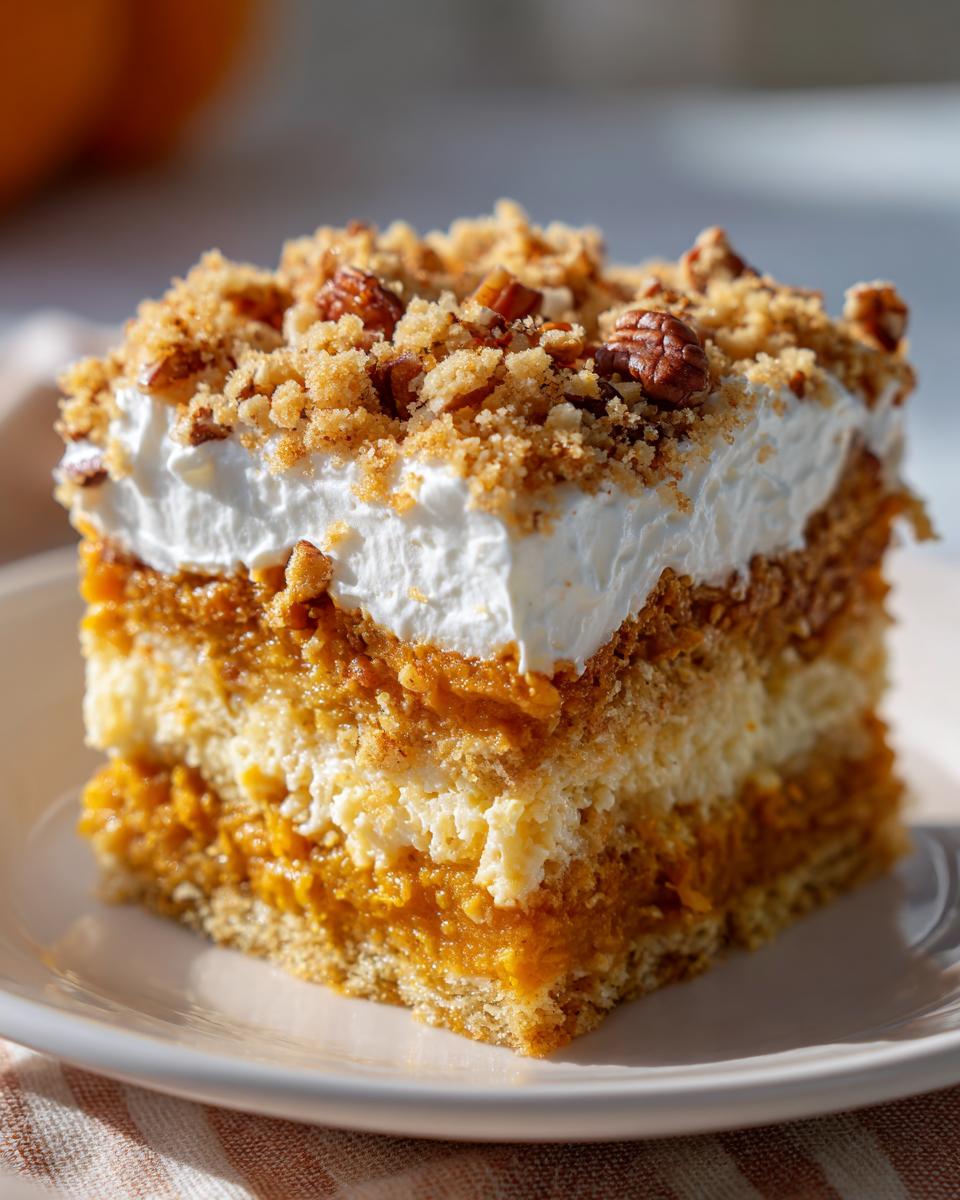
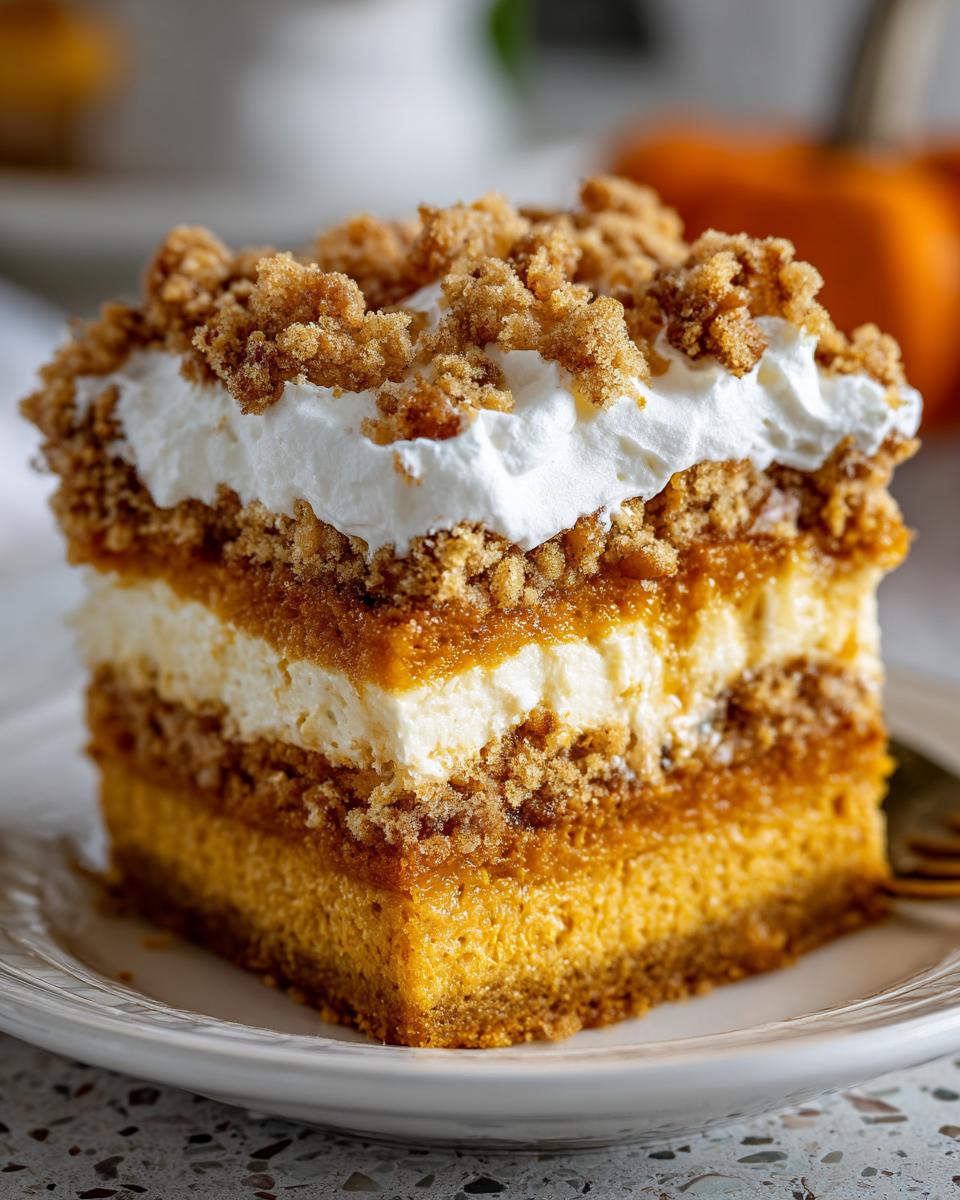
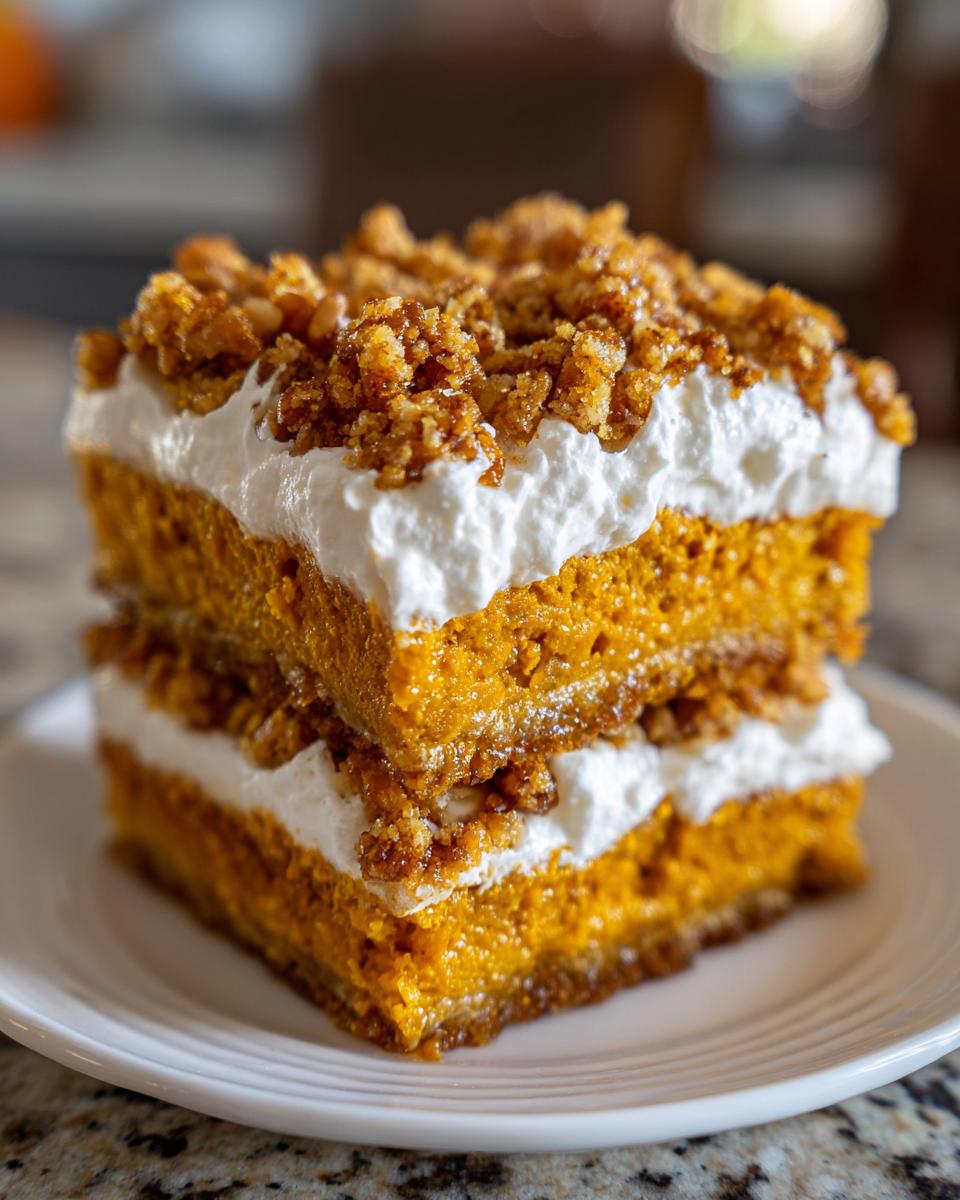
When the air gets crisp and you start seeing pumpkins everywhere, you know it’s time for the serious baking to begin. But let’s be honest: nobody wants a stressful holiday spread. That’s why I’m handing you my favorite secret weapon for fall gatherings: the ultimate, totally easy pumpkin crunch cake! This isn’t just another pie; it’s a masterpiece of texture—you get that rich, creamy pumpkin filling hugging a buttery streusel crunch. When I started Taste This Plate, my mission was simple: give you reliable recipes that create great memories without the kitchen meltdowns. You can find tons more inspiration in our dessert section here: our dessert section here. Trust me, this layered dessert delivers every single time.
- Why This Easy Pumpkin Crunch Recipe is Your New Fall Favorite
- Gathering Ingredients for Your Pumpkin Crunch
- Step-by-Step Instructions for Perfect Pumpkin Crunch
- Tips for Making an Authentic Hawaiian-Style Pumpkin Crunch
- Ingredient Notes and Substitutions for Your Pumpkin Crunch
- Serving Suggestions for This Autumn Spice Desserts Treat
- Storage and Reheating Instructions for Pumpkin Crunch
- Frequently Asked Questions About Making Pumpkin Crunch Cake
- Share Your Pumpkin Crunch Experience
Why This Easy Pumpkin Crunch Recipe is Your New Fall Favorite
I know you’re busy, especially when the holidays start rolling around. That’s why this pumpkin crunch cake is everything I stand for here at Taste This Plate: maximum flavor with minimum fuss. This genuinely is one of the most reliable Easy Pumpkin Desserts I’ve ever tested. It’s a certified Crowd Pleaser Holiday Treat because it looks like you spent hours on it, but I promise you, you didn’t! Every component has been tweaked for consistent, flawless results.
Simple Assembly: Almost a Dump Cake Style Pumpkin Crunch
Honestly, the prep time is only about 15 minutes. It’s so straightforward—you’re essentially mixing dry ingredients and pouring wet ones. If you love the simplicity of a dump cake, you’re going to adore how this layers together. There’s no messy electric mixer required for the crust layer, which saves time *and* cleanup!
Perfect Texture Contrast in Every Layer
This dessert is all about that textural dance, isn’t it? You cannot beat the sensation of spooning through the cool, silky pumpkin center and then hitting that warm, buttery layer on top. It’s the ultimate Crunchy Topping Dessert experience. That crunchy cake streusel combined with the creamy filling is why people ask me for this recipe every single year.
Gathering Ingredients for Your Pumpkin Crunch
Before we get too deep into the assembly—which is going to be so much fun, by the way—we need to make sure our pantry is stocked. Remember, every great recipe starts with quality components, even when we are taking shortcuts like using a boxed cake mix for that amazing crunch! I always lay everything out on the counter first. It saves those last-minute panics when you realize you’re out of vanilla extract. You can check out my baking workflow tips in my guide to moist banana bread if you’re interested in making your baking life easier!
Ingredients for the Crunchy Topping and Base
This is where the magic starts! We are using a standard yellow cake mix here—don’t grab the spice cake! The yellow cake mix gives us that sweet, vanilla-forward streusel that balances the pumpkin perfectly. Make sure you have these three items ready to go:
- One full box (about 15.25 ounces) of yellow cake mix.
- One cup of chopped pecans. Yes, chop them yourself! They toast better when they aren’t powdery fine.
- One full cup (that’s two sticks!) of unsalted butter, melted until liquid.
Quick reminder: We’ll use two-thirds of this mixture for the bottom crust and save the final third to sprinkle right on top before the final bake. Don’t mix it all together yet!
Ingredients for the Creamy Pumpkin Filling Recipes
This section is all about achieving those incredibly decadent, silky layers. These ingredients are what makes this recipe a true winner among Creamy Pumpkin Filling Recipes because it sets up perfectly without needing gelatin or eggs in the mix. You’ll need:
- One standard 15-ounce can of pure pumpkin puree. Please, please, please ensure it’s 100% pumpkin and NOT pumpkin pie filling! The filling already has sugar and spices mixed in, which will ruin the flavor balance here.
- One 14-ounce can of sweetened condensed milk. This is the binder and sweetener for our creamy layer.
- One small package (3.4 ounces) of instant vanilla pudding mix. Dry, straight from the box!
- One teaspoon of pumpkin pie spice.
- One teaspoon of vanilla extract.
Whisk these until they are completely smooth—no streaks of dry pudding powder allowed!
Step-by-Step Instructions for Perfect Pumpkin Crunch
Okay, now that we have everything laid out, this is where the speed comes in! Since this is one of my favorite Layered Pumpkin Dessert Recipe options, I want you to pay attention to the two separate baking steps. Don’t worry, it sounds more complicated than it is, and it’s crucial for achieving that wonderful layered structure!
Preparing the Butter Pecan Topping and Crust
First things first: preheat that oven to 350 degrees F and make sure your 9×13 inch baking dish is greased well. Now, take that dry cake mix and those pretty pecans and combine them. Pour that melted butter right over the top and mix until it looks like coarse, happy crumbs. Take about two-thirds of this crumbly mix and press it firmly into the bottom of your dish. That’s your crust base! Pop that base into the preheated oven and bake it for a quick 10 minutes. We just want it to start setting—it’s going to get a nice golden color!
Mixing and Layering the Creamy Layered Pumpkin Dessert Recipe
While the base is busy baking, grab a clean bowl and whisk together all those creamy filling ingredients we talked about before: the pumpkin, the condensed milk, the dry pudding mix, and spices. Whisk until it’s perfectly velvety smooth; we don’t want any hidden dry pockets. Pull that crust out after 10 minutes, and pour that gorgeous filling right over the top, spreading it gently to the edges. Take the final one-third of your cake/pecan mixture and sprinkle it all over the pumpkin layer. Back into the oven it goes for about 30 to 35 minutes. You’re looking for that topping to be golden brown and the filling underneath to look completely set.
Cooling and Finishing the Pumpkin Crunch
This is the hardest part, folks: waiting! Once it comes out of the oven, this pumpkin crunch *must* cool completely on a wire rack. Seriously, don’t rush this step. If you put the whipped topping on while it’s even slightly warm, you are going to end up with pumpkin soup, not a beautiful layered dessert. Once it’s totally cool—and I mean cool to the touch—spread that thawed whipped topping evenly over the top. Then, cover it gently and slide it into the fridge for at least 2 hours. That chilling time is non-negotiable if you want clean slices that hold their shape!
Tips for Making an Authentic Hawaiian-Style Pumpkin Crunch
You might notice I keep calling this recipe a classic crowd-pleaser, and that’s because it has roots in traditional Hawaiian baking! People go wild for anything Hawaiian Pumpkin Crunch Inspired, and while the original recipes can sometimes use a slightly different cake base, sticking to the yellow cake mix here gives you that signature balance of sweet and spiced. I actually looked into how they make theirs and learned a thing or two about consistency. My biggest tip, based on that research, is ensuring your pecans are toasted just right.
If you want an extra layer of depth—and this is just Kate talking now—try tossing your pecans in a tiny splash of melted butter before mixing them with the dry cake mix for the topping. It really amplifies that toasted nut flavor! You can read more about the history of this style over at Hawaii Magazine if you’re curious about the full background here. For another cozy baked treat, you could always check out my bread pudding recipe!
Ingredient Notes and Substitutions for Your Pumpkin Crunch
When you’re making a layered dessert like this, the ingredients really do matter, even if it’s designed to be simple! I want to make sure you get the best texture possible, which means sometimes we need to talk substitutions or quality checks. Since every batch of this pumpkin crunch is going into my rotation for big gatherings, I’ve tested a few alternatives so you don’t have to stress if you’re missing one item.
First off, let’s address the pumpkin. I cannot stress this enough: you must use 100% pure pumpkin puree. If you happen to grab the pumpkin pie filling by mistake—and don’t worry, we all do it sometimes—your filling is going to be too sweet and probably way too loose, which messes with the setting time. For the topping, make sure your butter is fully melted, but don’t walk away and let it start browning! We want liquid fat to soak into that dry cake mix, not baked, nutty butter bits yet. For more tips on making sure your baked goods stay soft, check out my recipe for Snickerdoodle Blondies!
Swapping Nuts in the Crunchy Topping Dessert
Everyone has a nut preference, right? Most of the Pinterest buzz for this dessert uses pecans, mainly because they have a wonderful, buttery flavor when baked. However, if you have a pecan allergy in the family, you don’t have to skip the crunch! The recipe notes say you can absolutely swap those out. Walnuts work beautifully in this environment; they have a slightly earthier taste that pairs really well with the autumn spice. Just chop them to about the same size as the pecans, and treat them exactly the same way when you mix them in with the cake mix and butter.
Serving Suggestions for This Autumn Spice Desserts Treat
Once you have that gorgeous, perfectly chilled pumpkin crunch cake out of the fridge, you have to think about presentation! This is such a fantastic dessert because, while it’s wonderfully rich on its own, it pairs beautifully with simple additions that just elevate the whole fall experience. We’ve done all the hard work creating the moist filling and the crunchy topping; now it’s time to enjoy the fruits of our labor.
Since this is such an intensely flavored treat—packed with all those warm scents best described as Autumn Spice Desserts—you don’t need to overwhelm it with complicated sauces. My go-to recommendation is always simplicity. A dollop of fresh, lightly sweetened whipped cream on top of each square just melts slightly into the cool pumpkin layer, creating a tiny bit of creaminess that is just heavenly.
If you’re serving this after a big meal, like Thanksgiving dinner, you might want something to cut through the richness. A small, strong cup of black coffee or perhaps an espresso is just the ticket! The bitterness of the coffee plays off the sweetness of the condensed milk and the cake mix perfectly. For a truly special dessert, I sometimes thin out a little bit of cream cheese with a touch of milk and a pinch of cinnamon to make a very drizzly glaze, instead of the thick layer of whipped topping. It runs down the sides beautifully. You can find another favorite easy recipe of mine, honey mustard chicken salad, if you’re looking for something savory for the main course!
Storage and Reheating Instructions for Pumpkin Crunch
One of the absolute best parts about this pumpkin crunch cake is that it actually tastes better the next day! Because the filling needs that time to firm up and meld with the nutty topping, it’s truly a fantastic make-ahead dessert for your holiday plans. You can definitely assemble this a day ahead; just make sure you wait until it’s completely cool before spreading on that final layer of whipped topping.
For storage, because we have a dairy topping, we always need to keep this chilled. Pop any leftovers into an airtight container or cover the dish tightly with plastic wrap. It keeps beautifully in the refrigerator for up to four days. I have honestly never managed to keep one around longer than that!
Now, about reheating—and this is important for a layered dessert like this: I really don’t recommend reheating the cake once the whipped topping is on. That topping is delicate, and warming it up will cause it to break down and weep, turning your beautiful final layer into a liquid mess. If you absolutely *must* have a slightly warmer slice, cut the piece you want to eat, leave the whipped topping off, and just microwave that single square for about 10 to 15 seconds. It warms the pumpkin layer just enough to bring those spices forward. But honestly, this dessert is designed to be served cold!
To get ahead and save you time on the big day, you can even make the crust and the filling layers completely, bake them, let them cool, and keep them stored airtight in the fridge for up to two days before you add the whipped topping. It’s so versatile! If you’re looking for another recipe that reheats well (or tastes good cold!), you should definitely try my recipe for classic southern banana pudding.
Frequently Asked Questions About Making Pumpkin Crunch Cake
It’s completely normal to have questions when you’re trying a new holiday recipe, even one as simple as this pumpkin crunch cake! I always try to tackle my own questions before I even start baking, just to make sure everything goes smoothly. I’ve gathered the most common things readers ask me about this layered dessert, so we can ensure your success. If you’re looking for something savory to balance out all the sweetness, you should check out my recipe for White Chicken Lasagna Soup!
Can I use pumpkin pie filling instead of puree in this Easy Pumpkin Desserts recipe?
Oh, please don’t! This is one of the most important things to watch out for among all Easy Pumpkin Desserts recipes. You absolutely need to use 100% pure pumpkin puree. Pumpkin pie filling is pre-seasoned and, more importantly, it’s already sweetened considerably beyond what we need for this recipe. If you use pie filling, your creamy layer will be way too sweet and probably won’t set up correctly because the sugar content throws off the balance with the condensed milk and pudding mix.
Is this Simple Dump Cake Style Desserts recipe better served warm or cold?
This is designed to be a chilled dessert, so it’s definitely better served cold! Because we have that wonderful, delicate creamy layer that sets up beautifully in the fridge, you really need that chill time. The instructions say chill for at least 2 hours, but I’m going to tell you—if you can manage it—overnight is even better. This is why it’s such a fantastic Simple Dump Cake Style Desserts option; you bake it, let it cool, and then stash it away until you need it, leaving your oven free for other dishes!
What kind of cake mix is best for the topping?
I get asked this a lot, especially since we are relying on the box mix for that amazing crunch! Stick with a standard yellow cake mix. It provides the perfect neutral, buttery base flavor that complements the spice without tasting too sweet or overwhelming the pumpkin. Spice cake mix tends to add too much cinnamon and clove, which clashes with the filling spices we already added. Yellow cake mix is the tried-and-true choice here—it’s what gives you that characteristic, slightly salty-sweet crunch!
Can I make this pumpkin crunch completely ahead of time?
Yes, you absolutely can, and I highly recommend it! As I mentioned before, this pumpkin crunch cake is better the next day. You can bake the two layers, let them cool completely, and even spread the whipped topping on, then cover it tightly and refrigerate it for up to 24 hours before serving. This frees up your day when you have guests arriving! Just make sure wherever you store it, it’s protected so that lovely topping doesn’t soak up any fridge odors.
Share Your Pumpkin Crunch Experience
Now that you’ve got my absolute favorite recipe for the ultimate fall centerpiece, I really want to know what you think! Creating these simple, reliable results is why I love doing this, and your feedback tells me if I’m hitting the mark. I developed this pumpkin crunch cake to be a guaranteed hit, yielding about 12 generous servings, so it’s perfect for any gathering, big or small.
If you made this recipe and it instantly became your new go-to dessert, please take a moment to leave a rating right down below. Five stars are always wonderful, but honestly, any feedback helps me continue testing and refining these recipes for all of us busy home cooks.
Did you try adding a little extra spice? Did the kids devour the buttery topping before you could even get it into the oven? I want to hear all about it! Don’t be shy—share your triumphs, your funny kitchen moments, or even if you decided to tweak the chilling time. You can always drop me a line using my contact page if you have detailed questions or want to share a story about serving it at your holiday table! Get in touch with me here!
Thanks so much for trusting Taste This Plate with your fall baking traditions. Happy cooking, friends!
PrintEasy Pumpkin Crunch Cake: The Ultimate Crowd-Pleasing Fall Dessert
Create this simple, layered Pumpkin Crunch Cake, inspired by Hawaiian favorites. It features a creamy pumpkin filling topped with a buttery yellow cake mix and pecan streusel crunch. This recipe is easy to assemble and perfect for Thanksgiving gatherings.
- Prep Time: 15 min
- Cook Time: 40 min
- Total Time: 55 min
- Yield: 12 servings 1x
- Category: Dessert
- Method: Baking
- Cuisine: American
- Diet: Vegetarian
Ingredients
- 1 box (15.25 oz) yellow cake mix
- 1 cup chopped pecans
- 1 cup (2 sticks) unsalted butter, melted
- 1 can (15 oz) pure pumpkin puree
- 1 can (14 oz) sweetened condensed milk
- 1 package (3.4 oz) instant vanilla pudding mix
- 1 teaspoon pumpkin pie spice
- 1 teaspoon vanilla extract
- 1 container (8 oz) frozen whipped topping, thawed
Instructions
- Preheat your oven to 350 degrees F. Lightly grease a 9×13 inch baking dish.
- In a medium bowl, combine the dry yellow cake mix and chopped pecans. Pour the melted butter over this mixture and stir until it resembles coarse crumbs. Press two-thirds of this mixture evenly into the bottom of the prepared baking dish.
- Bake the crust for 10 minutes. Remove from the oven.
- While the crust bakes, prepare the pumpkin filling. In a separate bowl, whisk together the pumpkin puree, sweetened condensed milk, instant vanilla pudding mix, pumpkin pie spice, and vanilla extract until smooth.
- Pour the pumpkin filling evenly over the partially baked crust.
- Sprinkle the remaining one-third of the cake mix and pecan mixture over the pumpkin layer.
- Bake for 30 to 35 minutes, or until the topping is golden brown and the filling is set.
- Let the cake cool completely on a wire rack.
- Once cooled, spread the thawed whipped topping evenly over the top layer. Chill for at least 2 hours before slicing and serving.
Notes
- For a texture closer to the classic Hawaii-Style Pumpkin Crunch, use a yellow cake mix for the topping, as specified here.
- You can substitute walnuts for pecans in the topping if desired.
- This dessert tastes best when fully chilled, which helps the layers set firmly.
Nutrition
- Serving Size: 1 slice
- Calories: 380
- Sugar: 35
- Sodium: 280
- Fat: 21
- Saturated Fat: 10
- Unsaturated Fat: 11
- Trans Fat: 0
- Carbohydrates: 48
- Fiber: 2
- Protein: 4
- Cholesterol: 25