
There is something truly magical about comfort food shaped into a perfect bite, isn’t there? Maybe it’s game day, or maybe you just need a delicious appetizer that feels indulgent but still comes together relatively easily. Forget the idea that fancy appetizers are reserved for restaurant menus! Today, we’re making what I truly believe is the best way to transform leftover risotto into something extraordinary: the Ultimate Cheesy Italian Arancini Rice Balls. Trust me, these are much easier to master than you think. We’ll guide you through every step to get that beautiful, shatteringly crisp golden crust hugging a gooey, cheesy center. These are the kind of homemade rice balls that make memories, and you absolutely have the skills to nail them. Once you try these, they’ll shoot right to the top of your list for simple yet impressive appetizer recipes.
- Why These Are the Best Homemade Rice Balls You Will Ever Make
- Gathering Ingredients for Perfect Crispy Rice Balls
- Essential Steps for Preparing Your Stuffed Rice Balls
- Forming and Stuffing the Mozzarella Stuffed Rice Balls
- The Secret to Achieving Golden, Crispy Rice Balls Through Frying
- Tips for Success with Your Arancini Rice Balls
- Serving Suggestions for These Appetizer Rice Balls
- Storing and Reheating Leftover Rice Balls
- Frequently Asked Questions About Making Rice Balls
- Share Your Ultimate Cheesy Rice Balls Experience
Why These Are the Best Homemade Rice Balls You Will Ever Make
I want you to trust me on this: the secret to glorious, perfect rice balls that hold their shape and deliver that amazing crunch comes down to one thing: cold, day-old risotto. That starch structure is everything! This recipe for Italian rice balls focuses intently on achieving that fantastic contrast—a super crispy exterior thanks to our careful dredging, which protects the creamy, mozzarella-stuffed interior. It’s engineered for success!

We’ve tested this arancini recipe dozens of times right here in my home kitchen to ensure reliability. When you follow these simple tests, you’re guaranteed an incredible result every single time you set out to make these comfort food bites.
Quick Facts About Our Italian Rice Balls
- Prep Time: 25 min
- Cook Time: 15 min
- Yield: 12 servings
- Cuisine: Italian
Gathering Ingredients for Perfect Crispy Rice Balls
The beauty of making these amazing fried rice balls is that much of the heavy lifting is already done if you’ve made a good risotto ahead of time! We need that leftover, slightly sticky, cooled risotto to act as our structure. Don’t skimp on the flavor here; if you have Parmesan risotto or maybe even a saffron one hiding in the fridge, that is your golden ticket.
When you gather your supplies, make sure everything is measured out before you start rolling. Since we are aiming for those irresistible, cheesy rice balls, having the dairy ready is key. Also, setting up your breading station ingredients upfront makes the entire shaping process flow beautifully. Here is exactly what you’ll need for a delicious batch of dinner ideas with rice that turn into appetizers!
- 3 cups leftover risotto (preferably Parmesan or saffron flavor)
- 1 cup shredded mozzarella cheese
- 1/2 cup grated Parmesan cheese
- 1 large egg, lightly beaten
- 1/4 cup all-purpose flour
- 2 large eggs, beaten for dredging
- 1 1/2 cups plain breadcrumbs
- Vegetable oil, for frying
- Salt and black pepper to taste
- Marinara sauce, for serving
Essential Steps for Preparing Your Stuffed Rice Balls
Before we even think about shaping, we need to make sure our rice mixture is ready to cooperate. I mentioned using cold risotto, and this is where you really need to listen up! If your risotto is soupy or too warm, those beautiful balls you form will melt away the second they hit the hot oil—oops! Chilling solidifies the starch, which is critical for holding the shape of these easy rice balls.
Once the risotto is firm, we mix in our binding agents and flavor enhancers. We want everything combined gently. Overmixing the cold rice can cause it to get gluey, and we want creamy, not gummy, inside our fried rice balls. After that, it’s time to set up the operation zone!
Preparing the Risotto Base for Rice Balls
Grab your cold risotto first. If it’s sitting out, let’s get it mixed up right away. In a medium bowl, you’re going to fold in the shredded mozzarella, the Parmesan, and that first, single egg. Fold it carefully—we are introducing binders, but we don’t want to mash the individual grains of rice. We want to maintain some structural integrity so it cooks up nicely later. Mix only until everything is evenly distributed and you can feel the cheese melting slightly from the warmth of your hands.
Setting Up Your Breading Station
This is the key to getting that flawless, golden, crispy rice balls exterior. You need three stations lined up in a row, like assembly line workers! Station one is your flour—this helps the egg stick. Station two is your beaten egg wash—this is the glue. And station three is where the magic happens: your breadcrumbs. Make sure you’ve got plenty of those breadcrumbs; you need a really thorough coating to ensure you don’t get any soggy spots in the oil!
Forming and Stuffing the Mozzarella Stuffed Rice Balls
Okay, this is the fun, slightly messy part where we turn that cold rice mixture into impressive stuffed rice balls. You’re going to want to work with slightly more chilled rice if your kitchen is warm, so feel free to pop the whole bowl back in the fridge for 15 minutes if needed. The goal here is tight structure so that the cheese stays hidden!
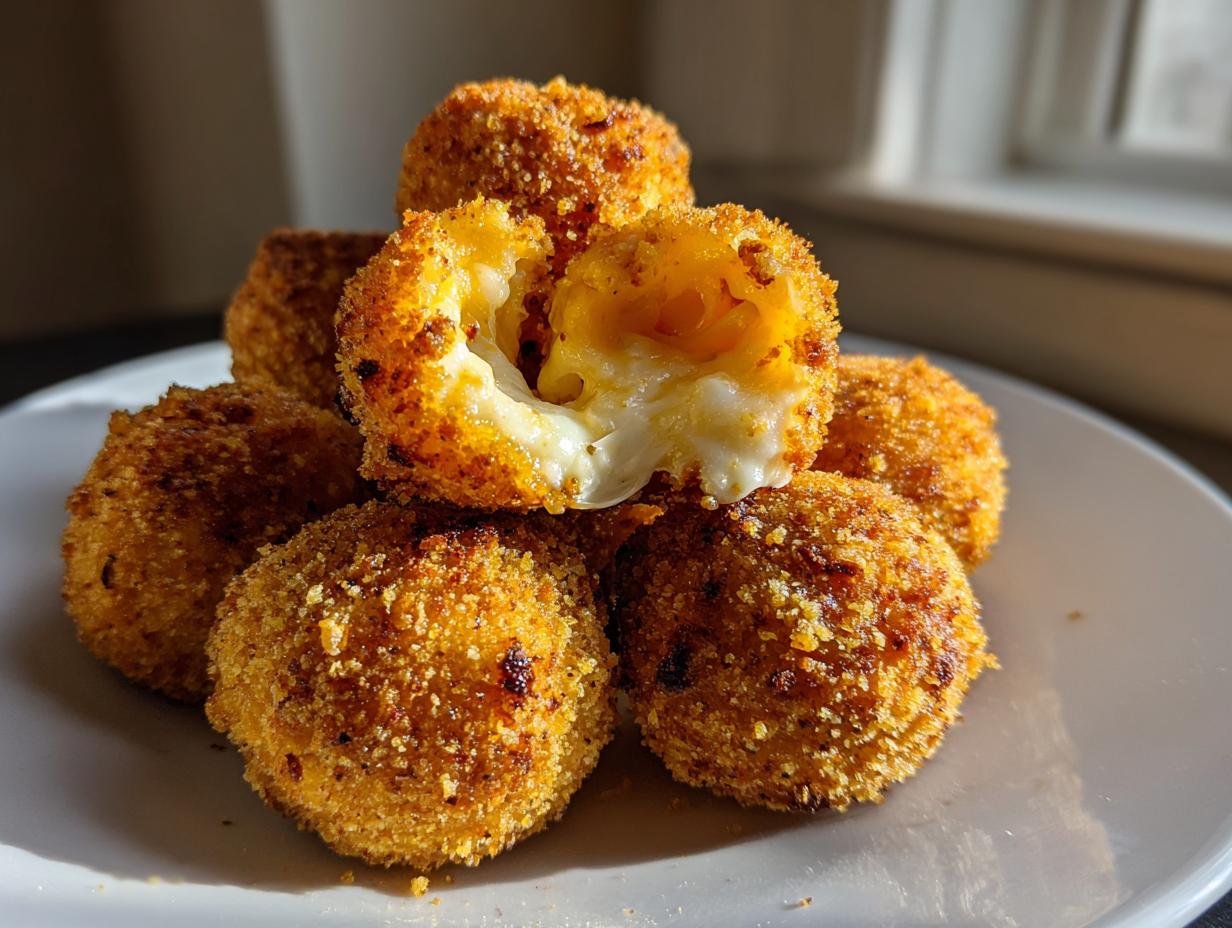
Grab about two tablespoons of the rice mixture and gently flatten it out in the palm of your hand—make it into a little pancake shape. Now, take one small cube of that mozzarella—about half an inch—and place it dead center on the rice. This is where you have to be gentle but firm. You need to carefully fold all the edges of the rice up and over that cheese center, making sure there are absolutely no gaps. Pinch it closed, and then gently roll it between your palms to form a tight sphere, aiming for about 1.5 to 2 inches across. If you don’t seal it well, you’ll end up with mozzarella lava when they fry!

The Secret to Achieving Golden, Crispy Rice Balls Through Frying
Okay, we have our perfectly breaded orbs, now comes the moment of truth for these fried rice balls! Achieving that gorgeous golden exterior without letting the oil seep into the rice (making them heavy and greasy) hinges entirely on temperature control. You absolutely must have your vegetable oil heated to a steady 350°F (175°C). If you don’t have a candy or deep-fry thermometer, please grab one; it’s the difference between amazing arancini recipe and a sink full of soggy regrets. Also, remember my warning: Don’t overcrowd the pot! You need space for that heat to circulate evenly around the rice balls. If you put too many in at once, the oil temperature will drop instantly, and what happens then? Greasy rice balls!
Frying Time and Draining Technique
Once those perfectly breaded rice balls slip into the hot oil, start a timer immediately. They usually only need about 3 to 5 minutes to reach that deep, gorgeous golden brown color we’re looking for. Turn them gently maybe halfway through so they brown evenly on all sides. When they look perfect, use a slotted spoon to lift them out. Quick tip: Don’t just dump them onto a stack of paper towels! That traps steam and softens the crust. Instead, place them directly onto a wire rack set over a baking sheet. This lets the air circulate underneath them, keeping that wonderful crunch factor alive. As soon as they hit the rack, give them a tiny sprinkle of salt while they are still hot.

Tips for Success with Your Arancini Rice Balls
Honestly, the best lessons come from experience, and my experience tells me a couple of things you should always keep in mind when making these Italian rice balls. First, I have to repeat it because it’s so important: using day-old, cold risotto is absolutely key here. It’s my number one rule for rice balls that actually hold their shape! If you skip this step, you’re asking for trouble when you try to form them.
Also, if you want to kick up the flavor profile above just cheesy rice balls, don’t be shy about adding some chopped, cooked ground meat—prosciutto or even leftover roast chicken works wonders! It adds a savory depth that pairs beautifully with the mozzarella. If you’re trying to avoid frying, remember you can certainly bake them; just check out the details on how to get them crispy in the oven over on this guide. These tips will help you make satisfying comfort food recipes easily!
Serving Suggestions for These Appetizer Rice Balls
When your beautiful, golden, crispy rice balls come out of the fryer, the presentation is almost as important as the taste, right? Good news: these are incredibly versatile! The absolute classic pairing that I love—and the one that never fails—is a small bowl of warm, bright marinara sauce for dipping. That light tomato tang cuts right through the richness of the fried exterior and the gooey cheese inside. Seriously, it’s perfection.

If you are putting together a bigger spread, these appetizer rice balls can anchor an entire Italian-inspired platter. Think about serving them alongside some olives, perhaps a fresh Caprese salad, or maybe even my zesty jalapeño popper dip if you want something spicy on the side! Because they are so rich, a little goes a long way.
And remember, even if you opted to bake them instead of frying this time—which is a great option when you need a slightly lighter touch—they still look wonderful piled high on a platter. You can find some neat ideas for ricotta-filled versions over at Whitney’s site, too. No matter how you cook them, these little arancini bites ensure everyone feels special at the table!
Storing and Reheating Leftover Rice Balls
What if you have leftovers? (I mean, I doubt you will, but let’s pretend!) You need to treat these crispy rice balls right so they don’t turn sad and soggy later. Store any remaining arancini in a single layer in an airtight container in the fridge for up to three days. Don’t reach for the microwave—that’s the enemy of crispiness!
If you want that glorious crunch back, you have two excellent options. Pop them in a 375°F oven for about 8 minutes, or better yet, toss them in an air fryer for 4-5 minutes until they are sizzling hot again. That quick blast of dry heat brings the outside right back to life. They are so good reheated, you’ll be making extra on purpose next time!
Frequently Asked Questions About Making Rice Balls
I know you might have a few lingering questions, especially since the concept of making rice ball snacks seems daunting at first. But don’t worry! That’s why we’re here—to take the mystery out of kitchen tasks. Feel free to ask me anything else in the comments, but here are the top few things I always get asked about these amazing Italian rice balls!
Can I make these rice balls without risotto?
You absolutely can, but I have to be honest: risotto is really the champion here. The starch in risotto—especially when it’s cooked the creamy way—is what gives us that gorgeous, cohesive texture when it’s cold. If you only have regular, plain cooked short-grain rice, you can try it! You’ll need to compensate by adding a little extra binder, maybe another splash of beaten egg or even a tablespoon of cream cheese, just to make sure those components stick together tightly when you form them. But for the absolute best result in your homemade rice balls, chilled risotto is the way to go.
Can I bake these crispy rice balls instead of frying?
Yes, you totally can bake them, especially if you’re looking for a lighter touch or just don’t want to deal with hot oil. You’ll find the specific instructions mentioned down in the Tips section, but the short version is: place them on a baking sheet, spray them really generously with cooking oil—and I mean generously—and bake them at 400°F (200°C) for about 15 to 20 minutes, flipping halfway through. They won’t be quite as bubbly and deep golden as the fried ones, but they are still delicious and crunchy!
What if I want a different filling than just mozzarella?
These are your cheesy rice balls, so mozzarella is the star, but feel free to get creative for a fantastic centerpiece appetizer! If you’re doing a meat-filled option, pre-cooked ground sausage or finely shredded rotisserie chicken mixed with a bit of ricotta works beautifully. If you want to stick vegetarian, try adding a small cube of smoked provolone instead of mozzarella, or even a small dollop of pesto into the center. Just remember the rule: the filling must be small enough that you can seal the rice completely around it.
Share Your Ultimate Cheesy Rice Balls Experience
Well, you did it! You took that leftover risotto and transformed it into these stunning, crispy, cheesy rice balls. Now that you’ve had a chance to enjoy them—maybe while watching the big game, or maybe just because you needed a little afternoon comfort—I would absolutely love to hear what you thought!
This is where the real magic of home cooking happens, right? It’s not just about following the steps; it’s about making the recipe your own and sharing the joy. If these Italian rice balls were a hit at your table, please take a moment to leave a rating right below this final section. Stars speak volumes, and it helps other cooks feel confident stepping into the kitchen!
Did you try adding prosciutto to the inside? Did your mozzarella ooze out perfectly? Tell me everything in the comments! I read every single note that comes in. Creating these simple, delicious meals together is what Taste This Plate is all about—making those memories one perfectly fried, crunchy bite at a time. If you ever have questions or just want to connect, you can always pop over to my contact page. Happy cooking, friends!
PrintUltimate Cheesy Italian Arancini Rice Balls

Make these crispy Italian rice balls stuffed with gooey mozzarella. This recipe shows you how to achieve a perfect golden crust and a creamy center, making them an ideal appetizer or snack.
- Prep Time: 25 min
- Cook Time: 15 min
- Total Time: 40 min
- Yield: 12 servings 1x
- Category: Appetizer
- Method: Frying
- Cuisine: Italian
- Diet: Vegetarian
Ingredients
- 3 cups leftover risotto (preferably Parmesan or saffron flavor)
- 1 cup shredded mozzarella cheese
- 1/2 cup grated Parmesan cheese
- 1 large egg, lightly beaten
- 1/4 cup all-purpose flour
- 2 large eggs, beaten for dredging
- 1 1/2 cups plain breadcrumbs
- Vegetable oil, for frying
- Salt and black pepper to taste
- Marinara sauce, for serving
Instructions
- Prepare the risotto base. If your risotto is cold, it should be firm enough to handle. If it is too loose, chill it for at least 2 hours.
- In a bowl, mix the cold risotto with the shredded mozzarella, Parmesan cheese, and the first lightly beaten egg. Season with salt and pepper. Mix until just combined.
- Set up a breading station: Place the flour in one shallow dish, the two beaten eggs in a second dish, and the breadcrumbs in a third dish.
- Take about 2 tablespoons of the rice mixture and flatten it slightly in your palm. Place a small cube (about 1/2 inch) of mozzarella in the center. Gently fold the rice around the cheese, forming a tight ball about 1.5 to 2 inches in diameter. Press firmly to seal the cheese inside.
- Roll each rice ball first in the flour, shaking off any excess.
- Next, dip the floured ball completely into the beaten eggs, allowing excess to drip off.
- Finally, roll the ball thoroughly in the breadcrumbs, pressing gently so the crumbs adhere completely.
- Heat about 2 inches of vegetable oil in a deep, heavy-bottomed pot or Dutch oven to 350°F (175°C). Use a thermometer to monitor the temperature.
- Carefully place 3 or 4 rice balls into the hot oil, ensuring you do not overcrowd the pot.
- Fry for 3 to 5 minutes, turning occasionally, until the rice balls are deep golden brown and crispy on all sides.
- Remove the fried arancini with a slotted spoon and place them on a wire rack lined with paper towels to drain excess oil. Sprinkle lightly with salt immediately.
- Serve the crispy rice balls hot with warm marinara sauce for dipping.
Notes
- Using day-old, cold risotto is key to making rice balls that hold their shape during frying.
- For a richer flavor, you can mix 1/4 cup of finely chopped cooked ground meat or prosciutto into the rice mixture.
- If you prefer a less oily result, you can bake these. Place them on a baking sheet, spray generously with cooking oil, and bake at 400°F (200°C) for 15-20 minutes, flipping halfway, until golden.
Nutrition
- Serving Size: 2 balls
- Calories: 350
- Sugar: 3
- Sodium: 450
- Fat: 18
- Saturated Fat: 8
- Unsaturated Fat: 10
- Trans Fat: 0
- Carbohydrates: 35
- Fiber: 1
- Protein: 14
- Cholesterol: 80