
If you’ve ever wanted one single dessert to be the absolute star of your holiday table or your next big party, you’ve found it. Seriously, nothing stops a conversation dead like a perfectly rendered **red velvet cheesecake**. It’s dramatic, it’s decadent, and honestly, it’s usually way too intimidating to make at home.
But that’s where I come in! As Kate Reilly, I believe that creating something truly memorable shouldn’t require professional training or specialized equipment. My whole goal here is to give you the exact roadmap for achieving that signature ultra-creamy texture in this amazing red velvet cheesecake. Trust me, after following these simple steps, you’ll be ready to serve bakery-worthy results!
- Why This Red Velvet Cheesecake Recipe Is Your New Favorite Showstopper Dessert
- Gathering Ingredients for Your Red Velvet Cheesecake
- Step-by-Step Instructions for Easy Cheesecake Baking
- Tips for Success: Mastering Your Red Velvet Cheesecake
- Making the Cream Cheese Frosting Topping
- Serving Suggestions for Your Festive Red Dessert
- Storage and Reheating Instructions for Homemade Cheesecake
- Frequently Asked Questions About Red Velvet Cheesecake
- Share Your Showstopper Dessert Creations
Why This Red Velvet Cheesecake Recipe Is Your New Favorite Showstopper Dessert
Listen, I make a lot of simple weeknight meals, but the **red velvet cheesecake** is my secret weapon for when I really need to impress people. This isn’t just some dessert; it’s a genuine showstopper dessert.
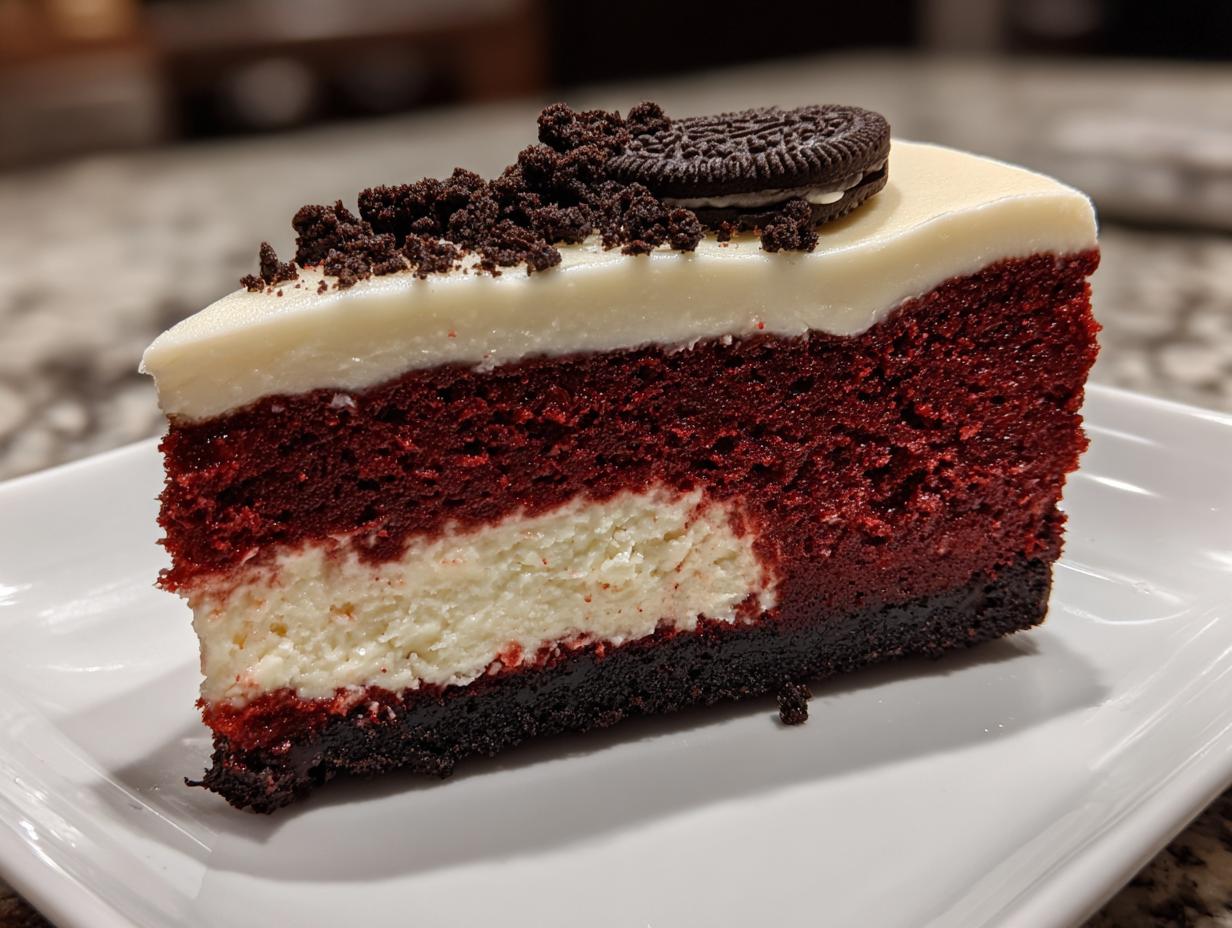
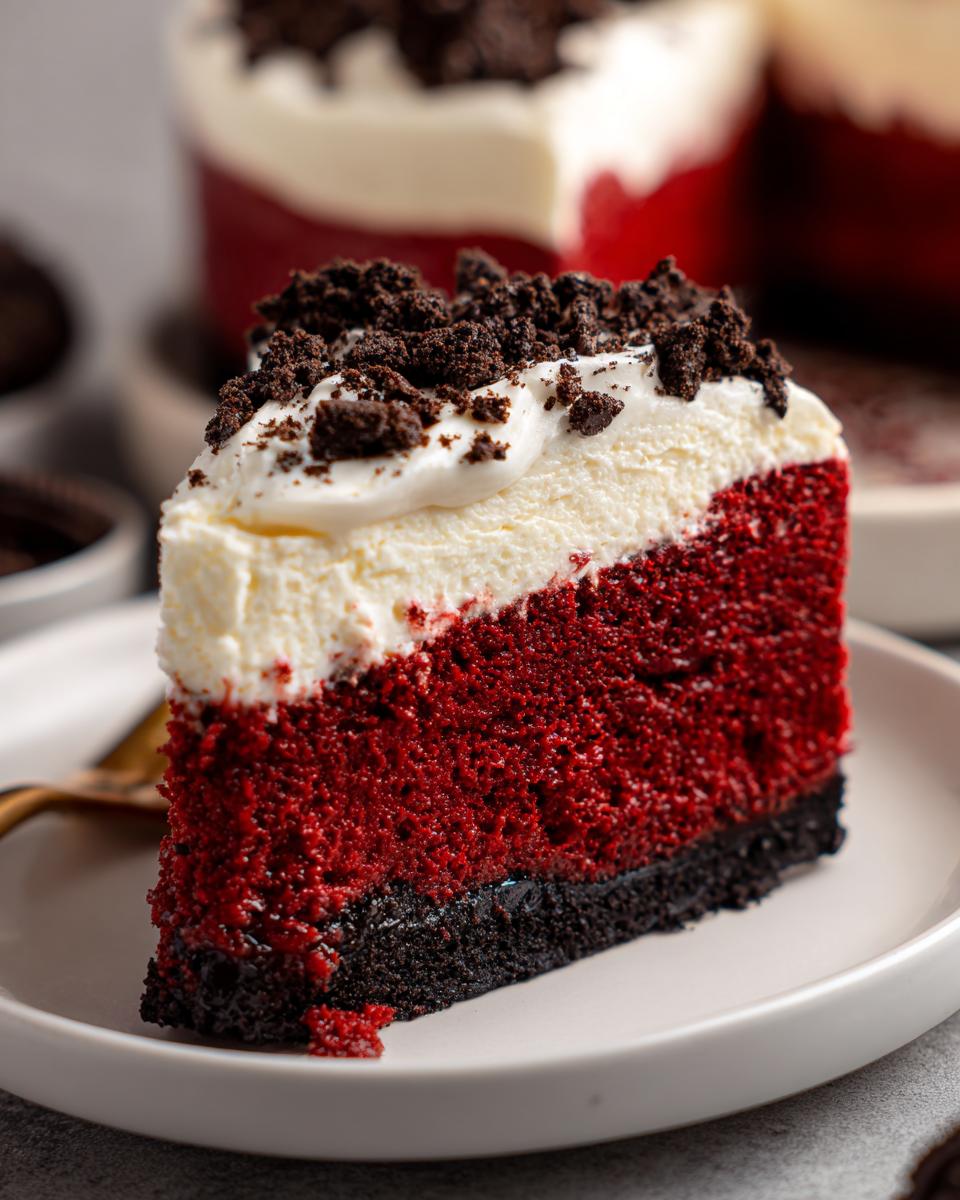
What I adore most is the visual impact—that deep red velvet against the crisp black Oreo crust. And let’s talk flavor: it’s rich, it’s decadent, and it hits all those nostalgic notes we love in red velvet, but in a stunning cheesecake form. I’ve worked tons of hours so you don’t have to worry about cracks or weird textures. You deserve all the compliments this bake is going to get you when you bring it out for the holidays! If you want more tips on getting a perfect bake, check out my guide on the best cheesecake recipe.
This recipe is surprisingly straightforward, but the payoff is huge. For more incredible ideas on making a showstopper, I always look at what others are making, like the gorgeous examples over at Eatast.
Achieving That Velvety Smooth Dessert Texture
The difference between a good cheesecake and a truly great one is the texture, right? For this recipe to deliver that perfect creamy cheesecake filling, you absolutely must use room temperature ingredients. If your cream cheese is cold, it never blends properly, and you end up with lumps!
When mixing, be gentle! We are aiming for smooth, not fluffy like whipped cream. Over-beating incorporates too much air, which causes cracking later. Just mix until that gorgeous color is uniform and you are ready to bake. Slow and steady is the path to a velvety smooth dessert every time.
Gathering Ingredients for Your Red Velvet Cheesecake
Okay, next up is gathering everything we need for this amazing red velvet cheesecake. Don’t let the long list scare you; we’re just breaking it down into sections so it’s super manageable. Remember what I always say? Simple ingredients create extraordinary meals! I always raid my pantry first. I’ve actually used similar cream cheese approaches for my blueberry cream cheese muffins, so I know how important that texture is!
For the Oreo Crust Cheesecake Base
We start with something crunchy because you know I love texture! For this Oreo crust cheesecake, you’ll need:
- 1 1/2 cups Oreo cookie crumbs (that’s about 30 cookies for you measuring-skeptics!)
- 6 tablespoons unsalted butter, melted
- 1 tablespoon granulated sugar
For the Creamy Cheesecake Filling
This is where the magic happens for that incredibly creamy cheesecake filling. Remember, grab your cream cheese, eggs, and sour cream out early so they are totally room temperature. If they’re cold, your beautiful red velvet cheesecake filling will have lumps, and we absolutely can’t have that!
- 16 ounces cream cheese, softened
- 1 1/2 cups granulated sugar
- 1/4 cup all-purpose flour
- 1 teaspoon vanilla extract
- 1/2 teaspoon salt
- 2 large eggs, room temperature
- 1/2 cup sour cream, room temperature
- 1/4 cup whole milk
- 1 tablespoon white vinegar
- 1 teaspoon red food coloring (gel is my favorite for vibrancy)
- 1 tablespoon unsweetened cocoa powder
- 1/2 teaspoon baking soda
Oh, and if you want that optional swirl, make sure you have 1 cup of prepared red velvet cake batter ready to go before you start mixing the main filling!
For the Cream Cheese Frosting Topping
This luscious topping seals the deal and turns this cake into a true showstopper dessert. Make sure your cream cheese and butter are soft before you start blending this part:
- 8 ounces cream cheese, softened
- 1/2 cup (1 stick) unsalted butter, softened
- 3 cups powdered sugar, sifted
- 1 teaspoon vanilla extract
- 1-2 tablespoons milk (only if necessary)
Step-by-Step Instructions for Easy Cheesecake Baking
Okay, deep breath! Making a cheesecake sounds scary, but with this roadmap, you’ll find this is actually pretty smooth sailing. We are going to conquer this red velvet cheesecake together. Remember, I test everything so you can relax and trust the process here. If you’ve ever made a no-bake version, this one takes a tiny bit more planning, but the results are totally worth it. For another great bake, check out my tiramisu cheesecake tutorial!
Preparing the Pan and Baking the Crust
First things first: we have to protect this pan, because this recipe uses a water bath—which is essential for a dreamy texture! Preheat your oven to 325°F (160°C). Take your 9-inch springform pan and wrap the entire outside bottom and sides snugly in heavy-duty aluminum foil. I mean tight! You don’t want any water seeping in later. Once that’s done, mix your crust ingredients and press them firmly into the bottom. Pop that into the oven for exactly 10 minutes. Then, let it cool down while you make the filling.
Mixing the Red Velvet Cheesecake Filling
Time to mix! Grab your mixer and the softened cream cheese. Beat that with the sugar and flour until it is completely smooth. I mean zero lumps. Scrape the bowl down often here. Once it’s perfect, you gently beat in your eggs, one at a time. Don’t go crazy mixing them in! Now, for the red velvet elements: whisk your milk, vinegar, cocoa, food coloring, and baking soda together in a separate bowl. That little fizz is normal; the baking soda reacts with the vinegar to help the structure, just like in a traditional red velvet cake. Gently fold that gorgeous red mixture into your main cheesecake batter until it’s uniform. If you’re swirling, pour two-thirds of this batter over your cooled crust now.
If you’re adding the optional cake batter swirl, dollop random spoonfuls onto the cheesecake layer. Then, take a knife and gently marble it in. Pour your remaining cheesecake batter on top to cover everything up nicely, making sure you get that perfect base layer for your friends to admire later!
Baking and Slow Cooling for a Flawless Red Velvet Cheesecake
Now comes the gentle part. Place your foil-wrapped pan inside a large roasting pan. Carefully pour hot water into the roasting pan until it comes about halfway up the sides of your cheesecake pan. This is the water bath, your protection against dry edges and cracks! Bake this whole setup for 60 to 75 minutes. It’s done when the edges look solid, but the center two inches still wobble slightly.
To get that flawless top we want, turn the oven OFF but leave the cheesecake inside with the door cracked open for a full hour. This slow cooling is non-negotiable for a crack-free red velvet cheesecake! After that hour, take it out, remove the foil, and let it cool on the counter until room temperature. Seriously, cover it and chill it for at least six hours, but overnight is way better. You can see some great tips on oven techniques over at Meallads.
Tips for Success: Mastering Your Red Velvet Cheesecake
I know you want this red velvet cheesecake to be perfect, and honestly, succeeding with cheesecake just comes down to respecting a few simple rules. The biggest one, which I can’t stress enough, is temperature management. If you follow this one detail, you skip 90% of the potential heartbreak when baking a decadent dessert like this!
My main goal for you is a flawless, crack-free top that serves up slices of pure bliss. My favorite way to test new techniques is always focusing on the base flavor, similar to how I developed my homemade chocolate pudding recipe—it has to be perfect from the start. For visual inspiration on perfect tops, always check out sites like Devour Dish.
Ingredient Temperature: The Secret to Creamy Cheesecake Filling
This is it, folks: the non-negotiable step for achieving that creamy cheesecake filling we are aiming for. All your dairy—the cream cheese, the eggs, the sour cream—must be at room temperature. I mean, seriously soft! If you try to mix cold cream cheese, you end up beating it forever trying to break up those hard little chunks, and that beating forces air into the mixture.
When cold ingredients force you to overmix, you invite air bubbles. Those bubbles rise to the top while baking, collapse during cooling, and boom—you get a crack! Make sure everything has sat out for at least an hour so it can blend effortlessly into that velvety smooth dessert texture you crave.
Making the Cream Cheese Frosting Topping
You’ve chilled the cheesecake overnight—can you smell that rich tanginess already? Now it’s time for the finale: the cream cheese frosting topping! This step is what truly elevates this dessert into that incredible showstopper dessert category we talked about. Honestly, once this luscious topping goes on, you’ll be proud to serve this red velvet cheesecake to anyone!
The trick here is using softened ingredients again; cold butter and cream cheese equal lumpy, unhappy frosting. Beat the 8 ounces of cream cheese and the stick of butter together until they look like smooth whipped silk. Start adding your 3 cups of sifted powdered sugar slowly on low speed—we don’t want a sugar cloud exploding in the kitchen!
Get the vanilla in there, mix until combined, and then take a look at the texture. If your frosting seems too stiff to spread nicely over that chilled, beautiful cheesecake, slowly add the milk, one teaspoon at a time. You only need enough to get it perfectly spreadable. Don’t let it get runny, though! If you’re worried about overworking it, remember you can always check out my guide for icing techniques, though this frosting stays soft, which is lovely against the firm cheesecake base.
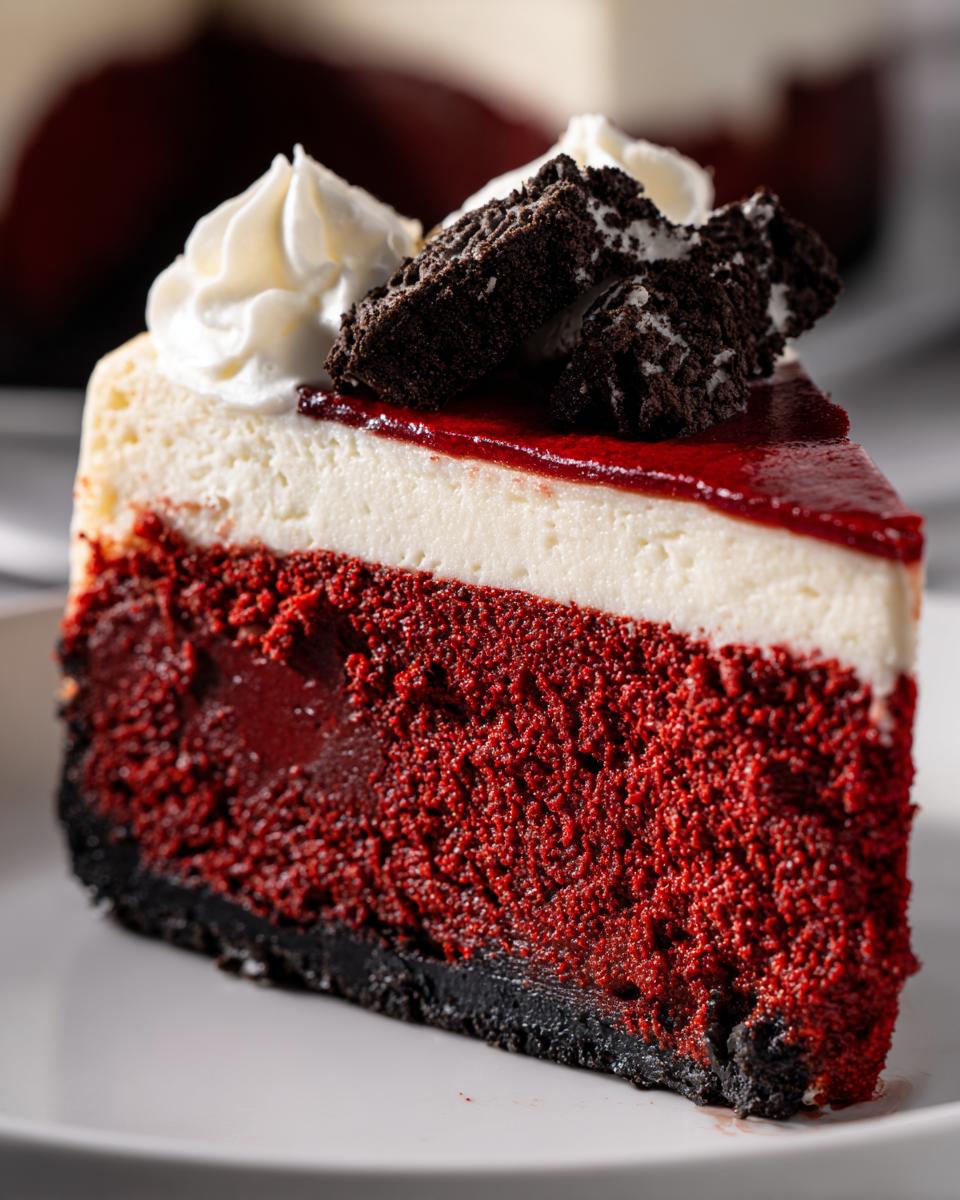
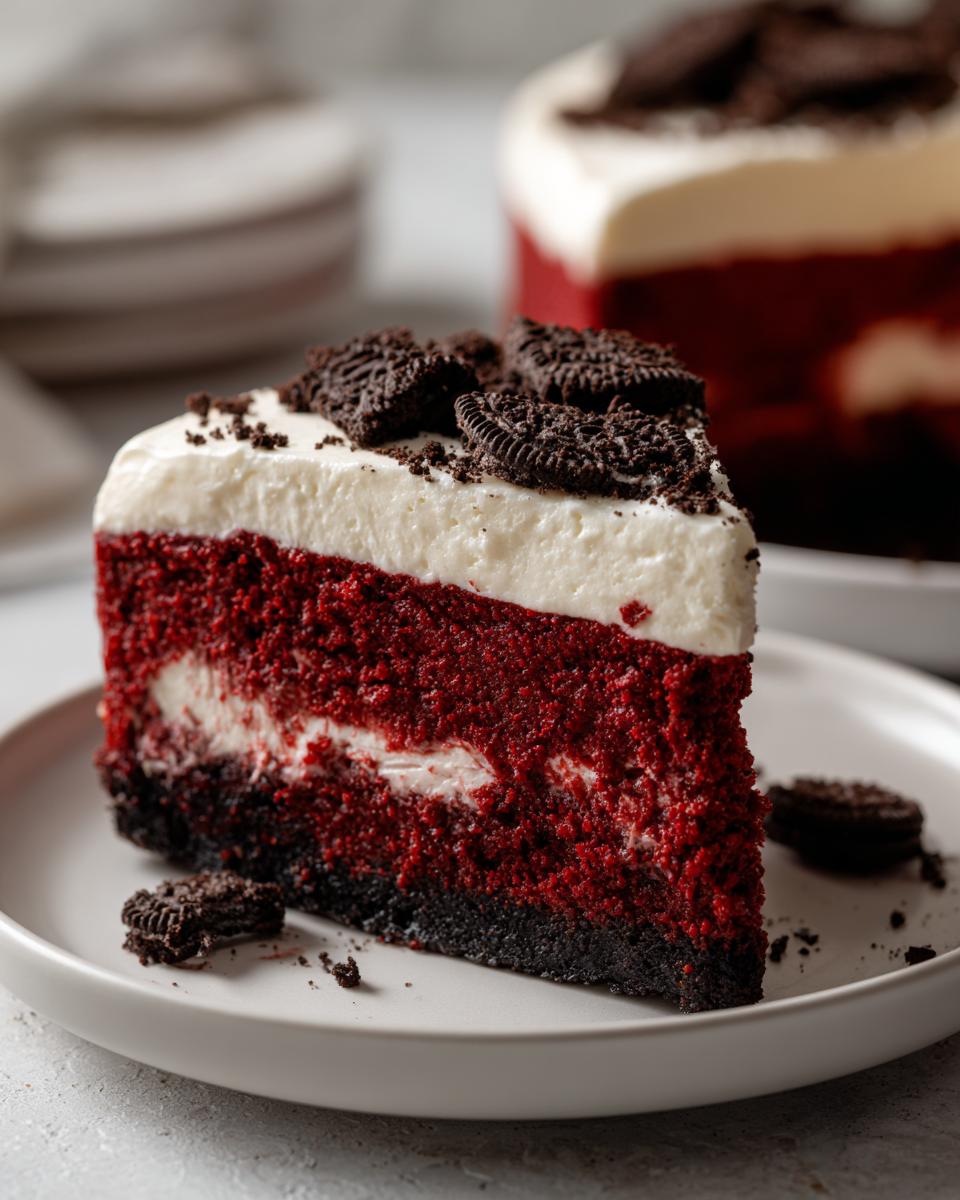
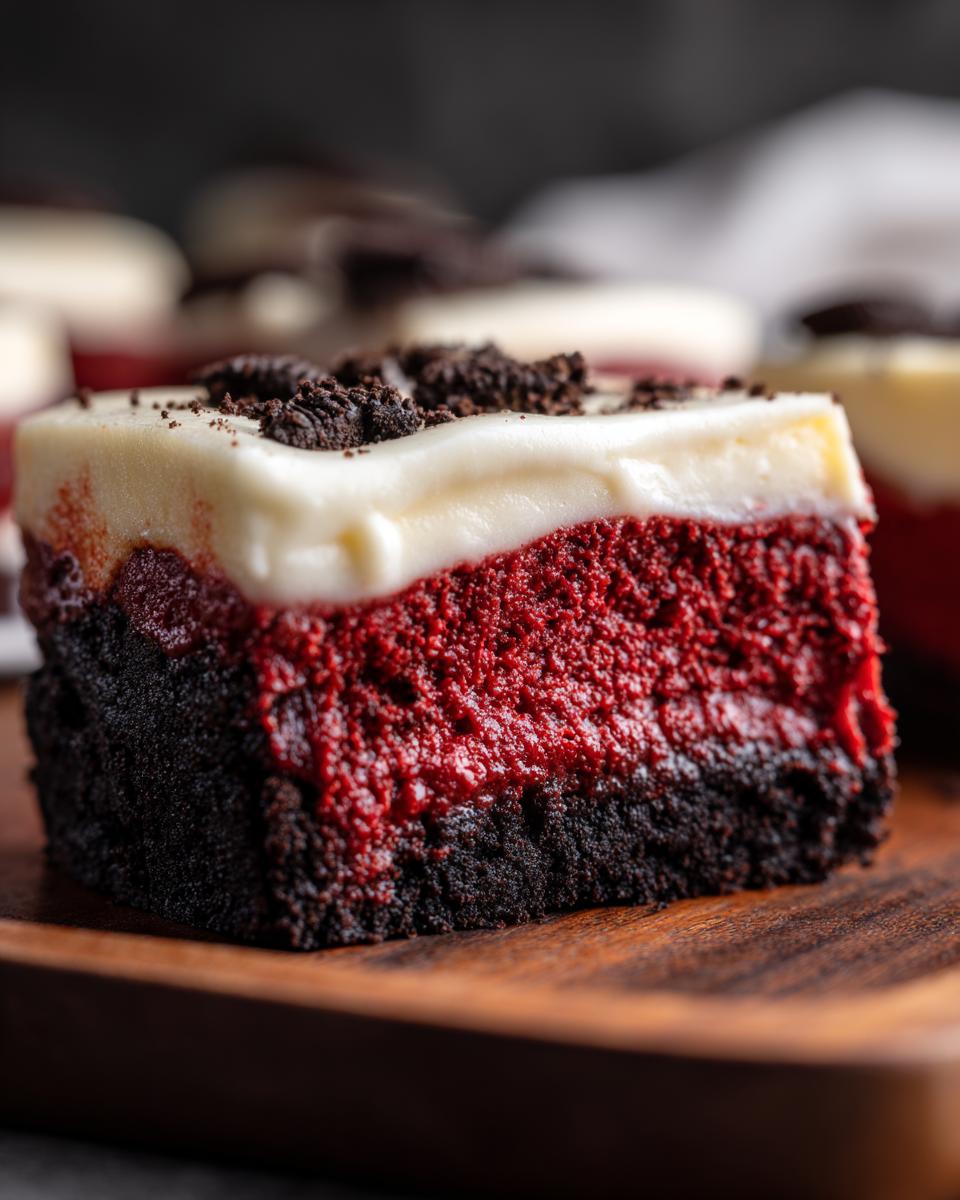
Once it’s smooth and beautiful, just spread it generously right over the top of your completely chilled homemade cheesecake. If you want to add some pretty red velvet crumbs sprinkled on top for an extra festive look, now is the time to do it before it sets up!
Serving Suggestions for Your Festive Red Dessert
So, your magnificent **red velvet cheesecake** is frosted and it’s just begging to be served! Because this is such a rich and decadent dessert, you want great pairings that cut through that richness just a tiny bit. Coffee is non-negotiable for me; a steaming cup of strong black coffee is the perfect counterpoint to that creamy texture.
If you are serving this during the warmer months, a small side of fresh raspberries or bright strawberries is just gorgeous against the crimson color. If you want to go ultra-indulgent for the holidays, I sometimes whip up a tiny drizzly sauce—maybe a simple white chocolate ganache, like the technique I use for my pecan pie bark, just drizzled delicately around the slice. It makes it look professional, and honestly, who says no to more dessert?
Storage and Reheating Instructions for Homemade Cheesecake
The hardest part of making this red velvet cheesecake is waiting for it to chill, but once it’s set, you need to know how to keep that incredible creamy cheesecake filling perfect until serving time! Since this is such a rich dessert, you really don’t need to reheat it at all. In fact, I’d say serving it cold straight from the fridge is often when the texture is absolutely spot on!
If you’ve managed to have leftovers (which I doubt sometimes!), the storage is simple. Make sure the top is covered well—use plastic wrap, but try not to let it touch the cream cheese frosting topping if you can help it, since it might stick. Cling wrap that doesn’t touch the frosting, or placing a loose dome over the cake carrier, works best. Keep it stored in the refrigerator, and it should be amazing for up to five days. It’s almost like the flavor gets deeper after day two, which is fantastic!
If you want to bring it to the absolute perfect temperature for slicing after it’s been in the fridge for a while, just pull it out about 20 to 30 minutes before you plan to serve it. That short time on the counter takes the chill off just enough so you can get a super clean slice without totally compromising the structure. Think of it like letting a good cheese sit out a little before eating!
If you made extra frosting, you can always store leftovers separately in an airtight container in the fridge, too. These leftovers are great for topping quick snacks, like maybe spreading a dollop on my strawberry freezer jam toast the next morning! Just let the frosting soften slightly before using it again.
Frequently Asked Questions About Red Velvet Cheesecake
I know you’ve got questions! Anytime we tackle a project that aims to be a true showstopper dessert, it’s normal to want extra reassurance. I’ve gathered the most common things people ask me when they are aiming for that perfect red velvet cheesecake at home. Being prepared is half the battle, so let’s clear these up so you can concentrate on mixing up that amazing batter!
When I’m figuring out new techniques, I always compile a quick reference list, just like this one. It helps me troubleshoot, which is why I think sharing these answers will help you avoid any snags along the way. For even more great tips and party favorites, you can always check out my recipe for the Neiman Marcus Dip!
Can I make this Red Velvet Cheesecake Recipe without a water bath?
Oh, friend, please don’t skip the water bath on this one! You really, really shouldn’t make this Red Velvet Cheesecake Recipe without it. I know the foil wrapper looks like an extra hassle, but that hot water bath provides gentle, even heat that surrounds the entire pan. Without it, the outside of your cheesecake cooks way faster than the middle. That temperature difference causes the cheesecake to pull away from the sides unevenly, which is the number one cause of those dreaded big cracks!
If you want that perfect, smooth, creamy cheesecake filling, the water bath is the secret weapon that keeps everything moist and cooks evenly. For more holiday baking ideas, sometimes I peek at trusted sources like Alee’s Recipes!
What is the best way to get the vibrant color for this Festive Red Dessert?
This is where we ensure you get that glorious, iconic red color for your festive red dessert! You absolutely need to use gel food coloring here, not the thin liquid drops usually found near the sprinkles at the grocery store. Why? Because the liquid coloring has too much water. Adding water to a cheesecake batter, even a little bit, can throw off the structure and make it runny.
Gel coloring is highly concentrated. You use just a tiny bit—maybe a teaspoon or two—and it delivers the deepest, most vibrant red without diluting your perfectly balanced red velvet cheesecake filling. Trust me, try the gel; you’ll be amazed at the saturation you get!
Share Your Showstopper Dessert Creations
Alright, you’ve done the hard work! You’ve mixed, you’ve patiently watched the water bath, and now you’ve got this stunning **red velvet cheesecake** sitting perfectly chilled in your fridge. That’s when my favorite part begins: seeing what you all create!
I truly believe that every meal we share is an opportunity to create happiness, and if this showstopper dessert made your table brighter, I want to hear all about it. Did it crack? Did the kids devour it in under five minutes? Don’t keep those stories to yourself!
I’m Kate, and your success is my favorite part of running this little blog. So please, take a minute after you serve those beautiful slices to leave a comment below and rate this recipe. Your feedback helps others make this decadent dessert with confidence next time. If you had a fantastic result, tell us what worked best for you!
And if you took a gorgeous photo of your finished cheesecake—maybe sitting next to a big bowl of my cowboy caviar at your last gathering—tag me on social media! I love seeing these gorgeous bakes in real homes. For more inspiration for your next big event, take a peek at some fantastic holiday ideas from Naya Baker. Now go enjoy the compliments!
PrintUltra Creamy Red Velvet Oreo Cheesecake: A Showstopper Dessert
Create an ultra creamy, rich red velvet cheesecake with a crunchy Oreo crust. This recipe is perfect for holidays or special occasions when you want to impress guests with a visually stunning, decadent dessert.
- Prep Time: 30 min
- Cook Time: 75 min
- Total Time: 8 hours 45 min (includes chilling)
- Yield: 12 servings 1x
- Category: Dessert
- Method: Baking
- Cuisine: American
- Diet: Vegetarian
Ingredients
- For the Oreo Crust:
- 1 1/2 cups Oreo cookie crumbs (about 30 cookies)
- 6 tablespoons unsalted butter, melted
- 1 tablespoon granulated sugar
- For the Red Velvet Cheesecake Filling:
- 16 ounces cream cheese, softened to room temperature
- 1 1/2 cups granulated sugar
- 1/4 cup all-purpose flour
- 1 teaspoon vanilla extract
- 1/2 teaspoon salt
- 2 large eggs, room temperature
- 1/2 cup sour cream, room temperature
- 1/4 cup whole milk
- 1 tablespoon white vinegar
- 1 teaspoon red food coloring (gel preferred)
- 1 tablespoon unsweetened cocoa powder
- 1/2 teaspoon baking soda
- For the Red Velvet Swirl (Optional):
- 1 cup prepared red velvet cake batter (use a box mix or your favorite recipe)
- For the Cream Cheese Frosting Topping:
- 8 ounces cream cheese, softened
- 1/2 cup (1 stick) unsalted butter, softened
- 3 cups powdered sugar, sifted
- 1 teaspoon vanilla extract
- 1–2 tablespoons milk (if needed for consistency)
Instructions
- Prepare the Oven and Pan: Preheat your oven to 325°F (160°C). Wrap the outside of a 9-inch springform pan tightly in heavy-duty aluminum foil to prepare for a water bath.
- Make the Oreo Crust: In a medium bowl, combine the Oreo crumbs, melted butter, and 1 tablespoon of sugar. Press the mixture firmly and evenly into the bottom of the prepared springform pan. Bake for 10 minutes. Let cool while you prepare the filling.
- Prepare Red Velvet Elements: In a small bowl, whisk together the milk, vinegar, red food coloring, cocoa powder, and baking soda until combined. Set aside. If using cake batter, prepare it now according to package directions, but do not bake it.
- Make the Cheesecake Filling Base: In a large bowl using an electric mixer, beat the softened cream cheese, 1 1/2 cups sugar, and flour on medium speed until completely smooth, scraping down the sides. Beat in the vanilla extract and salt.
- Incorporate Eggs and Dairy: Beat in the eggs one at a time, mixing only until just combined after each addition. Mix in the sour cream until smooth.
- Add Red Velvet Flavor: Gently mix the prepared red milk mixture into the cheesecake batter until the color is uniform. Do not overmix.
- Assemble the Cheesecake: Pour about two-thirds of the red velvet cheesecake batter over the cooled Oreo crust.
- Create the Swirl (Optional): Dollop the prepared red velvet cake batter randomly over the cheesecake layer. Take a knife or skewer and gently swirl the cake batter into the cheesecake batter to create a marbled effect. Pour the remaining cheesecake batter over the top to cover any exposed cake batter spots.
- Bake in a Water Bath: Place the foil-wrapped springform pan into a large roasting pan. Carefully pour hot water into the roasting pan until the water reaches about halfway up the sides of the springform pan. Bake for 60 to 75 minutes. The edges should look set, but the center 2 inches should still have a slight jiggle.
- Cool Slowly: Turn off the oven, crack the door open slightly, and let the cheesecake cool inside the oven for 1 hour. This slow cooling prevents cracking.
- Chill: Remove the cheesecake from the water bath and foil. Let it cool completely on a wire rack, then cover and refrigerate for at least 6 hours, or preferably overnight, before frosting.
- Make the Cream Cheese Frosting: Beat the softened cream cheese and butter together until smooth. Gradually add the sifted powdered sugar, beating until combined. Mix in the vanilla. Add milk one teaspoon at a time if the frosting is too stiff.
- Frost and Serve: Spread the cream cheese frosting evenly over the chilled cheesecake. Slice and serve cold.
Notes
- Wrapping the pan well in foil prevents water from the water bath from seeping into the crust during baking.
- Use room temperature ingredients for the filling; this is key to achieving that ultra creamy texture you want.
- If you skip the water bath, your cheesecake may bake unevenly or crack.
Nutrition
- Serving Size: 1 slice
- Calories: 450
- Sugar: 45g
- Sodium: 350mg
- Fat: 28g
- Saturated Fat: 17g
- Unsaturated Fat: 11g
- Trans Fat: 0.5g
- Carbohydrates: 48g
- Fiber: 1g
- Protein: 6g
- Cholesterol: 110mg