
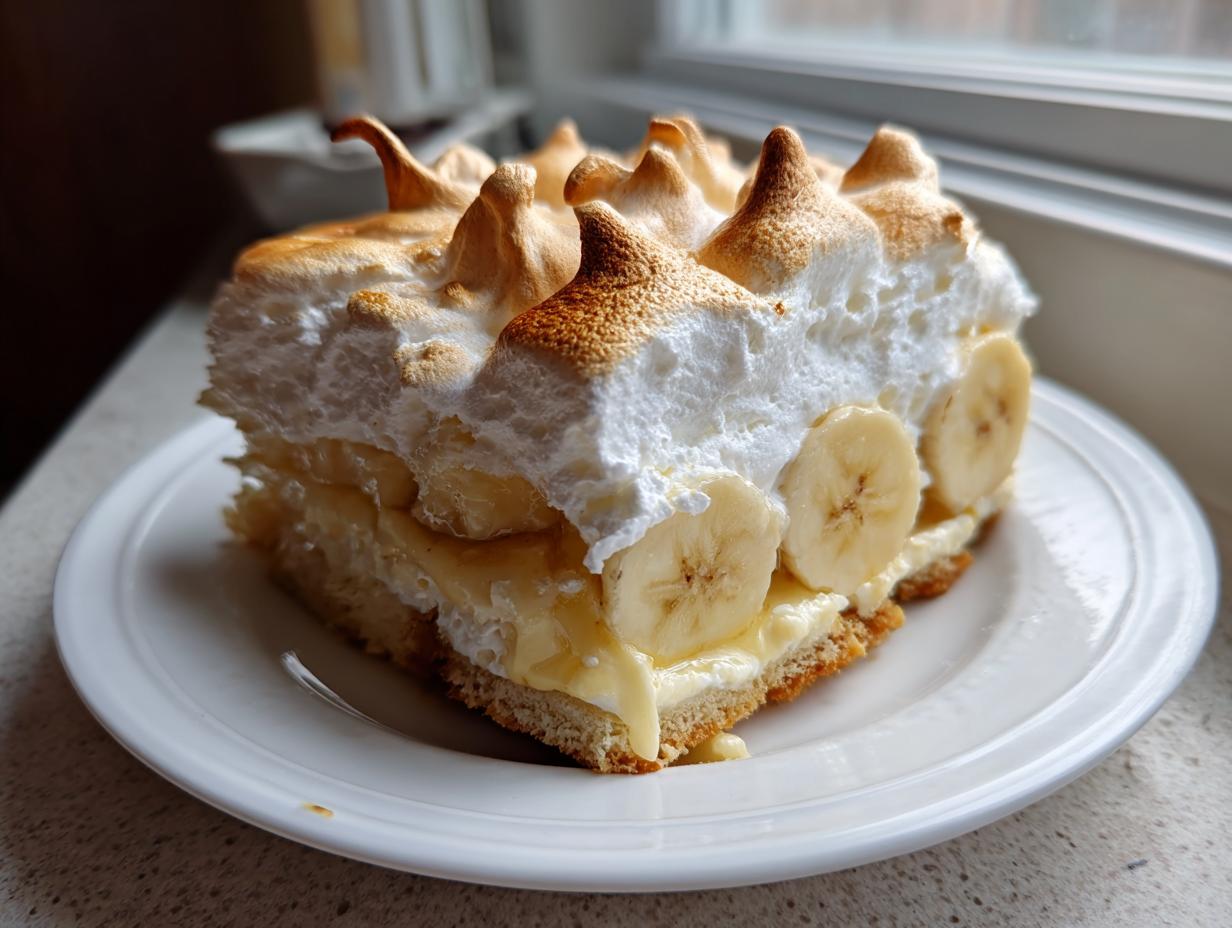
There’s nothing quite like a dessert that wraps you up in a hug, is there? For me, that’s always been the classic, from-scratch banana pudding. When I bring this recipe to a gathering, I know it’s going to disappear fast. Why? Because this isn’t one of those quick-mix shortcuts; this is the best classic Southern banana pudding recipe, rich with homemade vanilla custard. I learned early on from my grandmother that the best meals, and the best desserts, come from putting a little love and patience into the process. This layered treat is the definition of comfort food, and it’s absolutely perfect for your next family meal!
- Why This Classic Southern banana pudding Recipe Works (E-E-A-T)
- Ingredients for the Best banana pudding Ever
- How to Make Classic banana pudding From Scratch
- Tips for the Best Ever banana pudding Success
- Variations on Classic banana pudding
- Serving Suggestions for Your banana pudding
- Storage and Reheating Instructions for banana pudding
- Frequently Asked Questions About Homemade banana pudding
- Nutritional Estimate for This banana pudding Recipe
Why This Classic Southern banana pudding Recipe Works (E-E-A-T)
When you’re relying on a recipe for a big gathering—or just for your own peace of mind—you need to know it’s going to deliver. That’s why I put this banana pudding through the wringer in my kitchen. It relies on that incredible, from-scratch vanilla custard, not the instant stuff. This method ensures you get the most rich and creamy desserts experience possible. Baking the meringue topping might seem fussy, but trust me, that light, browned cloud on top is what seals the deal for a true classic! This recipe has been tested time and time again right here in my home.
Achieving the Perfect Creamy Layered Pudding Texture
The secret to that velvet texture lies right in step three: tempering those egg yolks. You never want to dump the yolks straight into the hot milk; that’s how you end up with sweet scrambled eggs! If you want to see my technique for getting creamy eggs, check out my post on fluffy scrambled eggs, the concept is similar. By slowly adding a little hot liquid to the yolks first, we gently wake them up. This process lets the starch thicken everything evenly, creating a smooth, luxurious Creamy Layered Pudding that coats a spoon beautifully, just like the desserts my mom used to make.
The Role of Nilla Wafers in Authentic banana pudding
You absolutely need the wafers in there *before* it chills. If you wait until serving, they’ll just be hard cookies sitting on top of soft pudding. But when you layer them while the custard is still warm, magic happens! They absorb that moisture and soften perfectly, transforming into a delightful, cake-like layer. This is the non-negotiable step for any true Nilla Wafer Dessert enthusiast.
Ingredients for the Best banana pudding Ever
Okay, listing ingredients feels simple, but believe me, the quality matters here! Since we are making this banana pudding completely from scratch, using fresh eggs and real butter makes a noticeable difference in flavor and richness. Before you start, make sure your bananas are perfectly ripe—yellow with maybe a few tiny brown flecks. If they are green, they won’t be sweet enough, and if they are too soft, they’ll just turn to mush in the layers!
Pudding Base & Custard Components
- 1 cup granulated sugar
- 1/2 cup all-purpose flour
- 1/4 teaspoon salt
- 3 cups whole milk
- 4 large egg yolks, lightly beaten
- 1 teaspoon vanilla extract
- 4 tablespoons unsalted butter, cut into small pieces
Meringue and Assembly Ingredients for banana pudding
This is where we bring in the wafers and get ready to build those beautiful layers. Don’t forget that final bit of sugar needed just for the meringue topping!
- 4 large egg whites, lightly beaten
- 1/2 cup granulated sugar (for meringue)
- 5 large ripe bananas, sliced
- 1 (11-ounce) box Nilla Wafers
How to Make Classic banana pudding From Scratch
Making this Classic Banana Pudding Recipe by hand is totally rewarding. I know it looks like a lot of steps, especially making the custard and then the meringue, but trust me, if you take it one step at a time, you’ll nail that perfect Southern texture. The key here is constant movement and paying attention to those visual cues. Don’t walk away from the stove! We’re aiming for a rich, homemade dessert that beats anything you can get from a box, so let’s get these layers built up.
Preparing the Rich Vanilla Custard
First off, grab a medium saucepan and whisk together your dry ingredients—that first cup of sugar, flour, and salt. Now, slowly whisk in the milk until everything looks smooth. Pop it on medium heat and just keep stirring; you want it to thicken nicely and coat the back of a spoon. When you drag your finger across the coated spoon, the line should stay clear without the mixture running back together. This is that magic moment! Then, we temper the yolks by slowly drizzling in some hot milk before returning that combo to the pot. Cook that for two more minutes, then switch off the heat and stir in your butter and vanilla until it’s silky smooth. For perfectly rich sides to your meal, I sometimes make my easy butter rice right before the pudding starts cooking; you can check out how I do that here!
Whipping the Stiff Meringue Topping
While the pudding is cooling down slightly, move over to a totally clean, grease-free bowl—shine is your friend here! Beat those four egg whites until they start getting foamy. Seriously, make sure there isn’t even a drop of yolk or grease in that bowl, or they won’t whip up right. Now, slowly start adding that half-cup of sugar, beating away until you have stiff, glossy peaks—the kind that stand straight up when you lift the whisk. This cloud of topping is going to give your pudding an amazing lift when it bakes.
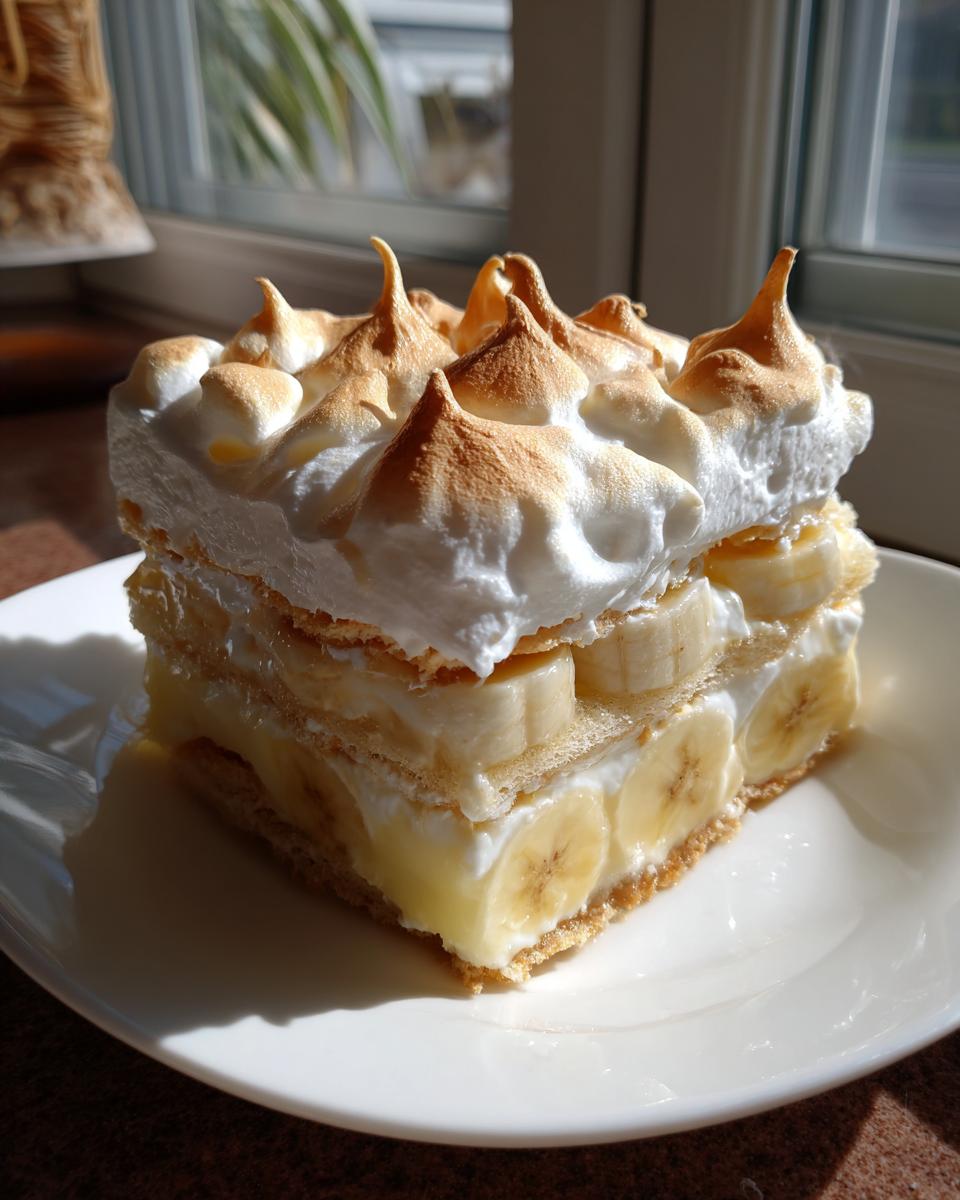
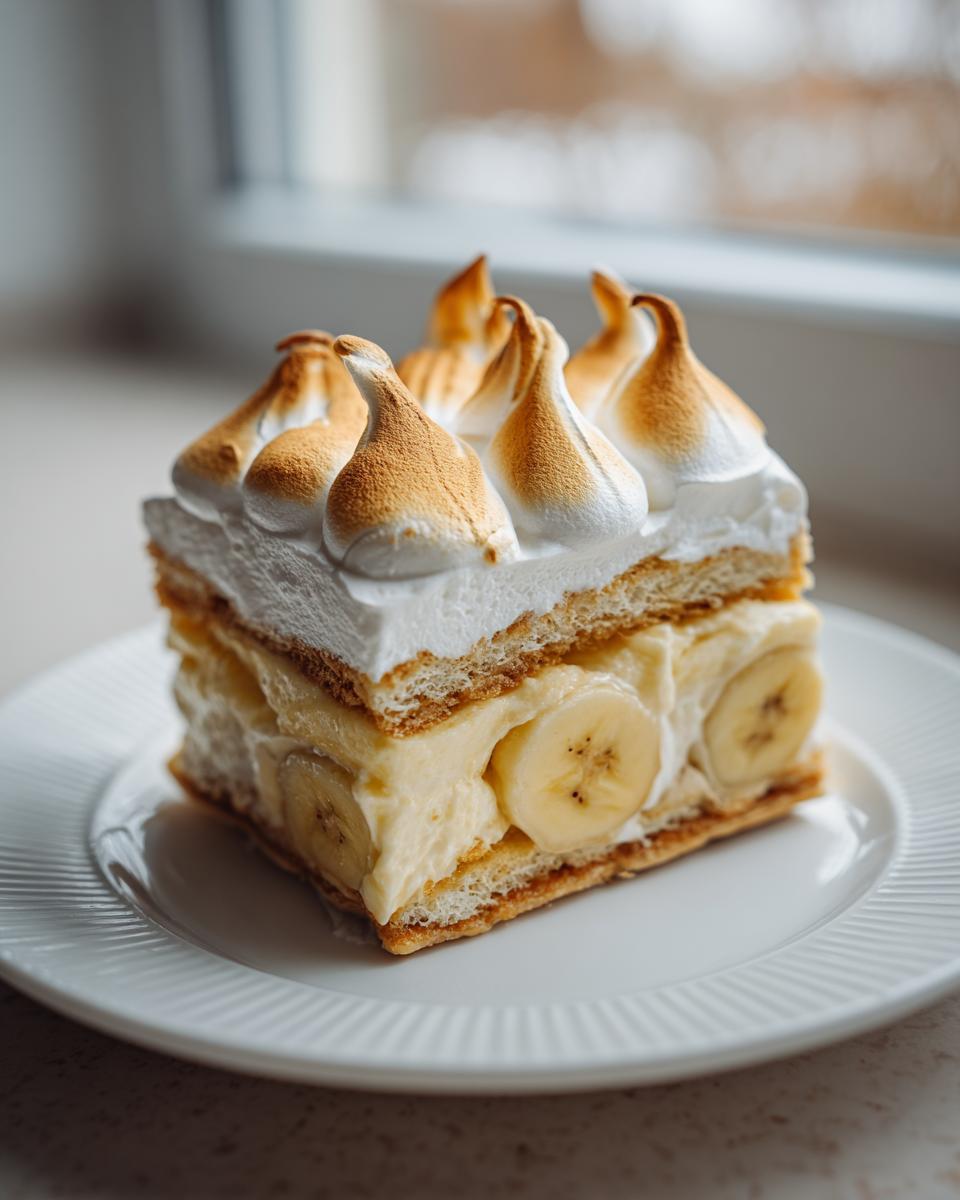
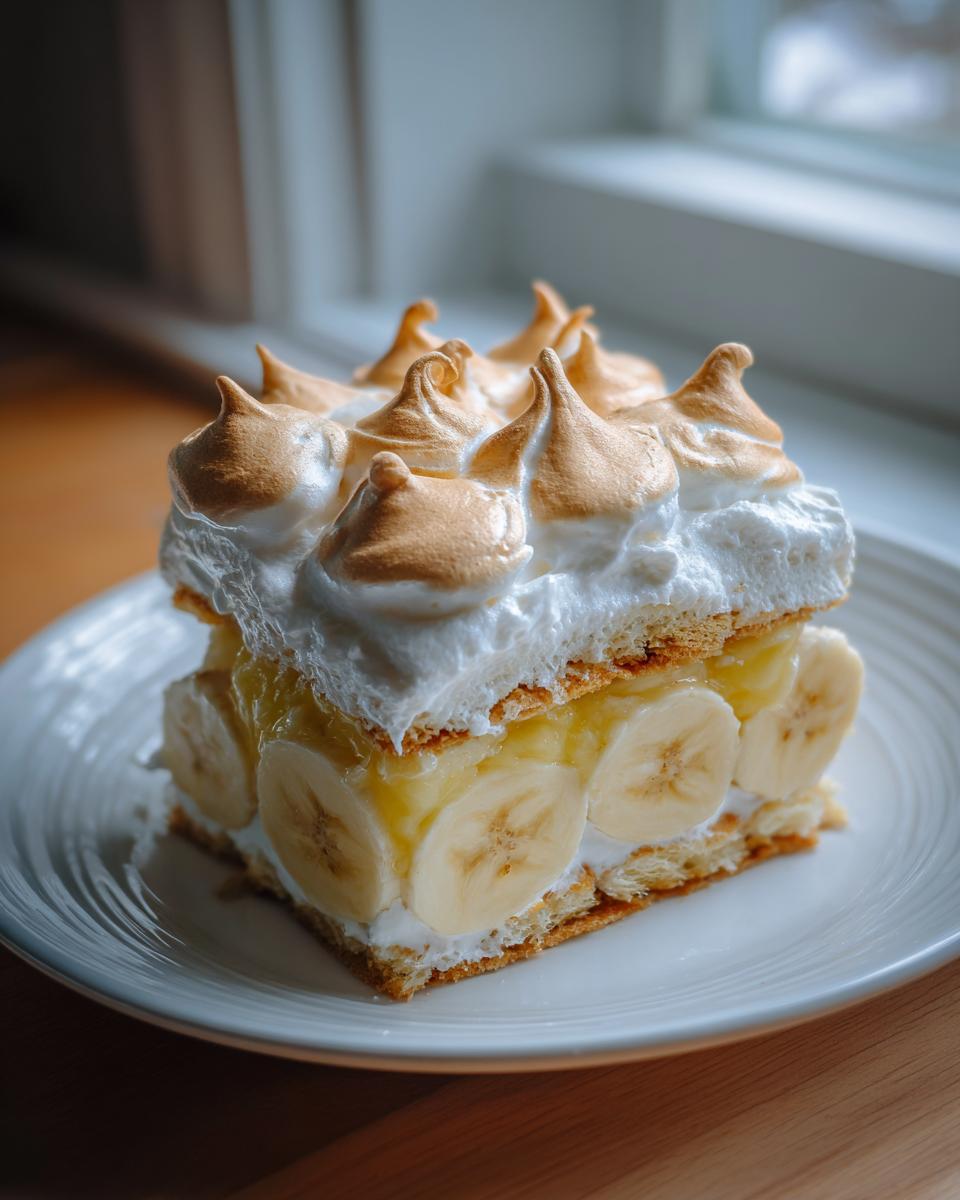
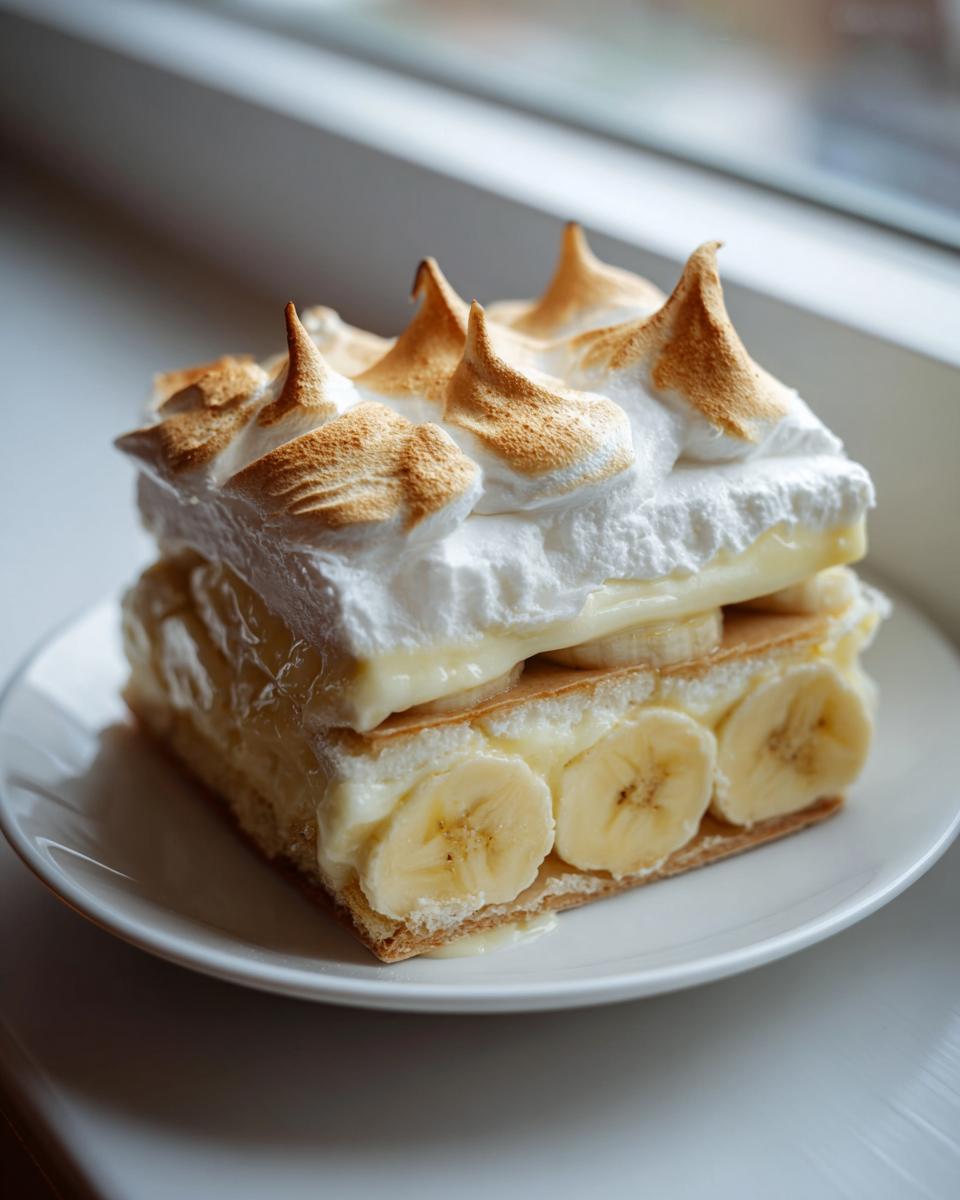
Layering and Baking your banana pudding
Time for assembly in your 9×13 dish! Alternate your layers: wafers, then bananas, then a generous scoop of that warm pudding. Repeat that pattern twice more. Finally, gently spread all that gorgeous meringue over the top layer of pudding. This next bit is crucial: make sure that meringue kisses the edges of the dish all the way around! This seals the moisture in and keeps the meringue from shrinking or “weeping.” Pop it into a 350°F oven for about 10 to 12 minutes, just until the top is beautifully golden brown. Then, hide it away in the fridge for at least four hours. Patience is key for the best melt-in-your-mouth sensation!
Tips for the Best Ever banana pudding Success
Even with a solid recipe, those little quirks can make the difference between good and, well, the Best Banana Pudding Ever! Getting the proportions just right in a layered dessert like this means even small details matter. I want you to have a flawless result every time you serve this up for dessert night, so here are a few of my favorite home-tested hacks that I learned while perfecting this recipe.
Choosing and Slicing Bananas for banana pudding
Remember how I said to use yellow bananas with just a few brown specks? That’s because overly soft, almost black bananas break down way too much during the long chill time. They turn into a mushy, brown layer that just bleeds into everything else. We want structure! Firm slices give you that perfect bite where you get the sweetness of the banana right alongside the soft wafer and creamy pudding. It keeps the integrity of those layers intact.
Making banana pudding Ahead of Time
This is a fantastic make ahead dessert, truly! If you’re serving it on a Sunday, you should absolutely put it together Saturday night. While four hours of chilling is the minimum—and that’s enough time for the wafers to get soft—I swear by letting it rest overnight. The pudding fully sets up, the flavors meld together beautifully, and it tastes even deeper and richer the next day. Trust me, overnight chilling is the secret weapon for making this dish look and taste professional at your next gathering. For more old-fashioned comfort techniques, you might want to check out this guide on homemade banana pudding.
Variations on Classic banana pudding
I absolutely adore making this recipe exactly as written—it’s the real deal, a true Southern Style Dessert centerpiece. But I totally get that sometimes you need to tweak things based on what you have on hand or just what mood strikes! Whether you’re looking for something lighter or richer, there are a couple of ways you can switch this up while keeping that comforting, creamy base we love so much.
Creating a No Bake banana pudding Option
If you’re making this in the summer when you don’t want to turn on the oven, or if you just really aren’t a meringue fan, you can easily make this a No Bake Banana Pudding! The trick is in the topping, naturally. Just skip steps 5, 6, and 7 entirely. Instead of making the meringue, once your custard has cooled down a bit, whip up some heavy cream with a little powdered sugar until you have stiff peaks. Spread that whipped cream on top instead of the meringue. It’s lighter and melts beautifully in your mouth! For a great copycat version that nails that texture without turning on the heat, check out this great guide on Magnolia Bakery style pudding.
Adding Extra Richness to Your banana pudding
If you want to lean into that ultra-indulgent, almost decadent flavor that people call ‘Million Dollar’ style, I have a super simple trick that boosts the richness way up. Right near the end when you add the vanilla and butter to the hot custard (step 4), swap out half of your whole milk for heavy cream. You heard me! Using cream instead of milk really thickens up that base and gives it an incredible mouthfeel. If you’re interested in other fluffy Southern classics, my recipe for fluffy coconut cake uses a similar focus on rich dairy.
Serving Suggestions for Your banana pudding
This banana pudding just screams ‘potluck perfection’ to me! While I love making it in one big glass dish so everyone can see those beautiful, distinct layers, sometimes serving it individually is just easier cleanup. If you’re taking this to a big event, consider making it in clear little parfait cups instead!
That way, everyone gets a perfect ratio of meringue, pudding, bananas, and wafers in every scoop. It travels perfectly and looks so elegant on a dessert table. It’s definitely the go-to choice when you need amazing Family Gathering Desserts that look gourmet but taste like home. Speaking of easy appetizer sharing, you should check out my recipe for an easy crockpot Reuben dip for another easy crowd-pleaser!
Storage and Reheating Instructions for banana pudding
Once you’ve gone to all the trouble of making this gorgeous, homemade banana pudding, you want to make sure it lasts, right? The good news is that leftovers keep well, but you have to manage your expectations about the texture because of those wonderful wafers. Since this is primarily a custard and meringue dessert—not a sturdy cake—it holds up best in the fridge!
Keep your dish tightly covered with plastic wrap and store it in the refrigerator. It’s at its peak flavor and texture within 24 hours, but honestly, it’s often still fantastic on Day Two. If you’re worried about the plastic touching the meringue, I sometimes stick a few toothpicks strategically in the pudding layers before covering the top. That way, the wrap hovers above the meringue, keeping it from getting sticky or deflated.
Now, about reheating: don’t even think about it! This dessert is meant to be served cold. Putting it back in the oven will ruin the beautiful texture of the meringue (hello, weeping mess!) and make the bananas way too soft. If you’re worried about serving something chilled, just take the dish out about 20 minutes before you plan to serve it. That little bit of warmth takes the chill off just enough. For more tips on making creamy Southern classics ahead of time, you might want to look at how I handle my creamy ham salad; the principles of chilling and freshness are similar!
One last thing: that wonderful wafer-softening process keeps going in the fridge. After Day Two, the wafers might start dissolving too much. If you want to save your pudding for Day Three, I actually recommend setting aside a small portion *without* wafers and layering those into fresh wafers right before serving.
Frequently Asked Questions About Homemade banana pudding
I know cooking from scratch can sometimes lead to questions when things don’t look exactly like the picture! Don’t worry, that’s why I’m here to troubleshoot. Whether you’re wondering about texture or shortcuts, these are the things I get asked most often about making the absolute best banana pudding.
Can I use instant pudding mix instead of making banana pudding from scratch?
Oh, the dreaded shortcut question! Look, if you are in a real pinch, yes, you *can* use instant pudding mix. But I have to be honest: this recipe is based on that slow-cooked, egg-yolk-thickened custard. Using instant mix results in a much different texture—it’s often sweeter and doesn’t have the same luxurious body or depth of flavor that you get from the cooked version. If you use the mix, you’ll get a fast Vanilla Pudding Dessert, but you miss out on the true heart of this Classic Banana Pudding Recipe.
Why is my meringue weeping on top of the banana pudding?
This is the most frustrating baking hiccup, isn’t it? Meringue weeps when moisture sits on top of the baked foam. Usually, this happens for two reasons: First, you didn’t beat the egg whites quite enough for stiff peaks, or second, and most common, you didn’t seal the meringue right to the edges of the pudding layer. Remember when I said to make sure that topping kisses the edges of the dish? That seals the moisture in below. If it’s super humid outside, that can sometimes cause slight weeping too, but a perfect seal works wonders!
What is the best way to slice bananas for banana pudding?
I always tell people to aim for uniformity—it just makes the final product look cleaner and tastes better distribution-wise. You want slices that are about a quarter-inch thick. If they are too thin, they disintegrate into the pudding after chilling, leaving you with just sweet mush. If they are too thick, you get giant chunks that overwhelm the creamy bites. A nice, even slice lets you get a perfect layer right alongside those melting Nilla Wafers in every spoonful. For more great tips on building flavorful layers in savory dishes, you can look at my guide on homemade salad dressings, where technique matters just as much!
If you’re trying other recipes out there, like the versions mentioned in places like this creamy dessert collection, remembering these fundamentals about the custard and the wafers will keep your results solid!
Nutritional Estimate for This banana pudding Recipe
Now, I know most of us don’t make this banana pudding because we’re counting calories; we make it because it’s pure, soulful comfort food! But since I believe in being transparent about what we’re cooking up in our kitchens, here is the approximate nutritional breakdown based on the ingredients used in this from-scratch recipe. Remember, these numbers are just estimates, just like when figuring out the calories in my creamy ham salad. Your final count will vary based on the exact brand of wafers you use or how much butter you sneak into the custard!
- Serving Size: 1 serving
- Calories: 410
- Sugar: 45g
- Sodium: 210mg
- Fat: 15g
- Saturated Fat: 7g
- Unsaturated Fat: 8g
- Trans Fat: 0.5g
- Carbohydrates: 68g
- Fiber: 2g
- Protein: 8g
- Cholesterol: 110mg
This is definitely a richer treat, mostly thanks to that beautiful butter in the custard and the sugar in the meringue. That’s why we serve it chilled—it just tastes better and feels a little lighter when it’s cold! Enjoy every single comforting spoonful!
PrintThe Best Classic Southern Banana Pudding Recipe
Create the best banana pudding ever with this classic Southern recipe. You get rich, creamy vanilla custard layered with fresh bananas and crisp Nilla wafers. This make-ahead dessert is perfect for potlucks and family gatherings.
- Prep Time: 25 min
- Cook Time: 15 min
- Total Time: 4 hours 40 min
- Yield: 8 servings 1x
- Category: Dessert
- Method: Baking
- Cuisine: American
- Diet: Vegetarian
Ingredients
- 1 cup granulated sugar
- 1/2 cup all-purpose flour
- 1/4 teaspoon salt
- 4 large egg yolks, lightly beaten
- 3 cups whole milk
- 1 teaspoon vanilla extract
- 4 large egg whites, lightly beaten
- 1/2 cup granulated sugar (for meringue)
- 5 large ripe bananas, sliced
- 1 (11-ounce) box Nilla Wafers
- 4 tablespoons unsalted butter, cut into small pieces
Instructions
- Make the pudding base: In a medium saucepan, whisk together 1 cup sugar, flour, and salt. Gradually whisk in the milk until smooth.
- Cook the pudding: Place the saucepan over medium heat. Cook, stirring constantly, until the mixture thickens enough to coat the back of a spoon, about 8 to 10 minutes. Do not boil rapidly.
- Temper the egg yolks: In a small bowl, slowly whisk about 1 cup of the hot milk mixture into the beaten egg yolks. Then, pour the yolk mixture back into the saucepan, whisking constantly.
- Finish the custard: Cook over medium heat, stirring constantly, for 2 more minutes until the pudding is thick. Remove from heat and stir in the vanilla extract and butter until melted and smooth.
- Make the meringue: In a separate clean bowl, beat the 4 egg whites until soft peaks form. Gradually beat in the remaining 1/2 cup sugar until stiff, glossy peaks form.
- Assemble the pudding: In a large glass serving dish (9×13 inch recommended), arrange a layer of Nilla Wafers. Top with a layer of sliced bananas. Spread one-third of the warm pudding over the bananas. Repeat the layers twice more: wafers, bananas, pudding.
- Top with meringue: Spread the meringue evenly over the top layer of pudding, making sure to seal the meringue to the edges of the dish to prevent weeping.
- Bake the meringue: Bake in a preheated 350°F oven for 10 to 12 minutes, or until the meringue is lightly golden brown.
- Chill: Let the banana pudding cool slightly on a rack, then refrigerate for at least 4 hours, or preferably overnight, before serving. This chilling time allows the wafers to soften into a cake-like texture.
Notes
- For a richer, more indulgent flavor, substitute half of the whole milk with heavy cream.
- If you prefer a no-bake option, skip the meringue and top the final pudding layer with a layer of whipped cream just before serving.
- Use slightly under-ripe bananas; overly soft bananas can turn mushy after chilling.
Nutrition
- Serving Size: 1 serving
- Calories: 410
- Sugar: 45g
- Sodium: 210mg
- Fat: 15g
- Saturated Fat: 7g
- Unsaturated Fat: 8g
- Trans Fat: 0.5g
- Carbohydrates: 68g
- Fiber: 2g
- Protein: 8g
- Cholesterol: 110mg