
If you’ve ever stared at a pan of gooey, warm cinnamon rolls and thought, “I wish this was richer, creamier, and even more decadent,” then listen up! That moment of perfection is exactly what inspired this Decadent Baked cinnamon roll cheesecake recipe. I’m Kate, and after countless hours testing and tweaking in my kitchen, I landed on a technique that locks in that luxurious, creamy texture while making sure you get a perfect, buttery, gooey cinnamon swirl in every single bite. Trust me, this isn’t just another dessert; it’s a showstopper designed to bring joy to your table, guaranteed by my commitment to flawless results.
- Why This cinnamon roll cheesecake Recipe Is a Showstopper Dessert Recipe
- Gathering Ingredients for Your cinnamon roll cheesecake
- Step-by-Step Instructions for the Baked Cheesecake Swirl
- Finishing Touches: The Cream Cheese Frosting Topping for Your cinnamon roll cheesecake
- Tips for Success with Your Creamy Cinnamon Dessert
- Variations on the cinnamon roll cheesecake Theme
- Serving Suggestions for Your Indulgent Baked Goods
- Storage and Reheating Instructions for Leftover cinnamon roll cheesecake
- Frequently Asked Questions About cinnamon roll cheesecake
- Share Your Homemade cinnamon roll cheesecake Creations
Why This cinnamon roll cheesecake Recipe Is a Showstopper Dessert Recipe
When I first brought this dessert to a potluck, it vanished faster than I could blink. That’s when I knew I had something special—a true showstopping dessert recipe that hits all the comfort notes. This isn’t just a heavy cake; it’s the ultimate mashup that checks every box for an indulgent baked good.
- The foundation is a buttery graham cracker crust that snaps just right against the filling.
- Inside, you get that vibrant, sweet and spiced cheesecake that melts in your mouth.
- The star? That incredible ribbon of gooey cinnamon swirl that makes it taste just like your favorite pastry.
If you’re looking for the best cheesecake recipes that deliver that ultimate wow factor for your next gathering, this is it. You can see other amazing treats over at my main desserts page, but this one always gets the most oohs and aahs!
Achieving the Perfect Creamy Cinnamon Dessert Texture
Listen, the success of any great cheesecake hinges on the texture, right? We are aiming for silky smooth, not grainy or cracked. That’s why I insist on using a water bath, or what some folks call a bain-marie. It sounds fancy, but truly, it’s just extra insurance. It wraps the cinnamon roll cheesecake in gentle, steamy heat, guaranteeing that unbelievably creamy cinnamon dessert texture and stopping those frustrating cracks before they even start. It’s a small step that makes all the difference between a good cheesecake and a legendary one.
Gathering Ingredients for Your cinnamon roll cheesecake
Okay, gathering up your supplies is half the battle, especially when you’re building layers! For this incredible cinnamon roll cheesecake, we aren’t just throwing things in a bowl. We need specific textures and preparations to make sure these layers marry perfectly. I’ve broken down everything below so you can shop and prep easily. Remember, room temperature ingredients are your best friend here—don’t skip that!
For the Graham Cracker Crust Cheesecake Foundation
This is the crunchy, buttery base that gives us that essential texture break from the creamy filling. Make sure your butter is perfectly melted when you mix this up.
- 1 1/2 cups graham cracker crumbs
- 1/4 cup granulated sugar (for crust)
- 6 tablespoons unsalted butter, melted
For the Gooey Cinnamon Swirl Filling
This is where the magic happens! We need this mixture to be crumbly and rich so it loosens up beautifully when baked into those spice pockets. The butter here absolutely needs to be softened, not melted, so you can mash it into crumbs with the sugar.
- 1/2 cup packed light brown sugar (for swirl)
- 1 tablespoon ground cinnamon (for swirl)
- 1/4 cup all-purpose flour (for swirl)
- 1/4 cup (1/2 stick) unsalted butter, softened (for swirl)
For the Silky Cheesecake Batter
This is the heart of the cheesecake, folks. For the silkiest, smoothest result, please make sure your cream cheese and your three large eggs have sat out on the counter for at least an hour. Cold ingredients mean lumpy batter, and nobody wants that!
- 3 (8 ounce) packages cream cheese, softened
- 1 1/2 cups granulated sugar (for filling)
- 1 teaspoon vanilla extract
- 1/4 cup sour cream
- 3 large eggs
For the Cream Cheese Frosting Topping
This light glaze cuts through the richness of the baked cheesecake perfectly. I love drizzling it on right before serving because that slightly runny, glossy finish makes the whole thing look like it came from a fancy bakery. You can easily thin this out with an extra dash of milk if you like it more pourable!
- 1 cup powdered sugar
- 2 tablespoons milk or cream (adjust for consistency)
- 1/2 teaspoon vanilla extract (for glaze)
Step-by-Step Instructions for the Baked Cheesecake Swirl
Alright, here is where the real baking joy happens for our cinnamon roll cheesecake! Follow these steps closely, and you’ll end up with that perfectly baked, gloriously creamy result. I promise, taking just a few extra moments for technique now will save you tons of trouble later, especially around the tricky baking and cooling parts!
Preparing the Crust and Cinnamon Swirl Mixture
First things first, let’s get the oven ready. We need to preheat it to 325°F (160°C). Don’t forget to grease your 9-inch springform pan lightly! You want this cheesecake to release beautifully later on.
For the crust, mix your graham crumbs, 1/4 cup of sugar, and the melted butter until it looks like wet sand. Press it down firmly onto the bottom of that springform pan. It needs a little head start, so pop it into the oven for just 10 minutes. While that’s baking, let’s make that spiced goodness.
To prepare our gooey cinnamon swirl, just take your softened butter, brown sugar, cinnamon, and flour and mash them all together in a small bowl. You want a crumbly mixture—like wet, coarse dirt. If it gets mushy, you used butter that was too soft or added too much liquid, so just make sure that butter is only soft, not greasy!
Mixing the Cheesecake Batter: Avoiding Overmixing
This step is where I see most people run into trouble when making any of the creamy desserts. When you beat your cream cheese until smooth, and then add the rest of the filling ingredients except the eggs, you are building structure. But when those three eggs go in, you have to dial it way back!
I can’t stress this enough: add the eggs one by one, mixing *just* until you see the yolk disappear. If you overmix the batter once the eggs are in, you’re whipping too much air in there. That trapped air expands too fast in the oven and then collapses when it cools, giving you those awful cracks. We want richness, not air pockets!
Assembling and Creating the cinnamon roll cheesecake Swirl
Now that your crust has cooled a touch, it’s time to layer! Pour half of that smooth, pale batter over the crust. Then, sprinkle half of your cinnamon crumb mixture evenly over the top. Follow that with the rest of the batter, and top it off with the remaining cinnamon crumbs.
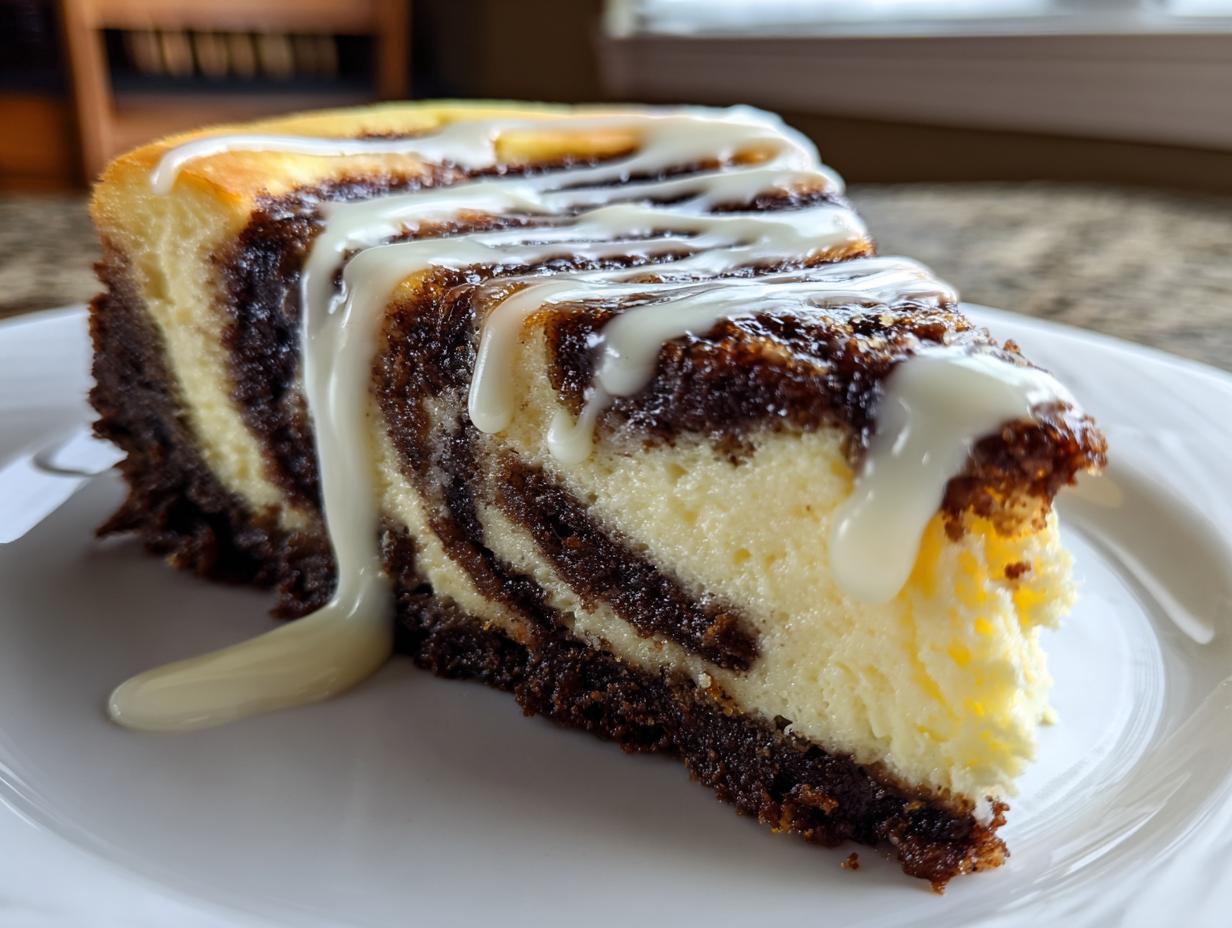
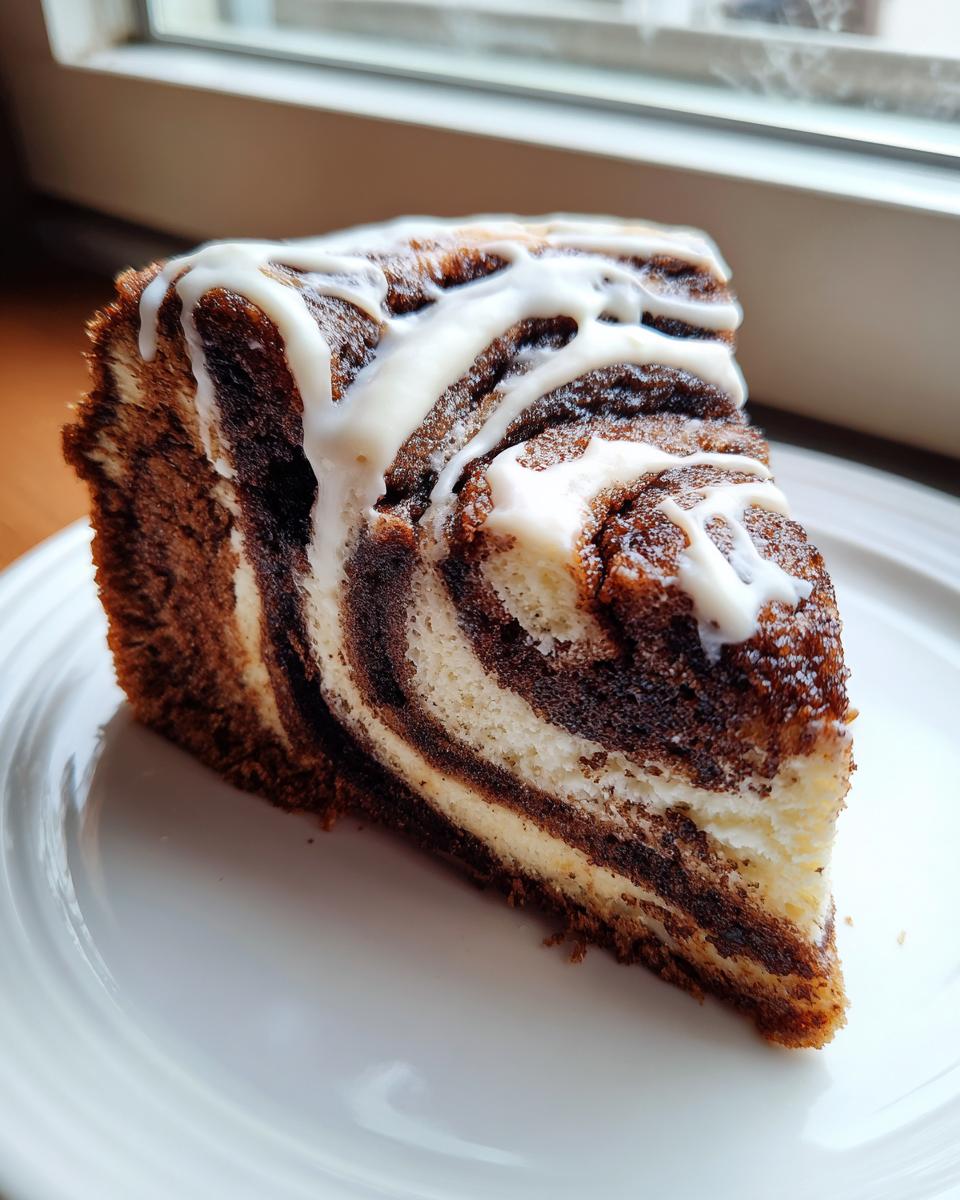
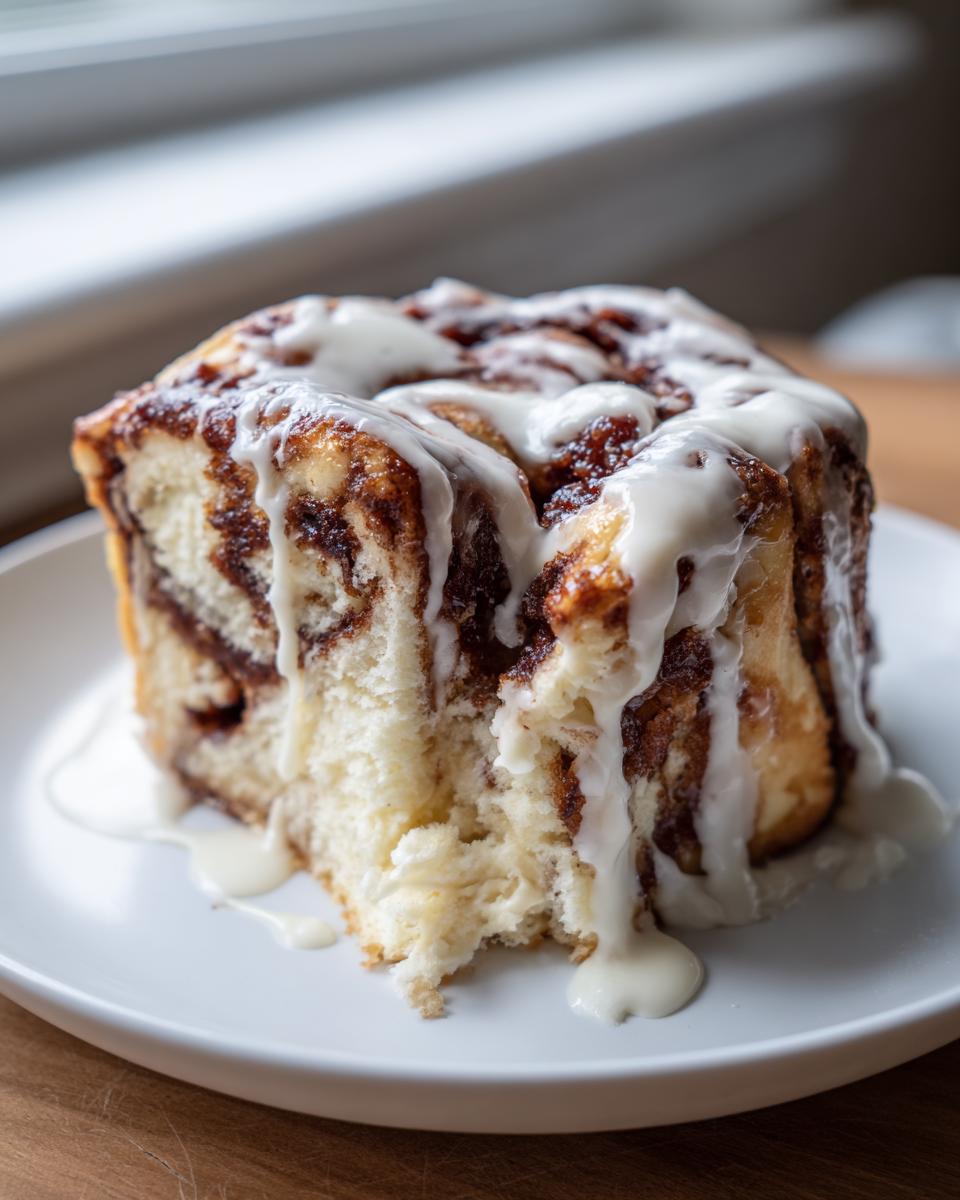
Here’s the fun part: the swirl! Take a thin knife or even a wooden skewer and gently cut figure-eight patterns through the layers. Think delicate movements! You’re trying to marble the flavors together, not completely combine them into one muddy layer. Seriously, take a peek at how this looks on this beautiful photo for inspiration—gentle circles are key!
Baking the cinnamon roll cheesecake with a Water Bath
This is the non-negotiable secret for a truly creamy finish! Take your springform pan and set it inside a larger roasting pan. Carefully pour hot water into the roasting pan until it comes halfway up the sides of your springform pan. This water bath creates a humid environment, ensuring your baking is slow and steady.
Bake for 60 to 75 minutes. You are looking for the edges to be set, but the very center should still have a slight, gentle jiggle—like firm pudding. Don’t panic! The jiggle confirms moisture.
Cooling is just as important as baking! Once the time is up, turn the oven OFF, crack the door open a tiny bit, and just let the cheesecake hang out in that warm environment for a full hour. This slow transition keeps it from shrinking or cracking. Once done cooling outside, wrap it up and chill it in the fridge for at least six hours, but honestly, overnight yields the very best slice!
Finishing Touches: The Cream Cheese Frosting Topping for Your cinnamon roll cheesecake
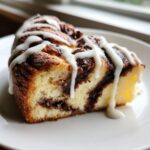
The cheesecake is baked, cooled, and chilled—it looks amazing, but it’s missing its final flourish! Honestly, the first time I drizzled the glaze over my finished cinnamon roll cheesecake, I almost couldn’t believe how professional it looked. That simple, glossy topping takes this dessert from ‘deliciously homemade’ to ‘bake sale champion’ status instantly. It brings that necessary tang to balance the pure sweetness of the cake and swirl.
Making the glaze is super straightforward—we’re moving onto step 9 here. You just need to whisk your powdered sugar, vanilla, and a couple of tablespoons of milk or cream together in a small bowl. If you want a thinner drizzle, that’s where you add that extra tiny splash of milk. If you’re finding it too thin (which sometimes happens if your powdered sugar is very airy), just beat in a little more sugar until it holds its shape on a spoon but still flows easily. I learned that mixing tip when I was trying to master the perfect texture for my vanilla frosting—it applies here too!
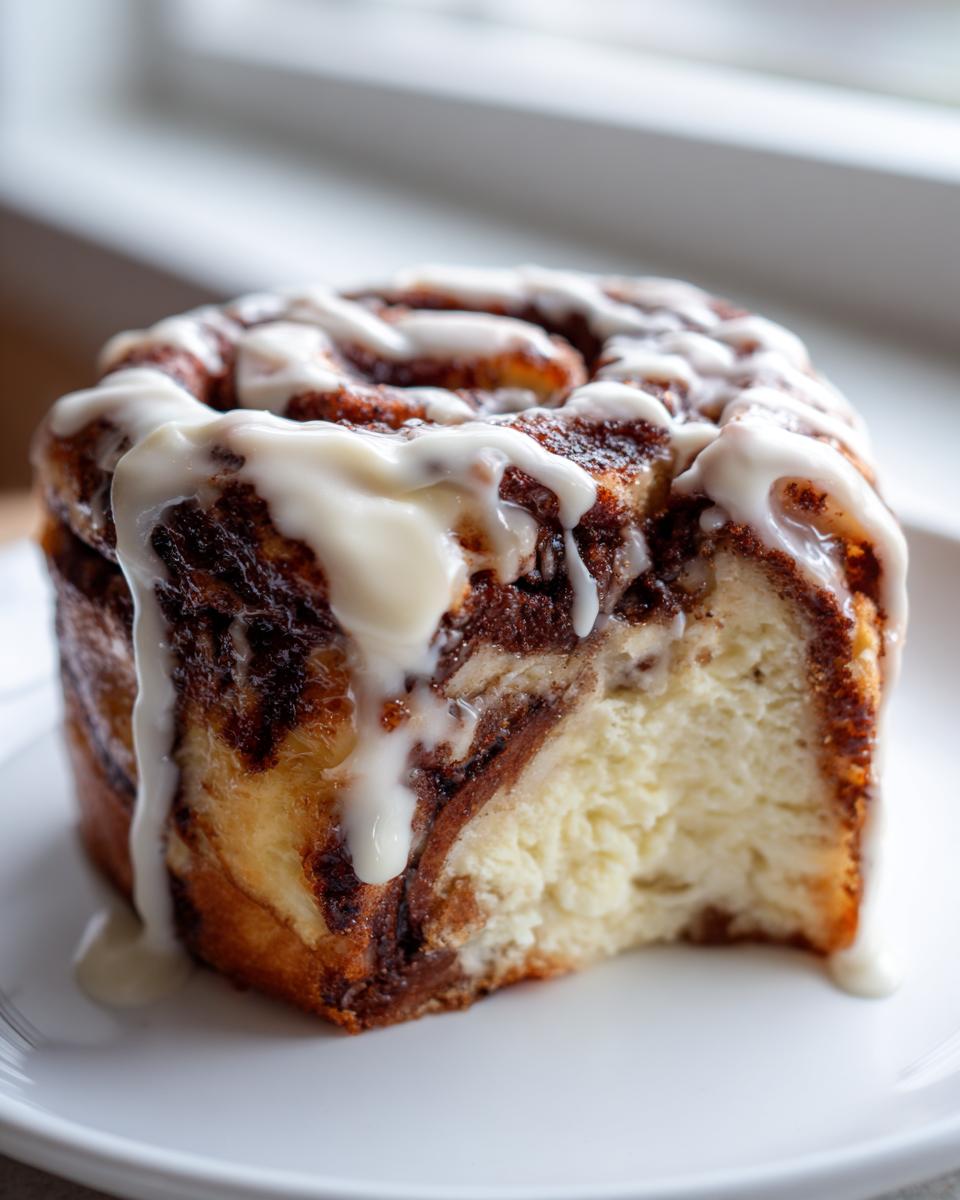
Once you pull that perfectly chilled cinnamon swirl cheesecake out of the springform pan (carefully!), just pour that glaze right over the top. Don’t stress about making perfect stripes; let it drip naturally down the sides. It looks stunning, and the aroma when it hits the cold cheesecake is heavenly. You can see how gorgeous the final result is over on this inspiration page!
Remember, that glaze tightens up beautifully once it sits for 15 minutes, leaving you with that perfect combination of creamy, spicy, and sweet. Slice it up, and watch everyone’s eyes go wide!
Tips for Success with Your Creamy Cinnamon Dessert
Creating a truly stellar cinnamon roll cheesecake—one that rivals the very best cheesecake recipes out there—comes down to managing a few small details. Baking this hybrid dessert requires a little more attention than your average sheet cake, but if you follow these simple guidelines derived from my testing, you’ll avoid every common hiccup!
First off, let’s talk lumps. If you try to rush the beginning and mix cold cream cheese, you’ll end up fighting stubborn lumps the entire time. My golden rule, which applies to almost any creamy cinnamon dessert you make, is making absolutely sure your cream cheese and those eggs are fully at room temperature. They need to be soft and yielding; this lets them blend seamlessly without needing aggressive beating.
Next, the dreaded crack! We covered the water bath, but here’s another essential check: don’t take the cheesecake out of the oven when it looks perfectly set. If you tap the side and it doesn’t have that slight, slight wiggle in the very center, you’ve overbaked it, and it will crack for sure as it cools. Remember, carryover cooking is real! For more insights on achieving that perfect, crack-free look, you can check out some of my detailed notes on that over at this post, too!
Finally, slicing this beauty can be messy if you try to cut it too soon. Because we want those clean lines that show off that lovely swirl, you must chill it for the full recommended time—overnight if possible. When it’s time to cut, use a long, thin knife dipped in hot water and wiped dry between every single slice. That little bit of heat melts the fat just enough for a clean release. It makes all the difference in presenting your stunning cinnamon roll cheesecake!
Variations on the cinnamon roll cheesecake Theme
While this baked cinnamon roll cheesecake is my absolute favorite—it’s rich, perfectly structured, and that swirl is unbeatable—I know sometimes you need something a little different! Our philosophy here at Taste This Plate is making food approachable, and sometimes that means changing the format to fit your needs, whether it’s for a party platter or a quick weeknight craving.
If you’re whipping up treats for a crowd, moving away from the large springform pan is a great idea. Have you ever thought about making Mini Cinnamon Roll Cheesecakes? I adore these! They bake up super fast, they are portion-controlled (in theory!), and they look adorable nestled in muffin tins. You can usually adapt the baking time down significantly for those mini versions, and you skip all the worry about chilling and slicing big slices.
Another fantastic way to present this flavor profile is by turning it into bars. Who doesn’t love a good bar cookie? Creating Cheesecake Bars with Cinnamon is surprisingly easy because you use a 9×13 pan instead of a springform pan, which means no springform ring to deal with! You’ll still get that wonderful creamy filling and the swirl effect, but they are fantastic for packing up in a cooler for picnics or cutting into neat squares for brunch.
I also get asked a lot about a no-bake option, especially in the summer when the oven seems like a distant memory. While I haven’t finalized my dedicated No Bake Cinnamon Cheesecake recipe just yet—because honestly, the baked version is just so much better—you can certainly try to mimic the flavor using a cookie crust mixed with cream cheese and whipped topping. Check out my general tips for no-bake recipes here, but just know it won’t have the density of this baked beauty.
If you want to see an example of those adorable little treats, you should definitely check out how they handle the Mini Cinnamon Roll Cheesecakes over there. It’s a great way to get that cinnamon-spice fix in a bite-sized package!
Serving Suggestions for Your Indulgent Baked Goods
Now that you have this gorgeous, rich cinnamon roll cheesecake sitting perfectly chilled and glazed, it’s time to think about how to serve it up! This is such a decadent, comforting dessert; it truly deserves the spotlight at any event. Whether you’re making it a centerpiece for a big family meal or just enjoying a slice after a cozy dinner, the right pairing makes all the difference.
Because this cheesecake is so intensely flavored—creamy, sweet, and packed with spice—I actually love pairing it with something simple so that the cheesecake remains the star. If you’re serving this for a major gathering or as part of your spread for Dessert for Holidays, skip the heavy, competing desserts!
My number one pairing suggestion is always a great cup of coffee. Think about it: the bitterness of a strong, freshly brewed cup cuts through the richness of that cream cheese filling perfectly. It’s the classic pairing for a reason! If coffee isn’t your thing, a strong cup of black tea is wonderful too.
If you are serving this on a cold night—and this is definitely a winner for Winter Comfort Baking—you want an equally comforting drink on the side. I recently perfected my stovetop hot cocoa recipe, and honestly, a small cup of that deep, dark cocoa alongside a slice of this cheesecake is pure indulgence. You can find my recipe for Homemade Hot Cocoa here—it’s so much better than the packet stuff, I promise!

For a lighter contrast, especially if you are having this after a heavy meal, try serving it with a glass of sparkling water served with just a few slices of fresh lemon or orange. The bubbles and light citrus notes offer a refreshing palate cleanser before you dive into that second bite—because let’s be honest, you’ll want one!
Storage and Reheating Instructions for Leftover cinnamon roll cheesecake
Oh, bless your heart if you think there will be leftovers of this glorious cinnamon roll cheesecake! But since we all know life sometimes forces us to save those precious last slices, let me walk you through how to keep them tasting just as amazing the next day. Proper storage is key, especially since we’ve got that decadent cream cheese frosting on top.
First, you need to let the cheesecake completely stabilize after you’ve frosted it. Once it’s sliced, cover any exposed areas of the remaining cake tightly, either with plastic wrap pressed gently against the cut surfaces or by placing the entire cake into an airtight container. You want to keep the air out so it doesn’t dry up or absorb any strange fridge smells. Keep it chilled in the refrigerator, and honestly, it’s fantastic for up to four or five days. That long chill time is what really lets the flavors of the creamy cinnamon dessert continue to meld together!
Now, let’s talk about reheating. With cheesecake, we almost never heat it up! Unlike a brownie or a cookie, baking cheesecake is all about that dense, cool creaminess. If you try to warm up a slice, you risk turning that beautiful structure into soup, and nobody wants a soupy center! Instead, if the slice feels just a tiny bit too cold straight from the fridge, take the slice out onto a plate about 20 to 30 minutes before you plan to eat it.
This little bit of time allows the slice to come up just slightly in temperature. You get that perfect release of flavor from the spices, and the texture softens just enough to feel luscious on the tongue, mimicking that wonderful warmth you get when the cake first comes out of the oven. Trust me, bringing your leftover slice to room temperature for just a minute is the superior method for enjoying this indulgent baked good!
Frequently Asked Questions About cinnamon roll cheesecake
It’s so common to have questions when you’re tackling a dessert that combines two classics! I’ve gathered the most frequent things I get asked about making this cinnamon roll cheesecake recipe. Hopefully, these tips will give you the confidence to dive right in and serve up something truly special, whether it’s a weeknight treat or a big Dessert for Holidays spread.
Can I make a No Bake Cinnamon Cheesecake instead?
That’s a great question, especially when the weather is hot! This recipe is specifically designed to be baked because we need that gentle heat to coax out the structure and create that dense, satisfying texture that makes it worthy of being called a cheesecake. A No Bake Cinnamon Cheesecake, by contrast, relies on gelatin or just stiffly whipped cream to set up, resulting in a much lighter, moussy texture. If you’re really set on skipping the oven, I recommend looking up a dedicated no-bake recipe, as simply chilling this baked batter won’t give you the creamy, set results we are looking for here. This one needs that oven hug!
What is the secret to a crack-free cinnamon swirl cheesecake?
Ah, the universal fear of the cheesecake baker! Honestly, there are two big secrets that work together for a flawless, crack-free cinnamon swirl cheesecake. First, and I preach this constantly, is room temperature ingredients for the batter—especially the eggs and cream cheese. Lumps cause rough mixing, which leads to air bubbles, and air bubbles lead to cracks!
The second, non-negotiable secret is the water bath! That gentle steaming environment keeps the edges from setting too fast before the center is ready. Combine that with my slow-cooling method—letting it sit in the turned-off oven for an hour—and you are virtually guaranteed a flat, stunning canvas for your glaze. If you avoid rapid temperature changes, you skip the cracks!
How far in advance can I prepare this dessert for holidays?
This is truly one of the best attributes of this dessert; it’s actually better when made ahead! For the best flavor and the easiest serving experience, especially when planning for large gatherings, I recommend baking the cheesecake completely a full day ahead. Bake it, cool it slowly, and let it chill overnight. That full chilling time allows the flavors to really settle into a gorgeous creamy cinnamon dessert profile.
Then, the next morning or just a few hours before your event, whip up that cream cheese frosting and drizzle it on top. This keeps the glaze looking fresh and shiny. It’s the perfect strategy for managing your kitchen time when preparing lots of Comfort Food Desserts for a holiday meal. You get all the stress out of the baking process the day before!
If you want to see some other fabulous, easy-to-make treats for those big meals, take a peek at my easy cheesecake bites recipe—they also freeze beautifully!
Share Your Homemade cinnamon roll cheesecake Creations
And there you have it! We’ve gone from a simple graham cracker base to a magnificent, swirled, and drizzled cinnamon roll cheesecake masterpiece. Honestly, seeing your finished bakes is the best part of my job here at Taste This Plate. When you take the time and care to bake something this indulgent, I truly want to know how it turned out!
Once you’ve let that baby chill and you’ve admired those perfect slices showing off that beautiful swirl, please snap a photo! Head over to our contact page or tag us on social media when you share your creation. It’s so inspiring to see this recipe come to life in different kitchens across the country.
And if you loved the texture, the spices, and the sheer decadence of this dessert, please don’t forget to leave us a quick rating at the bottom of the page! Five stars means the world to me because it tells me that all those hours I spent testing for that perfect creamy cinnamon dessert texture were worth it. Happy baking, friend—I can’t wait to see what you create!
PrintDecadent Baked Cinnamon Roll Cheesecake with Cream Cheese Glaze
Create this showstopping dessert that combines the creamy texture of baked cheesecake with the warm, spiced swirl of a classic cinnamon roll. This recipe uses simple ingredients to deliver an indulgent, memorable treat perfect for holidays or gatherings.
- Prep Time: 30 min
- Cook Time: 75 min
- Total Time: 8 hours 45 min
- Yield: 12 servings 1x
- Category: Dessert
- Method: Baking
- Cuisine: American
- Diet: Vegetarian
Ingredients
- 1 1/2 cups graham cracker crumbs
- 1/4 cup granulated sugar (for crust)
- 6 tablespoons unsalted butter, melted
- 3 (8 ounce) packages cream cheese, softened
- 1 1/2 cups granulated sugar (for filling)
- 1 teaspoon vanilla extract
- 1/4 cup sour cream
- 3 large eggs
- 1/2 cup packed light brown sugar (for swirl)
- 1 tablespoon ground cinnamon (for swirl)
- 1/4 cup all-purpose flour (for swirl)
- 1/4 cup (1/2 stick) unsalted butter, softened (for swirl)
- 1 cup powdered sugar (for glaze)
- 2 tablespoons milk or cream (for glaze)
- 1/2 teaspoon vanilla extract (for glaze)
Instructions
- Preheat your oven to 325°F (160°C). Lightly grease a 9-inch springform pan.
- Prepare the crust: Mix graham cracker crumbs, 1/4 cup sugar, and melted butter until combined. Press the mixture firmly into the bottom of the prepared springform pan. Bake for 10 minutes. Let cool slightly.
- Prepare the cinnamon swirl mixture: In a small bowl, combine the brown sugar, cinnamon, flour, and softened butter until crumbly. Set aside.
- Prepare the cheesecake batter: In a large bowl, beat the softened cream cheese until smooth. Gradually beat in 1 1/2 cups sugar until fully combined. Beat in vanilla extract and sour cream. Add eggs one at a time, mixing just until incorporated after each addition. Do not overmix.
- Assemble the cheesecake: Pour half of the cheesecake batter over the cooled crust. Sprinkle half of the cinnamon swirl mixture evenly over the batter. Gently pour the remaining cheesecake batter over the cinnamon layer. Sprinkle the remaining cinnamon mixture on top.
- Create the swirl: Use a knife or skewer to gently cut figure-eight patterns through the layers to create the cinnamon swirl effect. Do not over-swirl.
- Bake the cheesecake: Place the springform pan in a larger roasting pan. Carefully pour hot water into the roasting pan until it reaches halfway up the sides of the springform pan (this is a water bath). Bake for 60 to 75 minutes, or until the edges are set and the center has a slight jiggle.
- Cool the cheesecake: Turn off the oven, crack the door open slightly, and let the cheesecake cool inside the oven for 1 hour. This prevents cracking. Remove from the water bath and cool completely on a wire rack. Chill in the refrigerator for at least 6 hours, or preferably overnight.
- Prepare the glaze: Whisk together powdered sugar, milk, and vanilla extract until smooth. Add more milk if you prefer a thinner glaze.
- Frost and serve: Once chilled, carefully remove the cheesecake from the pan. Drizzle the cream cheese glaze over the top before slicing and serving.
Notes
- Using a water bath is key to achieving a creamy, crack-free cheesecake texture.
- Make sure your cream cheese and eggs are at room temperature before starting the batter; this prevents lumps.
- For the best flavor and clean slices, chill the finished cheesecake for a full 12 hours before serving.
Nutrition
- Serving Size: 1 slice
- Calories: 450
- Sugar: 45g
- Sodium: 300mg
- Fat: 28g
- Saturated Fat: 17g
- Unsaturated Fat: 11g
- Trans Fat: 0.5g
- Carbohydrates: 48g
- Fiber: 1g
- Protein: 7g
- Cholesterol: 110mg