
Oh, I get it—the craving hits hard. You want that rich, velvety tang of cheesecake, but the thought of dealing with a water bath, a hot oven, and praying it doesn’t crack? Forget about it! Honestly, when I started Taste This Plate, it was because so many people felt overwhelmed by beautiful desserts like cheesecake. That’s where these amazing cheesecake bites come in. They give you all the decadent flavor you dream about but are perfectly portioned and best of all, they are completely no-bake!
We’re talking about individual, creamy treats that set up beautifully in the fridge. No oven stress, no cracked tops, just pure, glorious cheesecake goodness in a single bite. My goal here is always to make the best results accessible, and these creamy cheesecake treats prove you don’t need complicated steps to achieve perfection. Trust me, these little gems will become your go-to party dessert.
- Why You Will Love These Easy Cheesecake Bites
- Essential Ingredients for Perfect No-Bake Cheesecake Bites
- Step-by-Step Guide to Making Your Cheesecake Bites
- Expert Tips for Flawless Cheesecake Bites Every Time
- Creative Variations for Your Cheesecake Bites
- Serving Suggestions for These Bite Sized Desserts
- Storage and Reheating Instructions for Cheesecake Bites
- Frequently Asked Questions About Cheesecake Bites
- Share Your Homemade Cheesecake Bites
Why You Will Love These Easy Cheesecake Bites
When I tell people how simple this recipe is, they usually don’t believe me! Seriously, these are your new secret weapon for easy entertaining. Why are they so fantastic?
- No Oven Required: That’s right, we skip the oven entirely! This makes them perfect for hot summer days or when you just don’t want to heat up the kitchen.
- Portion Perfection: They are already perfectly portioned. You get that creamy texture you crave in a cute, manageable size. No fussing with slices!
- Speedy Assembly: From the crust to the filling, you can have these assembled in under 20 minutes. They just need time to chill.
- Incredibly Creamy: The texture is just unbelievable—rich, smooth, and melt-in-your-mouth, proving that easy cheesecake bites don’t mean sacrificing quality.
Essential Ingredients for Perfect No-Bake Cheesecake Bites
When you’re making something this simple, the quality of your ingredients really shines through. Since we aren’t using an oven to mask anything, we need good stuff! Luckily, these ingredients are all super easy to find at any regular grocery store. Remember, that cream cheese MUST be fully softened—I mean, elbow-room-soft!
Here’s what you’ll need to pull off these amazing creamy cheesecake treats:
- One and a half cups of graham cracker crumbs—make sure they are nice and fine!
- A quarter cup of regular granulated sugar just for that crust.
- Six tablespoons of unsalted butter, melted down gently.
- Sweet, softened cream cheese—you’ll need 16 whole ounces of it.
- One cup of powdered sugar for that perfect sweetness.
- One teaspoon of good vanilla extract (don’t skip this!).
- A quarter cup of heavy whipping cream—this is key for the fluffy texture!
- And finally, your fun stuff: optional toppings like fresh berries or a drizzle of chocolate sauce.
Use real butter and good full-fat cream cheese here; those substitutes just won’t give you that authentic, rich flavor we are going for in these cheesecake bites.
Step-by-Step Guide to Making Your Cheesecake Bites
Okay, let’s get down to the fun part! This method for making cheesecake bites is so straightforward, you’ll wonder why you never tried no-bake cheesecake before. We handle this in three simple phases: crust, filling, and chilling. Just follow along, and you’ll have 24 beautiful little desserts ready to go!
Preparing the Graham Cracker Crust for Your Cheesecake Bites
First up is the base. Grab a medium bowl and mix those graham cracker crumbs with the 1/4 cup of sugar. Once they look friendly, pour in the melted butter and stir everything until those crumbs look uniformly damp. You want them to hold together when you squeeze a pinch, but not be soggy.
Now, line your mini muffin tin. This is where I always emphasize using those little paper liners! They make getting the set bites out without smashing them incredibly easy later on. Press that buttery crumb mixture firmly into the bottom of each liner. Be firm here—a solid base keeps your final product looking sharp.
Whipping the Creamy Cheesecake Filling
This is where we build that essential texture. Grab your mixer and beat that room-temperature cream cheese first until it is absolutely silky smooth. Seriously, take your time and scrape down the bowl; no lumps allowed! This initial smooth base is the secret to those famously creamy cheesecake treats.
Once it looks like velvet, mix in the powdered sugar and vanilla extract until it’s just combined. Next, slowly stream in the heavy cream and beat just until the filling becomes light and fluffy. Be careful not to overmix once that cream is in there, or you risk losing all that lovely air we just whipped in!
Assembling and Chilling the Mini Cheesecake Bites
Time to put it all together! Carefully spoon or pipe that gorgeous filling evenly over the crumb crusts in your muffin tin. Try to keep them level—they look much prettier that way. Now for the hardest part: waiting!
These no bake cheesecake bites absolutely need time to firm up. Pop the whole tin into the refrigerator for a minimum of four hours. But if you can wait overnight, that’s my real recommendation. The longer they chill, the firmer and more decadent those individual cheesecake cups become!
Expert Tips for Flawless Cheesecake Bites Every Time
Listen, even with a simple cheesecake recipe like this, sometimes things go a little sideways. I had one batch early on where I thought, “I don’t have liners, I’ll just use oil spray!” Big mistake. They stuck to the tin like glue, and I ended up serving cheesecake sludge instead of perfect little bites (a disaster at a cookout, let me tell you!). So, trust me on these tried-and-true tips to make sure yours turn out flawlessly every time.
First off, when you’re pressing that crust in, use the back of a small measuring cup or the bottom of a shot glass. It gives you a much flatter and more even surface than your fingers, which helps keep all your finished cheesecake bites uniform. You want them all behaving the same way in the chilling process!
If you are worried about the crust being too crumbly, I sometimes cheat a little bit, which I found in my notes. While the recipe says you can bake the crust raw, if I know I’m rushing the chilling time, I’ll pop those crusts into a 350°F oven for about five minutes. Just make sure they cool completely afterwards! It gives the butter a chance to really bind everything together. It’s a little insurance policy for stability, especially for those of you making individual cheesecake cups for transport.
The biggest texture tip I can share, though, is all about the ingredients temperature. If your cream cheese is too cold, it will fight with the sugar and never get that signature smooth texture we want. If your heavy cream is warm, it won’t whip up well. Everything should be chilled or room temperature as directed. For the absolute smoothest filling, try gently warming the bowl your cream cheese is in under warm water for just thirty seconds before you start beating it; it helps ensure you get that amazing melt-in-your-mouth feel every time. You can read more about getting that perfect texture in my deep dive on no-crack creamy cheesecake!
Creative Variations for Your Cheesecake Bites
The beauty of using my basic cheesecake bites recipe is that the perfectly creamy filling acts like a blank canvas. You can take this same foundation and instantly transform it for any holiday or craving! I love experimenting with different flavors, and these adaptations are so easy, they take almost no extra time.
For example, if you’re aiming for those gorgeous strawberry cheesecake bites everyone raves about, you have a few options. My favorite trick is ditching the heavy cream and using 1/4 cup of strawberry puree instead. Make sure that puree is thick, not watery, or you’ll need to add a little extra powdered sugar to compensate.
If chocolate is calling your name—and I know it often calls mine—you can make decadent chocolate cheesecake bites in a snap. Simply whisk in about 1/4 cup of sifted, unsweetened cocoa powder along with your powdered sugar. If you want it richer, use a teaspoon of your favorite instant espresso powder too; it really deepens that chocolate flavor without making it taste like coffee!
I also see people making beautiful Pink Velvet versions, especially around Valentine’s Day, which is a visually stunning way to present these treats. To get that look—and taste—you just need to add 1-2 drops of red food coloring to the filling mixture until you get a soft pink hue. If you want to read about the spices that make up the classic Red Velvet flavor profile, check out my post on red velvet cheesecake!
Remember, whatever flavor you choose, the method stays exactly the same: crust base, creamy filling, and chill time. It’s the best way to get customized, impressive bite sized desserts with minimal effort.
Serving Suggestions for These Bite Sized Desserts
If you’re making these cheesecake bites for a party—and you absolutely should be, they make the best party desserts idea—presentation is everything! Even though these are quick and easy, you want them to look like they took hours. Since they are already perfectly sized, it keeps the cleanup low, but we can definitely amp up the visual appeal!
When it comes time to serve, take them out of the fridge about 15 minutes beforehand. This slight warming allows the texture to soften just a hair, making them extra creamy when you take that first bite.
Let’s talk toppings! This is your chance to get creative. I always set up a little “Topping Bar” when I make these. You can keep it simple, like just a light dusting of powdered sugar, or go all out.
- Drizzle: A thin, messy drizzle of melted dark chocolate or caramel sauce looks incredibly gourmet. Don’t worry about neat lines; that organic splash pattern looks fantastic.
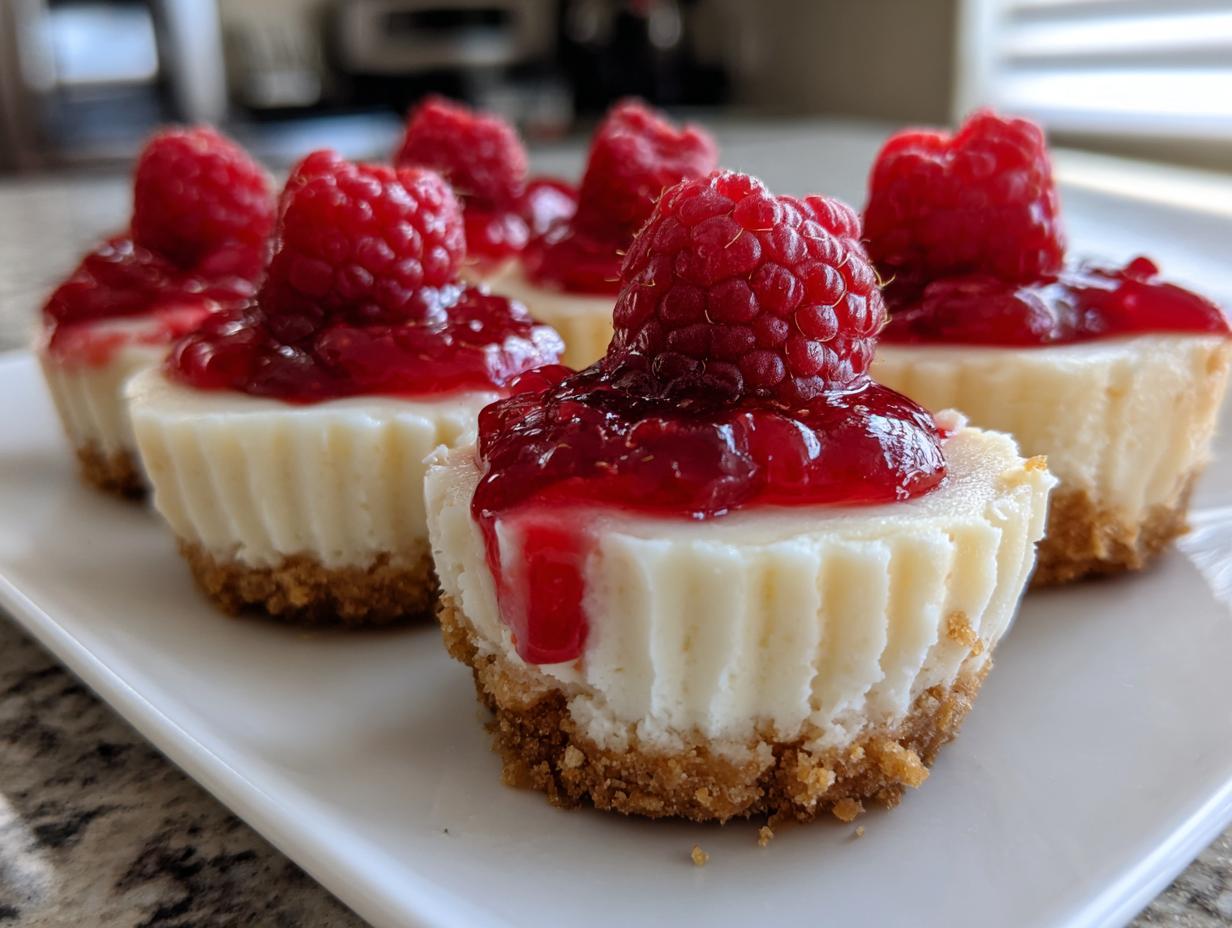
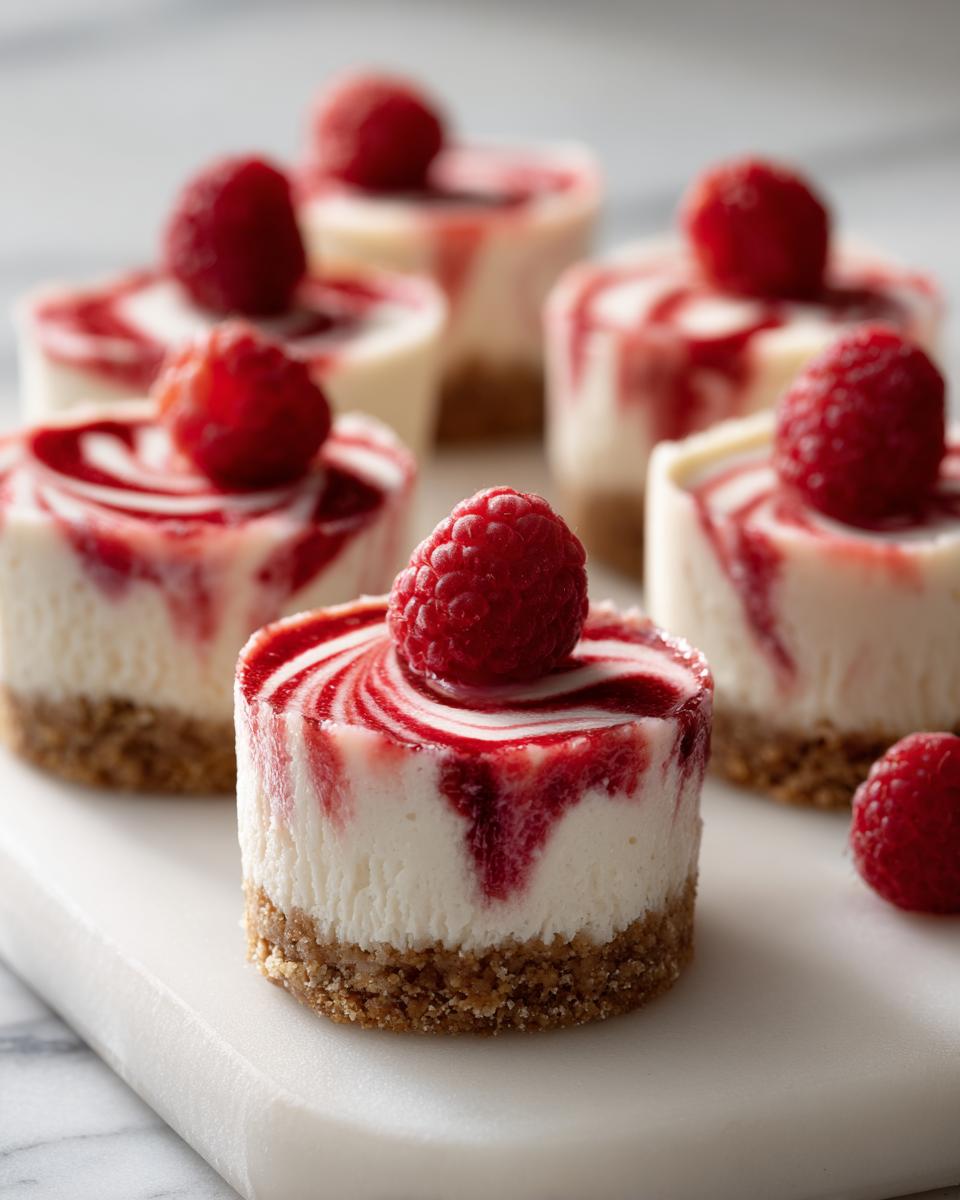
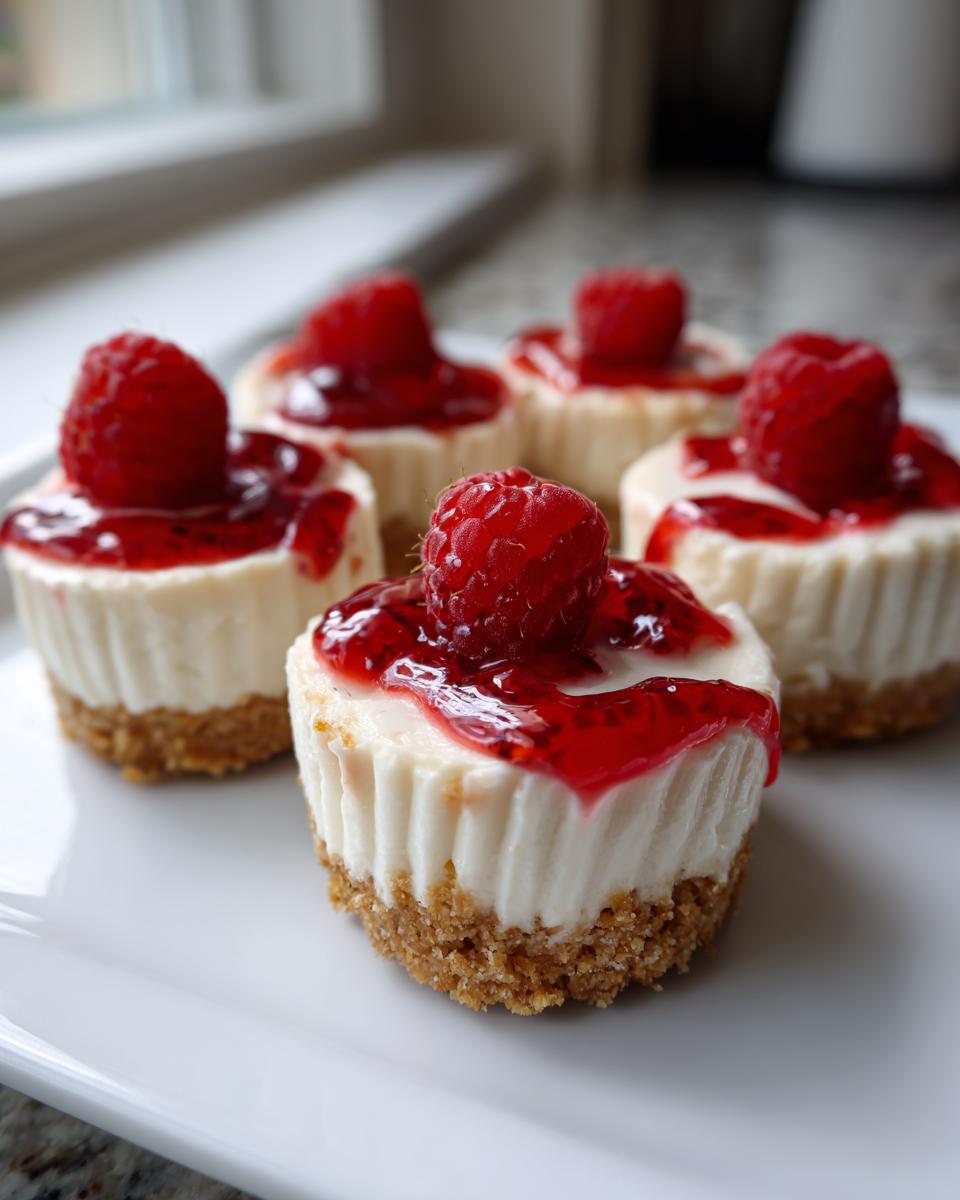
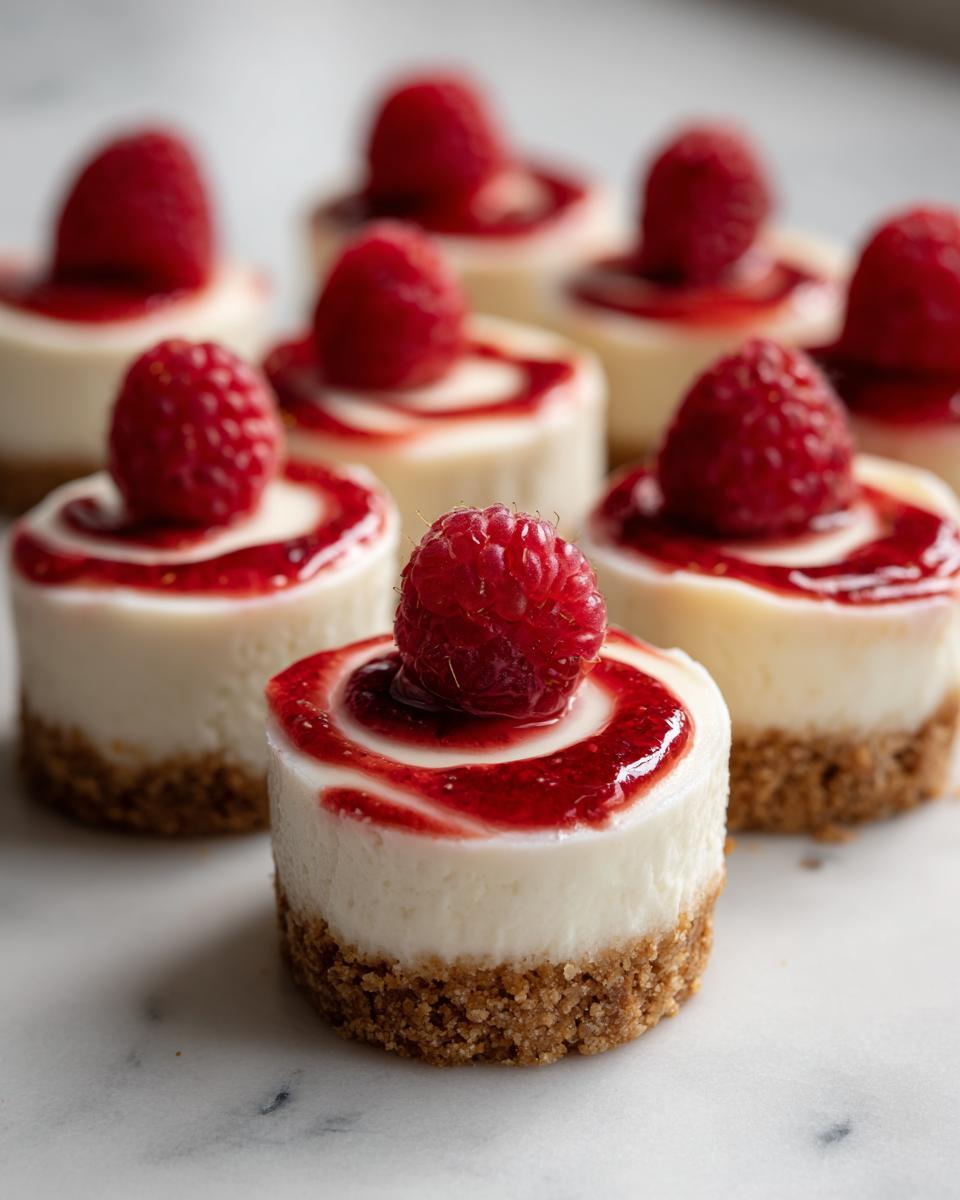
- Fruit Forward: Fresh raspberries or thin slices of strawberry are the easiest, prettiest topping. The tartness cuts right through the richness of the cream cheese.
- Crunch Factor: If you want that little bit of texture that makes a dessert memorable, think about sprinkling crushed pistachios or some toasted pecans over the top just before serving.
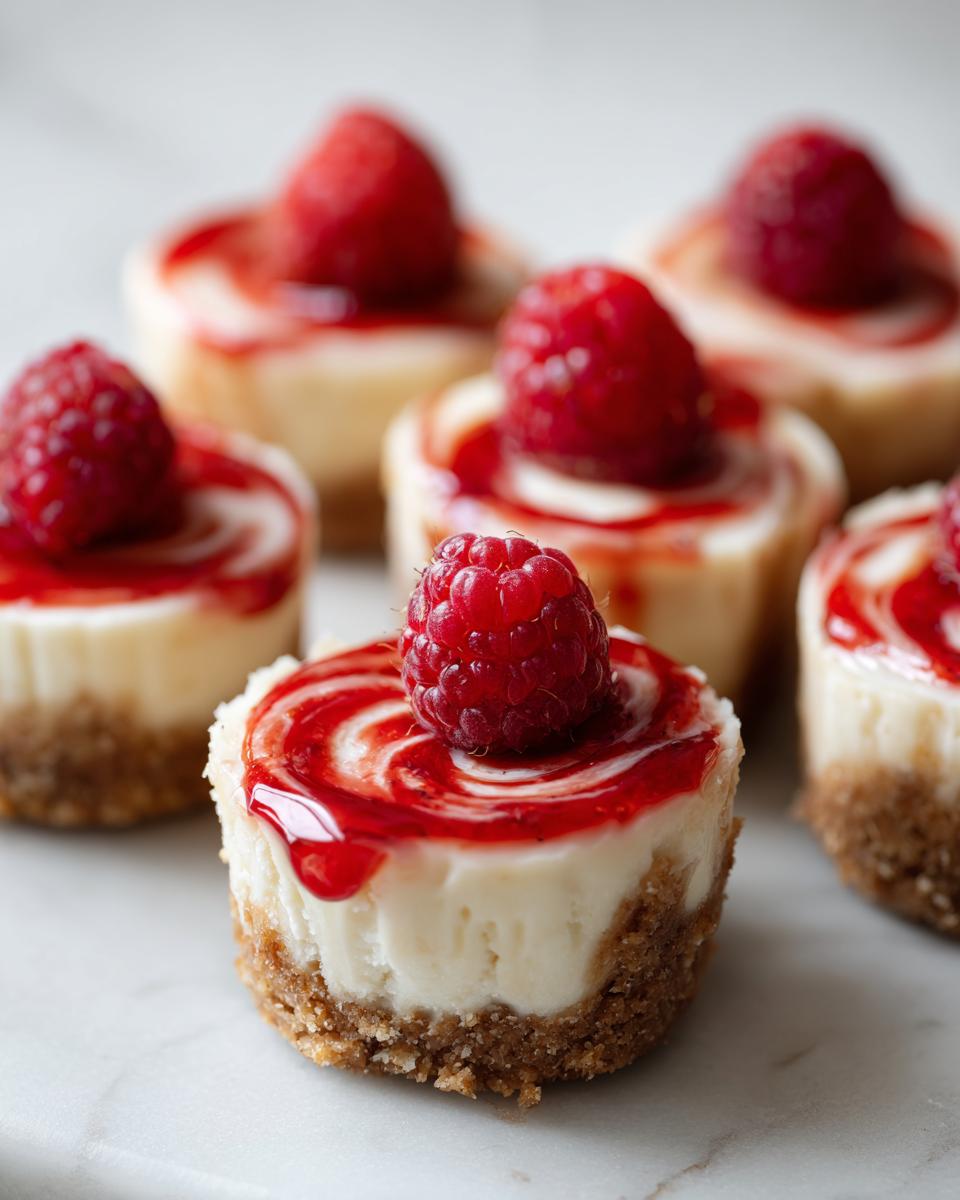
Presentation-wise, skip just plopping them on a paper plate. Arrange them tightly on a white cake stand or a dark slate platter. The contrast makes them pop! If you’re serving them alongside a festive brunch or celebration, these little treats pair wonderfully with something bubbly and light. I find that something refreshing like a classic Bellini cuts through the richness of the cream cheese perfectly, leaving everyone ready for another one of these decadent bite sized desserts!
Storage and Reheating Instructions for Cheesecake Bites
One of the biggest advantages of making these cheesecake bites is that they are fantastic make-aheads! I usually plan to make them the day before a party because they just seem to taste better after they’ve had a good, long chill session to let the flavors marry up.
So, storage is simple, but there’s a huge caveat: toppings are a no-go until serving time. If you put fruit or chocolate drizzle on them right away, the moisture is going to do weird things to the surface while they sit in the cold. Save yourself the trouble and keep them plain!
In the refrigerator, they keep wonderfully in an airtight container for up to five days. That’s right—almost a full week of having perfect little creamy cheesecake treats for a midnight snack. I line the bottom of the container with a paper towel first, just to catch any tiny bit of condensation that might form, keeping the crust nice and crisp.
Now, about freezing these beauties. Yes, you absolutely can freeze your no bake cheesecake bites, and this is great if you’re prepping for a holiday gathering weeks in advance! Freeze them without any toppings—just the plain crust and filling. Lay them out on a baking sheet lined with parchment paper until they are fully frozen solid. Then, you can transfer them into a freezer-safe, airtight container or heavy-duty zip-top bag. They should last beautifully for about a month.
When you want to eat them, just pull out the amount you need and let them thaw in the refrigerator for about 4 to 6 hours. Once they are fully soft and no longer icy, then—and only then—should you take a few minutes to top them with your favorite sauce or some fresh fruit. They’ll taste as fresh as the day you made them! For more make-ahead inspiration, check out the tips over at No-Bake Pink Velvet Cheesecake Bites; they have some similar make-ahead advice!
Frequently Asked Questions About Cheesecake Bites
I always get so many questions when I post these because everyone wants to know the little secrets to making them perfect. Since you’re probably wondering too, I gathered the most common things people ask about making their own mini cheesecake bites recipe come out just right. It’s all about those little details!
Can I make these cheesecake bites ahead of time?
Oh yes, please do! Making these ahead is actually my favorite way to tackle them. You can mix up the crust and the filling, assemble all 24 little guys, and keep them in an airtight container in the fridge for up to 5 days before you serve them. Just remember what I said earlier: hold off on any toppings like fruit or chocolate until right before guests arrive. That way, the crust stays crisp and the topping stays fresh!
What is the best way to get creamy cheesecake treats without baking?
This is the magic of the no-bake method, and it all comes down to two things working together: the heavy cream and the chill time. When you whip the heavy cream, you are incorporating air that gives the filling that light, fluffy lift, which stops the mixture from being stiff or dense like a brick. Then, the long, cold chill time does the rest of the work, helping those fats solidify perfectly. It really ensures you get those lovely, creamy cheesecake treats we’re after. A good long chill overnight is your best friend for these no bake cheesecake bites!
Can I use a different type of cookie for the crust in this simple cheesecake recipe?
Absolutely! While I love the classic flavor of graham crackers, you can switch things up if you’re out or just feeling adventurous. Vanilla wafers are a fantastic substitute, and they give a slightly sweeter, milder base. If you use vanilla wafers or even shortbread cookies, you might want to reduce that extra 1/4 cup of granulated sugar you add to the crust mixture, since those cookies are already sweeter than plain graham crackers. You’ll still be amazed at how delicious these easy cheesecake bites turn out with a simple crumb swap!
Share Your Homemade Cheesecake Bites
I truly hope you are already dreaming about making these! That’s the whole point of this blog—to get you excited about making something wonderful without the stress. Once you whip up your first batch of these fantastic cheesecake bites, I absolutely want to see them! Don’t be shy!
If you make these for a party or just for a quiet weeknight dessert, please come back and leave a rating below. Knowing how they turned out for you—whether you kept them simple or went wild with toppings—helps me keep testing and improving the recipes we all share here on Taste This Plate.
And if you snap a picture, share it on social media so I can see your delicious creations! Tag us so we can cheer you on. I love seeing how everyone customizes these simple treats.
Thank you so much for stopping by my kitchen today. If you have any leftover questions about the technique or ingredients, feel free to pop over to the contact page. Happy baking (or, well, happy chilling)!
PrintEasy No-Bake Mini Cheesecake Bites Recipe

Create creamy, individual cheesecake treats without turning on your oven. This simple recipe uses basic ingredients to make perfect bite-sized desserts ideal for parties or quick cravings.
- Prep Time: 20 min
- Cook Time: 0 min
- Total Time: 4 hr 20 min
- Yield: 24 bites 1x
- Category: Dessert
- Method: No Bake
- Cuisine: American
- Diet: Vegetarian
Ingredients
- 1 1/2 cups graham cracker crumbs
- 1/4 cup granulated sugar (for crust)
- 6 tablespoons unsalted butter, melted
- 16 ounces cream cheese, softened
- 1 cup powdered sugar
- 1 teaspoon vanilla extract
- 1/4 cup heavy cream
- Optional toppings: fresh berries, chocolate drizzle, strawberry sauce
Instructions
- Prepare the crust: In a medium bowl, mix the graham cracker crumbs and 1/4 cup granulated sugar. Pour in the melted butter and stir until the crumbs are evenly moistened.
- Press the crust mixture firmly into the bottom of a lined mini muffin tin (use paper liners for easy removal). You should have 24 small crust bases.
- Make the filling: In a large bowl, beat the softened cream cheese with an electric mixer until smooth. Scrape down the sides of the bowl.
- Add the powdered sugar and vanilla extract to the cream cheese. Beat until fully combined and creamy.
- Slowly mix in the heavy cream until the filling is light and fluffy. Do not overmix.
- Spoon or pipe the cheesecake filling evenly over the prepared crusts in the muffin tin.
- Chill the mini cheesecake bites in the refrigerator for at least 4 hours, or until firm. For best results, chill overnight.
- Once set, remove the cheesecake bites from the liners. Top with your desired toppings just before serving.
Notes
- For a firmer crust, you can bake the crusts for 5 minutes at 350°F (175°C) before cooling and adding the filling.
- If you do not have a mini muffin tin, you can press the crust into the bottom of a 9×13 inch pan and cut into squares after chilling.
- If you want a strawberry crunch topping, crush freeze-dried strawberries and mix them with a small amount of melted white chocolate for a simple crunch.
Nutrition
- Serving Size: 1 bite
- Calories: 180
- Sugar: 15
- Sodium: 110
- Fat: 12
- Saturated Fat: 7
- Unsaturated Fat: 5
- Trans Fat: 0
- Carbohydrates: 16
- Fiber: 0
- Protein: 3
- Cholesterol: 35