
You know those nights when you need a showstopper dessert, but the thought of turning on the oven feels like too much work? I totally get it. That’s why I’m so thrilled to share what I genuinely think is the ultimate Oreo Pie recipe. This isn’t just some tossed-together treat; this is a tested, ultra-creamy, no-bake wonder built for busy people. Here at Taste This Plate, we believe in simple recipes for everyday meals, and this cookies and cream pie proves you can create something memorable without breaking a sweat. Seriously, it’s pure magic!
- Why This No Bake Oreo Pie Recipe Is Your New Favorite Easy Oreo Dessert
- Gathering Ingredients for Your Creamy Oreo Pie Recipe
- Step-by-Step Instructions for the No Bake Oreo Pie
- Tips for Success with Your Oreo Cookies and Cream Pie
- Variations: Making a Chocolate Oreo Pie or Oreo Mousse Pie
- Serving Suggestions for Your Oreo Pie
- Storage and Reheating Instructions for Your Oreo Pie
- Frequently Asked Questions About the Oreo Pie
- Share Your Homemade Oreo Pie Experience
Why This No Bake Oreo Pie Recipe Is Your New Favorite Easy Oreo Dessert
When I tell you this is the most requested Easy Oreo Dessert in my house, I mean it! It checks every single box for a busy cook like me. You don’t need anything complicated, just a few standard pantry items, and you get that classic, decadent cookies and cream texture we all crave.
- It’s completely no-bake—zero oven time needed. Hello, summer cooking!
- The filling is impossibly smooth, almost like a dream.
- It holds its shape beautifully, making it a perfect Dessert for Parties.
Quick Prep Time for Your Oreo Pie
The absolute best feature? The prep time is usually under 20 minutes. After that, it just chills itself! This makes it one of my go-to Summer Pie Recipes when the weather heats up and I don’t want to heat up the kitchen cranking the oven. It’s ready to serve faster than you can decide what movie to watch.
Simple Ingredients for the Best Oreo Pie Recipe
We focus on accessible ingredients here. While pinning similar recipes sometimes claims a ‘6 Ingredient Oreo Pie,’ this version uses a few essentials—like proper cream cheese and pudding—to get that truly thick, rich filling. Trust me; every ingredient serves a purpose in making this the Best Oreo Pie Recipe.
Gathering Ingredients for Your Creamy Oreo Pie Recipe
Alright, let’s talk about what you need to pull this gorgeous Creamy Oreo Pie Recipe together. Remember, simplicity is key here, so use what you can find easily at your regular grocery store. We are aiming for that perfect, cloud-like texture, and the ingredients are what make that happen.
Oreo Crust Recipe Components
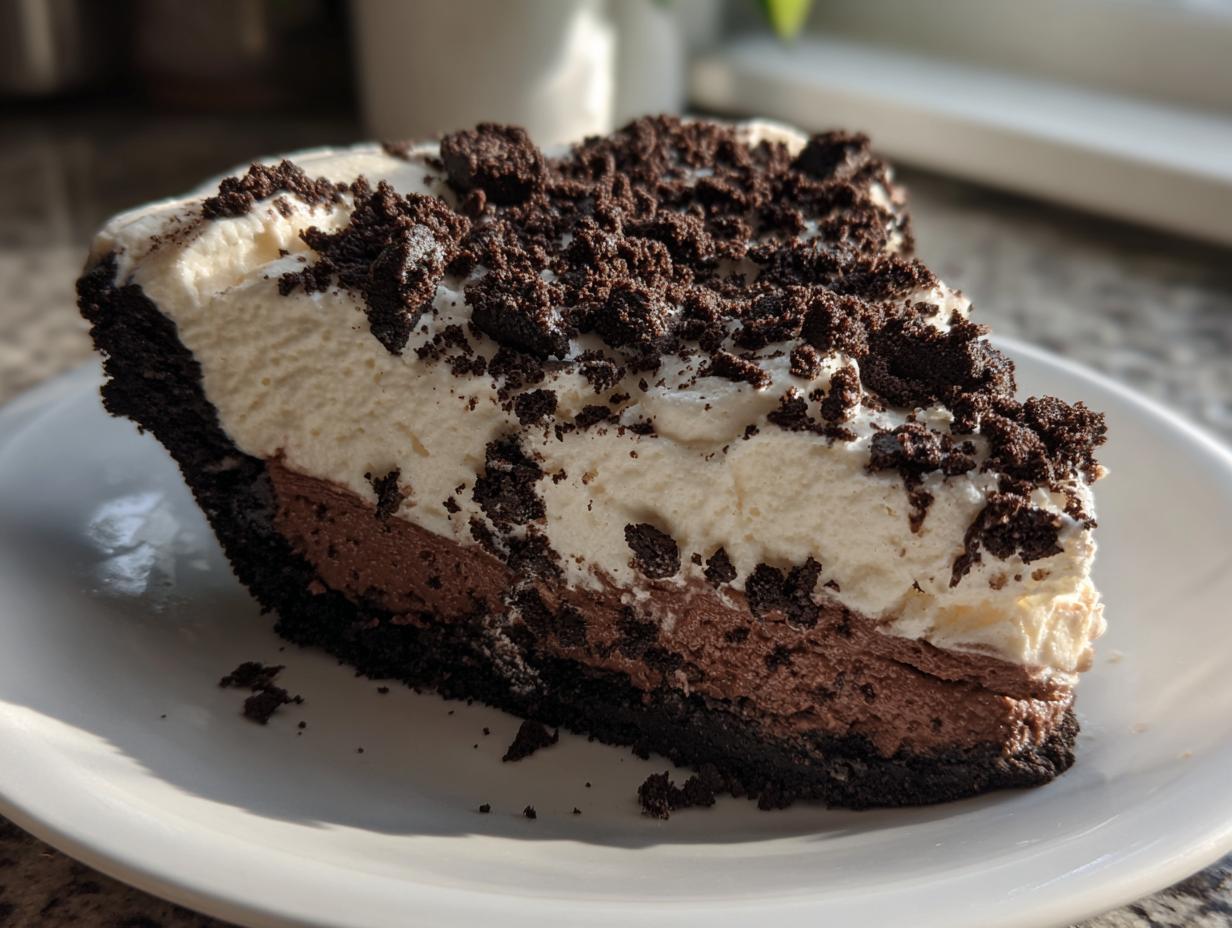
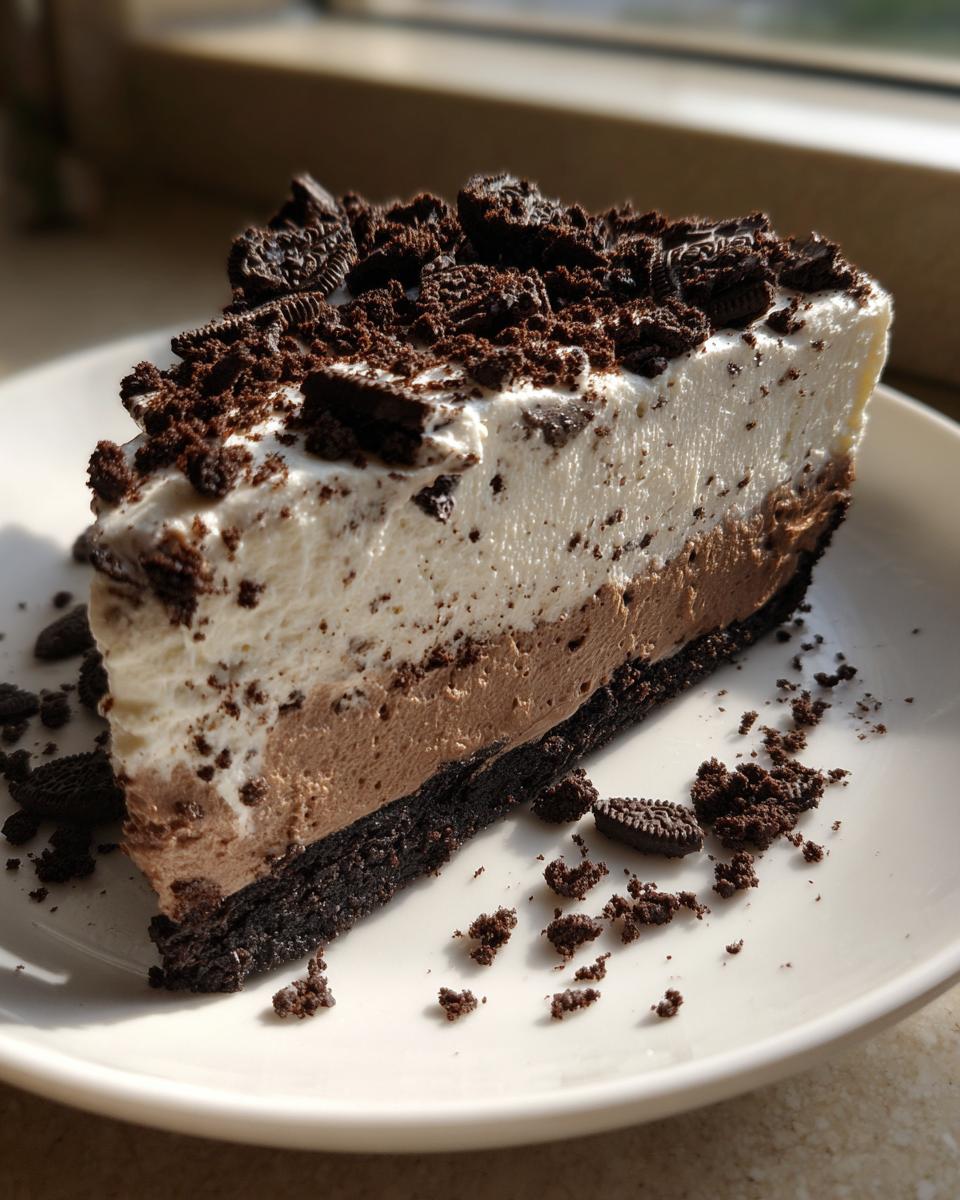
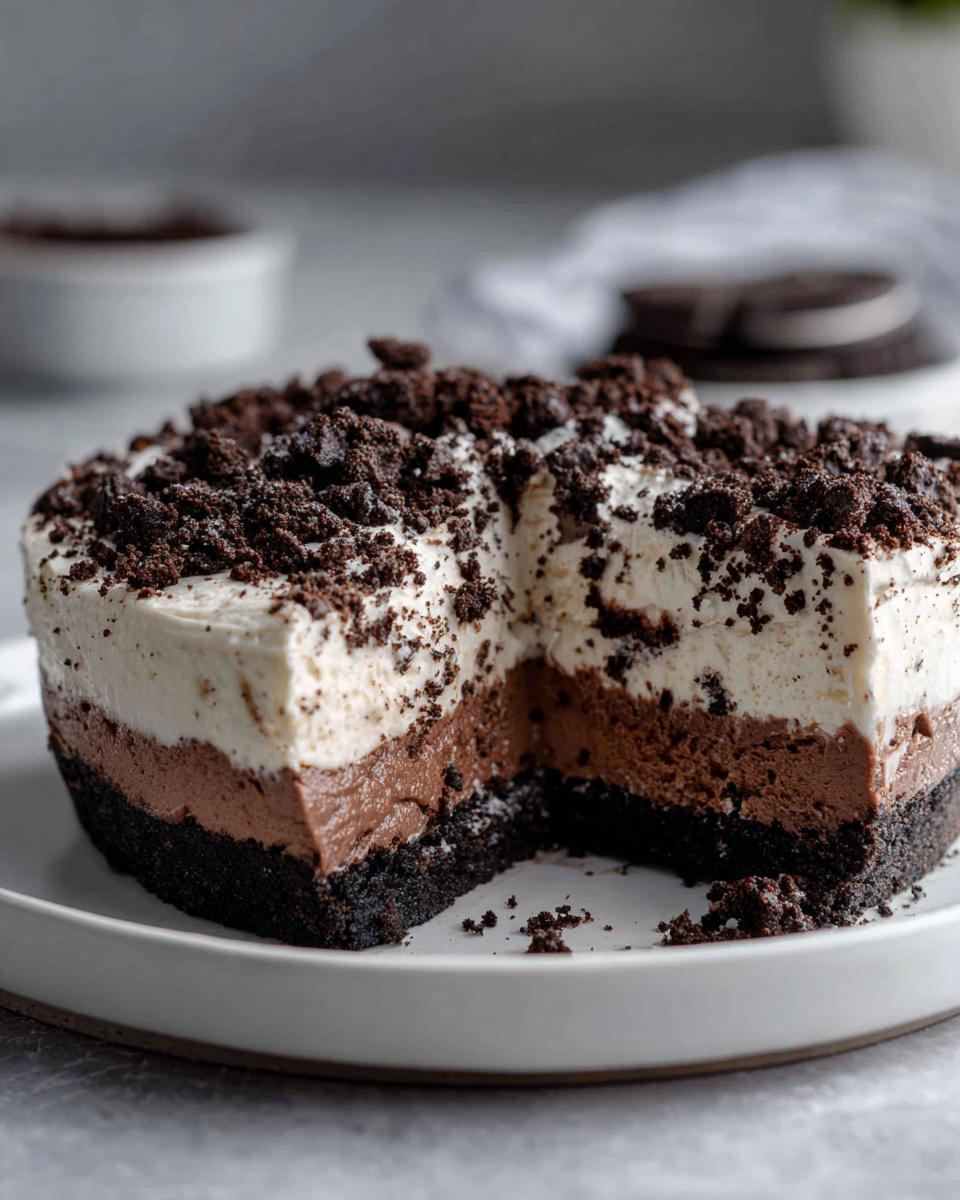
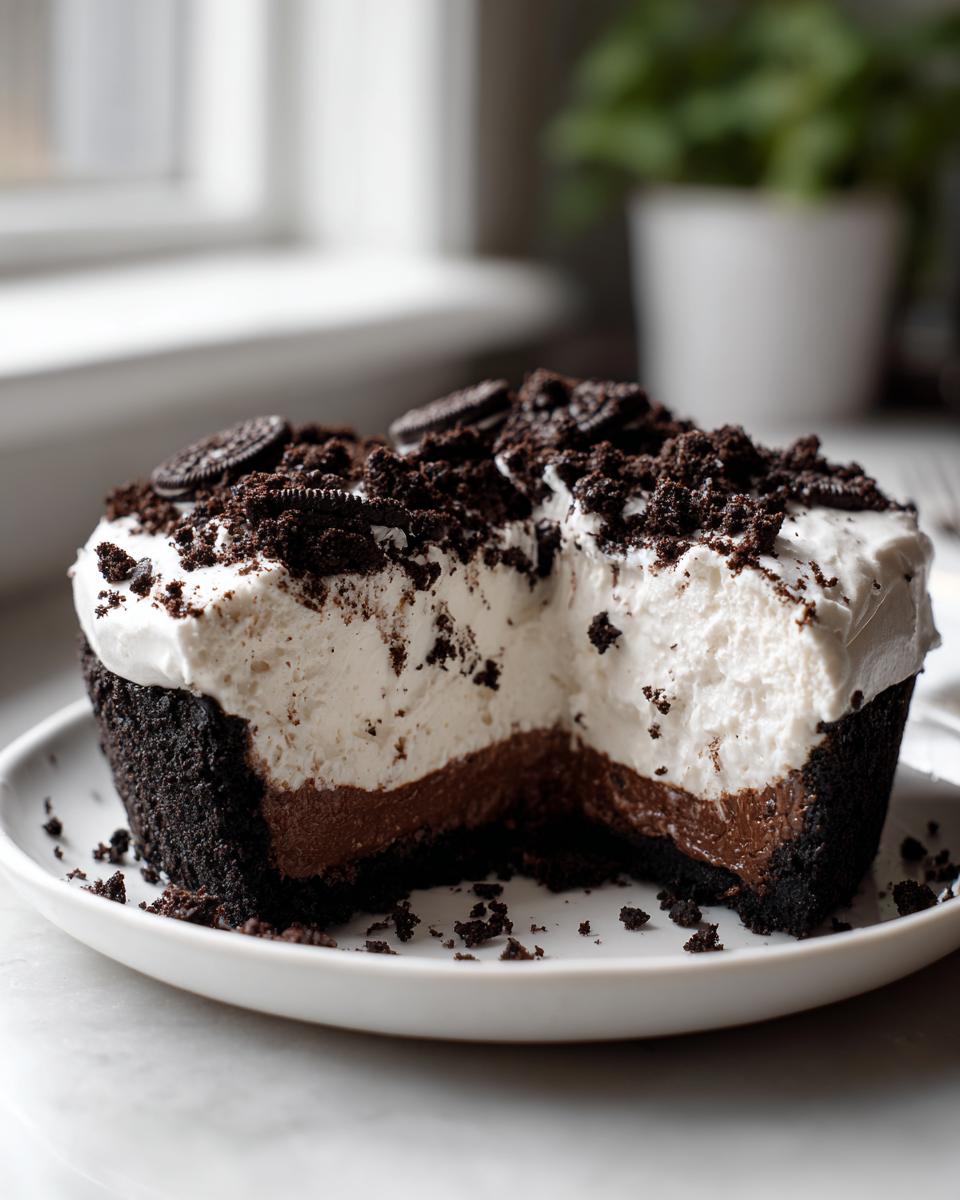
First up, we tackle that crunchy base. You’ll need exactly one and a half cups of finely crushed Oreo cookies—that’s roughly 30 cookies if you’re counting! Make sure they are packed down well when you measure. Then, grab six tablespoons of unsalted butter, melted completely. Mix these two components together until you get that wet sand consistency necessary for a sturdy Oreo Crust Recipe.
Homemade Oreo Pie Filling Ingredients
Now for the star! You’ll need one full 8-ounce package of cream cheese; make sure it’s softened completely so it mixes smoothly. Measure out one cup of powdered sugar and one teaspoon of vanilla extract. For the fluff factor, thaw one 12-ounce container of your favorite whipped topping—that’s the one you buy frozen. Finally, we need one 3.4-ounce package of instant pudding mix. For the milk, measure one and a half cups of cold milk. If you want that richer flavor, just grab chocolate milk!
Step-by-Step Instructions for the No Bake Oreo Pie
This is where the magic happens, and honestly, it’s less cooking and more assembling! Since this is a Quick and Easy Pie, we move fast through the mixing stages. Just make sure you have a sturdy 9-inch pie dish ready to go. Remember, we’re building layers here, so keep things tidy as you work your way toward the best Oreo Pie ever.
Creating and Chilling the Oreo Crust Recipe
First things first: the crust. Take your combined Oreo crumbs and melted butter and mix them well—you want everything evenly coated. Press that mixture firmly into the bottom and up the sides of your pie dish. Don’t be shy; press it down hard so it holds together when slicing later! Once it’s packed in, pop that whole dish into the freezer. This chilling step is vital while you whip up the two creamy layers.
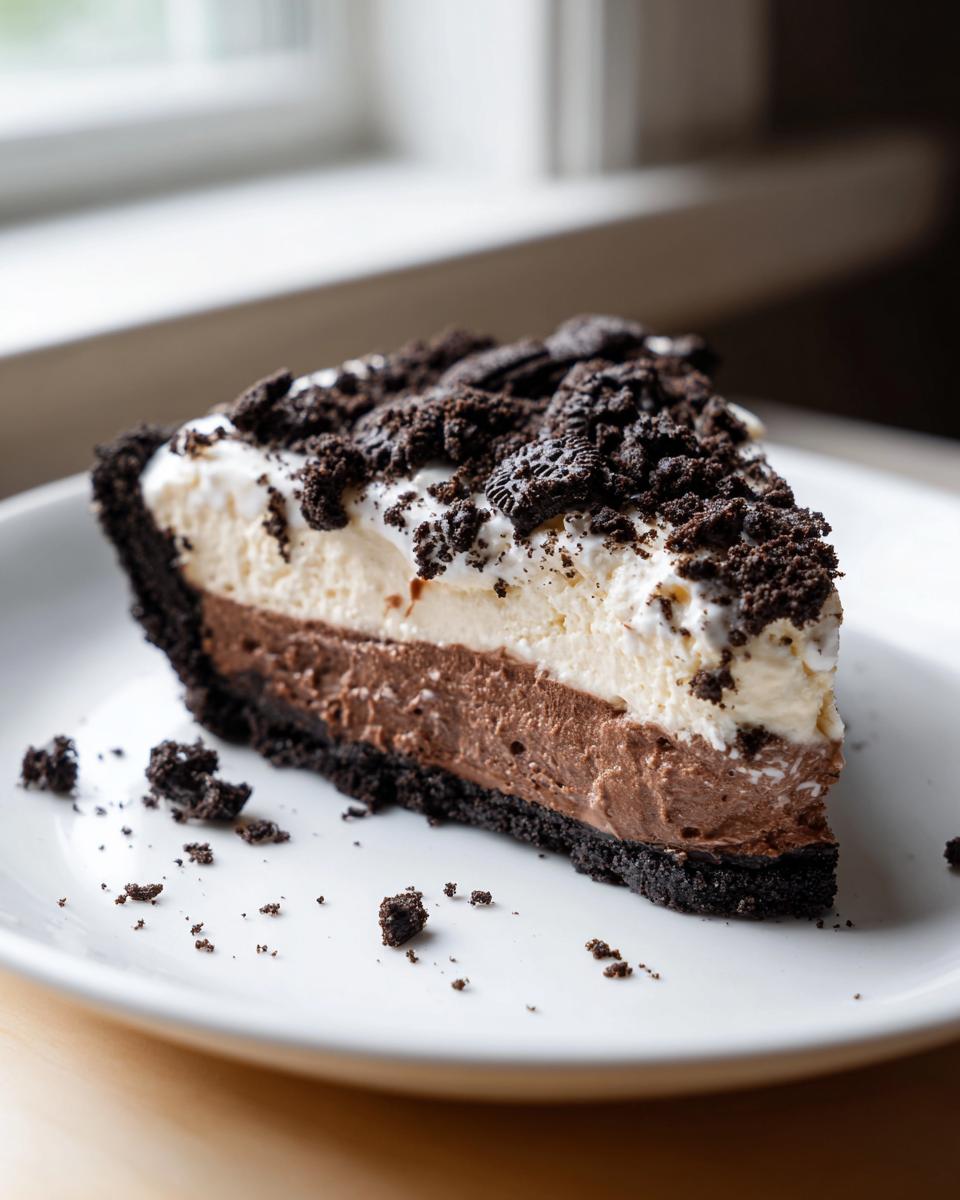
Building the Cream Cheese Layer for Your Oreo Pie
Grab a large bowl and beat your softened cream cheese until it’s completely smooth—no lumps allowed! Slowly beat in the powdered sugar and vanilla extract until everything is looking uniform. Now, take *half* of your thawed whipped topping and very gently fold it in. I mean gentle! We want to keep air in here so the layer stays light. Spread this creamy mixture evenly over your frozen crust base.
Preparing and Layering the Creamy Cookie Pie Filling
In a separate bowl, it’s time for the pudding layer. Whisk your instant pudding mix and the cold milk together vigorously for about two full minutes. It’s going to look soupy, but let it sit on the counter for five minutes—it thickens up fast! Once it’s slightly thick, gently fold in the remaining half of the whipped topping. Now, spread this luscious pudding layer right on top of that cream cheese layer you just set in the crust.
Setting and Serving Your Simple Oreo Dessert
Almost done! Cover the pie bowl super loosely with plastic wrap—you don’t want the wrap touching the filling. Place it in the refrigerator. This needs a solid four hours to set completely, but honestly, overnight is best for an amazing Make Ahead Dessert consistency. When you’re ready to serve this Simple Oreo Dessert, pull it out and shower the top with extra crushed Oreos for that final crunch!
Tips for Success with Your Oreo Cookies and Cream Pie
Achieving that perfect, sliceable texture in this no-bake beauty takes just a couple of tricks I borrowed from my experimenting days. It’s not just about throwing things in a bowl; it’s about making smart choices!
If you want to double down on the chocolate flavor—which, let’s be honest, you probably do—switch to chocolate sandwich cookies for the crust and use chocolate instant pudding in the filling. It amps up the richness beautifully!
And remember that chilling time? Don’t rush it! While the recipe says four hours minimum, if you can push it to six hours or prep it the day before, like a great Make Ahead Dessert should be, the filling sets up much firmer. Nobody wants a sloppy slice, right?
Also, just a quick note about texture: if you happen to have leftover pastry cream from another recipe, that works brilliantly as a substitute for the pudding layer, but you’ll need to make sure it’s fully chilled before continuing. It gives a slightly different, denser mouthfeel, which some people love!
Variations: Making a Chocolate Oreo Pie or Oreo Mousse Pie
While the classic cookies and cream version is just divine, I love experimenting when I make this pie again. If you’re dealing with a serious crowd of chocolate lovers—and who isn’t?—you can easily pivot this number into a richer experience. It’s so adaptable, which is why it always ends up on my list of favorite Dessert for Parties.
To really lean into that deep chocolate vibe and create a true Chocolate Oreo Pie, you just need to swap out two elements. First, for the crust, use chocolate sandwich cookies instead of the regular ones. Second, and this is the fun bit, use cold chocolate milk when you mix up that instant pudding in Step 3. That little switch instantly boosts the richness of the filling layers!
Now, if you’re chasing that super airy, cloud-like texture—what you might call an Oreo Mousse Pie—the key is simple: chilling time. While the recipe works great at the 4-hour minimum, if you chill it closer to six hours, or let it hang out overnight, the layers firm up just that little bit more. Plus, if you happen to have some leftover chocolate pastry cream, swapping that in for the instant pudding is a neat trick for a slightly denser, more sophisticated texture. It’s still incredibly fast, but gives you a wonderful elevation!
Serving Suggestions for Your Oreo Pie
Because this Oreo Pie is so incredibly rich and creamy—packed with cookies and cream goodness—you need something bright on the side to cut through all that decadence. I generally avoid serving it with anything else heavy.
It’s fantastic alongside a fresh fruit arrangement—strawberries and raspberries are perfect partners for the dark chocolate flavor! If you’re looking for a beverage pairing, skip the heavy sodas. Instead, try making a batch of my Sparkling Honey Lemonade Soda; its bright citrusy lift really balances the sweetness of the pie. It’s the perfect refreshment to sip while you enjoy every rich slice!
Storage and Reheating Instructions for Your Oreo Pie
Listen, this No Bake Oreo Pie is a champion make-ahead dessert, but because it relies on the stability of cream cheese and whipped topping, we have to treat it right when storing it. The good news is that leftovers keep wonderfully, provided they stay *cold*! That’s the number one rule for any pie featuring creamy layers.
You absolutely cannot reheat this pie. It uses whipped topping and cold-set pudding; heating it up turns it into a sweet, sad puddle, and nobody wants that disaster! This pie needs to stay chilled from the moment it sets in the fridge until the moment you eat it.
When putting leftovers away, make sure you cover the pie dish tightly. I usually place plastic wrap directly on top of the filling, making sure it doesn’t stick, and then secure an outer layer of foil around the edges. This double-layer protection keeps out any fridge odors. Stored this way, your leftover slices will stay perfectly delicious for about three to four days in the refrigerator.
If you are transporting leftovers, make sure to use an insulated container or keep it chilled until serving time. Honestly, it tastes best within the first 48 hours, but it should hold up fine until your next gathering!
Frequently Asked Questions About the Oreo Pie
When you’re making a classic like this, questions are bound to pop up! I’ve answered a few things I hear a lot from readers who are setting out to make their first batch of this wonderful Oreo Pie. Don’t hesitate to reach out if yours isn’t covered here!
Can I make this Oreo Pie the day before serving?
Absolutely! In fact, I highly recommend it. This is genuinely a great Make Ahead Dessert because those creamy layers need time to firm up properly. If you can manage to get it into the fridge the night before you need to serve it, that guarantees the structure will be perfect when you slice into it. You just can’t beat that clean, chilled slice!
How does this compare to a Village Inn Style Pie Recipe?
That’s a fair question! We all know those famous diner pies, and people often search for a Village Inn Style Pie Recipe copycat. The good news is that our recipe delivers that same decadent, deeply embedded cookies-and-cream experience. The secret here really lies in that two-layer filling—the cream cheese base followed by the pudding layer. It gives you that incredibly creamy, rich, almost mousse-like filling that stands up tall and tastes just as indulgent.
What if I don’t have instant pudding?
Oh, I’ve been there! If you’re out of the instant mix, you can certainly use cook-and-serve pudding, but you must fully cook it according to package directions first. Then, you need to whisk in just a tiny bit less milk than the box calls for, let it cool down almost completely—warm pudding and whipped topping do not mix!—and *then* gently fold in your whipped topping. It’s a bit more work, but it still results in a lovely pie!
Share Your Homemade Oreo Pie Experience
What I really love about sharing these simple recipes, like this amazing Oreo Pie, is seeing how you bring them into *your* kitchens. Food is about community, right? So, once you’ve whipped up this no-bake beauty, I would absolutely love to hear about it!
Did you add some peanut butter to the filling? Maybe you used chocolate milk like I suggested for an extra boost of flavor? Tell me everything! Drop a quick rating in the box below—let me know how many stars this easy dessert earned in your family.
Hearing your feedback helps me know which recipes to keep testing and refining for all of us here at Taste This Plate. We’re all learning and making memories together around the table, one simple ingredient at a time. Happy baking—or in this case, happy *not* baking!
PrintEasy No Bake Oreo Pie

Make this simple, creamy Oreo Pie without turning on your oven. It uses few ingredients and delivers the classic cookies and cream flavor everyone loves, making it a perfect dessert for any gathering.
- Prep Time: 20 min
- Cook Time: 0 min
- Total Time: 4 hr 20 min
- Yield: 8 servings 1x
- Category: Dessert
- Method: No Bake
- Cuisine: American
- Diet: Vegetarian
Ingredients
- 1 1/2 cups crushed Oreo cookies (about 30 cookies)
- 6 tablespoons unsalted butter, melted
- 1 (8 ounce) package cream cheese, softened
- 1 cup powdered sugar
- 1 teaspoon vanilla extract
- 1 (12 ounce) container frozen whipped topping (like Cool Whip), thawed
- 1 (3.4 ounce) package instant chocolate or vanilla pudding mix
- 1 1/2 cups cold milk (use chocolate milk for chocolate filling)
- Extra crushed Oreos for topping
Instructions
- Prepare the crust: Mix the crushed Oreo cookies and melted butter in a bowl until the crumbs are evenly moistened. Press this mixture firmly into the bottom and up the sides of a 9-inch pie dish. Place the crust in the freezer while you prepare the filling.
- Make the cream cheese layer: In a large bowl, beat the softened cream cheese until smooth. Gradually beat in the powdered sugar and vanilla extract until fully combined. Gently fold in half of the thawed whipped topping until no streaks remain. Spread this mixture evenly over the chilled Oreo crust.
- Prepare the pudding layer: In a separate bowl, whisk the instant pudding mix and cold milk together for about two minutes, or until the mixture begins to thicken slightly. Let it sit for five minutes.
- Combine the fillings: Gently fold the remaining half of the whipped topping into the thickened pudding mixture. Spread this creamy layer over the cream cheese layer in the pie crust.
- Chill the pie: Cover the pie loosely with plastic wrap and refrigerate for at least 4 hours, or preferably overnight, until the filling is completely set.
- Serve: Before serving, sprinkle the top of the pie generously with extra crushed Oreos. Slice and serve cold.
Notes
- For a richer chocolate flavor, use chocolate sandwich cookies for the crust and chocolate instant pudding for the filling.
- If you want a thicker, more decadent filling, chill the pie for 6 hours instead of the minimum 4.
- You can substitute the instant pudding mix with 1 cup of homemade chocolate pastry cream for a different texture.
- This recipe works well as a make-ahead dessert; prepare it the day before your event.
Nutrition
- Serving Size: 1 slice
- Calories: 380
- Sugar: 35
- Sodium: 280
- Fat: 22
- Saturated Fat: 12
- Unsaturated Fat: 10
- Trans Fat: 0.5
- Carbohydrates: 45
- Fiber: 1
- Protein: 4
- Cholesterol: 45