
There is just something about the holidays that makes you crave the familiar—the smell of pine, the twinkle of lights, and, for me, the taste of rich, perfect eggnog. Forget those thin, overly sweet cartons you grab at the store; we’re doing this the way it should be done! This recipe for homemade eggnog is the absolute best; it’s velvety and so much thicker than anything else I’ve tried. When I started Taste This Plate, my goal was to simplify those memorable flavors from my grandmother’s kitchen, and serving up a stunning, crowd-pleasing drink like this every December is truly what it’s all about. If you love this thick texture, you should also check out how we make our coquito recipe! We make sure everyone gets to enjoy this classic, whether you prefer it spiked with a good bourbon or kept purely festive and non-alcoholic. Get ready to fill your glass!
- Why This Homemade Eggnog Recipe is Your Best Holiday Drink Recipe
- Ingredients for Classic Creamy Homemade Eggnog From Scratch
- How to Make Homemade Eggnog: Old Fashioned Eggnog Recipe Instructions
- Spiked Eggnog with Rum or Bourbon Eggnog Recipe Options
- Nonalcoholic Eggnog Recipe: Festive Non-Alcoholic Drinks Alternative
- Tips for Success When Making Homemade Eggnog
- Storage & Reheating Instructions for Your Homemade Eggnog
- Frequently Asked Questions About Homemade Eggnog
- Serving Suggestions for This Classic Holiday Beverages Recipe
- Serving Suggestions for This Classic Holiday Beverages Recipe
Why This Homemade Eggnog Recipe is Your Best Holiday Drink Recipe
Why settle for sad, watery store-bought options when you can create the Best Homemade Eggnog Recipe right here? I developed this because I needed a formula that was absolutely dependable for my holiday parties. You see, every recipe here has been tested and re-tested in my own kitchen, making this a recipe you can trust completely for your gatherings. That custard base is the secret weapon that delivers that incredible, Thick and Creamy Holiday Drink feel. For more kitchen reliability tips, you can always check out my guide on the Best Homemade Eggnog Recipe section! Trust me, once you taste this rich version, you won’t look back. It’s the ultimate classic holiday beverage because it focuses on technique over complicated ingredients.
Achieving That Velvety Winter Beverages Texture
The main reason this eggnog shines is how we handle those egg yolks and sugar right at the start. We gently heat them with the milk and cream until it thickens just enough to coat the back of a spoon. That slow cooking process creates a stable custard—that’s the science behind the richness! It’s what transforms the mixture from thin milk into a proper, Velvety Winter Beverages experience. Don’t rush it, and remember a long chill time is essential for that signature thickness.
Ingredients for Classic Creamy Homemade Eggnog From Scratch
Making truly Creamy Eggnog From Scratch is all about using the right components in the right amounts. I want you to feel confident looking at this list, knowing that every single measurement is precise. This isn’t the time to eyeball things, especially because we are creating a custard base. We are focusing on richness here, starting with eggs and cream. Here is exactly what you’ll need for about six generous servings of the best holiday drink.
- 6 large egg yolks (Yes, six! That’s where the body comes from.)
- 1 cup granulated sugar
- 1/4 teaspoon salt
- 1 teaspoon vanilla extract
- 1/4 teaspoon ground nutmeg, plus more for serving (You need that fresh sprinkle at the end!)
- 1/4 teaspoon ground cinnamon
- 2 cups whole milk
- 1 cup heavy cream
- Optional: 1 cup bourbon, rum, or brandy (We’ll talk about spiking later!)
Ingredient Clarity and Preparation Notes
I always get asked about the eggs, and I want to reassure you right away. Since we are whisking them thoroughly with sugar and salt and then heating the mixture gently on the stovetop, you aren’t dealing with truly raw eggs in the final product. That slow heating process is our insurance policy against scrambling them, which is way more important than worrying about the raw factor!
When measuring your spices, especially the nutmeg, remember that a little goes a long way. That 1/4 teaspoon is for the base flavor; the fresh grating on top is purely for that wonderful, sharp aroma when you pour a glass. Also, please use whole milk—don’t try to swap it for 2% if you want that classic richness. We are building a decadent drink here, not a diet beverage!
How to Make Homemade Eggnog: Old Fashioned Eggnog Recipe Instructions
Now that we have our beautiful ingredients laid out, let’s talk about turning them into that luxurious, homemade eggnog we dream about all year. This method is truly old-fashioned because we take the time to build flavor starting on the stovetop. Don’t let the mention of cooking eggs scare you off; if you follow these steps exactly, you will end up with a flawless, velvety custard base. This is where we prove that making something wonderful takes a little patience, but it’s absolutely worth the effort!
- First things first, grab your medium saucepan. Whisk those beautiful egg yolks together with the granulated sugar and the salt until the mixture looks pale yellow and smooth as silk. You’re incorporating air right here, setting up the base!
- Next, and this part is key for preventing scrambled eggs, place the pan over medium-low heat. You need to *slowly* whisk in the whole milk and the heavy cream. Don’t just dump it all in at once!
- This is the moment that separates the good eggnog from the great eggnog. You need to cook this mixture, stirring constantly with a wooden spoon or a heatproof spatula, until it gets thick enough to coat the back of that spoon. Watch it closely! This slow work usually takes about 10 to 15 minutes. I absolutely cannot stress this enough: Do not let the mixture boil. If it bubbles hard, you’ve gone too far, and those yolks will curdle.
- Once it coats the spoon beautifully, immediately remove the saucepan from the heat. Stir in the vanilla extract, nutmeg, and cinnamon.
- If you are making the spiked version today, now is the time to stir in your chosen spirit—your bourbon or rum goes right in here.
- To ensure we catch any little bits that might have cooked unevenly, pour the entire mixture through a fine-mesh sieve into a large bowl or pitcher. This step smooths out any rough edges.
- Cover the pitcher and pop it into the refrigerator. You must chill this for at least 4 hours, but honestly, if you can wait until tomorrow, do it! That overnight rest is magical for allowing the spices to meld properly.
- When you’re ready to serve your heavenly homemade eggnog, pour it cold into glasses and top each one with a final, fresh sprinkle of ground nutmeg. Pure joy!
Tempering Eggs Safely for Your Homemade Eggnog
When people talk about tempering, they are usually talking about preventing eggs from seizing up when they meet heat, and that’s exactly what we are doing in steps one and two. Before you even turn the burner on, you want those egg yolks thoroughly beaten with the sugar until they lighten in color. This initial whisking creates a protective barrier. When you start slowly drizzling in the milk and cream, you are gently raising the temperature of the yolks incrementally. If you add cold liquid too fast while heating, the proteins in the yolks contract too quickly, resulting in tiny cooked egg bits floating in your drink. By keeping the heat low and stirring constantly, we coax everything into a smooth, consistent base. If you want to really dive deep into the science of custards, I have a full breakdown on fail-proof classic egg custard recipe methods!
Chilling for the Best Thick and Creamy Holiday Drink
I know it feels like forever when you have to wait, but chilling is non-negotiable if you want that signature thickness. Remember, the heat is what *starts* the thickening process, but the cold is what locks it in and thickens it further. Even if you are absolutely desperate to taste it, give it at least 4 hours in the fridge. If you can plan ahead, making this the day before is the real trick to getting the most Thick and Creamy Holiday Drink possible.
Spiked Eggnog with Rum or Bourbon Eggnog Recipe Options
Okay, let’s talk about the fun part! For so many people, the holidays require something just a little stronger in their cup, right? When we serve this homemade eggnog at parties, I usually set up two distinct pitchers—one for the kids and the folks keeping it cozy non-alcoholic, and one batch that gets the grown-up treatment.
When you look back at the instructions, you’ll see exactly where to add your spirits: Step 5 (or Step 6, depending on if you made the basic version first). This timing is intentional! We add the alcohol *after* we take the mixture off the heat and *before* we strain it. Why? Because simmering alcohol can sometimes change its flavor profile, and we want that strong, beautiful spirit flavor to shine through without being cooked off.
My go-to choice is usually high-quality bourbon. The vanilla and oak notes in a good bourbon pair unbelievably well with the nutmeg and cream, making for a truly fantastic Bourbon Eggnog Recipe. But honestly, you can’t go wrong with aged rum or even a good brandy if that’s what you prefer. If you’re interested in other warm, spirited drinks, you might want to peek at my boozy hot chocolate recipe for a different cozy vibe!
If you are sticking to the classic Spiked Eggnog with Rum, make sure you use at least a cup, as the alcohol gets slightly diluted by the dairy base. But remember, you can always adjust once it’s chilled, so start with one cup, give it a taste, and then decide if you need to top it off before serving. It’s your holiday cheer, after all!
Nonalcoholic Eggnog Recipe: Festive Non-Alcoholic Drinks Alternative
Not everyone enjoys spirits, and honestly, sometimes I prefer my holiday cheer to be entirely dairy-based, especially during a long afternoon of hosting! Making a batch of homemade eggnog that everyone can enjoy is just as important as making a boozy one. That’s why this recipe is so fantastic for entertaining—it’s inherently designed to be versatile.
If you are avoiding alcohol entirely, the process is actually easier! You just follow the instructions exactly as written above, stopping right before Step 5/6 where we add the bourbon or rum. That’s it! You skip the spirits, and you are left with a wonderfully Nonalcoholic Eggnog Recipe that is still rich, thick, and deeply satisfying. It’s the perfect base for those who are driving, expecting, or just avoiding alcohol that day.
This is why I always tell people to make one larger base batch and then split it up if they want to spike just a portion. It saves you from having to wash an extra pot! For our non-boozy version, I love to boost the flavor slightly by adding a splash more vanilla or maybe whipping in a little extra heavy cream to make it even more decadent. If you are looking for other great option for your guests that don’t drink, you absolutely have to try my cranberry orange cider punch recipe!
Serving a delicious Festive Non-Alcoholic Drink ensures that every single person seated at your table feels included in the celebration. It’s a small detail, but those welcoming touches are what make the holidays so special.
Tips for Success When Making Homemade Eggnog
I know we’ve covered the steps for making this wonderful homemade eggnog, but let’s pause for a moment and talk about making your life easier during the crazy holiday season. The beauty of the custard base we use here is that it actually *rewards* you for planning ahead. Getting that perfect, thick texture requires patience, and honestly, the flavor demands a little time to settle down and become friends with itself!
The two most important things you can do to guarantee perfection are temperature control while cooking (which we covered thoroughly!) and patience during chilling. Cooling it down properly is the key to thickening the mixture without needing weird stabilizers or thickeners. You want that velvety mouthfeel, and that only happens when the dairy fats and egg proteins have had a long rest together.
Make Ahead Holiday Drinks: Best Practice for Homemade Eggnog
This is truly one of the best Make Ahead Holiday Drinks you can ask for. I’m usually baking and prepping for days before Christmas, so setting aside the eggnog work until two days before the party is a lifesaver. If you follow the recipe all the way through chilling (Step 7), you’ll find that the spices—especially that warm nutmeg and cinnamon—really bloom overnight. When the drink is cold, the texture firms up perfectly, giving you that luxurious, scoopable consistency that feels like true indulgence.
When you wake up the next morning, it’s ready to go. Just give it a good whisk to reincorporate anything that might have settled at the bottom, and you’re set for serving! Making your homemade eggnog ahead of time means less stress right before the doorbell rings, and honestly, that peace of mind is the best garnish of all. For more tips on timing your holiday cooking, you might find my guide on Make Ahead Holiday Drinks really helpful!
Storage & Reheating Instructions for Your Homemade Eggnog
So, you made a massive batch of the most incredible homemade eggnog the world has ever seen? Congrats! Now comes the important, slightly less fun part: storing the leftovers. Since we worked so hard to get that perfect, velvety texture using real dairy and eggs, we need to treat this beautiful drink with respect in the fridge!
My hard rule is simple: homemade eggnog must stay cold. We are absolutely not going to try reheating this drink. Traditionally, eggnog is supposed to be served ice-cold, and trying to warm up a dairy and egg custard mixture on the stovetop again just invites disaster—it risks turning rubbery or scrambling the yolks we worked so hard to temper earlier. Keep it chilled!
When stored properly, your lovely homemade eggnog should keep beautifully in an airtight container in the coldest part of your refrigerator. I find that it stays absolutely fantastic for about 3 to 4 days. After about Day 4, you might notice the flavor softening a bit, or you might see a slight separation, though that’s rare if you used fresh, good ingredients.
If you see a tiny bit of separation (which is common when chilling such a rich mix), don’t panic! It just means the heavier cream content settled a bit. Before serving those leftovers, just give the pitcher a really vigorous whisking or even give it a quick zap in the blender for a few seconds. That simple action brings the richness right back together, and it’s ready to enjoy cold again. It’s the perfect solution for enjoying your favorite holiday drink all week long!
Frequently Asked Questions About Homemade Eggnog
I know when you’re tackling something classic like this homemade eggnog, you probably have a few little questions buzzing around, especially since we are dealing with eggs! Don’t worry, I’ve gathered the most common ones right here. My goal is to make sure your first batch is flawless, so you can serve up the Best Christmas Drinks to Make with total confidence. If you’re looking for a slightly faster version, I have a great guide on a simple eggnog recipe, too!
Can I use pasteurized eggs instead of raw eggs in this homemade eggnog?
That’s a really smart question, and absolutely, you can! If the idea of heating the mixture gently over the stove to temper the yolks makes you nervous, using pasteurized eggs is a perfectly safe shortcut. They’ve already been treated to eliminate potential bacteria, so you could technically skip the stove-heating step entirely and just chill everything. However, I really recommend following the recipe’s cooking instructions anyway, even with pasteurized eggs. Why? Because that gentle cooking is what transforms the mixture into that gorgeous, Creamy Eggnog From Scratch custard texture we love so much!
What is the best alcohol to use for spiked eggnog?
Oh, the fun stuff! For me, the spirit you choose can totally change the vibe of the drink. We mentioned bourbon, rum, and brandy as options, and honestly, they all work wonderfully! If you are going for a rich, deep holiday flavor, I lean heavily towards a good quality bourbon—one that has those lovely caramel or vanilla notes. That makes for a fantastic Bourbon Eggnog Recipe experience. If you prefer something a little spicier, an aged rum is a classic choice that brings lovely molasses complexity. The key here is using a spirit you genuinely enjoy sipping on its own, as its flavor really comes through in the final chilled drink.
How long does homemade eggnog last in the refrigerator?
Because this recipe is made with fresh dairy and cooked yolks, it doesn’t store as long as those industrial shelf-stable versions, but it lasts plenty long enough for a few days of holiday merriment! I find that our homemade eggnog is absolutely at its peak flavor and thickest texture within the first 48 hours. You can typically push it to 4 or maybe even 5 days in the fridge if you keep it sealed tight and super cold. But seriously, once you taste how good it is, it rarely lasts that long! If it looks a little separated when you pull it out later in the week, just give it a hard whisk to blend it back up.
Serving Suggestions for This Classic Holiday Beverages Recipe
You’ve done the hard work, you’ve waited (impatiently, I’m sure!), and now it’s time to present your magnificent homemade eggnog! Since this is a rich dessert-like drink, the garnishes and pairings are just as important as the flavor itself. When I serve this, I treat it like a little holiday cocktail because it deserves that special attention.
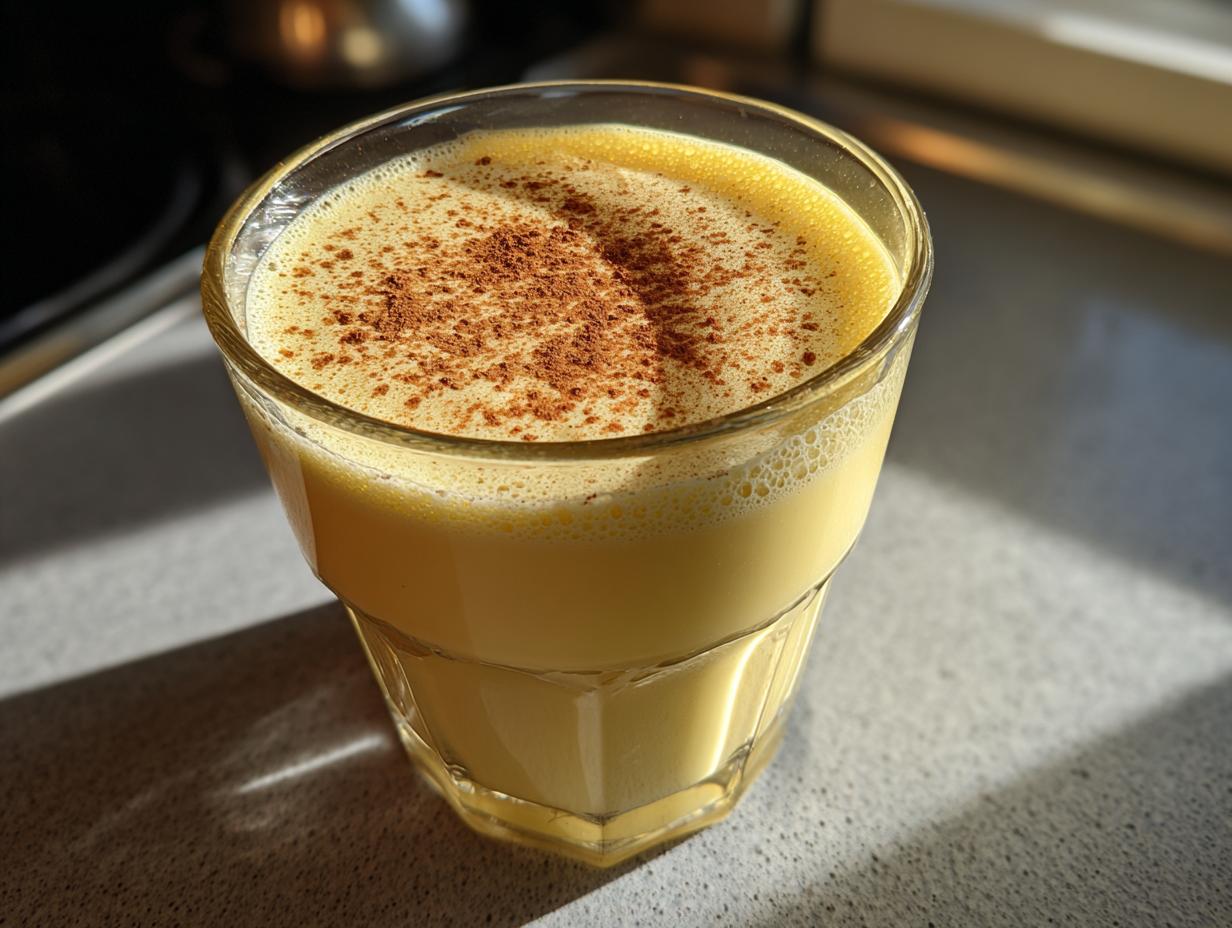
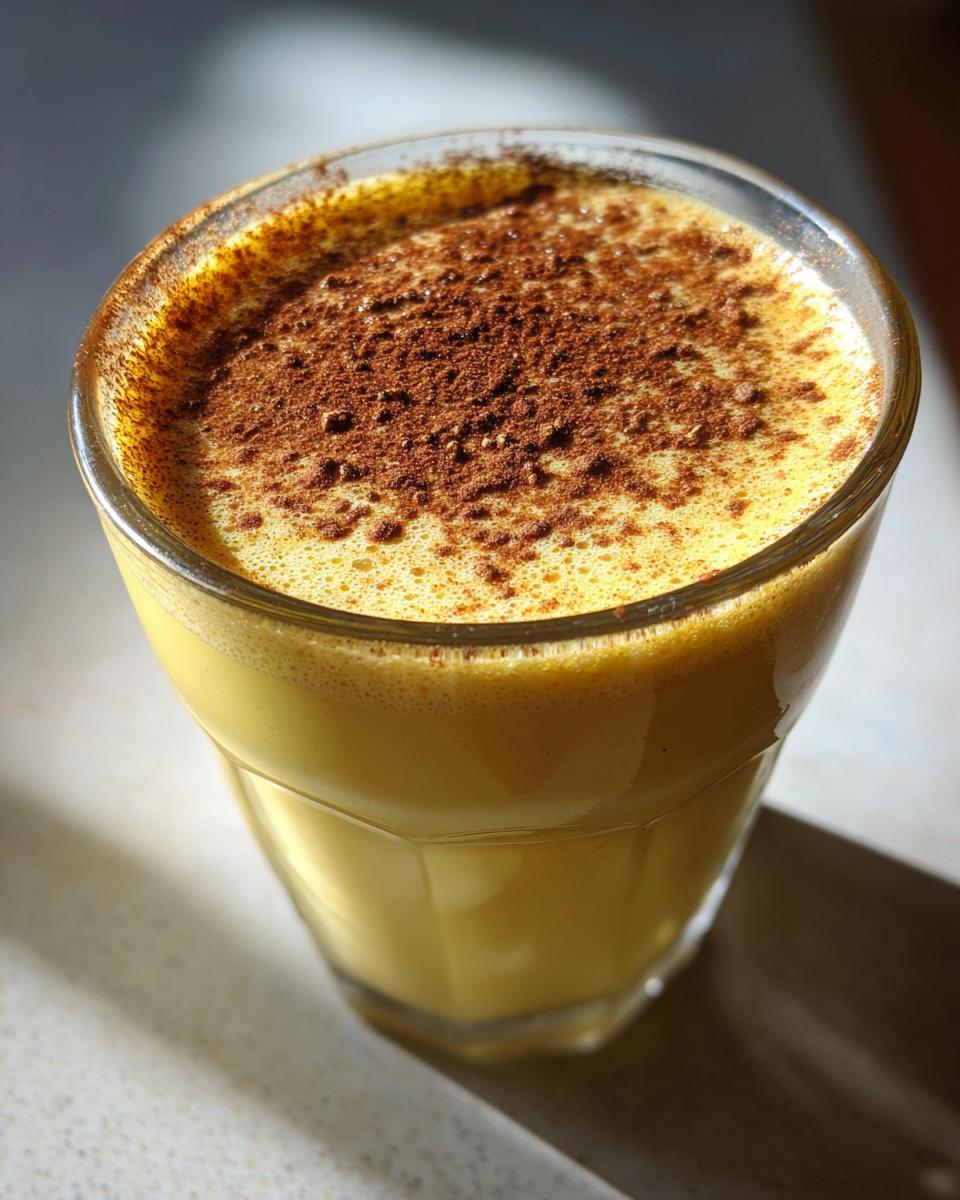
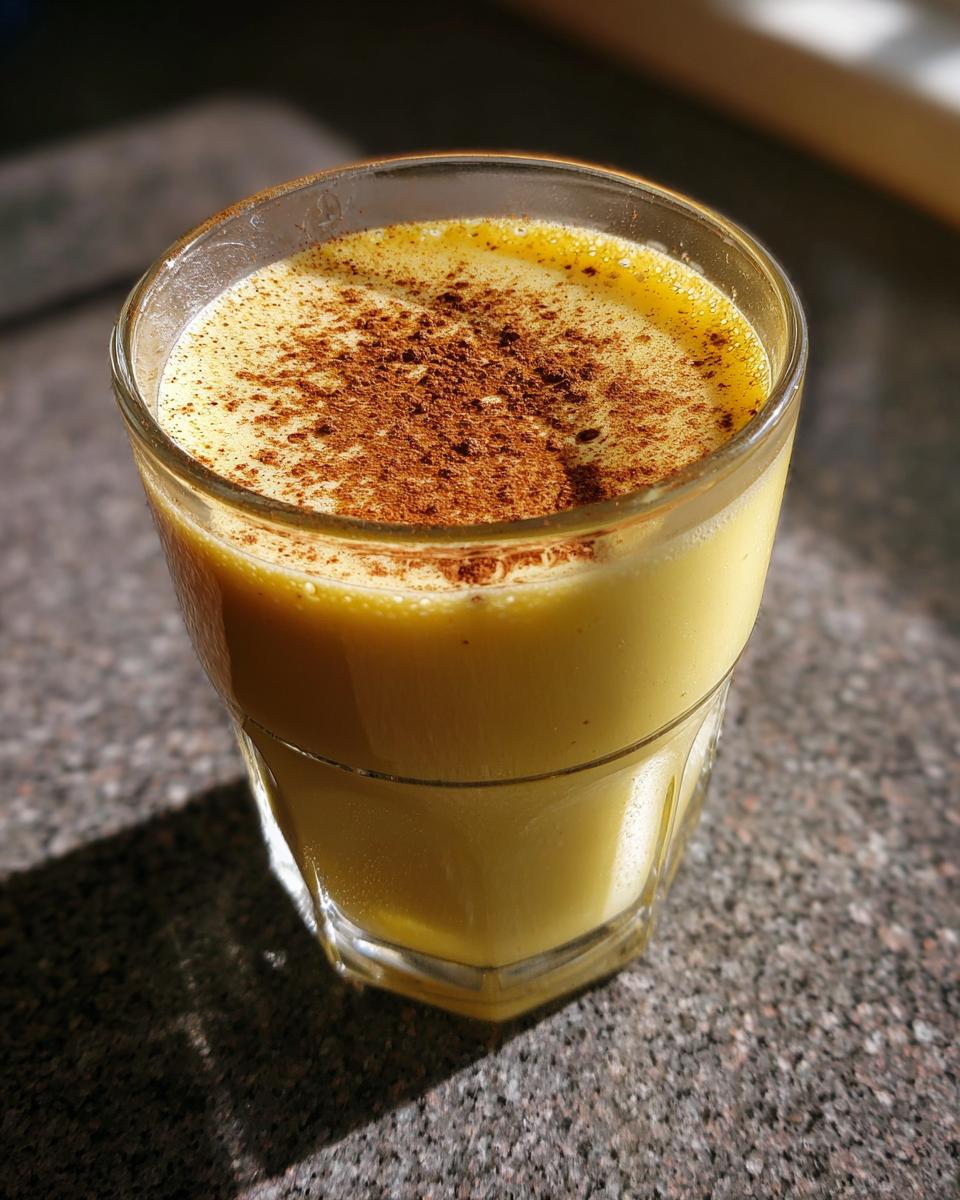
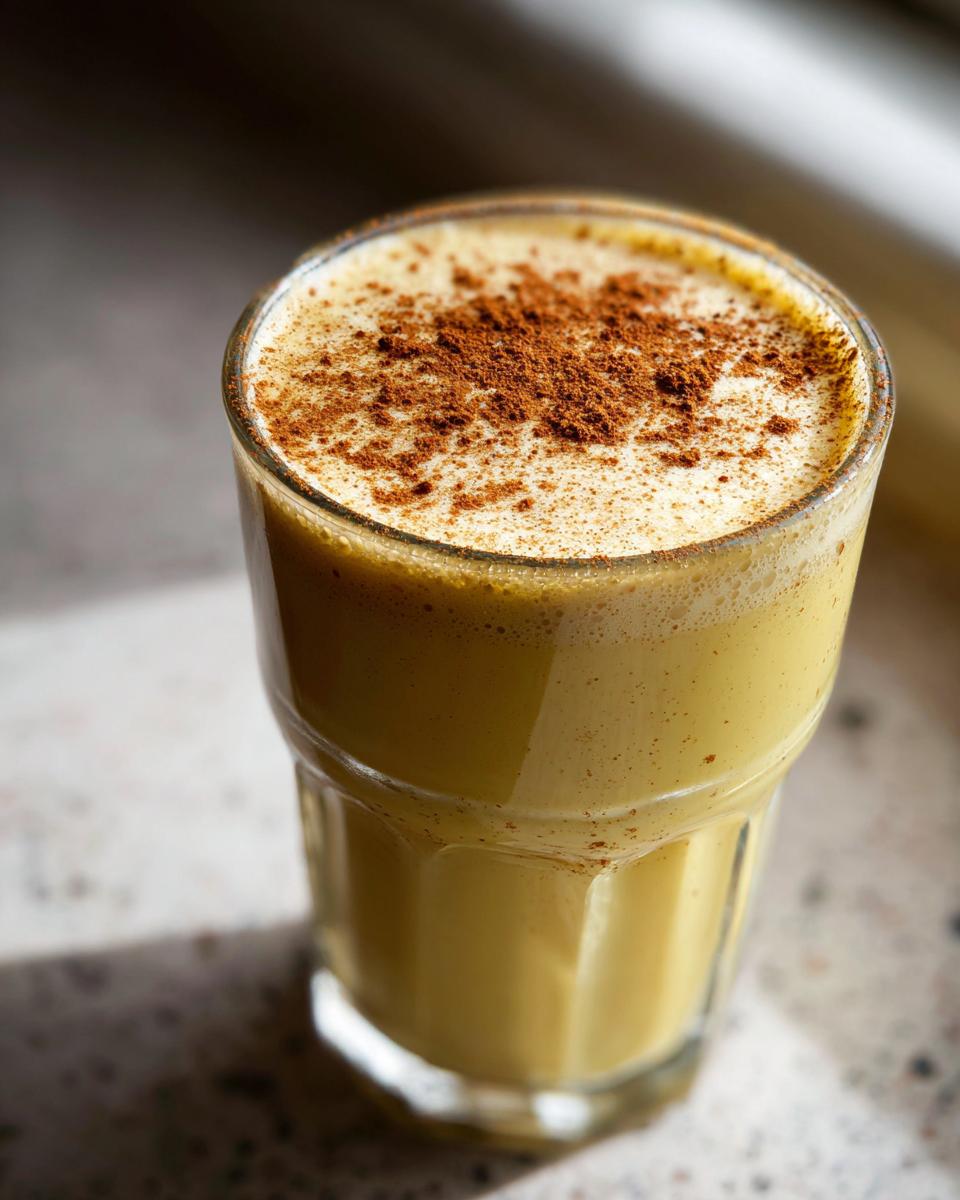
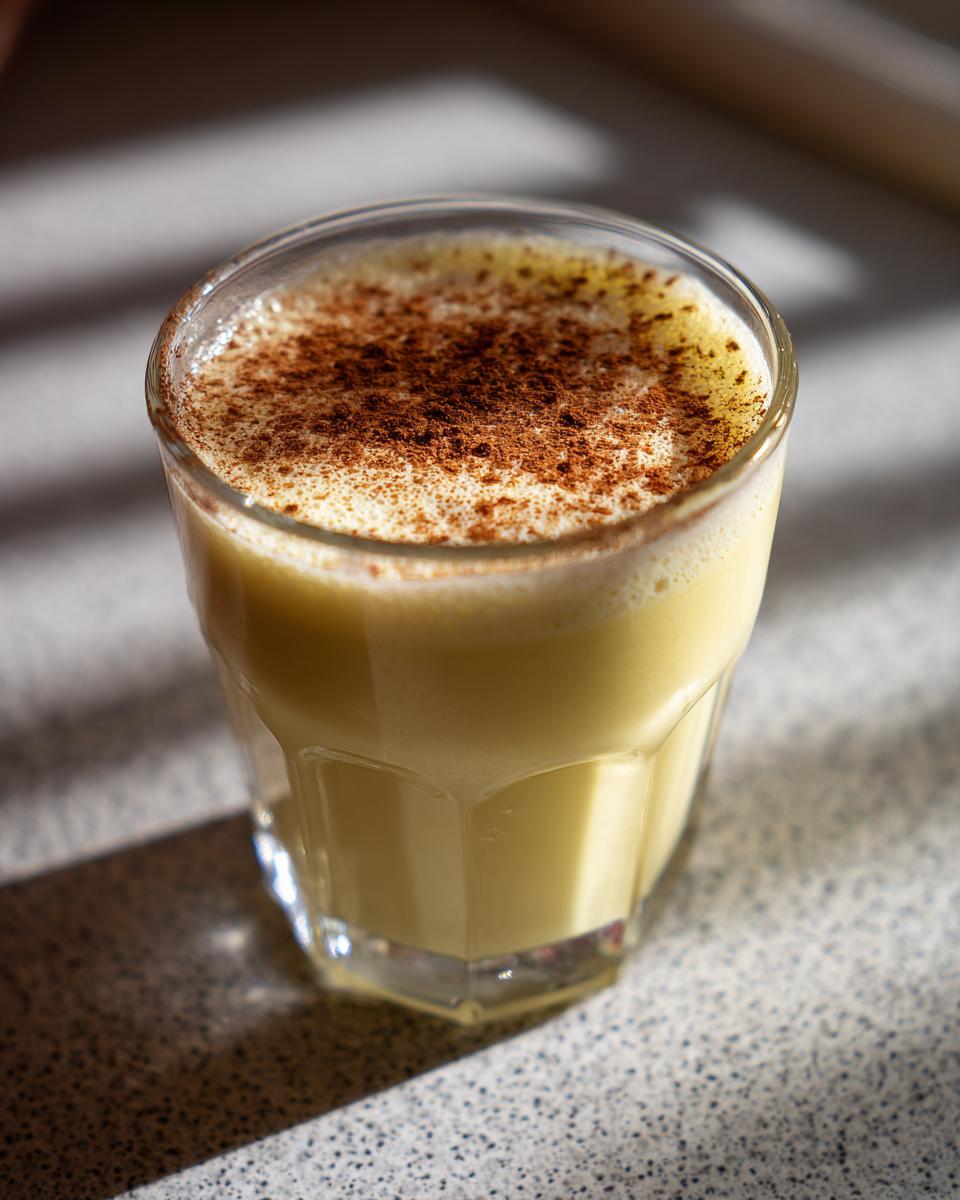
The absolute must-do is grating fresh nutmeg over the top right before you hand the glass over. That sharp aroma you get when the spice hits the cold drink is an unbeatable sensory experience. You can also add a dash of ground cinnamon if you like, though I prefer the nutmeg focus for true holiday cheer.
For an extra festive look—especially if you’re serving it in a punch bowl for your Classic Holiday Beverages spread—toss in a few cinnamon sticks. They look beautiful floating on top and give off just a tiny hint of extra spice. If you’re looking for something delightful to serve alongside your eggnog, you must try pairing a glass with my peppermint bark recipe—the cool mint and the warm spice are just heaven together!
And finally, if you’ve made the non-alcoholic version and want to dress it up for kids or designated drivers, try floating a few dark cherries or even a small vanilla wafer on top. It turns your Festive Non-Alcoholic Drinks into a little dessert cup. Honestly, presenting this rich, creamy drink makes you feel like the most accomplished holiday host there is!
Serving Suggestions for This Classic Holiday Beverages Recipe
You’ve done the hard work, you’ve waited (impatiently, I’m sure!), and now it’s time to present your magnificent homemade eggnog! Since this is a rich dessert-like drink, the garnishes and pairings are just as important as the flavor itself. When I serve this, I treat it like a little holiday cocktail because it deserves that special attention.
The absolute must-do is grating fresh nutmeg over the top right before you hand the glass over. That sharp aroma you get when the spice hits the cold drink is an unbeatable sensory experience. You can also add a dash of ground cinnamon if you like, though I prefer the nutmeg focus for true holiday cheer.
For an extra festive look—especially if you’re serving it in a punch bowl for your Classic Holiday Beverages spread—toss in a few cinnamon sticks. They look beautiful floating on top and give off just a tiny hint of extra spice. If you’re looking for something delightful to serve alongside your eggnog, you must try pairing a glass with my peppermint bark recipe—the cool mint and the warm spice are just heaven together!
And finally, if you’ve made the non-alcoholic version and want to dress it up for kids or designated drivers, try floating a few dark cherries or even a small vanilla wafer on top. It turns your Festive Non-Alcoholic Drinks into a little dessert cup. Honestly, presenting this rich, creamy drink makes you feel like the most accomplished holiday host there is!
PrintClassic Creamy Homemade Eggnog Recipe

Make rich, velvety homemade eggnog from scratch. This old-fashioned recipe gives you instructions for a thick, creamy holiday drink that is far better than store-bought versions. You can easily make this recipe alcoholic with bourbon or rum, or keep it nonalcoholic.
- Prep Time: 15 min
- Cook Time: 15 min
- Total Time: 4 hours 30 min
- Yield: 6 servings 1x
- Category: Dessert
- Method: Stovetop Cooking
- Cuisine: American
- Diet: Vegetarian
Ingredients
- 6 large egg yolks
- 1 cup granulated sugar
- 1/4 teaspoon salt
- 1 teaspoon vanilla extract
- 1/4 teaspoon ground nutmeg, plus more for serving
- 1/4 teaspoon ground cinnamon
- 2 cups whole milk
- 1 cup heavy cream
- Optional: 1 cup bourbon, rum, or brandy
Instructions
- In a medium saucepan, whisk the egg yolks, sugar, and salt until the mixture is pale yellow and smooth.
- Place the saucepan over medium-low heat. Slowly whisk in the whole milk and heavy cream.
- Cook the mixture, stirring constantly with a wooden spoon or heatproof spatula, until it thickens enough to coat the back of the spoon. Do not let the mixture boil. This process takes about 10 to 15 minutes.
- Remove the saucepan from the heat. Stir in the vanilla extract, nutmeg, and cinnamon.
- If making the alcoholic version, stir in your choice of spirit now.
- Pour the eggnog through a fine-mesh sieve into a large bowl or pitcher to catch any bits of cooked egg.
- Cover the eggnog and chill in the refrigerator for at least 4 hours, or preferably overnight, until it is very cold and thick.
- Serve the chilled homemade eggnog in glasses, topping each serving with a fresh sprinkle of ground nutmeg.
Notes
- To make this a nonalcoholic eggnog recipe, simply skip adding the bourbon, rum, or brandy in step 6.
- If you are concerned about using raw eggs, you can temper them over low heat as directed. The gentle heating process cooks the yolks sufficiently for a safe custard base.
- This recipe is excellent for making ahead. It tastes even better after chilling overnight, allowing the spices to fully meld.
Nutrition
- Serving Size: 1 cup
- Calories: 450
- Sugar: 35g
- Sodium: 120mg
- Fat: 28g
- Saturated Fat: 16g
- Unsaturated Fat: 12g
- Trans Fat: 1g
- Carbohydrates: 38g
- Fiber: 0g
- Protein: 10g
- Cholesterol: 250mg