
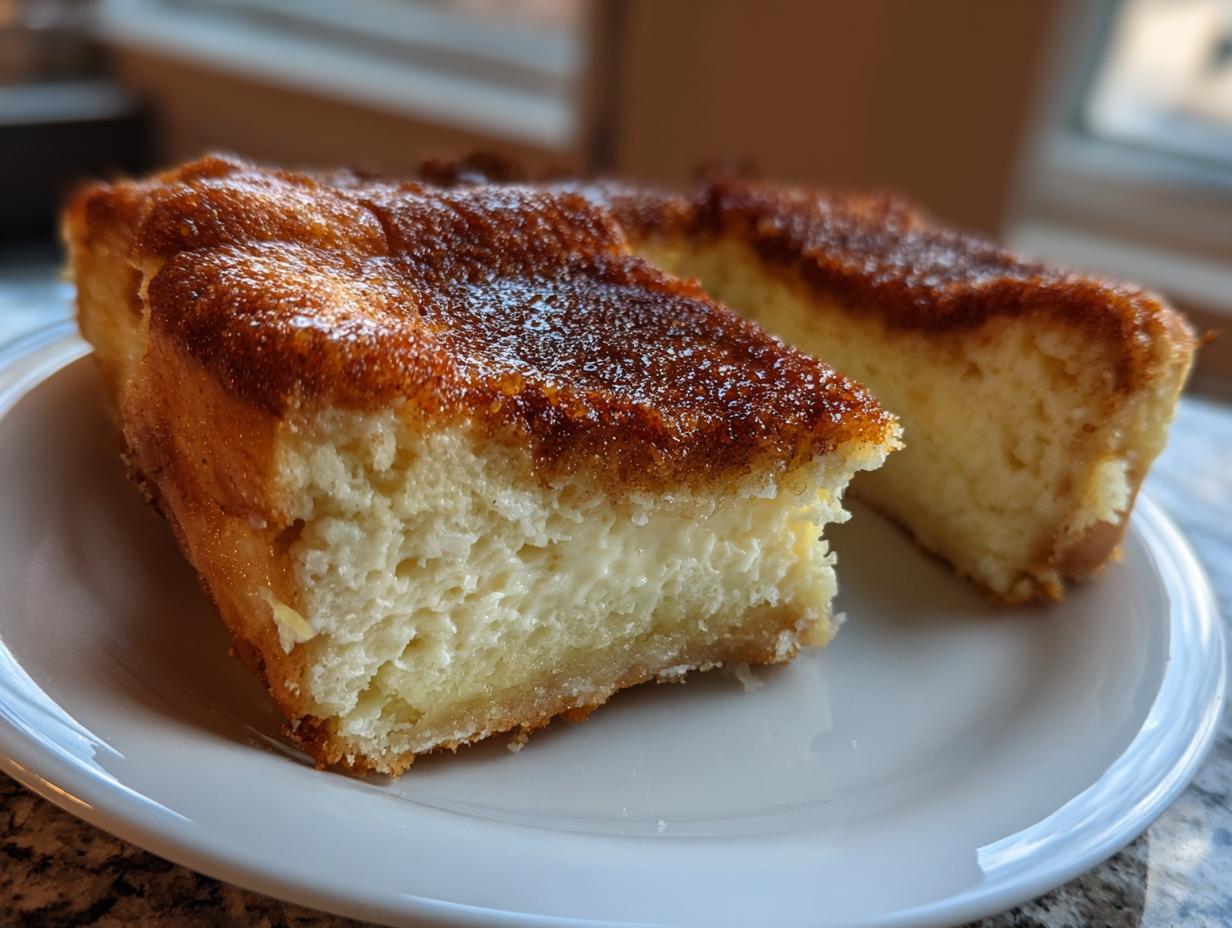
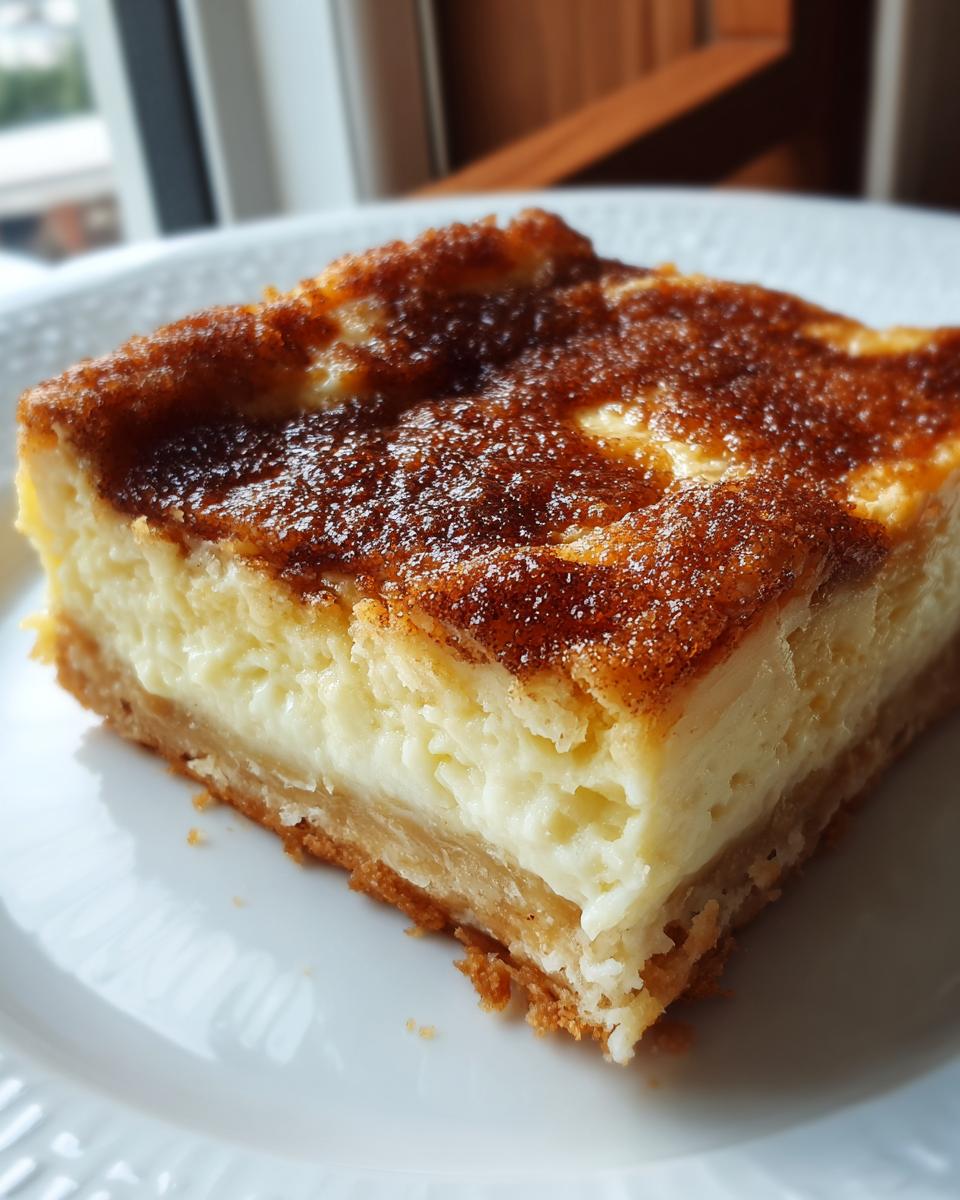
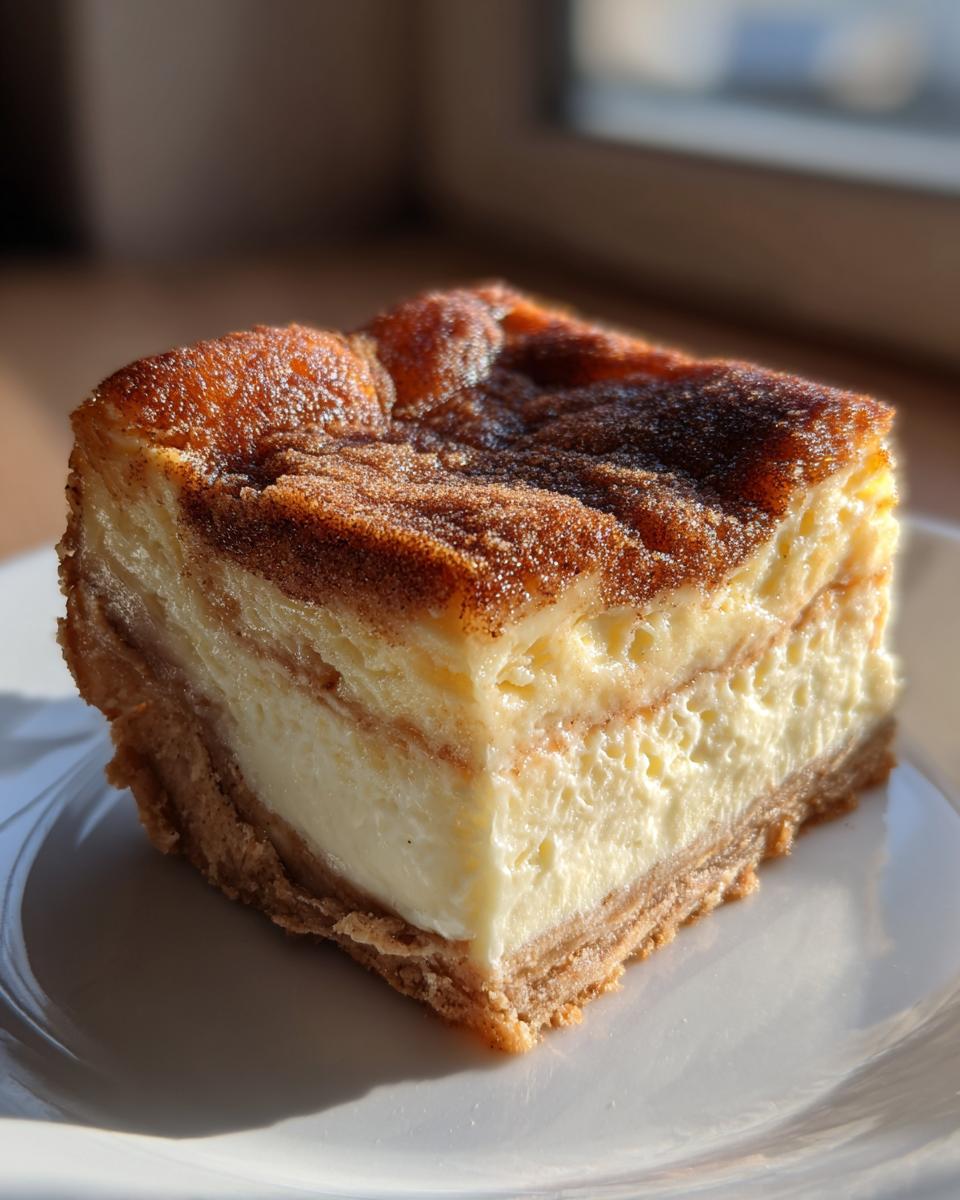
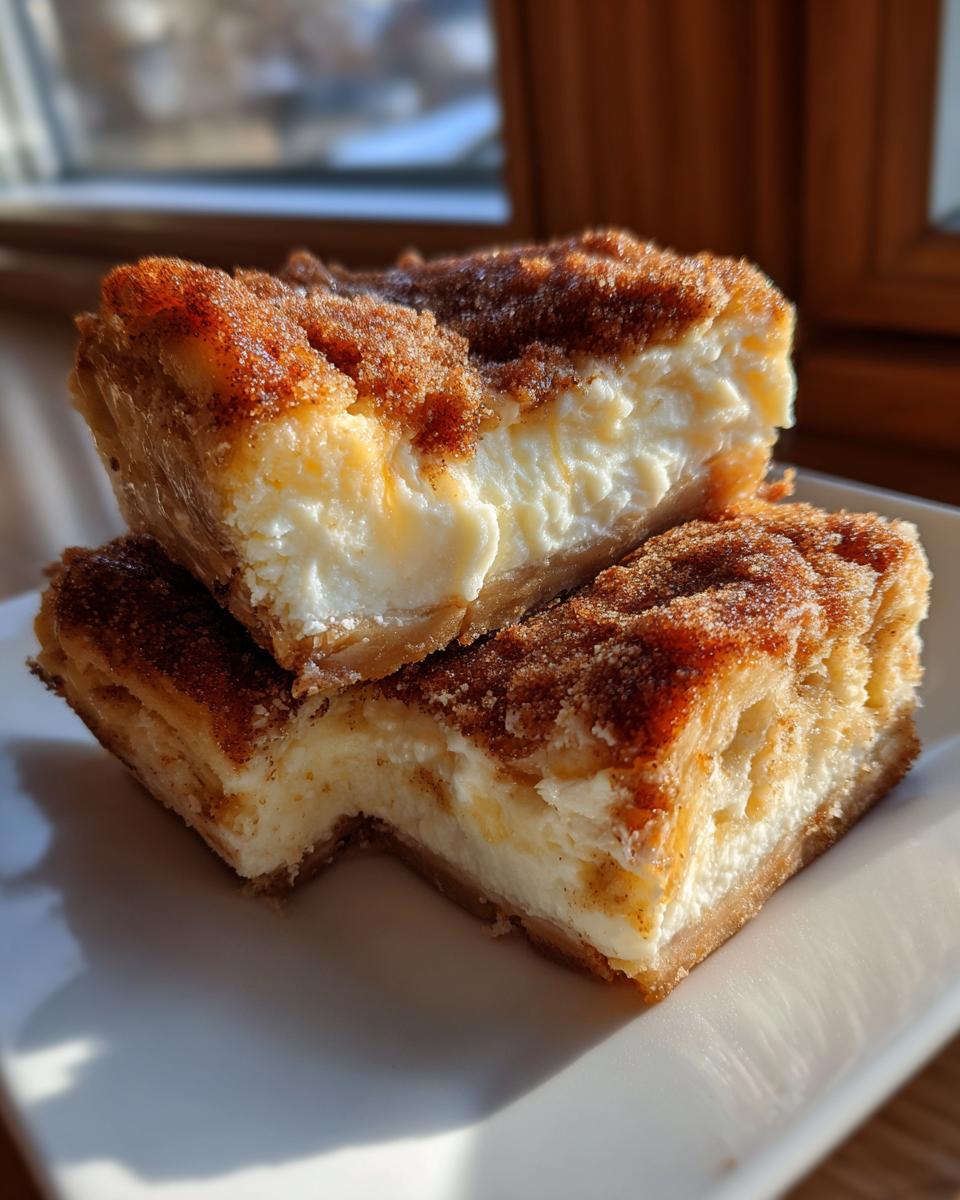
When you’re looking for a dessert that truly sings—that happy marriage between cozy comfort food and a little bit of spice—you have to try the sopapilla cheesecake. I’m Kate, and I promise you, this is the easiest, most wonderful dish you’ll pull from your oven this year. Imagine flaky pastry, a lush, creamy center, and that warm, addictive cinnamon sugar crunch all together. I’ve tested this recipe repeatedly in my real kitchen because I want you to have a flawless result without any fuss. If you’re craving something that tastes like a blend of churros and cheesecake right away, you’ve come to the right place. Get ready to bookmark this one—it’s going straight into our favorite collection of easy dessert recipes.
- Why This Easy Sopapilla Cheesecake Recipe Is a Family Favorite Dessert
- Gathering Ingredients for Your Sopapilla Cheesecake
- Step-by-Step Instructions for Perfect Sopapilla Cheesecake Bars
- Tips for Success When Making Sopapilla Cheesecake
- Variations on the Classic Sopapilla Cheesecake
- Serving Suggestions for Your Sopapilla Cheesecake
- Storing Leftovers of Your Sopapilla Cheesecake
- Frequently Asked Questions About Sopapilla Cheesecake
- Estimated Nutritional Data for One Sopapilla Cheesecake Bar
Why This Easy Sopapilla Cheesecake Recipe Is a Family Favorite Dessert
I know you’re busy, and the last thing I want is for you to stress out over dessert. That’s why this sopapilla cheesecake recipe is quickly becoming the go-to for my own family gatherings. It’s honestly one of the best easy dessert recipes out there that still feels special.
- The Perfect Blend of Churro Cheesecake Recipe Flavors
If you love churros but maybe don’t want to mess with deep frying, this is for you! It perfectly mimics that amazing combination: you get the sweet, flaky dough texture layered with that signature silky cheesecake. It truly is a melt in your mouth dessert experience.
- Simple Ingredients for Quick Baked Sweets
The simplicity here is what sells it for me every time. We aren’t whipping up homemade pastry dough! We rely on those handy tubes of refrigerated dough—total game changer when you need quick baked sweets. If you love crescent roll desserts, prepare to be obsessed.
Gathering Ingredients for Your Sopapilla Cheesecake
Okay, ingredient gathering time! This is why I love making sopapilla cheesecake—you probably have most of this already in the fridge or pantry. We keep this super simple, using store-bought dough to speed things up. Make sure your cream cheese is nice and soft before you start mixing, that’s key for that smooth center. Remember, we’ll be using a little extra sugar for that cinnamon topping, so keep those two bowls separate!
- 2 cans (8 ounces each) refrigerated crescent roll dough
- 1 package (8 ounces) cream cheese, softened
- 1 cup granulated sugar (for the filling)
- 1 large egg
- 1 teaspoon vanilla extract (for that lovely scent, check out my notes on vanilla buttercream for other uses!)
- 1/2 cup (1 stick) unsalted butter, melted
- 3/4 cup granulated sugar (for the topping)
- 2 teaspoons ground cinnamon
Step-by-Step Instructions for Perfect Sopapilla Cheesecake Bars
Alright, let’s get this easy sopapilla cheesecake into the oven! Trust me, timing matters here, but the actual hands-on work is super fast. Remember we are aiming for that beautiful pale golden brown on top, which tells us it’s done.
Preparing the Dough and Filling for Sopapilla Cheesecake
First things first, get that oven preheated to 350 degrees Fahrenheit, and make sure you grease up that 9×13 dish really well. Take one can of those crescent rolls—yes, straight from the can!—and press that dough right into the bottom of your pan. We want an even base layer, so press it out gently but firmly.
Now for the creamy part! In a separate bowl, beat your softened cream cheese with the one cup of sugar, the egg, and vanilla until it looks totally smooth. Seriously, beat it until you can’t see any lumps. Spread this beautiful filling right over your bottom crust layer.
Assembling and Baking Your Sopapilla Cheesecake
Time for the top layer! Unroll that second can of dough and lay it right over the filling. My biggest tip here is to pinch those edges together—really seal them up so that filling doesn’t try to escape while baking! Then, mix your topping sugar and cinnamon together.
Brush the top dough with all that melted butter, and then sprinkle that cinnamon-sugar mix generously over the top. Pop it into the oven for about 25 to 30 minutes. You are looking for the top to be gorgeous and golden brown, and the filling underneath should feel set when you gently shake the pan. When you master this, you’ll have the perfect creamy baked dessert.

Tips for Success When Making Sopapilla Cheesecake
Even though this is an easy recipe, there are a couple of things I learned through trial and error that really make the difference between good and absolutely amazing sopapilla cheesecake. We want that perfect balance—flaky on top, creamy in the middle, and definitely not soggy!
When you brush that butter on the top layer, make sure you get right to the edges. That butter helps toast the very top layer, which works with the cinnamon sugar to create that signature crisp texture we’re aiming for. It really elevates this from a simple dessert to a genuine flaky pastry dessert!
Achieving the Best Creamy Baked Dessert Texture
This is the hardest part, honestly, because it requires patience! You absolutely must let these bars cool completely before you even think about slicing them. I know, I know, the smell is driving you crazy when it comes out of the oven all warm, but Step 10 isn’t optional for perfection. If you slice into it while it’s hot, that gorgeous cream cheese filling will ooze everywhere. Trust me, waiting allows that filling to firm up properly, ensuring you get those beautiful, clean slices of cheesecake bars that everyone compliments you on later.
Variations on the Classic Sopapilla Cheesecake
Part of the fun with any great recipe is making it your own! While I totally stand by the classic preparation for this sopapilla cheesecake, sometimes you need a different size or a little flavor twist. If you’re making this for a smaller crowd, you can absolutely use a 9×9 inch pan instead of the 9×13. Just know you’ll need to bake it for a few extra minutes since the layers will be deeper.
For flavor? Try adding just a tiny splash of almond extract instead of all vanilla in the filling. Or maybe you’re intrigued by recipes like my red velvet cheesecake? You could swirl in a drop of red food coloring for a holiday look, or even add a teaspoon of citrus zest into the filling for brightness. Never stop experimenting!
Serving Suggestions for Your Sopapilla Cheesecake
Once these bars have cooled down and you’ve managed to slice them neatly—which is a victory in itself!—it’s time to present them. The warm cinnamon and vanilla flavors beg for something cozy alongside them. I absolutely love serving these with a mug of creamy hot chocolate; it’s the ultimate comfort combination, especially on a chilly evening. You can find my recipe for the best creamy hot chocolate linked right there.
If you want something lighter, a dusting of simple powdered sugar right before serving really makes the golden color pop. A small dollop of lightly sweetened whipped cream on top of each bar is also divine and adds a nice temperature contrast!
Storing Leftovers of Your Sopapilla Cheesecake
Okay, if you somehow managed to have any sopapilla cheesecake leftover—which I doubt, but hope for your sake!—storage is easy. Because of that lovely cream cheese filling, you must cover the leftovers tightly with plastic wrap or pop them into an airtight container. Then they head straight into the refrigerator. They’re perfectly fine stored this way for about three to four days.
When you pull them out the next day, they will be firm, but still so delicious! I actually think they are fantastic chilled, straight from the fridge. If you prefer them a little softer, just let the bars sit on the counter for about 15 or 20 minutes before serving so the filling can warm up just slightly. Enjoy!
Frequently Asked Questions About Sopapilla Cheesecake
I always get asked the same questions when I bring this dessert to a gathering, so let’s clear up any last-minute worries about making the best sopapilla cheesecake! These are simple fixes for simple questions, and I promise you’ll be serving a winner.
Can I use puff pastry instead of crescent rolls for this sopapilla cheesecake?
That’s a great question about swapping out the dough! You technically could, but I strongly advise against it if you want that authentic texture. Crescent roll dough gives us those built-in layers that puff up slightly and get flaky when baked. Puff pastry tends to puff up too much in the middle, potentially pushing your filling out, and it might not capture that specific flaky pastry dessert feel we are aiming for. Stick with the crescent rolls for the best results!
What makes this a great party potluck sweet?
This is probably my top choice for any party potluck sweet! Why? Because it bakes perfectly in a 9×13 dish, which makes transport a total breeze—just cover it up and go! Plus, everyone loves it. It’s rich enough to feel indulgent, but because it’s cut into squares, it’s easy to manage on a plate. It’s a true crowd-pleaser, whether you call it a simple cheesecake recipe or a Tex Mex inspired dessert.
If you’re looking for the absolute best cheesecake bars that travel well and disappear fast, this is absolutely the one to choose. It truly delivers that melt in your mouth dessert experience everyone craves.
Estimated Nutritional Data for One Sopapilla Cheesecake Bar
Now, I have to be straight with you—because I’m not a registered dietitian, this nutritional breakdown is just an estimate based on the specific ingredients and brands I typically grab at the grocery store when making these bars. If you swap out the butter for a substitute or use a different brand of crescent rolls, those numbers might wiggle a bit. But it gives you a good general idea of what you’re enjoying when you have one of these delicious squares!
This is the information I calculated based on the full recipe yielding 16 bars:
- Serving Size: 1 bar
- Calories: 280
- Sugar: 20g
- Sodium: 250mg
- Fat: 16g
- Saturated Fat: 8g
- Unsaturated Fat: 8g
- Trans Fat: 0g
- Carbohydrates: 31g
- Fiber: 1g
- Protein: 4g
- Cholesterol: 35mg
It’s truly a satisfying treat, hitting that sweet spot between indulgence and still being relatively simple. Enjoy every single bite!
PrintEasy Sopapilla Cheesecake Bars with Cinnamon Sugar Topping

Make these easy Sopapilla Cheesecake Bars for a dessert that combines flaky pastry, a creamy center, and a sweet cinnamon-sugar finish. This recipe uses simple ingredients like crescent rolls for a quick, crowd-pleasing treat.
- Prep Time: 15 min
- Cook Time: 30 min
- Total Time: 45 min
- Yield: 16 bars 1x
- Category: Dessert
- Method: Baking
- Cuisine: Tex-Mex Inspired
- Diet: Vegetarian
Ingredients
- 2 cans (8 ounces each) refrigerated crescent roll dough
- 1 package (8 ounces) cream cheese, softened
- 1 cup granulated sugar
- 1 large egg
- 1 teaspoon vanilla extract
- 1/2 cup (1 stick) unsalted butter, melted
- 3/4 cup granulated sugar
- 2 teaspoons ground cinnamon
Instructions
- Preheat your oven to 350 degrees Fahrenheit. Lightly grease a 9×13 inch baking dish.
- Unroll one can of crescent roll dough and press it evenly into the bottom of the prepared baking dish. This forms your bottom crust layer.
- In a medium bowl, beat the softened cream cheese, 1 cup of sugar, egg, and vanilla extract until the mixture is smooth and creamy. This is your cheesecake filling.
- Spread the cream cheese mixture evenly over the bottom layer of crescent roll dough.
- Unroll the second can of crescent roll dough and carefully place it over the cream cheese layer. Pinch the seams together lightly to seal the edges.
- In a small bowl, mix the remaining 3/4 cup of sugar and 2 teaspoons of cinnamon.
- Brush the top layer of dough evenly with the melted butter. Sprinkle the cinnamon-sugar mixture over the buttered top.
- Bake for 25 to 30 minutes, or until the top is golden brown and the filling is set.
- Let the bars cool completely in the pan on a wire rack before slicing. This helps the filling firm up.
- Once cool, slice into bars and serve. You can dust with powdered sugar if desired.
Notes
- For a richer flavor, substitute honey for a small amount of the melted butter when brushing the top.
- If you want a whole cheesecake instead of bars, use a 9×9 inch pan and adjust baking time slightly.
- This dessert tastes best when fully cooled, allowing the cream cheese layer to set properly.
Nutrition
- Serving Size: 1 bar
- Calories: 280
- Sugar: 20
- Sodium: 250
- Fat: 16
- Saturated Fat: 8
- Unsaturated Fat: 8
- Trans Fat: 0
- Carbohydrates: 31
- Fiber: 1
- Protein: 4
- Cholesterol: 35